Marketplaces Exceed 1,000,000 Members: Infographic!


Hey folks! I’m Jordan McNamara, the Community Manager for Envato and I wanted to share some exciting news with you about the Envato Marketplaces.

The 12th of September was an exciting day for me as a member of our thriving Marketplace community. I along with everyone here at Envato HQ watched eagerly as the global Marketplace member count steadily grew higher and higher and higher…

We were close, very close to the 1,000,000 member milestone. With every page refresh the count grew higher and I began to reflect on just how staggering having 1,000,000 members really is and on just what a fantastic community everyone has helped to build here.

Continue reading “Marketplaces Exceed 1,000,000 Members: Infographic!”

250+ Free, Vintage Graphics: Flourish Vector Ornaments


Wow, if you’re looking for high quality free vector graphics, then you’ve landed on the right article. We’ve roundup up a massive collection of free vector flourishes. These graphics are composed of a wonderful mix of vintage elements, floral ornaments, swirly design mixes, and are all made of beautifully curved vector art.

These retro designs are great for adding a classic feel and to separate areas of information in your work. These lovely vector flourishes are available in EPS, SVG, AI and other vector formats for free download. Whether you’re an Adobe Illustrator, Inkscape, or prefer another vector software package, you can download these sets and use them in your next design.

Continue reading “250+ Free, Vintage Graphics: Flourish Vector Ornaments”

Quick Tip: How to Create a Sparkly Text Effect


In the following quick tip you will learn how to create a sparkly text effect in fifteen simple steps. It’s a another tutorial focused on the Appearance panel. Basically, almost the entire text effect is made using only one compound path. A compound path with a simple fill, eight strokes and some basic Illustrator effects.

Continue reading “Quick Tip: How to Create a Sparkly Text Effect”

How to Make Simple Events with FMOD Designer

Twice a month we revisit some of our reader favorite posts from throughout the history of Audiotuts+. This tutorial was first published in September 2008.

FMOD Ex is one of several audio middleware systems that are used in modern game development. It is integrated alongside an existing game engine technology (such as Unreal or Gamebryo) to add or extend audio playback functionality. One of the primary benefits of using a technology such as FMOD is that it shifts much of the systems design and implementation into the hands of the sound designer, rather than relegating it to a programmer, who may or may not be as well versed in audio.

Some recent game titles using the FMOD EX sound system include:

In our last tutorial, we looked at a simple means of creating raygun or laser sounds. In this tutorial, I will introduce you to the FMOD Designer tool, as well as some basic concepts used in modern game development. Thumbnail image by skipthefrogman.

NOTE: A full introduction to the use of FMOD Designer is beyond the scope of this tutorial. For our purposes, we will assume that you have at least some familiarity with the program or have read the User Guide enough to understand the basic navigation and concepts.

Tools Used

  • FMOD Designer 4.18
  • FMOD Sandbox 4.18

Step 1

The first thing I’ve done with our raygun sound is to separate the three ‘bursts’ from the original final mix. Each of these is trimmed neatly so the attack is immediate, and each file is reduced to mono. Here’s what the files sound like:

Zap 1

Zap 2

Zap 3

Game Development Tip: While there are exceptions, in most game audio situations where sounds are going to be placed in three-dimensional space, working with a mono audio file is preferred. The pan information in a stereo audio file is not necessary (and sometimes can have unpredictable results) because the location of the sound will be determined by its position in the game world, relative to the ‘listener’, which could be the player’s avatar, the camera, etc.


Step 2

Now that we have three individual variations of the raygun sound, we’re going to create a new FMOD Project and Event that will randomly play one of the three sounds.

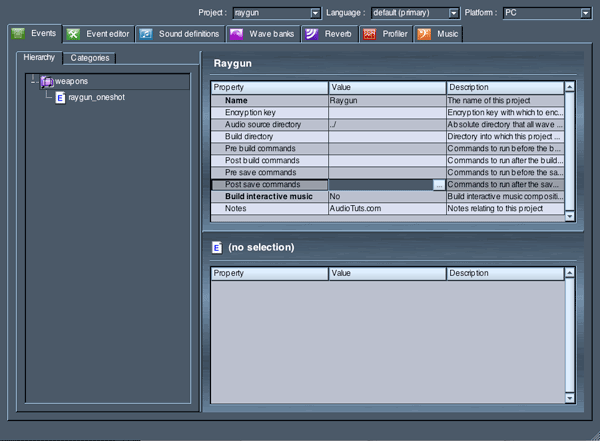
From the File menu, create a new FMOD Project. Call the project ‘Raygun’. I’ll call the Event Group ‘weapons’ and name my first event ‘raygun_oneshot’.


Step 3

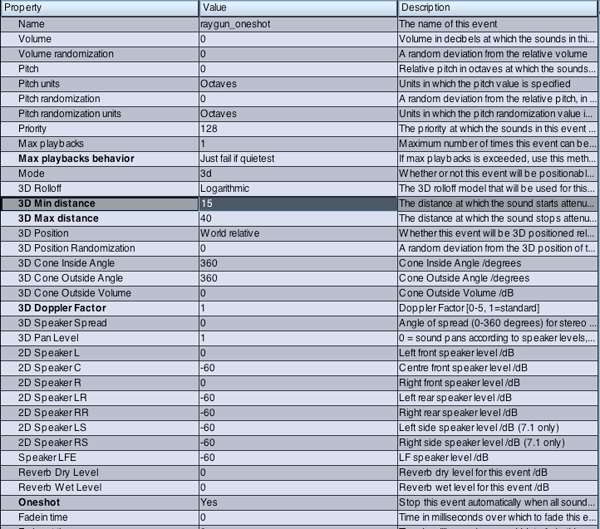
We’ll configure our Event Properties next. Most of the defaults will be adequate, but let’s make some changes that will make our raygun event more approprate for use in a game scenario.

  • Set ‘Max Playbacks’ to 3 – this will allow us to trigger up to 3 raygun sounds simultaneously before we need to steal or fail one to start a new event.
  • We’ll set ‘May Playbacks Behavior’ to ‘Just Fail If Queitest’. This behavior will tell the engine to fail the quietest raygun event if a 3 events are playing and a 4th one is triggered.
  • Mode is set to 3D – this will ensure that we can make the raygun sound emanate from a specific location in the game world. Frequently, weapon sounds may be attached to ‘muzzleflash’ type effects, such that if a weapon is fired, both a ‘flash’ from the muzzle is seen, and a corresponding sound is played.
  • 3D Rolloff is set to ‘Linear’. This is a common misunderstanding with FMOD – many users leave the rolloff to ‘Logarithmic’, which follows real-life volume curves (as the distance doubles, the volume halves). The problem with using this type of rolloff in a gameworld is that quite frequently, you want more specific control over what sounds are playing within a given viewport or game screen. If rolloff is set to ‘Logarithmic’, you may hear a weapon from a character over 500 meters away, even though the player may have no idea where the sound is coming from because they can’t see an enemy. There are a host of other reasons, but the simple solution is to set rolloff to ‘Linear’, which gives you more control over when and how and where sounds are heard throughout a given game.
  • We’ll set our 3D Min and Max distance to 15 and 40 respectively. This ensures that we’ll hear the raygun sounds at minimum volume if we are within 40 meters, and will hear them at full volume if we are within 15 meters. Outside of 40 meters, the event will be inaudible.
  • Lastly, we’ll set the Oneshot property to ‘Yes’ to ensure that when a raygun event is triggered, it automatically stops itself once the sound is finished playing.


Step 4

Next, we’ll create a wavebank in which we’ll place our raygun sounds.

  • Click on the Wave Banks tab.
  • In the Banks column, right click and select ‘Add Bank’.
  • Give the Wave Bank a descriptive name.

The properties for an FMOD Wave Bank (also known as an FSB) will vary greatly depending on a number of factors specific to your game.

As an example, however, I’ll set this wavebank to load into memory (this keeps the sounds active and availble for immediate use in game), set compression to ADPCM (offers a good balance of sound quality, compressed file size and low CPU utilization), disable Syncpoints and set Max Streams to 0, since we wont be streaming any of our raygun sounds from a disk.

Game Development Tip: Wave Banks will vary greatly depending on your target platform (Windows, Xbox 360, Wii, Playstation 3, etc.), the type of sounds in the bank, how the sounds are used in the game, and how your game engine uses audio resources. While further discussion of these topics is outside the scope of this tutorial, no doubt you’ll continue to learn about them as you work in game development.


Step 5

Now that we have a Wave Bank, we’ll add our raygun sounds to the bank.

  • Click on the Sound definitions tab.
  • Right click in the Sound definitions column to ‘Add empty sound definition…’
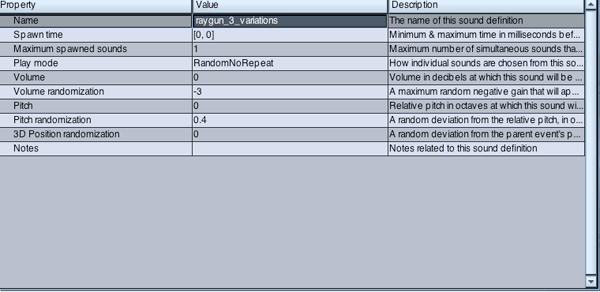
  • Call the definition “raygun_3_variations”.
  • Right click on the newly created definition and ‘Add wavetable…’
  • Shift-select the three raygun variations and click ‘Open’.
  • In the Sound definition properties, set Play mode to ‘RandomNoRepeat’. This ensures that when the event is triggered, it will randomly select one of the three raygun sounds.
  • Set Volume randomization to “-3”, which will randomize the volume by 3dB when the event is triggered.
  • Set Pitch randomization to “0.4”. This value is currently set in Octaves, but if you prefer working with other units, you can specify tones or semitones in the FMOD Event Properties view (Pitch Units and Pitch Randomization Units).

You can now audition the sound definition by clicking the ‘Play’ button atop the Sound definitions properties window.


Step 6

The final step in making our raygun event is to add the sound definition to the event.

  • Click on the Event editor tab.
  • In the grey area of layer00, right click to ‘add sound’.
  • From the dropdown list, add ‘raygun_3_variations’.
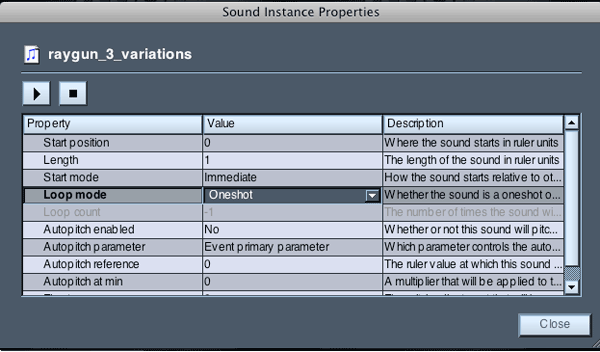
  • Right click on the newly added sound definition and select ‘Sound Instance Properties’.
  • Ensure that Loop mode is set to ‘Oneshot’.

Our raygun event is now complete, and once the project is ‘built’, it will be ready to use in an actual game!

Download the Play Pack for this tutorial (300KB)

Contents

  • FMOD Ex Source File
  • WAV Samples

If you’ve enjoyed learning a bit about game audio design, please let us know in the comments. We are considering more tutorials along these lines, but we need to know if you find them valuable. We appreciate your feedback!


{excerpt}
Read More

Winner Announced: Win a Logic Pro Tutorials Package from Logic-Courses.com

Want to learn more about Logic Pro? Logic-Courses.com offer two certified courses, one for beginner/intermediate users, and the other at a more advanced level. We’re giving you a chance to win both! To enter, just leave a comment! One random commenter will be chosen as winner. Too easy.


Winner Announced

Our winner for this competition (picked at random) is Raleigh Kleeb, who left this comment:

I only get to practice with my band for one month each year and I’d like to know all there is to know about editing music on my own so I can at least express my ideas to the other guys.

Congratulations – we’ll be in touch with you shortly.

If you didn’t win the book and are still interested, stay tuned for a post in the next day or two letting you know how to save 20% when signing up.


Logic Courses from Logic-Courses.com

Logic-Courses.com offer certified online video training courses to suit Logic users of all levels – from beginner to advanced users.

If you want to get the most out of your Logic software suite and learn all the latest tips, tricks and workflow methods then this brand new online training course provides the perfect solution for you.

Logic Courses provides both a basic/intermediate and advanced level course to support all levels of users, and the courses are delivered through a series of online video tutorials which you can access at any time, from wherever you are.

These videos will tell you more:

Beginner/intermediate course

Advanced course

How to Win

For the chance to win, you need to do two things:

  1. Firstly, comment! It would be great if you would tell us what you’d like to learn in Logic Pro. Make sure to include your correct email address with your comment so that we can contact you.
  2. Secondly, ‘like’ the sponsor’s ProducerTech Facebook page so you’ll keep up to date with their Logic Pro and Ableton Live courses (and a new Reason course coming out in a few days).

This giveaway is open worldwide, but make sure to get your comment in before midnight Sunday, October 23, 2011, AEST.


Rules and Conditions

  • To enter, leave a comment below letting us know what you would like to learn in Logic, and ‘like’ the ProducerTech Facebook page.
  • You may only enter once. Duplicate entries will be disqualified.
  • Envato staff and people who have written more than two tutorials/articles for a Tuts+ site are not eligible to enter.
  • Make sure to enter a valid email address so that we can contact you.
  • Entries will be accepted until Sunday, October 23, 2011, AEST.
  • Giveaway is open to all jurisdictions.
  • You must be of legal age in the jurisdiction that you reside to enter.
  • Giveaway is void where prohibited.

This competition is sponsored by ProducerTech and Logic-Courses.com.


{excerpt}
Read More

Photo Effects Week: Turn a Portrait Photo Into a Painting

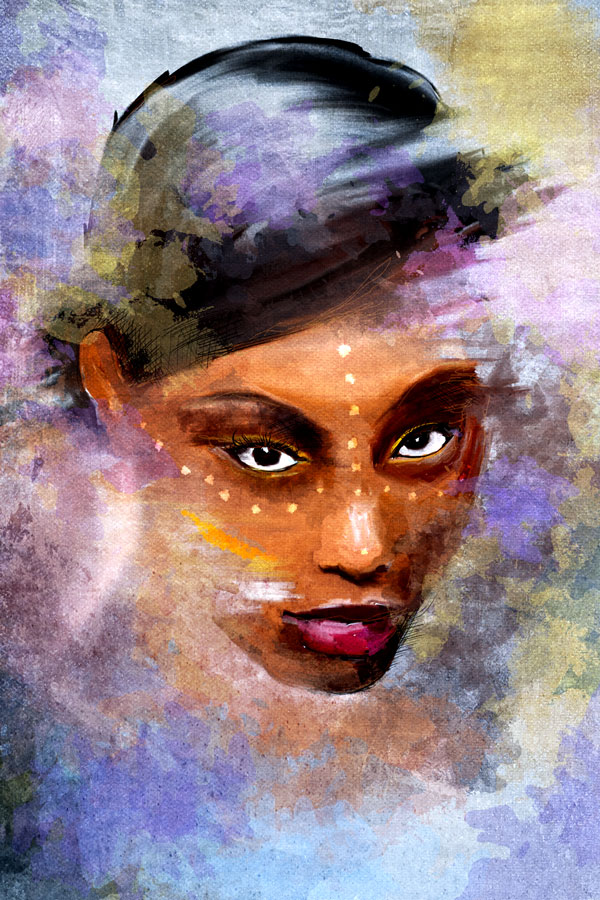
This week we are celebrating the launch of PhotoDune, Envato’s new stock photography website with a series of photo effect and photo manipulation tutorials that showcase the images from our new marketplace. In this tutorial we will turn a photo into a digital painting using several techniques to achieve a mixed media look. For this workflow you don’t necessarily need to be good at freehand drawing as we won’t start from scratch but use the photo as the base of our artwork. The photo used in this tutorial is available for free for Psd Premium Members. Let’s get started!


Tutorial Assets

The following assets were used during the production of this tutorial. We have granted a complimentary personal license to Psd Premium Members for the PhotoDune images used in this tutorial. They can be accessed in the source files of your premium download. If you are not a premium member, you can download the images used in this tutorial below.


Step 1

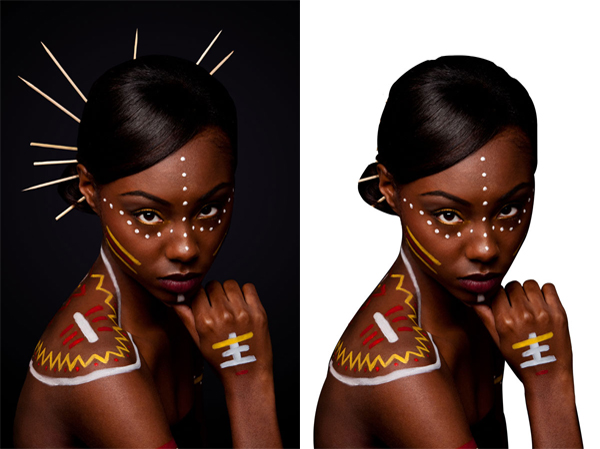
Open the Tribal beauty photo. First of all we need to extract the woman from the original background of the photograph. We don’t need to include the sticks in her hair, which makes the selection a bit easier. As the background and the foreground are too close to each other in colors we will you use the Pen tool for the selection. You can see the end result of the masking on this image:


Step 2

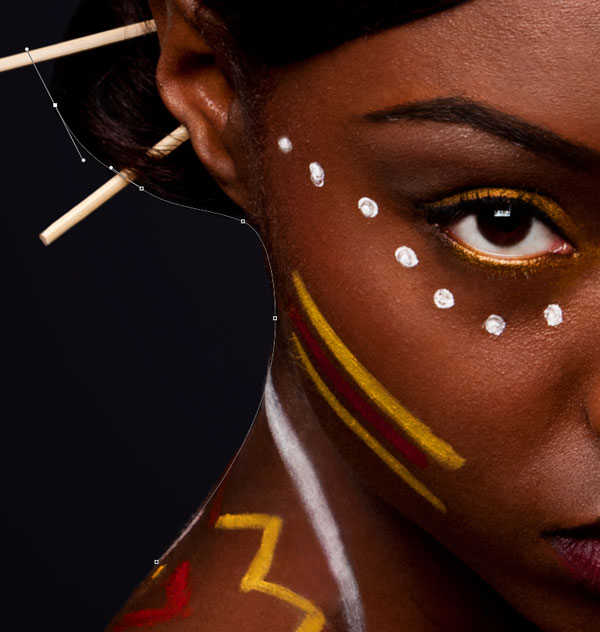
On images like this using the Pen tool is very useful as we have lots of clean curves on the edges. With the Pen tool you can create curves easily to track the outlines of the portrait. Once we draw the whole path, we will turn it into a selection and save it as a pixel mask. You should select the Pen tool and make sure you use the Path mode.


Step 3

You can choose to include the hand and the body in the selection and use it in the final composition but if you want to make the masking faster you can leave it out and only focus on the head as we will only use the head in this tutorial. Try to use the least amount of anchor points for your path but try to follow the edges preciously with your curves. If you are not familiar with the Pen tool check this tutorial out from my Photoshop for Beginners series:


Step 4

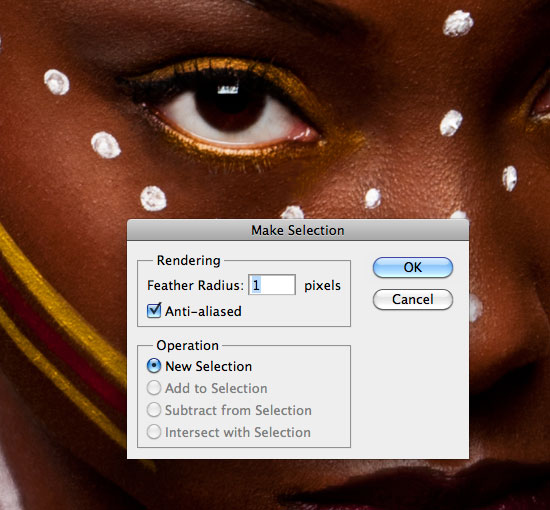
Once you go around the head with the Pen tool and you finish the path by closing it up you are ready to turn it into a selection. While still having the Pen tool selected use right click and choose Make Selection from the context menu. You can add 1 pixel feather.


Step 5

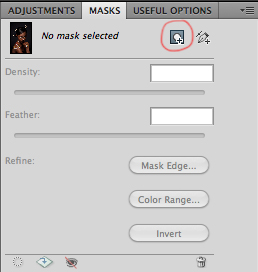
After you made your selection you will need to turn the Background layer into a normal layer by double clicking on it in the Layers panel and call the layer Portrait. After this turn your selection into a Pixel Mask by clicking on the this icon in the Mask panel or at the bottom of the Layers panel:


Step 6

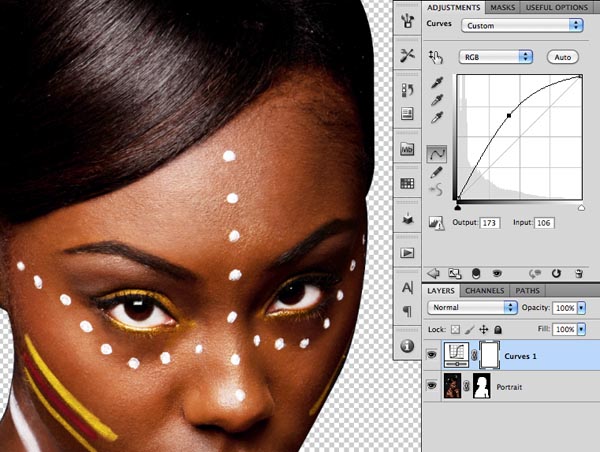
The mask will hide the original background, where you should see transparent pixels now. Next thing we need to do is to brighten up the portrait. We are going to use a Curves Adjustment layer with the following curve:


Step 7

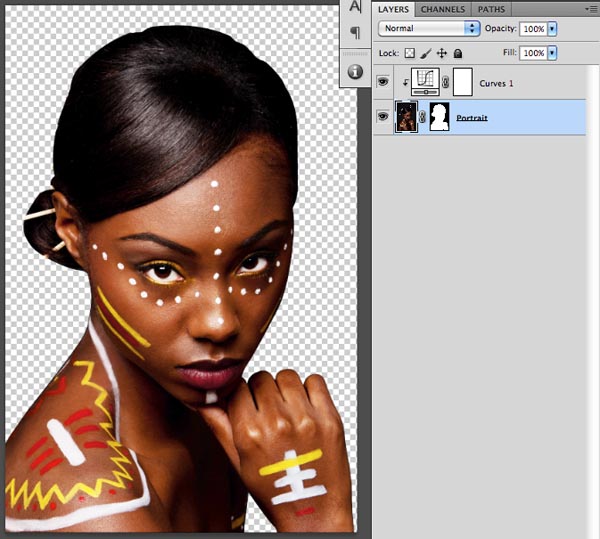
Select the Adjustment layer and make a clipping mask between the adjustment and the portrait layers by pressing Ctrl + Alt + G / Cmd + Option + G to make sure the adjustment won’t affect other layers below. After this use the Free Transform tool from the Edit menu (Ctrl/Cmd + T) to make the whole portrait slightly bigger to fill the original frame more tightly.


Step 8

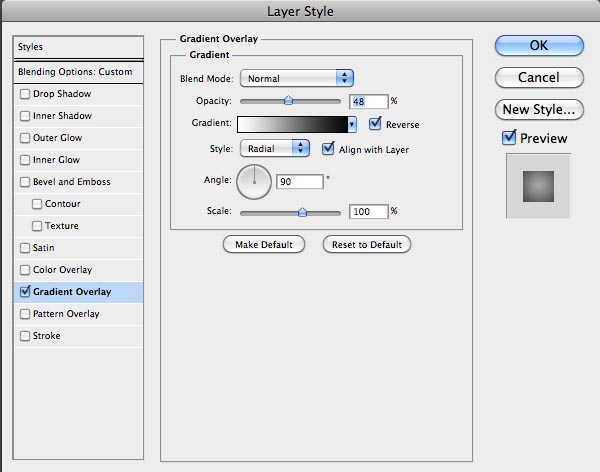
We need to create a new layer at the bottom of the layer structure. Fill in this new and empty layer with white (press D and then Ctrl/Cmd + Backspace) and then apply the following layer style on it:


Step 9

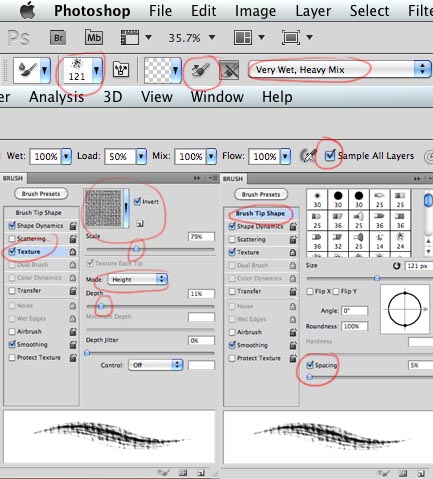
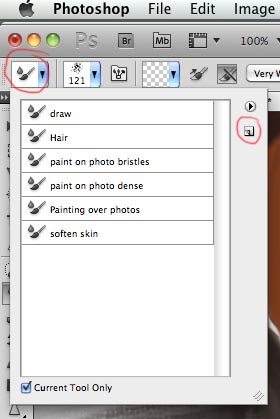
You can call this layer Background. Next step is to make a new layer on top of the other layers and call it Mixer Brush. On this layer we are going to start creating the foundation of the painting effect. You will need to download the Watercolor Splatter brush set for this step. You can find the link at the beginning of the tutorial. Once you have the brush file, just double click on it to install it. After that the brush set should be available in Photoshop. First of all you will have to select the Mixer Brush tool (CS5 only) and set up the following options for it:

  • Choose Splatter 24px (from the Watercolor Splatter brush set)
  • Set the brush size to 121 px
  • Turn off the ‘Load brush after each stroke’ option
  • Choose Very Wet, heavy Mix option
  • Turn Sample All Layers option on
  • In the Brushes panel you will have to turn on Texture, Load the Artistic Surfaces and choose Dark Coarse Weave texture (turn Invert option on)
  • Under Texture set Mode to Height, Scale to 79% and Depth to 11%
  • If you have a tablet use Shape Dynamics too and set the Size Control to Pen Pressure (if you work with a mouse you don’t need this)
  • Under Brush Tip Shape set the Spacing to 5%

Step 10

After all these settings it is worth saving this brush setup for later use. Let’s save it as a Mixer Brush Tool preset. Click on the far left icon on the control bar and click on the new icon and name the brush Painting over photos.


Step 11

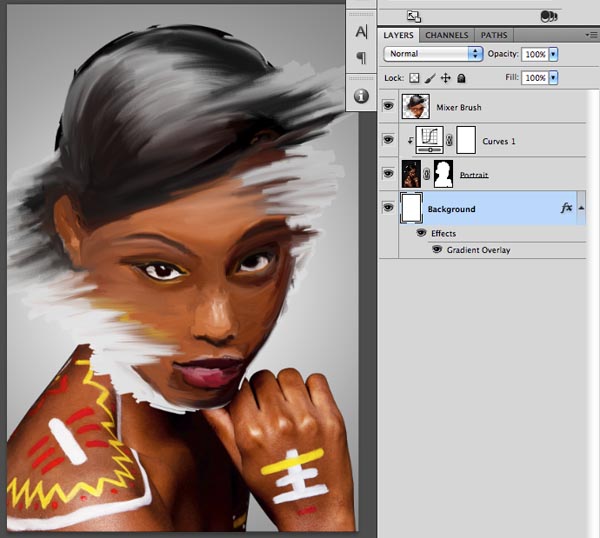
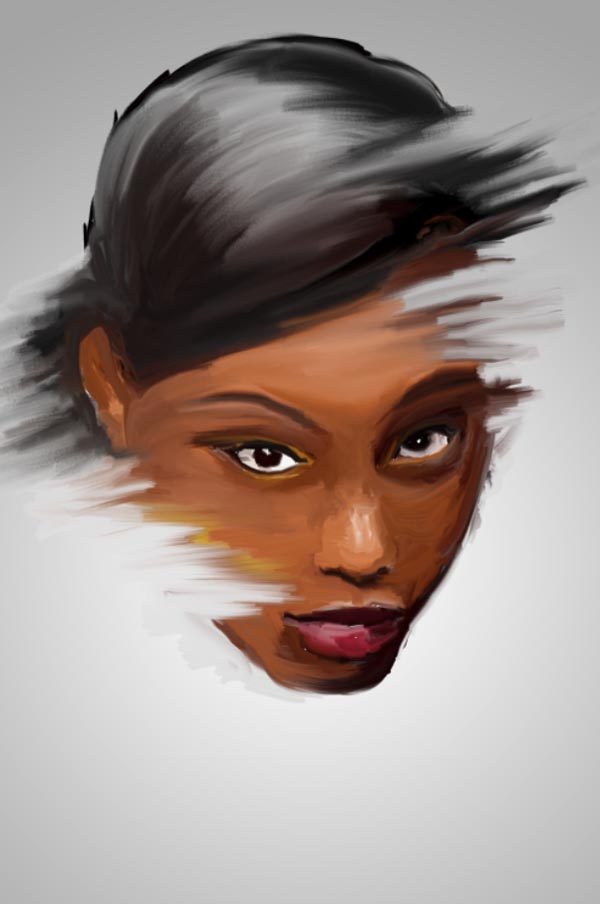
Make sure you have the new empty layer selected before you start painting over the photo. With this setup on the Mixer Brush you will be able to paint over the portrait blend details together. The Mixer Brush will not only use the portrait layer but it will also sample from the background, which will help us to break up the original edges of the face to make it a bit more artistic, painterly. Try to keep the details on the eyes, nose and mouth but you can be much more loose on the other parts of the face. Use your creativity in this step.


Step 13

After this point you can turn off the Portrait layer, which will also turn off the clipped Curves Adjustment layer. We don’t need them anymore, but it is good to keep them in case we want to add some more detail to the Mixer Brush layer (like the hand for instance).


Step 14

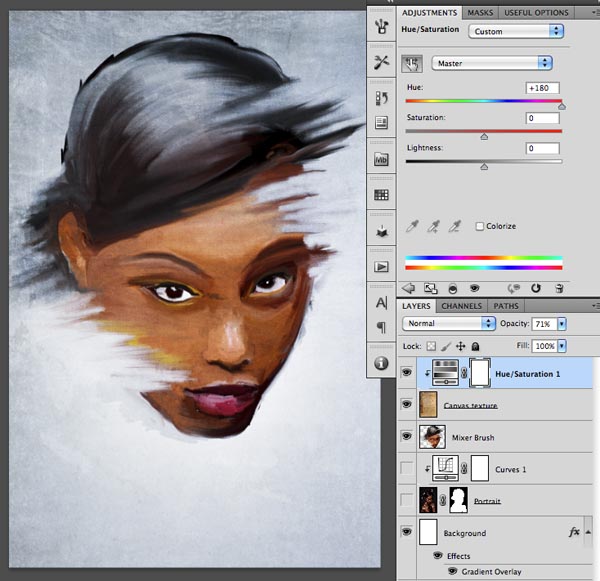
It is time now to add more canvas feel to our painting with the image you can download from the link I included at the start. Open up this image and drag it on top of our composition and name the layer Canvas Texture. Set the blend mode to Overlay and then create a Hue/Saturation adjustment layer with the following options (this adjustment layer has to be clipped to the texture layer):


Step 15

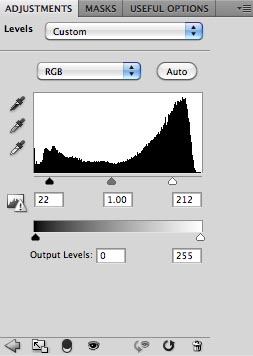
To increase the contrast lets add a Levels Adjustment Layer on the top with these values:

Step 2  On images like this using the Pen tool is very useful as we have lots of clean curves on the edges. With the Pen tool you can create curves easily to track the outlines of the portrait. Once we draw the whole path, we will turn it into a selection


Step 16

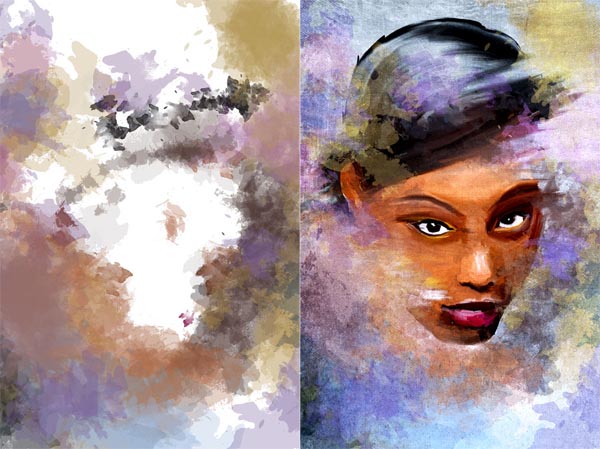
It is time now to make the whole painting more dynamic and interesting by using the Splatter brushes with Brush tool. Create a new layer under the Canvas Texture and call it Colors. There is no correct way to set the options for this step as you will get interesting effects no matter what options you use. It is useful to work with more than one brush tip shape from the brush set and also to use Jitter on the size and angle to get more variation. I was changing my color a lot and I tried to introduce interesting and vivid tints like purple, yellow and blue. On the left you can see the Colors layer separated and on the right the way it looks together with the other layers. This step took roughly 20 minutes, but it is the fun part of the process.

d


Step 17

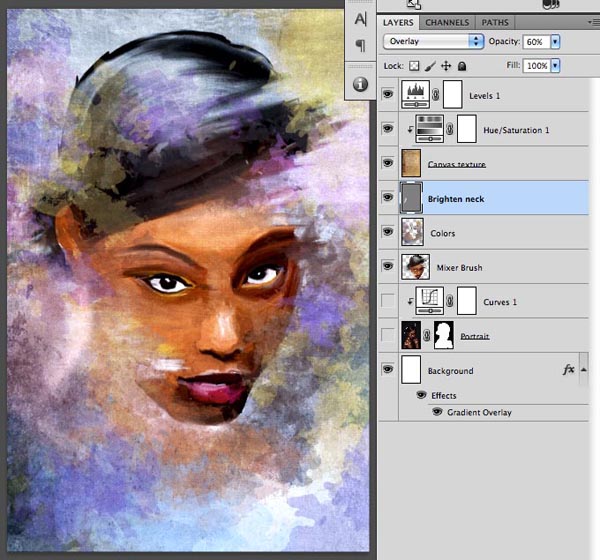
Now we need to show the neck somehow. An interesting way to do it is to brighten the background instead of outlining the curve of the neck. This technique is very similar of using a sponge or a cloth to smudge and brighten up parts of your painting. The way we can easily do it in Photoshop is to make a new layer above the Colors and below the Canvas Texture, then fill this layer with 50% gray (Edit/Fill option with 50% gray option), set the blend mode to Overlay and the opacity to 60%. Once you are ready with this you will need to use the Brush tool with a soft edge brush set to white color and 20% opacity on this layer. Simply brush over the neck and maybe other areas as well a couple of times where you feel a bit of brightening would help the overall look. Optionally you can also darken with this layer if you change your brush color to black.


Step 18

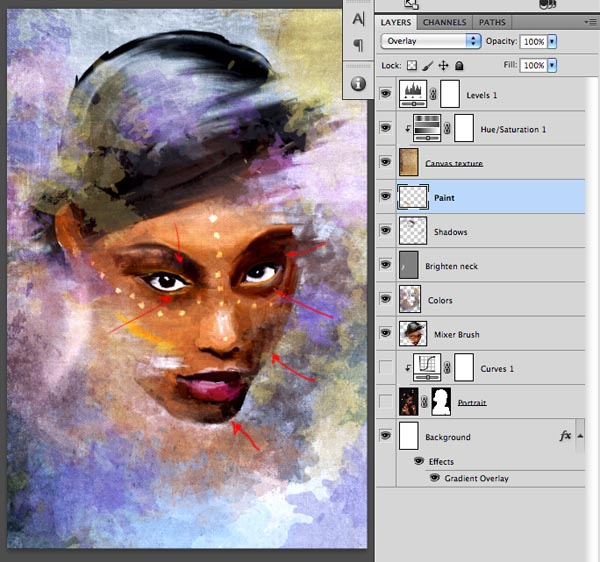
Next step is to add more detail onto the face. I wanted to emphasise the eyes so I decided to create two new layers. I used a layer to paint some dark details (marked with red arrows) and another layer set to Overlay blend mode for adding bright paint spots on the face. These spots are actually following the design of the original makeup from the photograph.

Step 2  On images like this using the Pen tool is very useful as we have lots of clean curves on the edges. With the Pen tool you can create curves easily to track the outlines of the portrait. Once we draw the whole path, we will turn it into a selection


Step 19

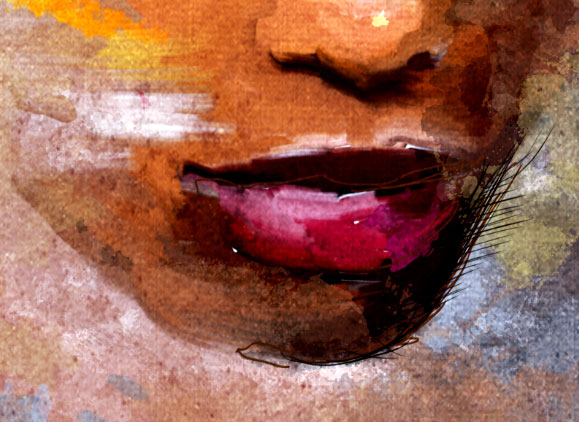
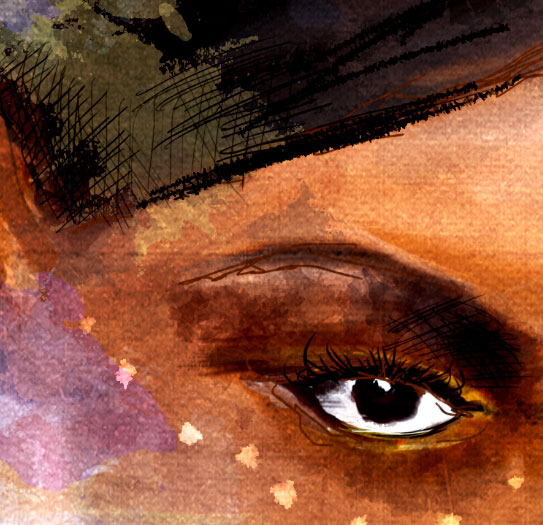
The last layer we need to create is for adding more detail to the whole portrait. On this layer I will use a simple default circular brush with hard edges and draw over parts of the image. You can place this layer below the Canvas texture and you call it Ink as it is similar to using ink over paint. Here are two close ups to see the details of this new layer:

d

d


Step 20

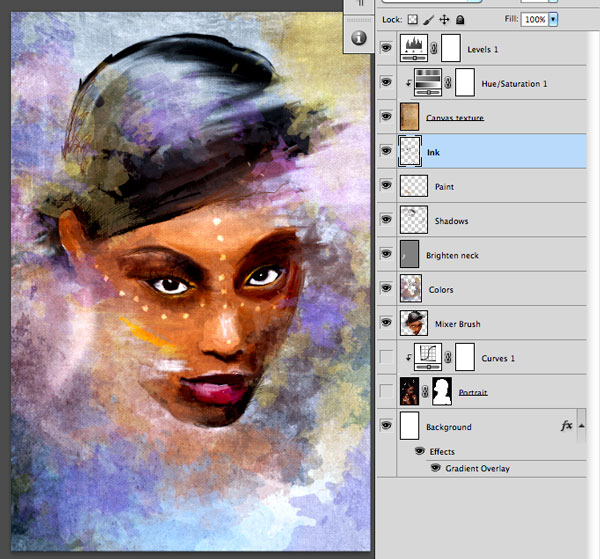
After this point it is up to your imagination how to finish the whole piece. Hopefully it was inspiring to go through these steps together. On the image below you can see the final layer structure:

Final Image


{excerpt}
Read More

SEO Articles Needed All Niches ,=,- $2 per 500 words,./,.., by omd34322

We have thousands of articles that need to be written and we are looking for some writers who are native speakers of English to help on this project. The rate of pay is $2 per 500 words. The average requested length of articles 500-600 words… (Budget: $30-$250 USD, Jobs: Articles)


Excellant French Translator with Basic MS Access Skills by AlexC434

We need someone with ‘perfect’ French translation and grammar skills. You will scope the internet for magazines and online publication (in French) to add to our database and then translate some pitches that will go to these publications… (Budget: £20-£250 GBP, Jobs: Translation)


Need JS fixer. Existing website with IE 8 and 9 errors… by qlddigital

We have an existing website that has recently getting some fatal errors in Ie9. The site appears fine in Safari and the menus load etc using js scripts. However recently on IE and Firefox its broken and we need someone to have a look and debug it and fix the errors in IE and firefox… (Budget: $30-$250 AUD, Jobs: CSS, Javascript, PHP)