Twice a month we revisit some of our reader favorite posts from throughout the history of Audiotuts+. This tutorial was first published in September 2008.
FMOD Ex is one of several audio middleware systems that are used in modern game development. It is integrated alongside an existing game engine technology (such as Unreal or Gamebryo) to add or extend audio playback functionality. One of the primary benefits of using a technology such as FMOD is that it shifts much of the systems design and implementation into the hands of the sound designer, rather than relegating it to a programmer, who may or may not be as well versed in audio.
Some recent game titles using the FMOD EX sound system include:
- Age of Conan
- Kung Fu Panda
- Guitar Hero III
- BioShock
- Call of Duty 4
- StarCraft II
- World of Warcraft
- Crysis
In our last tutorial, we looked at a simple means of creating raygun or laser sounds. In this tutorial, I will introduce you to the FMOD Designer tool, as well as some basic concepts used in modern game development. Thumbnail image by skipthefrogman.
NOTE: A full introduction to the use of FMOD Designer is beyond the scope of this tutorial. For our purposes, we will assume that you have at least some familiarity with the program or have read the User Guide enough to understand the basic navigation and concepts.
Tools Used
- FMOD Designer 4.18
- FMOD Sandbox 4.18
Step 1
The first thing I’ve done with our raygun sound is to separate the three ‘bursts’ from the original final mix. Each of these is trimmed neatly so the attack is immediate, and each file is reduced to mono. Here’s what the files sound like:
Zap 1
Zap 2
Zap 3
Game Development Tip: While there are exceptions, in most game audio situations where sounds are going to be placed in three-dimensional space, working with a mono audio file is preferred. The pan information in a stereo audio file is not necessary (and sometimes can have unpredictable results) because the location of the sound will be determined by its position in the game world, relative to the ‘listener’, which could be the player’s avatar, the camera, etc.
Step 2
Now that we have three individual variations of the raygun sound, we’re going to create a new FMOD Project and Event that will randomly play one of the three sounds.
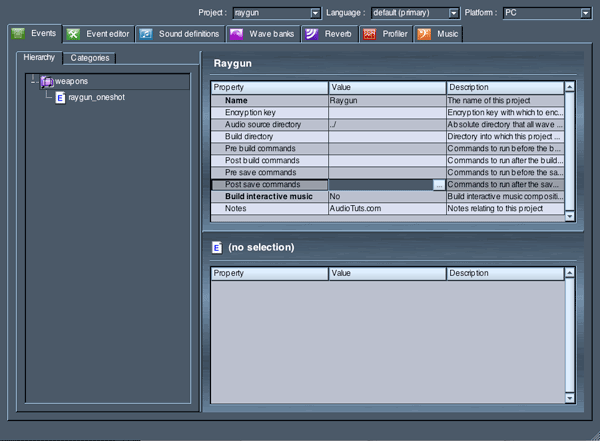
From the File menu, create a new FMOD Project. Call the project ‘Raygun’. I’ll call the Event Group ‘weapons’ and name my first event ‘raygun_oneshot’.
Step 3
We’ll configure our Event Properties next. Most of the defaults will be adequate, but let’s make some changes that will make our raygun event more approprate for use in a game scenario.
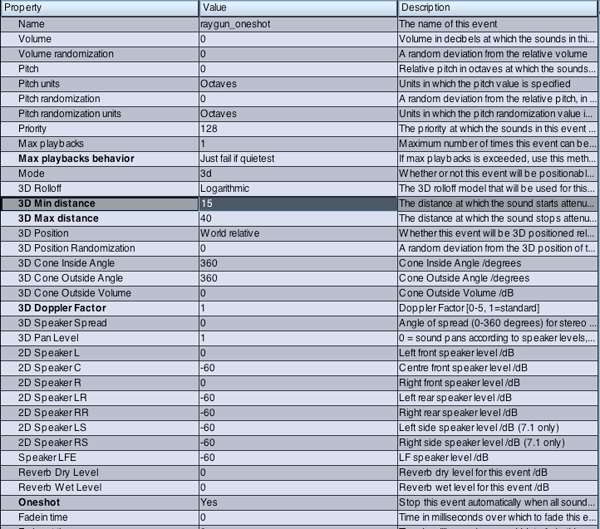
- Set ‘Max Playbacks’ to 3 – this will allow us to trigger up to 3 raygun sounds simultaneously before we need to steal or fail one to start a new event.
- We’ll set ‘May Playbacks Behavior’ to ‘Just Fail If Queitest’. This behavior will tell the engine to fail the quietest raygun event if a 3 events are playing and a 4th one is triggered.
- Mode is set to 3D – this will ensure that we can make the raygun sound emanate from a specific location in the game world. Frequently, weapon sounds may be attached to ‘muzzleflash’ type effects, such that if a weapon is fired, both a ‘flash’ from the muzzle is seen, and a corresponding sound is played.
- 3D Rolloff is set to ‘Linear’. This is a common misunderstanding with FMOD – many users leave the rolloff to ‘Logarithmic’, which follows real-life volume curves (as the distance doubles, the volume halves). The problem with using this type of rolloff in a gameworld is that quite frequently, you want more specific control over what sounds are playing within a given viewport or game screen. If rolloff is set to ‘Logarithmic’, you may hear a weapon from a character over 500 meters away, even though the player may have no idea where the sound is coming from because they can’t see an enemy. There are a host of other reasons, but the simple solution is to set rolloff to ‘Linear’, which gives you more control over when and how and where sounds are heard throughout a given game.
- We’ll set our 3D Min and Max distance to 15 and 40 respectively. This ensures that we’ll hear the raygun sounds at minimum volume if we are within 40 meters, and will hear them at full volume if we are within 15 meters. Outside of 40 meters, the event will be inaudible.
- Lastly, we’ll set the Oneshot property to ‘Yes’ to ensure that when a raygun event is triggered, it automatically stops itself once the sound is finished playing.
Step 4
Next, we’ll create a wavebank in which we’ll place our raygun sounds.
- Click on the Wave Banks tab.
- In the Banks column, right click and select ‘Add Bank’.
- Give the Wave Bank a descriptive name.
The properties for an FMOD Wave Bank (also known as an FSB) will vary greatly depending on a number of factors specific to your game.
As an example, however, I’ll set this wavebank to load into memory (this keeps the sounds active and availble for immediate use in game), set compression to ADPCM (offers a good balance of sound quality, compressed file size and low CPU utilization), disable Syncpoints and set Max Streams to 0, since we wont be streaming any of our raygun sounds from a disk.
Game Development Tip: Wave Banks will vary greatly depending on your target platform (Windows, Xbox 360, Wii, Playstation 3, etc.), the type of sounds in the bank, how the sounds are used in the game, and how your game engine uses audio resources. While further discussion of these topics is outside the scope of this tutorial, no doubt you’ll continue to learn about them as you work in game development.
Step 5
Now that we have a Wave Bank, we’ll add our raygun sounds to the bank.
- Click on the Sound definitions tab.
- Right click in the Sound definitions column to ‘Add empty sound definition…’
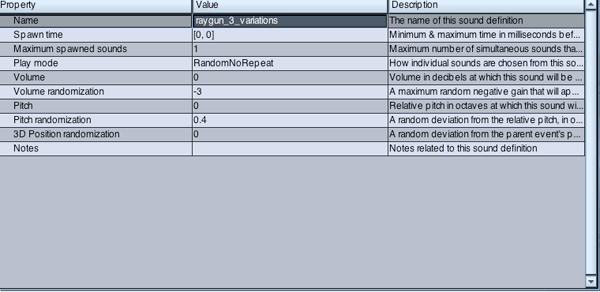
- Call the definition “raygun_3_variations”.
- Right click on the newly created definition and ‘Add wavetable…’
- Shift-select the three raygun variations and click ‘Open’.
- In the Sound definition properties, set Play mode to ‘RandomNoRepeat’. This ensures that when the event is triggered, it will randomly select one of the three raygun sounds.
- Set Volume randomization to “-3”, which will randomize the volume by 3dB when the event is triggered.
- Set Pitch randomization to “0.4”. This value is currently set in Octaves, but if you prefer working with other units, you can specify tones or semitones in the FMOD Event Properties view (Pitch Units and Pitch Randomization Units).
You can now audition the sound definition by clicking the ‘Play’ button atop the Sound definitions properties window.
Step 6
The final step in making our raygun event is to add the sound definition to the event.
- Click on the Event editor tab.
- In the grey area of layer00, right click to ‘add sound’.
- From the dropdown list, add ‘raygun_3_variations’.
- Right click on the newly added sound definition and select ‘Sound Instance Properties’.
- Ensure that Loop mode is set to ‘Oneshot’.
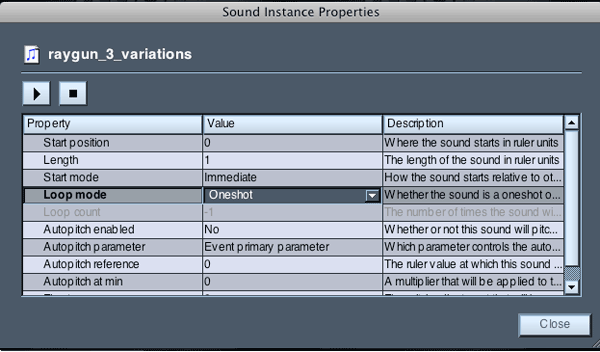
Our raygun event is now complete, and once the project is ‘built’, it will be ready to use in an actual game!
If you’ve enjoyed learning a bit about game audio design, please let us know in the comments. We are considering more tutorials along these lines, but we need to know if you find them valuable. We appreciate your feedback!
{excerpt}
Read More