Company Log And Small Retail Website Design

I need a professioanl website that can handle small volume retail sales. The site will be mostly used for informational use but would like to have the ability to recieve orders. I would also like some flash on the site. Needs to be able to host product demonstration videos.
Needs to have secure payment options and encryption for credit card purchases

Come Write For Us!

Calling All Video Producers! Are you an expert in production? Do you have lots of tips, techniques, and industry advice that you’d like to share? You might be the perfect person to contribute a tutorial to Tuts+! We’re particularly interested in finding writers with expertise in what it takes to shoot great video… so read on to find out more…


What We’re Looking For

Starting in December, we’d like to start integrating more tutorials that aren’t limited to only After Effects. A few of the areas we’re looking for experts in are:

  • Lighting
  • Shooting
  • DIY Projects
  • Indie Film Making

You must also be comfortable with the English language. We can proof your content, but we can’t recreate an entire tutorial for you. To put it simply, if you struggle when deciding whether to write its or it’s, this might not be the gig for you.

Pitch a Tutorial

We will, of course pay you for your content ranging from around $50-$75 for a Quick Tip, right up to several hundred dollars for an in-depth Premium tutorial. The details vary depending on the piece in question, so get in touch with us to pitch your tutorial:

We have a strong belief at Tuts+ that everyone has unique ideas to share and techniques they come across as they work and experiment. We’d love to hear your creative content ideas and look forward to potentially working with you.


{excerpt}
Read More

Quick Tip: Create a Glossy Downloads Folder Icon


Follow this quick tip and you will learn how to draw a folder starting from a single path with the help of the 3D Extrude&Bevel effect. You will play with multiple appearances, effects and shadows and you will use the Halftone Pattern effect to create a different texture for the folder icon. Let’s begin!

Continue reading “Quick Tip: Create a Glossy Downloads Folder Icon”

How to Build Letter Art From Bricks In Illustrator


In this tutorial we’ll use 3D-rendering, Blends, and an Art Brush for creating the final brick art. The skills you will learn here can easily be transferred to creating various brick letters. Enhance your vector skills as a digital brick artist in today’s Illustrator tutorial. So let’s get started!

Continue reading “How to Build Letter Art From Bricks In Illustrator”

How to Create Excitement in Your Music with Tremolo

Twice a month we revisit some of our reader favorite posts from throughout the history of Audiotuts+. This tutorial was first published in 2009.

Tremolo was always one of those plug-ins that my eyes completely skipped past. It wasn’t until some experimenting and tips from other composers that I began to see the potential behind this simple device.

In this tutorial we’ll look at some examples of how tremolo can help you make some truly interesting and unique sounds, including several techniques used to create the final piece from the “How To Create a Compelling Ostinato” tutorial.

All of the examples in this tutorial were created in Logic Pro, but the principles are universal and should apply to any tremolo plug-in in your program of choice. The goal here is to create good music, it’s not the specific tools that get you there but how you use them.


1. Creating a Pulse

One of the most basic effects we can use tremolo for is to create a pulsing rhythm, such as a driving bass.

Start with a basic sound. I’ve selected an interesting Zebra pad (interesting means that it is slightly complex with some motion in it) and a really nice deep low end.

Here’s the basic sound on whole notes:

Download audio file (PulseBass_NoTrem.mp3)

Not terribly exciting yet. Let’s initiate a Tremolo plug-in on the instrument and make this something we’d actually want to listen to.

We’ve got 5 settings to play with: Depth, Rate, Symmetry, Smoothing and Phase.


  • Depth: Depth controls how much the tremolo will be applied, or how “deep” you want the effect to go. A setting of 100% means you’ll go from each extreme end, either all the way left to right, or all the way loud to silent. Since we want a rhythmic pulse let’s use depth of 100% so that it can really be felt.
  • Rate: The rate determines how often the tremolo effect will loop. This can be set to either a time or a rhythm. 95% of the time you’ll want it set to a rhythm so that it will lock in nicely with your track and you have the flexibility of changing your songs tempo without having to go in and fix your settings. Let’s use an 8th note rate (1/8) to give an exciting and driving pulse that our ears can keep up with.

  • Symmetry: Symmetry can be thought of as Attack and Release settings. It determines how similar the “up” time is to the “down” time. 50% means that it will get loud just as quickly as it gets quiet. I’ve set the symmetry to 1% for our bass so that the attack is as sharp as possible and the rest of the sound fades away until our next attack (it has to be at least 1% because 0% would be no attack at all).

  • Smoothing: Whether the sound fades in and out or has a more sudden change is determined by smoothing. You might be thinking that since we want a sharp attack we would not want this to be smooth, but actually we have the opposite. Because out symmetry is so low the attack at the very beginning of the beat is taken care of; a smoothing of 100% will allow for a very gradual fade down.
  • Phase: The stereo field is controlled with phase. A phase of 180 will cause your sound to shift from left to right and back again rather than loud to quiet. We’ll be using a phase of 0 because we want our sound to be full, centered and more about volume than stereo spread.

This is what the Tremolo settings look like:

This is what our low pad sounds like now that we’ve added Tremolo:

Download audio file (PulseBass_Trem.mp3)

And here’s one example of how you could actually use this technique:

Download audio file (PulseBass_Example.mp3)

In one of my previous tutorials, “How to Create a Compelling Ostinato”, the final piece used tremolo in a variety of unique ways. The next three examples are all taken from that piece.


2. An Exciting Stereo Effect

The piece begins with a backwards snare sound. The purpose of this sound is to grab the listener’s attention, so it needs to be exciting and interesting.

Here’s the basic sound of a snare drum played in reverse:

Download audio file (Snare_NoTrem.mp3)

It’s already a somewhat interesting sound, but we can use tremolo to give it that extra bit of spice.

Here are the settings I’m using:

The biggest differences here are the phase and symmetry settings. The phase is now set to 180, meaning we go from the extreme left side to the extreme right side rather than loud to quiet. The symmetry is set to 50% this time so that there is an equal shift from left to right as there is back right to left.

Add a touch of reverb and the final result comes out like this:

Download audio file (Snare_Trem.mp3)

Notice that the sound now feels like it is consuming the entire space and really pulls you in.


3. A Spooky Stereo Effect

Another great use for tremolo is to add haunting ambience. Using a very slow rate, soft smoothing and a wide phase we can give a sound the feeling of coming in and out of nowhere or spinning around our heads.

Here is the sound we’ll be using to demonstrate, a complex pad:

Download audio file (PnoPad_NoTrem.mp3)

The settings:

By this point you should be getting the hang of what these different parameters do. We’ve set the rate to a 1/2, so the effect is spread out over a little more time than the rhythmic effects we were using before. The phase is set to 180 so that the sound will cross over the entire stereo field and the depth is at 100% to allow the sound to go completely from one side to the other before crossing back.

The result sounds like this:

Download audio file (PnoPad_Trem.mp3)


4. Creating a Complex Sound

In this last example we’ll look at how to use tremolo with automation to create a more complex sounding idea. The basic sound is just two french horns in fifths:

Download audio file (Hrn_NoFX.mp3)

The first thing we’ll do is automate the panning and volume so the horns have a sense of moving from the right to the left as well as a crescendo and back down to a decrescendo. If you’re not familiar with how to use automation, the concept is beyond the scope of this tutorial but I would highly recommend you learn how to use this very useful tool as soon as possible.

Here is a screenshot of the panning automation:

And here’s the volume panning:

This is what our horns sound like so far:

Download audio file (Hrn_NoTrem.mp3)

For the tremolo settings we’ll start with 100% depth so that the sound goes from completely full to complete silence. We’ll set our starting rate to a dotted 32nd note (1/32d) which will feel like a very fast pulse. The symmetry should be at 50% to allow an equal amount of time between loud and quiet, and the smoothing should be at 0% so that we’re either loud or silent and nothing in between. Finally the phase is set to 0 because we don’t want the sound to bounce back and forth from left to right, we want it to come in and out of nothing.

Here is what these settings look like:

The part we are going to automate is the rate, so that the sound has a sense of “slowing down”. If you’re using Logic you can adjust this setting by going into automation mode, selecting the track you are working on, and clicking on the automation box under the track name (it defaults to “Volume”). In that menu you can choose tremolo -> rate. Let’s slow the rate all the way from our dotted 32nd note to a 1/2 note.

Here’s how that will look in automation:

Notice that we use a straight line from one end of the rate to the other. This will allow the sound to smoothly slow down over the allotted time, in this case 3 bars.

The result of automating the tremolo:

Download audio file (Hrn_Trem.mp3)


Conclusion

As you can see from these examples, there is a lot of potential behind a simple and often overlooked plugin such as tremolo. The last three examples were used in context in this piece:

Download audio file (Trem_Examples.mp3)

Please leave a comment about what creative ideas ways you’ve come up with to make the most out of tremolo.


{excerpt}
Read More

Realistic Portrait Retouching With Photoshop

Today’s designers and photographers need to have a varied skill set that sets them apart from the pack. One common skill that both can use is portrait photography retouching. This tutorial will make you a more effective retoucher and help keep your portraits looking clean and realistic. Subtlety is – going too far will only make the results noticeable. The best comment you can get after presenting a final image is "I didn’t even notice you did that". Let’s get started!


Tutorial Assets

The following assets were used during the production of this tutorial.


Step 1

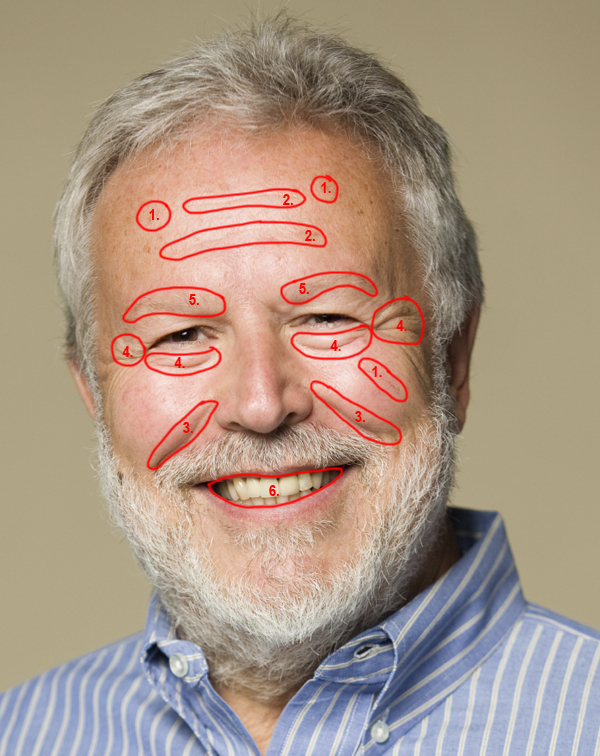
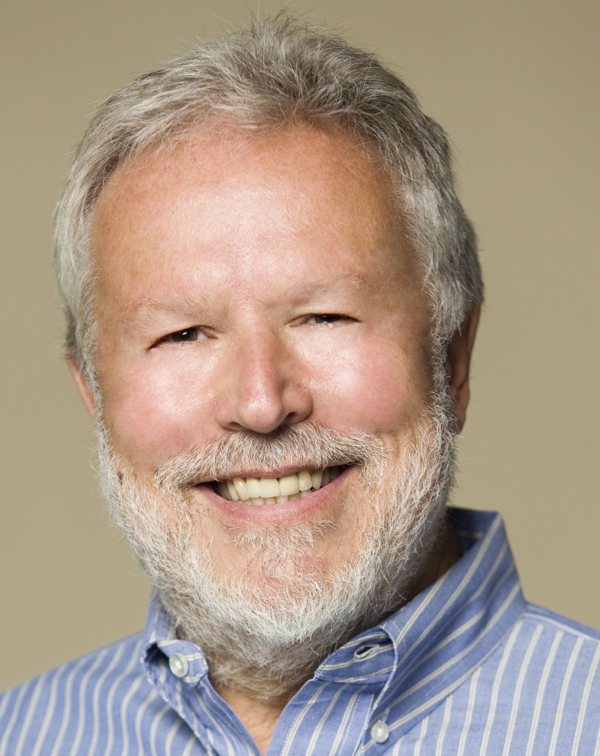
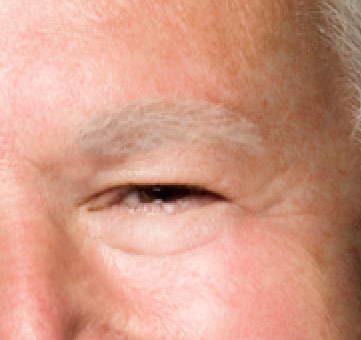
Step 1 does not involve using a tool at all. Before you start retouching an image, you should open and evaluate the image and come up with a mental roadmap of what need be done. I’ve illustrated the steps necessary to retouch this portrait below.

The areas to retouch are: 1. Age spots, skin blemishes and other skin issues; 2. Forehead wrinkles; 3. Laugh lines and deep wrinkles; 4. Bags under eyes and crows feet; 5. Thinning eyebrows; 6. Stained teeth


Step 2

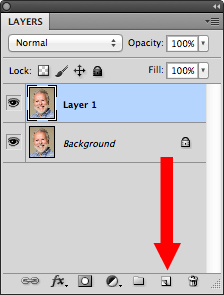
First, we need to work non-destructively. Duplicate the layer in the Layers Panel, by either dragging the background layer to the New Layer icon at the bottom of the Layer Panel, or by using the keyboard shortcut Command/Ctrl + J to duplicate the Layer Via Copy. This will give us "Layer 1". Double click the layer name and rename "Retouched". This will be the layer we will do all our retouching on, leaving the Background untouched.


Step 3

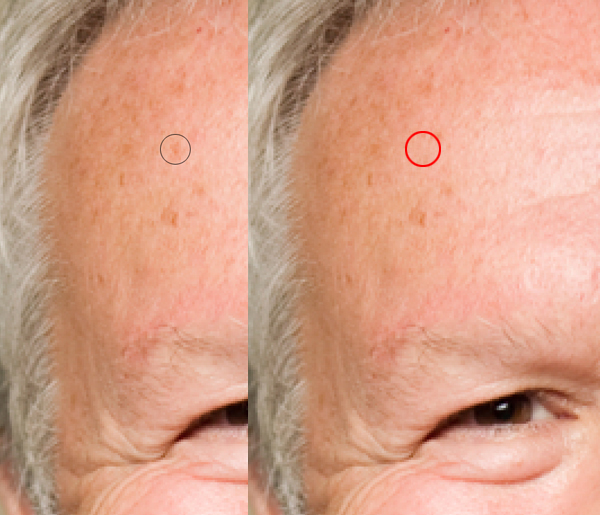
The first tool we will be using is the Spot Healing Tool shown in the Tool Bar below or with the tool shortcut "J".

The Spot Tool utilizes local texture and tone to blend over flawed areas in your image. There are several settings in the Options Bar at the top of your window. There are only two that we are going to need to focus on however. The first is the Brush Picker (1) and the Type (2).

First, Access the Brush Picker via the drop down arrow on the right side of the button. The only control we need to adjust in this window is the Hardness, which we will set it to 50%. 50% will blend the tool with the existing image better than 100%, which looks like a paper punch, but will not soften the brush too much. 0% will blend too much and diminish the effectiveness of the tool. Hit enter/return to exit the window – do not click off to the side to close the panel or you may accidentally affect your image. Next, make sure you are on "Proximity Match" for this portion of the tutorial. Photoshop CS5 has an added feature – "Content-Aware", but we are not going to use that (yet).

We are now ready to start retouching the image. The Spot Tool is a brush-based tool and only needs to be slightly larger that the small flaws we are repairing. To adjust the brush size, use your bracket keys to change the size. Left bracket [ makes the brush smaller and right bracket ] makes it larger. (You can also adjust the hardness by adding the Shift key, but we want to keep this at 50%). Center your brush over your flaw, click and release. It should cover the flaw and blend in flawlessly. If it does not, make sure that your brush is properly sized and that you are not overlapping another texture, like hair or darker skin tones, etc.

Repeat this step until all skin small blemishes are removed. If you have larger areas (the vein on the cheek) leave those for now, and concentrate on smaller spots, freckles, moles, etc. Remember to adjust the brush using the bracket keys as you go. Keep it small – if you increase your brush size tool large, the tool will fail by mixing too much information and you will end up with a mess. No worries, there are tools designed for larger areas.


Step 4

After repairing the small spots, it’s time to move up to the larger flaws – forehead wrinkles, larger skin defects and laugh lines. To repair these areas, we will be using the Healing Brush Tool, which can be found under the Spot Healing Tool. Click and hold on the tool in the toolbar to access the additional healing tools. The Healing Brush tool repairs similar to the Spot Tool, but it splits the workload in two. Texture is now designated by the user (you) and tone is blended locally after you use the tool.

Once you select the tool, again access the Brush Picker in the Options Bar and make sure the Hardness is set to 50%. Make sure the "Align" option is checked to the right of the Options Bar. You can use the bracket key shortcut to change the size as needed.

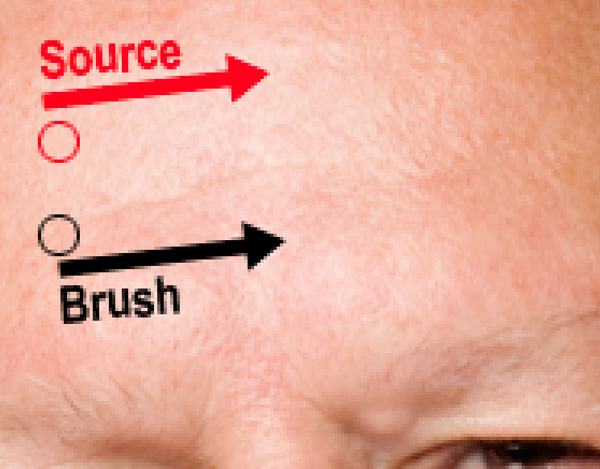
We will start with the forehead wrinkles. Move your brush to a clean area of skin texture – usually you can find this between the wrinkles. We want to make sure that we have enough room to move and not run into other textures, like his hair or other wrinkles.

Hold down your Opt (Mac)/Alt (PC) key and click once to designate the texture source. Then take your tool and align the brush over the beginning of the wrinkle. Change your brush size to a size slightly wider the wrinkle. Click and hold, then brush across the flaw. Notice that your source icon is following your every move, offset based on your source. Try to paint in one mouse-click if possible, but if you notice that your source is getting close to another texture, you can release. When you release, the tool blends the tone locally making the new texture blend in with the existing surroundings. The "Align" feature will keep your source offset exactly where you designated it, until you choose another source. With each flaw, you should Opt/Alt-Click another source area and then paint over the flaw.

For the laugh lines, align the source slightly above the flaw and offset enough that you can paint over the entire wrinkle in one motion. Cover the initial wrinkle first, then blend the tone with additional strokes. Always be aware of your surroundings. If you get too large of a brush, you could accidentally blend in the lighter color of the mustache or other areas. Adjust your size as needed.


Step 5

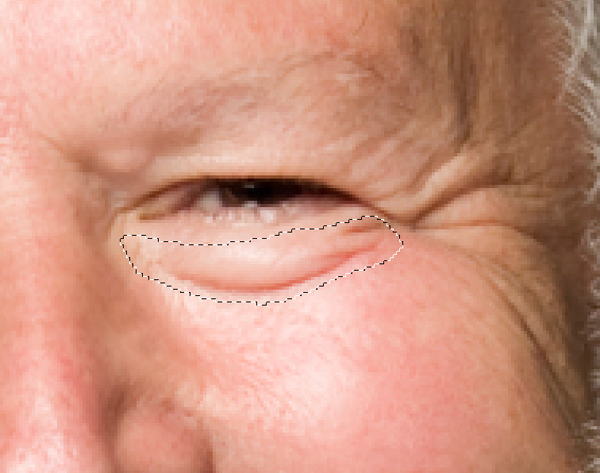
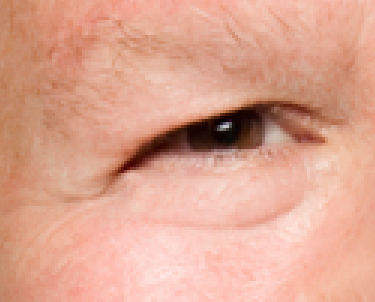
The eyes present the biggest challenge on any portrait. Flaws are usually are so close to the eye and other areas (eyelashes, eyebrows, etc.) that using the Healing Brush is almost impossible given the size constraints. This is where the Patch Tool comes in. The third healing tool of the group, the Patch Tool is not brush based at all- it is selection based. Choose the Patch Tool under the Healing Brush Tool in the Tool Bar.

The only setting we have to check on this tool is that it is set to "Source" in the Options Bar.

Start by using the Patch tool to make a selection around the bag under the right eye. I like to dissect the eye wrinkles into sections. This gives me a more effective result than trying to select around the entire eye at one time.

Next click and drag the selection to a clean area of skin texture, like the forehead, and release. The new texture blends with the local tone and the wrinkle is gone. Repeat around the eye, selecting sections (left, right, top, bottom) individually and dragging the selection to a clean texture source.


Step 6

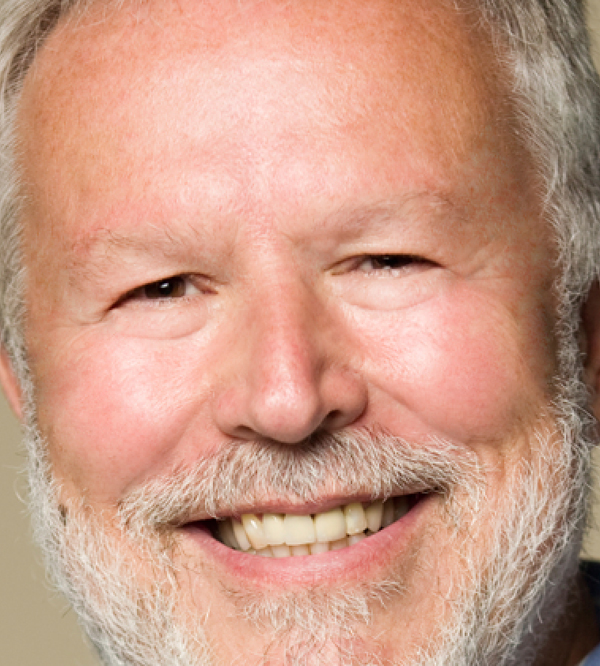
After you have the eyes completed, this is what the finished "Retouched" layer should look like:

But as you can see, this looks completely unrealistic. The trick is to use a Layer Mask to blend the original image back into the retouched layer.

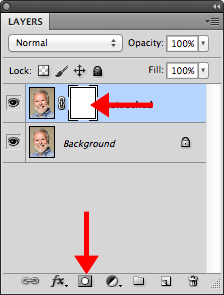
Start by clicking the Layer Mask button at the bottom of the Layers Panel. This will give you a Layer Mask on the Retouched Layer.

Then, using the Eraser tool we will blend back in some of the flaws from the original image. Set your background color to Black (or hit "D" for default colors) and change your Eraser opacity to 33%. Make sure you are using a soft-edged brush (at least 50% Hardness).

Start by erasing over the laugh lines in one stroke. Choose a brush size that will encompass the flawed area. This will slowly bring back the flaw. I like to go over the entire wrinkle once, then on the second pass starting at the nose, I go halfway down the wrinkle giving it 66% coverage. Lastly I go right next to the nose on another pass making it 99%. This technique fades the wrinkle away as it moves further away from the nose. Repeat on the other side.

For the eyes, I use the same technique, but start at the corner of the eye closest to the nose and blend away from the nose. Remember to build slowly back into the area, we do not want to bring the entire flaw back at 100%. For the crows feet, I only went with one pass since they were so defined.

This is how the blended face looks after masking:


Step 7

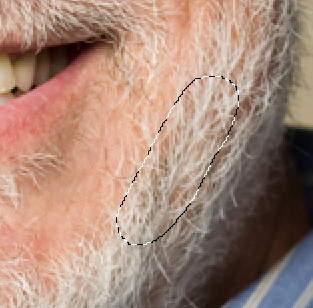
After blending the face, I noticed that his eyebrows were pretty thin and I wanted to add some more definition back into that area. We can do this using a new process in Photoshop CS5 – Puppet Warp. First, make a selection around his beard using the lasso tool like so:

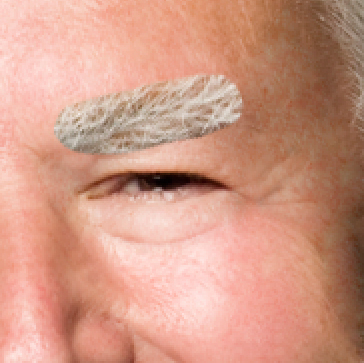
Next click on the Retouched layer icon in the Layers panel (deselecting the mask) and duplicate the selection onto a new layer using Command/Ctrl + J. Name the layer "Eyebrow". Move the image up to the eyebrow area and rotate to the approximate angle using Edit > Transform.

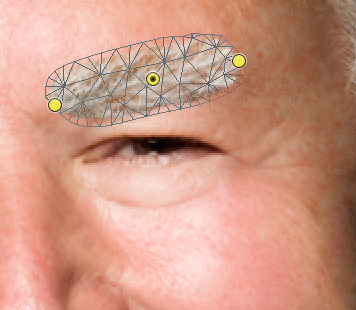
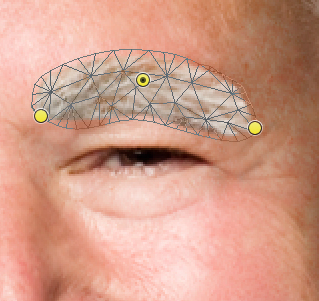
Next, go to Edit > Puppet Warp. This will create a mesh over your eyebrow. Click on the two ends of the eyebrow, dropping pins on the mesh. Click and drop a third pin in the middle of the eyebrow.

Click and drag the pins to warp the eyebrow to match the contour of the existing shape. And hit Enter/Return to accept the warp.

Finally, drop the opacity on the Eyebrow layer and using a soft eraser, blend the edges of the new eyebrow to the portrait. Repeat the steps for the other eyebrow.


Step 8

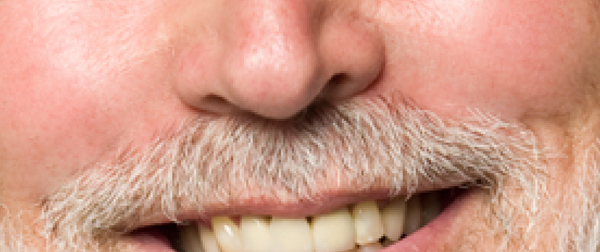
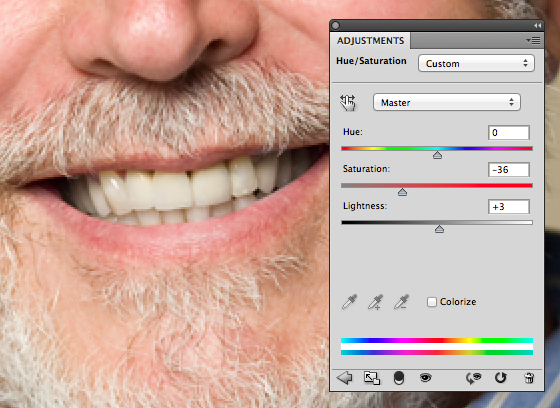
To whiten the teeth, simply make a rough selection using the lasso tool. Next, go to the Adjustments Panel and create a new Hue/Saturation Adjustment Layer.

Adjust the Saturation setting to the negative side, desaturating the yellow teeth. Do not go too far, you still want some color. Adjust brightness if needed. Do not adjust the Hue.
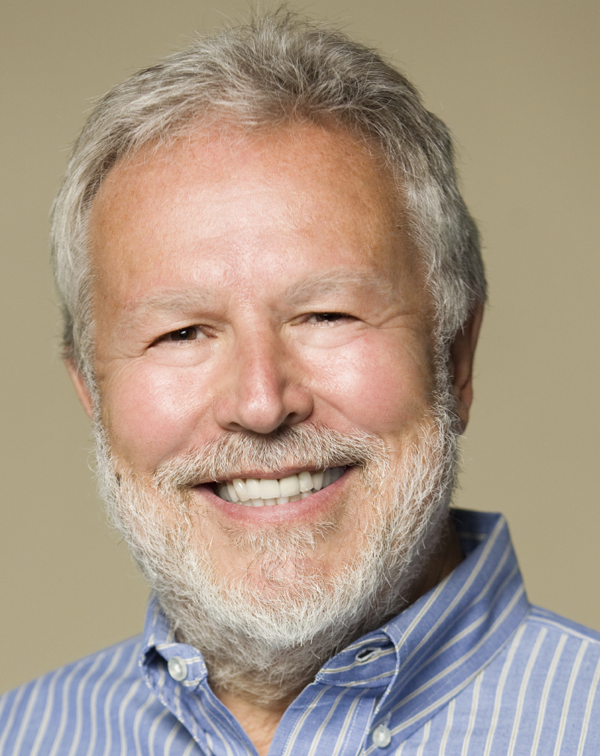

Final Image

Here is the final image. Wrinkles are nice and blended, new eyebrows for our friend and a whiter smile.


{excerpt}
Read More

Soccer Related Images (250)

Hi there Scriptlancer’s.

I need a collection of 250 images related to soccer. A few examples:
– An angry player
– A happy player that just has scored
– A goalkeeper
– FC Barcelona’s logo
– RealMadrid’s logo
– Picutre of David Beckhamm
– Brazil flag with a football on
– UEFA logo
– Image of Messi
etc. etc.

All images should be delivered in size 130×130 AND in size 65×65 in jpg format, named from 001_130x130.jpg to 250_130x130.jpg (and 001_65x65.jpg to 250_65x65.jpg). This makes it a total of 500 images.
All images must be cropped nicely to fit the square format.

As addition to the images, I need a textfile with a list of maximum 5 words per line about the content of the 250 images. First line in the .txt file = image 001_130x130.jpg etc.

No border allowed around the images.

I want club logos of all the major clubs in: England, Sweden, Norway, Denmark, Germany, Holland, Italy, Spain, Portugal. (Thats 100+ images alone)

The images should be grouped logically together, so like: Image 1-33 = famous players, image 34-66 = funny soccer image, image 67-102 = national soccer flags… etc

Someone skillful with Google, knowledge about soccer and image manipulation will be able to finish the job in about 6-8 hours.