Twice a month we revisit some of our reader favorite posts from throughout the history of Audiotuts+. This tutorial was first published in 2009.
Tremolo was always one of those plug-ins that my eyes completely skipped past. It wasn’t until some experimenting and tips from other composers that I began to see the potential behind this simple device.
In this tutorial we’ll look at some examples of how tremolo can help you make some truly interesting and unique sounds, including several techniques used to create the final piece from the “How To Create a Compelling Ostinato” tutorial.
All of the examples in this tutorial were created in Logic Pro, but the principles are universal and should apply to any tremolo plug-in in your program of choice. The goal here is to create good music, it’s not the specific tools that get you there but how you use them.
1. Creating a Pulse
One of the most basic effects we can use tremolo for is to create a pulsing rhythm, such as a driving bass.
Start with a basic sound. I’ve selected an interesting Zebra pad (interesting means that it is slightly complex with some motion in it) and a really nice deep low end.
Here’s the basic sound on whole notes:
Download audio file (PulseBass_NoTrem.mp3)
Not terribly exciting yet. Let’s initiate a Tremolo plug-in on the instrument and make this something we’d actually want to listen to.
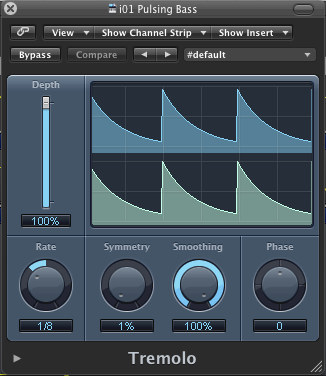
We’ve got 5 settings to play with: Depth, Rate, Symmetry, Smoothing and Phase.
- Depth: Depth controls how much the tremolo will be applied, or how “deep” you want the effect to go. A setting of 100% means you’ll go from each extreme end, either all the way left to right, or all the way loud to silent. Since we want a rhythmic pulse let’s use depth of 100% so that it can really be felt.
- Rate: The rate determines how often the tremolo effect will loop. This can be set to either a time or a rhythm. 95% of the time you’ll want it set to a rhythm so that it will lock in nicely with your track and you have the flexibility of changing your songs tempo without having to go in and fix your settings. Let’s use an 8th note rate (1/8) to give an exciting and driving pulse that our ears can keep up with.
- Symmetry: Symmetry can be thought of as Attack and Release settings. It determines how similar the “up” time is to the “down” time. 50% means that it will get loud just as quickly as it gets quiet. I’ve set the symmetry to 1% for our bass so that the attack is as sharp as possible and the rest of the sound fades away until our next attack (it has to be at least 1% because 0% would be no attack at all).
- Smoothing: Whether the sound fades in and out or has a more sudden change is determined by smoothing. You might be thinking that since we want a sharp attack we would not want this to be smooth, but actually we have the opposite. Because out symmetry is so low the attack at the very beginning of the beat is taken care of; a smoothing of 100% will allow for a very gradual fade down.
- Phase: The stereo field is controlled with phase. A phase of 180 will cause your sound to shift from left to right and back again rather than loud to quiet. We’ll be using a phase of 0 because we want our sound to be full, centered and more about volume than stereo spread.
This is what the Tremolo settings look like:
This is what our low pad sounds like now that we’ve added Tremolo:
Download audio file (PulseBass_Trem.mp3)
And here’s one example of how you could actually use this technique:
Download audio file (PulseBass_Example.mp3)
In one of my previous tutorials, “How to Create a Compelling Ostinato”, the final piece used tremolo in a variety of unique ways. The next three examples are all taken from that piece.
2. An Exciting Stereo Effect
The piece begins with a backwards snare sound. The purpose of this sound is to grab the listener’s attention, so it needs to be exciting and interesting.
Here’s the basic sound of a snare drum played in reverse:
Download audio file (Snare_NoTrem.mp3)
It’s already a somewhat interesting sound, but we can use tremolo to give it that extra bit of spice.
Here are the settings I’m using:
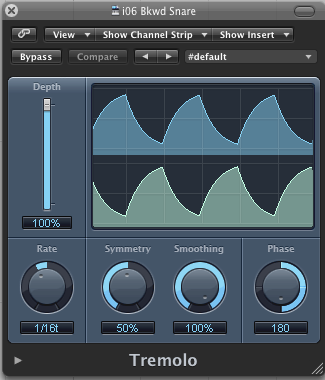
The biggest differences here are the phase and symmetry settings. The phase is now set to 180, meaning we go from the extreme left side to the extreme right side rather than loud to quiet. The symmetry is set to 50% this time so that there is an equal shift from left to right as there is back right to left.
Add a touch of reverb and the final result comes out like this:
Download audio file (Snare_Trem.mp3)
Notice that the sound now feels like it is consuming the entire space and really pulls you in.
3. A Spooky Stereo Effect
Another great use for tremolo is to add haunting ambience. Using a very slow rate, soft smoothing and a wide phase we can give a sound the feeling of coming in and out of nowhere or spinning around our heads.
Here is the sound we’ll be using to demonstrate, a complex pad:
Download audio file (PnoPad_NoTrem.mp3)
The settings:
By this point you should be getting the hang of what these different parameters do. We’ve set the rate to a 1/2, so the effect is spread out over a little more time than the rhythmic effects we were using before. The phase is set to 180 so that the sound will cross over the entire stereo field and the depth is at 100% to allow the sound to go completely from one side to the other before crossing back.
The result sounds like this:
Download audio file (PnoPad_Trem.mp3)
4. Creating a Complex Sound
In this last example we’ll look at how to use tremolo with automation to create a more complex sounding idea. The basic sound is just two french horns in fifths:
Download audio file (Hrn_NoFX.mp3)
The first thing we’ll do is automate the panning and volume so the horns have a sense of moving from the right to the left as well as a crescendo and back down to a decrescendo. If you’re not familiar with how to use automation, the concept is beyond the scope of this tutorial but I would highly recommend you learn how to use this very useful tool as soon as possible.
Here is a screenshot of the panning automation:
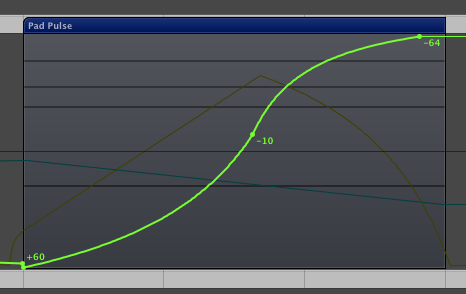
And here’s the volume panning:
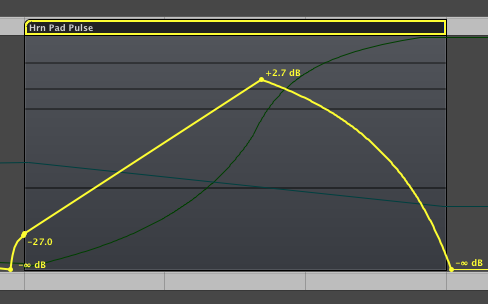
This is what our horns sound like so far:
Download audio file (Hrn_NoTrem.mp3)
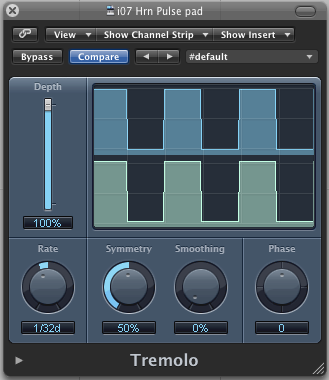
For the tremolo settings we’ll start with 100% depth so that the sound goes from completely full to complete silence. We’ll set our starting rate to a dotted 32nd note (1/32d) which will feel like a very fast pulse. The symmetry should be at 50% to allow an equal amount of time between loud and quiet, and the smoothing should be at 0% so that we’re either loud or silent and nothing in between. Finally the phase is set to 0 because we don’t want the sound to bounce back and forth from left to right, we want it to come in and out of nothing.
Here is what these settings look like:
The part we are going to automate is the rate, so that the sound has a sense of “slowing down”. If you’re using Logic you can adjust this setting by going into automation mode, selecting the track you are working on, and clicking on the automation box under the track name (it defaults to “Volume”). In that menu you can choose tremolo -> rate. Let’s slow the rate all the way from our dotted 32nd note to a 1/2 note.
Here’s how that will look in automation:
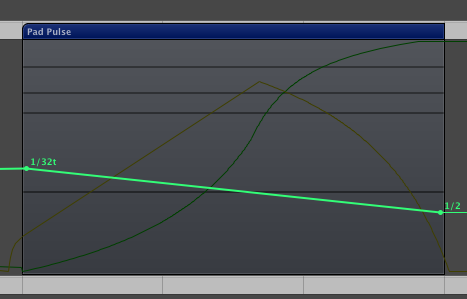
Notice that we use a straight line from one end of the rate to the other. This will allow the sound to smoothly slow down over the allotted time, in this case 3 bars.
The result of automating the tremolo:
Download audio file (Hrn_Trem.mp3)
Conclusion
As you can see from these examples, there is a lot of potential behind a simple and often overlooked plugin such as tremolo. The last three examples were used in context in this piece:
Download audio file (Trem_Examples.mp3)
Please leave a comment about what creative ideas ways you’ve come up with to make the most out of tremolo.
{excerpt}
Read More