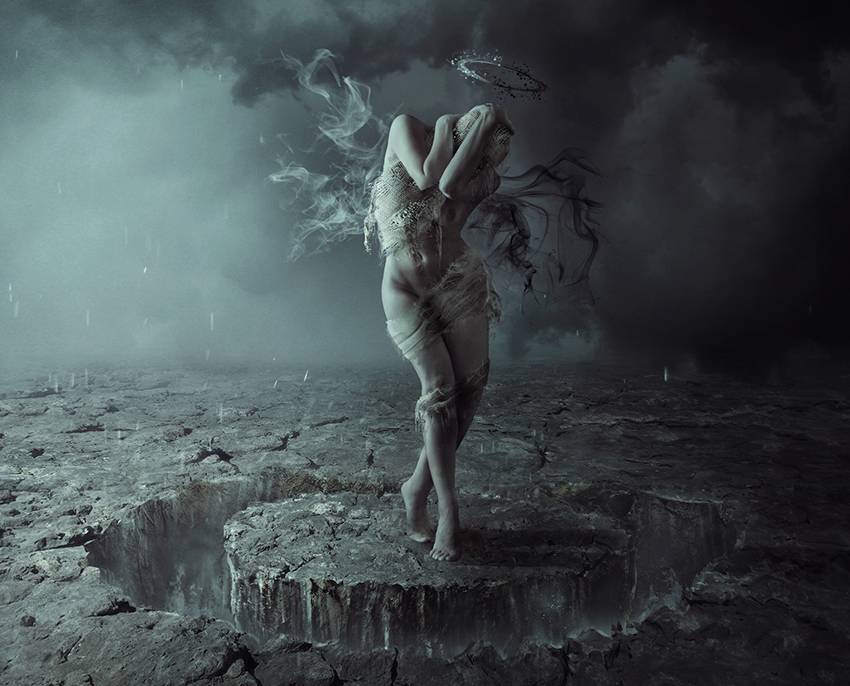
In this tutorial, I’ll show you how to use Adobe Photoshop to create a dark fallen angel scene using a variety of photo manipulation techniques.
First, we’ll build the base scene with ground, sky, and rock images. After that, we’ll add the underground atmosphere, retouch the model, make jagged clothes with bandages, and create a half-black, half-white halo and smoke wings. Later, we’ll paint tiny dots and import particles. We’ll use several adjustment layers to complete the final effect.
Tutorial Assets
The following assets were used during the production of this tutorial:
1. How to Build the Base Scene
Step 1
Create a new 1614 x 1302 px document in Photoshop with the given settings:

Step 2
Open the sky 1 image. Drag this image into the white canvas using the Move Tool (V), and place it in the upper section.

Step 3
Go to Layer > New Adjustment Layer > Hue/Saturation and reduce the Saturation value to -93.

Step 4
Create a Curves adjustment layer and decrease the lightness. On this
layer mask, activate the Brush Tool (B) and choose a soft round one with
black color. Use this brush to paint on the left of the canvas as we’re aiming to make the main light source there.


Step 5
Make another Curves adjustment layer to bring more light to the left
side. Use a soft black brush on the layer mask to erase the right so it
won’t be affected by this adjustment layer.

Step 6
Open the ground image. Use the Rectangular Marquee Tool (M) to select
the ground only, and place it in the lower section of the canvas. Use the
Free Transform Tool (Control-T) to change the ground’s perspective a
bit.

Step 7
Duplicate this layer, move it upwards, and use Control-T to make it narrower.

Step 8
Use the Lasso Tool (L) to make two jagged selections in the middle of the ground.

Change the foreground to white and click the second icon at the bottom
of the Layers panel to add a mask to this layer. We’ll have a result
like the one below.

Step 9
Add a mask to the second layer and use a soft black brush to soften the edges and blend this ground part with the sky.

Step 10
Create a new layer and activate the Clone Tool (S). Use this tool to refine some details on the ground.


Step 11
Select all the ground and clone layers and hit Control-G to make a group
for them. Change this group’s mode to Normal 100% and add a Curves
adjustment layer to darken the ground. On this layer mask, use a soft
black brush to erase the part on the right.

Step 12
Add another Curves adjustment layer to brighten the left part a bit. Paint on the right to keep its contrast.

Step 13
Create a Hue/Saturation adjustment layer to desaturate the ground. Bring the Saturation value to -66.

2. How to Build the Rocky Underground
Step 1
Open the rock images. We’ll be using image 2 and image 6. Isolate
the rock from image 6 to place it below the white space on the
ground. Set this layer below the ground’s group.

Step 2
Duplicate this layer three times to fill in the middle and the edges of the white space.

Step 3
Cut out the rock from image 2 and place it on the right edge of the small, jagged area on the ground.

Step 4
We’ll use several adjustment layers and some other tools to fix the
light and shadow of the rock parts below the ground. Create a Curves
adjustment layer above the rock part on the right edge and set it as a Clipping Mask. Decrease the lightness and use a soft black brush to
remove the dark effect on the left side of this part.

Step 5
On the rock layer on the left edge, make a new layer, change the mode to Overlay 100%, and fill with 50% gray.

Use the Burn Tool (O) to darken and paint some shadow details within
this rock part. You can see how I did it with Normal mode and the result
with Overlay mode.

Step 6
Use the Dodge and Burn Tool to refine the light, shadow, and details of the part in the middle selection.

Step 7
Make a Curves adjustment layer to brighten the left portion of this rock part.
The selected part on the right shows where to paint on the layer mask.

Step 8
Use another Curves adjustment layer to darken the right of the rock.

Step 9
Continue using the same method to retouch the rest of the rocks.


Step 10
Make a group for all the rock layers and the clipped ones. Use a
Hue/Saturation adjustment layer to desaturate all the rock parts a bit.

Step 11
Create a Curves adjustment layer to darken the rocks more. Paint on the left of the rock to keep its lightness.

3. How to Make the Underground Atmosphere
Step 1
Open the sky 2 image and drag it into our working document. Set it below the ground’s group but above the rock ones.

Use a layer mask to reduce the mist intensity, making it appear only inside the underground part.

Step 2
Create a Curves adjustment layer to make the effect more subtle. You can
use a soft black brush to recover the effect on the left of the
underground part where the main light source is.

Step 3
Create a new layer on top of the layers, change the mode to Overlay 100%, and fill with 50% gray. Use the Dodge and Burn Tool to paint light for
the contour of the circles on the ground.

Step 4
Open the flame images. I’ve used image 4 and image 8 to add flames to both sides of the underground part (feel free to take the images you want)
and change the mode of these layers to Screen 100%.

Add a mask to each of these layers and use a medium-hard black brush to
remove the flame parts on the ground, making them appear only inside the
underground part.

Step 5
Group all the flame layers into a new folder and change this group’s
mode to Screen 100%. Add a Hue/Saturation adjustment layer to desaturate
the flames and reduce their lightness.

Step 6
Add a mask to the flame group and use a soft black brush with a lowered opacity (about 30-35%) to reduce the flames’ visibility.

4. How to Retouch the Model
Step 1
Cut out the model and place her on the surface of the middle part of the rock. Add a mask to this layer and use a hard black brush to
delete the flying scarf part outside the model.


Step 2
To create a shadow for the model, add a new layer below the model one.
Hold Control and click the thumbnail of the model layer to load her
selection.

Fill this selection with the color #101010 and flip it vertically
(Edit > Transform > Flip Vertically). Convert this layer to a
Smart Object. Move it to the right of the canvas and use Control-T to
make the shadow narrower to fit the way the light falls.

Step 3
Lower the Opacity of this layer to 40% and use a layer mask to erase the
shadow part that’s fallen into the underground part, making it visible only on the
ground.

Step 4
Go to Filter > Blur Gaussian Blur and set the Radius to 6 px. On the
filter mask, use a soft black brush to erase the soft effect on the feet
area to keep it hard and solid.

Step 5
Create a new layer and use a hard brush with the color #101010 to paint the missing shadow part below the feet.

Step 6
Make a new layer above the model one, change the mode to Overlay 100%, and fill with 50% gray. Use the Dodge and Burn Tool to refine the light
and shadow on the model.

Step 7
Add a Hue/Saturation adjustment layer to desaturate the model. Bring the Saturation value down to -79.

Step 8
Create a Photo Filter adjustment layer and pick the color #a0deed.

Step 9
Make a Curves adjustment layer to reduce the highlight on the model a
little. On the layer mask, paint on the shadow area and any details you want.

Step 10
Use another Curves adjustment layer to lighten the contrast of the model. Use this layer mask to reduce the light on the areas which are bright
already.

5. How to Add the Bandages
Step 1
Cut out the bandages from the original image, and then take one of them to add to our working document. Use Control-T to rotate it as
shown below:

Add a mask to this layer and use a hard black brush to remove the
bandage part from the model and below the arms. I recommend using a tablet pen to leave some tiny strings around this part to make the
result more realistic.

Step 2
Make a Curves adjustment layer and reduce the lightness. On the layer
mask, paint on the front of the bandage so it won’t affected by this
adjustment layer.

Step 3
On a new layer, use the Dodge and Burn Tool to enhance the light and shadow of this bandage a bit.

Step 4
Take different parts from the bandages in the original one to add to the
model’s body using the same method. The masking process takes some
patience and time, but the result will be worth it.


Step 5
Create a group for the bandage layers and use a Hue/Saturation
adjustment layer within this group to desaturate the bandage parts.

Step 6
Make a Curves adjustment layer to increase the contrast of the bandages.
Paint on the front of these parts to keep their brightness.

Step 7
Add a new layer above the bandage group and use a soft brush with the color #101010 and Opacity about 30% to paint shadow below the bandages.

6. How to Create the Half-Black, Half-White Halo
Step 1
Create a new layer on top of the other layers and change the brush to one of the abstract circle ones. Take the one you like with the color #101010
(I’ve chosen the one numbered 700) and spot on the main canvas. Use
Control-T to scale it down and rotate it a bit, and place it over the
model’s head.


Step 2
Duplicate this layer several times and flip them horizontally to complete the halo.

Step 3
Create a group for these circles and add an Invert adjustment layer to convert the halo’s color to white.

On this layer mask, use a soft black brush to recover the black on the right side. Now we have a half-black, half-white halo.

Step 4
Create a new layer, and change the brush to a soft round one. Press F5 to change the settings of this brush:


Use the color #e6e6e6 for this brush and paint lots of tiny dots around the white half of the halo.

Step 5
Make another layer and turn the foreground to #101010. Use the same brush to paint dark dots for the black half of the halo.

7. How to Make the Smoke Wings
Step 1
Make a new layer on top of the layers and use a smoke brush with black
color (feel free to take the one you feel looks similar to a wing)
to add to the bright side of the model.

Use a layer mask with a soft black brush to erase the top of this smoke part and the part covering the model’s body.

Step 2
Add more smoke to the top part of this side and the other side to complete the smoke wings. Use a
layer mask on each of this layer to erase any details you feel are unnecessary.


Step 3
Create a group for the smoke layer and add a Curves adjustment layer to
turn the wings’ color from black to white (you can use an Invert
adjustment layer instead). On this layer mask, paint on the right wing
(from the viewer) to get half-black, half-white wings.


8. How to Add the Particles
Step 1
Open the particles image pack. I’ve used image 2 and image 4 to add to the
main scene. Change this layer mode to Linear Dodge 100% and use
Control-T to rotate the images to make the particles fall straight down.

Step 2
Create a group for these layers and alter this group’s mode to Linear
Dodge 100%. Add a Hue/Saturation adjustment layer and reduce the
Saturation value to the minimum.

Step 3
Add a mask to this group to reduce the particle intensity and visibility, making the result more subtle.

9. How to Make the Final Adjustments
Step 1
Create a Gradient Map adjustment layer on top of the layers and pick the colors #9c7d6b and #80b1a7. Alter this layer mode to Soft Light 100%.

Step 2
Make a Color Balance adjustment layer and change the Midtones and Highlights settings.


Step 3
Add two Photo Filter adjustment layers and pick the colors #71c0f8 and #72892e.


Step 4
Create a Curves adjustment layer to increase the contrast of the whole
scene a bit. The selected areas show where to paint on the layer mask.

Step 5
Make another Curves adjustment layer to increase the shadow on the right
side. Paint on the bright side of the scene so it won’t be affected by
this adjustment layer.

Step 6
Add a Vibrance adjustment layer to enhance the final effect.

Congratulations, You’re Done!
I hope that you’ve enjoyed the tutorial and learned something new for
your own projects. Feel free to share your results or leave comments in
the box below. Enjoy Photoshopping!
