Yesterday, Carlos examined the Google AJAX API and Flash. Today, we’re going to look at creating a Silverlight Translator Application using the Microsoft Translator service. We’ll begin with interface design (in Photoshop) and move into implementation using Silverlight 4 (including its most recent features) as a web application framework.
We’ll be using Photoshop and Expression blend as user interface design tools and Visual studio as development environment.
What’s Covered?
Here’s a quick breakdown of what’s covered in this tutorial:
- Silverlight 4 and Expression Blend overview
- Interface design
- Customizing UI Controls in Blend
- Integrating Blend with Visual Studio
- Using the Microsoft Translator service
- Make use of Silverlight 4′s newest features
Note: For a solid foundation in working with Silverlight, check out Mike Taulty’s An Introduction to Microsoft Silverlight 4.
Silverlight and Expression Blend Overview
Silverlight is a browser plug-in that extends the web development experience far beyond the limitations of plain HTML and JavaScript. It is very similar to Adobe Flash. In Silverlight applications, user interfaces are declared in Extensible Application Markup Language (XAML) and programmed using a subset of the .NET Framework. You can therefore use any .NET Language like C# or VB.NET to start implementing your programs.
As Silverlight uses XAML for creating user interfaces you can use Expression Blend to design your application interface. That’s because Blend is a user interface design tool developed for creating graphical interfaces for web and desktop applications. It’s called Blend because it blends the features of these two types of applications.
Interface
Design is a plan for arranging elements in such a way as best to accomplish a particular purpose
– Charles Eames
Because interface is very important for any application we will cover the detailed steps of creating our interface.
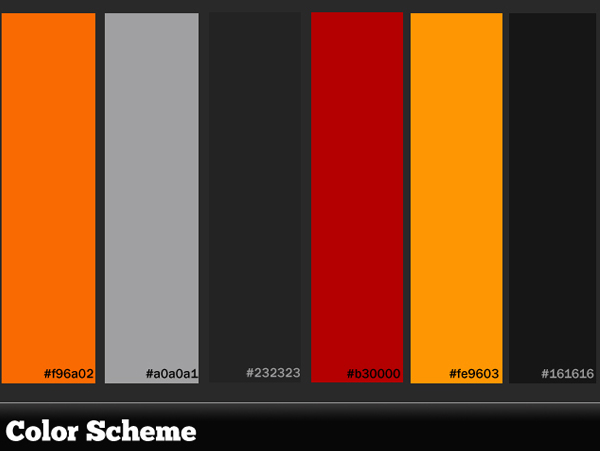
Step 1: Color Scheming
Before we start designing our interface we’ll need to look at the overal visual effect. I made this color scheme:
Step 2: Header
The first step is to set up your document. We’re going to be designing an interface for a Translator application so it won’t be too big. We’ll go for 640 x 468px.
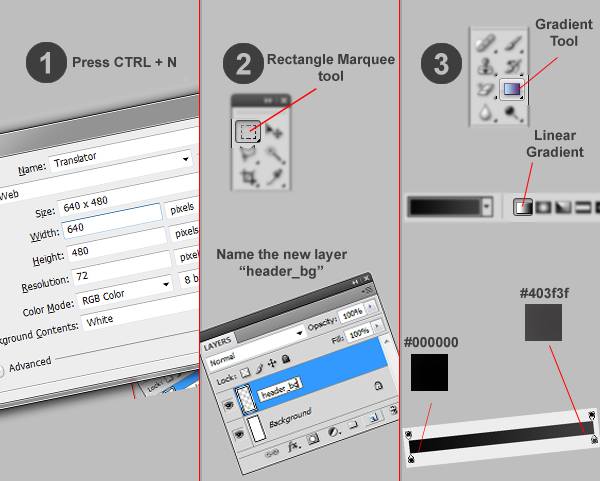
Fire up Photoshop and press the shortcut keys CTRL + N to create a new document. Choose 640 x 468px as the dimensions then click OK.
Create a new layer and rename it “header_bg” then create a selection of 640 x 44px (or whatever you feel is good) in the head of the image using the Rectangle Marquee tool.
Then choose the Gradient tool and be sure that it’s a Linear Gradient as in the image above.
Choose the Horizontal Type tool and write “{T}ranslator” with these settings:
- Font Family: ChunkFive
- Font size: 48px
- Font weight: Regular
- Anti-aliasing setting: Smooth
- Color: #ffffff
Then choose the “Add A Layer Style” tool from the Layers menu and click the Gradient Overlay option. Change the gradient as in the image. Then use the Horizontal Type tool and write “T” and as in the last step change its Gradient Overlay option and replace it in the correct position as in the image.
Use the Type tool again and type “it translates for you” then change its layer name to “slogan”. After that, select all layers you have created and press CTRL + G to group them, renaming the group to “header”.
Step 3: Background
Here is the background used in the application. Right-click it and “Save As” so you can use it in your app.

Step 4: Footer
Choose the Rectangle Marquee tool and create a rectangle at the bottom of the image with a height of 52px. Then choose the Gradient Tool and, with the same settings we created the header with, make a gradient such as you see in the image. I placed some of images like the Activetuts+ logo and features images in mine; you can find them in the source download.
Make sure that you have created a new group of all these layers and called it “footer”.

Step 5: Create Buttons
In the following few steps we will design the UI Elements, like buttons and text boxes.
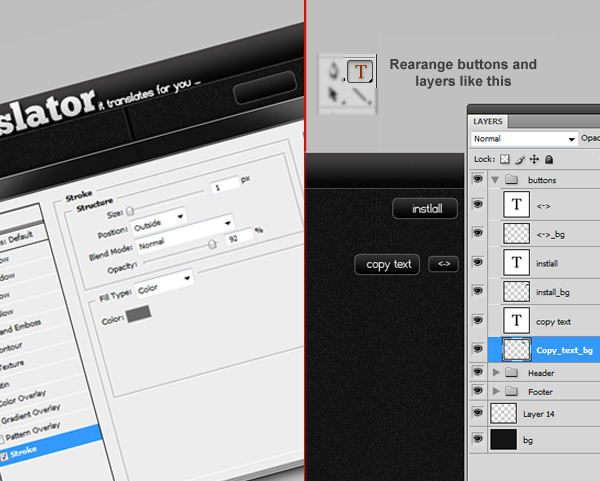
We’ll start with our buttons. Create a new layer, call it “Copy text_bg” and make a selection of 800 x 24px. Then click Select > Modify > Smooth and set the Sample Radius to 3px. Now select the gradient tool and with same gradient as the header make a gradient like that in the image:

Double-click the layer and choose “Stroke” then set its value to what you see in the image. Select the Horizontal Type tool and write “Copy text” and place it over the button. Duplicate the “Copy text_bg” layer by dragging and dropping it to the new layer button and type “Install” then place it over the button. Duplicate “Copy_text_bg” again and rename it to “” which stands for invert languages and press CTRL + T to resize it as you see in the image.
Step 6: Translate Button

Make a new layer, select the Elliptical Marquee tool and create a circle, then choose the Gradient tool. Make sure it’s a reflected Gradient and create a gradient as in the image. Then click Select > Modify > Contract, set the value to 2px and create a new layer. Then with the Brush tool and color value of #000000 make the selection dark colored. Now make an Oval selection and choose the Gradient tool; make sure it’s a Linear Gradient whose color values are #555555 and #000000, then make a gradient like the image.
Step 7: Make the PSD Ready to Blend
Because Blend doesn’t support some Photoshop features like gradients and strokes we need to rasterize all layers with such effects. To do that select the “header_bg” layer and right-click it, then choose “Convert to Smart Object” then right-click again and choose Rasterize Layer. Repeat these steps to the layers “{T}ranslator”, “T” and slogan.
Step 8: Design and Create Application Icon
As we are covering the process of creating an application from start to end we will discuss the process of creating the application’s icon.
Make a new Photoshop file of 430 x 330px by pressing CTRL + N, then make a new layer and name it “border”. Create a selection of 247 x 242px, smooth the selection by clicking Select > Modify > Smooth and type 30. Then click Select > Redefine Edge with Smooth of 20 and Contract/Expand of +100%.
Next, make a gradient as in the image, then click Select > Modify > Contract and type 20, then press Delete. Double-click the layer and mark Drop Shadow with opacity of 54%. Create a new layer and name it “inside” then make a selection inside the border and make a gradient like what you see in the image. Double-click the layer and make a stroke of 2px. Now click the Horizontal Type tool and write “Translator” with the font type ChunkFive and size of 24pt. Also, type “{T}” with the same font but with size of 110pt.
You don’t need to convert your icon to .ico format, just save your icon in .png format with sizes of 280 x 280px, 48 x 48px, 32 x 32px and 16 x 16px and Visual Studio will do the rest!
Step 9: Get Ready for Implementation
To start implementing the Translator you need to make sure that you have installed Web developer features when you installed your Visual Studio. Then you’ll need to download and setup Silverlight 4 tools which you can get from http://bit.ly/Silverlight4tools and Silverlight 4 Developer Runtime, which you can get here.
Step 10: Moving to Visual Studio and Prototyping
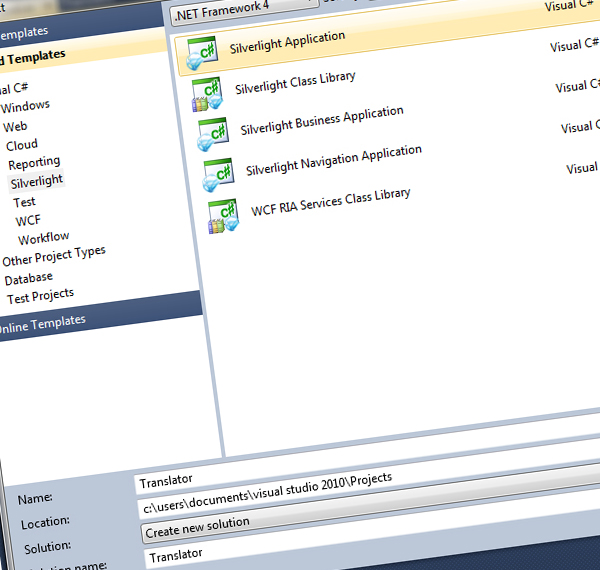
After creating the interface and making it ready to use in Blend we will go to Visual Studio and make a prototype for the project to start our implementation process. Fire up your Visual Studio, click File > New > Project and choose Silverlight then choose Silverlight Application. Click OK for the next window.
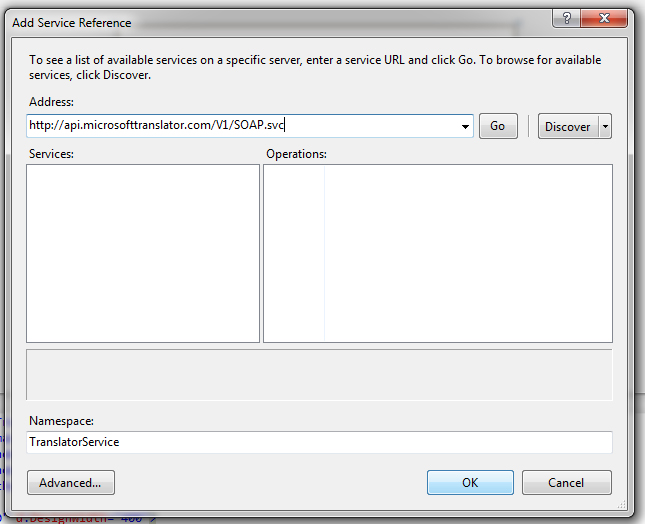
Step 11: Add Translator Service
Click Project > Add Service Reference and paste the service url http://api.microsofttranslator.com/V1/SOAP.svc with Namespace as TranslatorService. To use the Bing Translator Web Service you will need an AppID. So go to http://www.bing.com/developer/appids.aspx?FORM=PMPD and create a new AppID for your Translator.
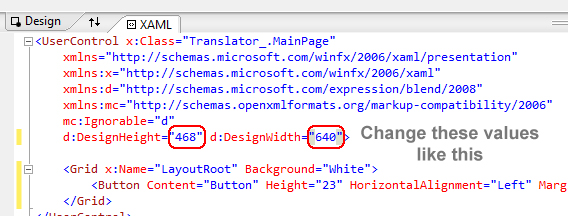
Step 12: Resize the Application
As we mentioned before, the application will be 640 x 468px so we need to resize it.
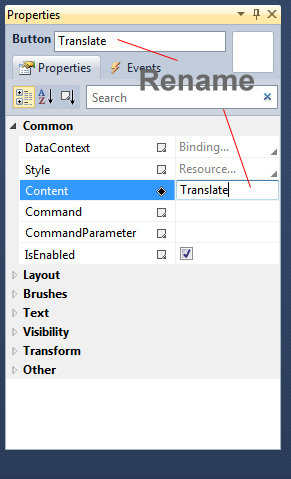
Step 13: Add Translate Button
Now click View > Toolbox (or press CTRL + W + X) to make the Toolbox menu appear. Drag and drop “button” from the Properties menu, change its name and text to “Translate”. Repeat the process and create “Copy text”, “install” and “” buttons.
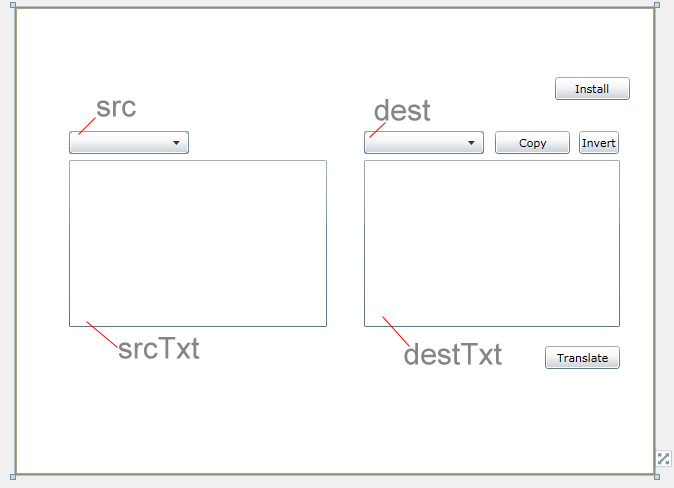
Step 14: Add Text and Comboboxes
From the Toolbox drag and drop two Text boxes then rename them to “srcTxt”, which will handle the Source Text our user will enter, and “destTxt”, which will output the translated text. Then, drag another two comboboxes and rename them to “src”, which will have all source languages that the user can choose from, and “dest”, which is the language the user wants to translate to. After that, rearrange the elements as in the image.
Step 15: Start Implementing
Now we will start implementing the program. Double-click the Translate button then Visual Studio will open the Source Code of the application. Add the Translator Service Namespace by pasting this code after the last Namespace.
using Translator.TranslatorService;
Step 16: Variables
In the snippet below, the first line creates an instance called “client” from the LanguageServiceClient class. The second creates a variable of type String called “AppId” to refer to the Application ID needed by SOAP Service. The last two lines are the result groups that returned from the SOAP calls and they are in the form of ObservableCollection.
TranslatorService.LanguageServiceClient client = new TranslatorService.LanguageServiceClient();// instance of LanguageServiceClient.
string AppId = "6CE9C85A41571C050C379F60DA173D286384E0F2";// This AppId is created for my name
System.Collections.ObjectModel.ObservableCollection<string> results;// The result languages names returned by the SOAP Searvice.
System.Collections.ObjectModel.ObservableCollection<string> langcodes;// The result languages codes returned by the SOAP Searvice.
Step 17: Constructor
Silverlight calls the webservices in Asynchronous Modes only. Hence we need to handle the events to fetch the values. We have to get the results inside those event definitions. Following are the delegates for events which we can give in the Page load event. Also we have to call the Comboboxes’ load events to load the languages.
 InitializeComponent();
//Event Handlers
client.TranslateCompleted += new EventHandler<TranslateCompletedEventArgs>(client_TranslateCompleted);

client.GetLanguageNamesCompleted += new EventHandler<GetLanguageNamesCompletedEventArgs>(client_GetLanguageNamesCompleted);
client.GetLanguagesCompleted += new EventHandler<GetLanguagesCompletedEventArgs>(client_GetLanguagesCompleted);
//For filling the comboboxes and Language codes
client.GetLanguageNamesAsync(AppId, this.Language.IetfLanguageTag);
client.GetLanguagesAsync(AppId);
Step 18: client_TranslateCompleted Event
As we mentioned before, we need to handle each event as we’re working in Asynchronous mode. This is the first event which called client_TranslateCompleted() it will handle the complete translation event and if there are no errors in the process of returning the translation it sets the destTxt combobox text value with the resulting translation.
//Get the translated text
protected void client_TranslateCompleted(Object sender, TranslateCompletedEventArgs e)
{
	if (e.Error == null)
	{
		destTxt.Text = e.Result;
	}
}
Step 19: client_GetLanguagesCompleted Event
This event, called client_GetLanguagesCompleted, retrieves the possible languages that the SOAP Translator Service offers – but in a form of code that is understandable for the Service – and sets them to the String langcodes. This is set after checking for errors.
//Get Languages
protected void client_GetLanguagesCompleted(object sender, GetLanguagesCompletedEventArgs e)
{
	if (e.Error == null)
	{
		langcodes = e.Result;
	}
}
Step 20: client_GetLanguageNamesCompleted Event
This event gets the name of each language. To clarify, the code for the English language is “en” and the name, of course, is “English”. If there are no errors when getting language names it sets the string “results” with these language names. Then it sets the two comboboxes with the language names.
//Fill the comboboxes

protected void client_GetLanguageNamesCompleted(Object sender, GetLanguageNamesCompletedEventArgs e)
{
	if (e.Error == null)
	{
		results = e.Result;
		this.src.ItemsSource = results;
		this.dest.ItemsSource = results;
	}
}
Step 21: PerformTranslation Function
Now we will implement the last thing to accomplish our goal. This function’s operation is to start the translation process. It checks the two selected items in comboboxes, makes sure that they are not yet empty then calls the Asynchronous Translation function and passes the neccesary arguments to it. These arguments are the Application ID and the Source Text that needs to be translated, plus the language of this Source Text and the language of the Desired Translated Text.
private void PerformTranslation()
{
	if (src.SelectedItem != null && dest.SelectedItem != null)
	{
		client.TranslateAsync(AppId, srcTxt.Text, (langcodes[src.SelectedIndex].ToString()), (langcodes[dest.SelectedIndex].ToString()));
	}
	else
		MessageBox.Show("Please select languages first !");
}
Step 22: Translate Button Event
As we’ve finished implementing the Translation Service we need to get it work. So we need to handle the Translate button click event. It’s really simple it just calls the PerformTranslation() function to start its work. To do that just go to the design view and double-click the Translate button.
//Translate on button click
private void button1_Click(object sender, RoutedEventArgs e)
{
	PerformTranslation();
}
Step 23: Invert Button
The Invert button performs a simple swapping of selected languages in the comboboxes. It creates a String called tmp to store the values in the source combobox when it takes the value of the destination combobox, then puts its value in the destination combobox.
private void Invert_Click(object sender, RoutedEventArgs e)
{
	if (src.SelectedItem != null && dest.SelectedItem != null)
	{
		string tmp = src.SelectedItem.ToString();
		src.SelectedItem = dest.SelectedItem.ToString();
		dest.SelectedItem = tmp;
	}
}
Step 24: Copy Text Button
Silverlight 4 came with a lot of new useful features. One such example is the Clipboard API which provides methods for grabbing content that can be temporarily held in the machine’s “clipboard” and manipulated if need be.
private void CopyText_Click(object sender, RoutedEventArgs e)
{
	Clipboard.SetText(destTxt.Text);
}
Step 25: Install Button
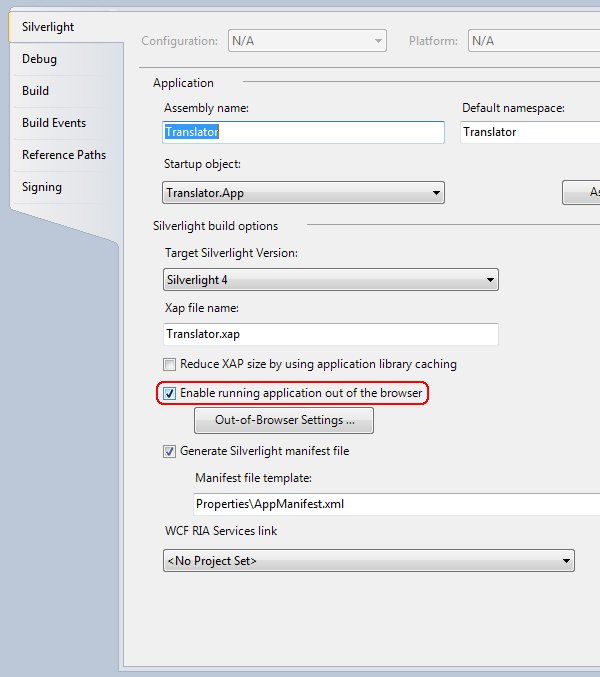
Another new feature of Silverlight 4 is ability to run Silverlight applications Out-of-Browser. That’s because the .NET Common Runtime (CLR) now enables the same compiled code to be run on the desktop and Silverlight without change. This feature can be implemented by clicking Project > (Application name) Properties then the menu in the image will appear. Click Enable running application out of the browser.
You can access this feature now by right-clicking the app; you will find Install this application. However, we want to add a button to handle this feature so we’ll make an install button and the following is the code for its click event:
private void install_Click(object sender, RoutedEventArgs e)
{
	if (!Application.Current.IsRunningOutOfBrowser)// asks if the application is not installed
		{ Application.Current.Install(); }// install application
}
Step 26: Build Prototype
Now if you press CTRL + F5 to build the application, it will be built but a warning message will appear. So to debug your application right-click on the web service in the Solution Explorer, which is Translator.Web, then click Debug > Start new instance. Test your application.
Step 27: Moving to Blend
As we finished implementing our application we will start implementing our interface. Open Blend and a splash screen will appear. Choose Open Project from it, then navigate to the project files and open the Solution file which is called “Translator.sln”.
Step 28: Import Photoshop File
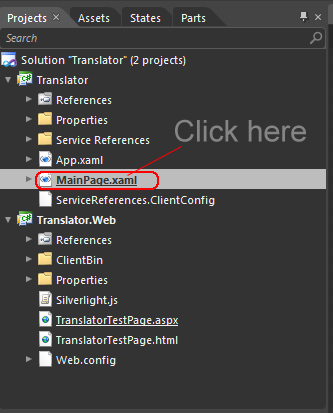
From the Project tab double-click on MainPage.xaml then click File > Import Adobe Photoshop file then navigate to our PSD file and open it.
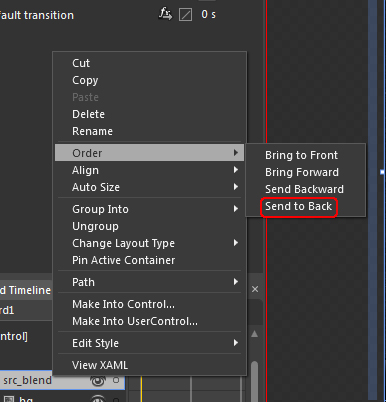
All of our images will be imported to our project file but will be on the top of our Buttons and boxes. In the Objects and Timeline tab right-click on PSD_Source and choose Order > Send to Back.
Step 29: Customize Text Boxes
Blend provides a really useful feature; the ability to customize any user interface element as you want. To do that, select any textbox and right-click it, then choose Edit Template > Edit a Copy, mark Apply to all, then click OK.
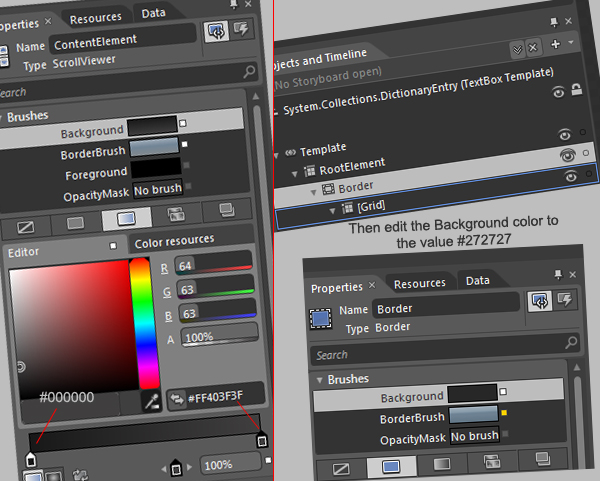
From the Objects and Timeline tab, navigate to contentElement as in the image. Now from Properties tab change the Background color like the image. Now we are editing in the textbox; to go back to the workspace click on srcTxt as shown in the image. Now select the two textboxes and change the Foreground color to #A3A3A3, then go to the Properties menu, scroll to the Text tab and change the font to Franklin Gothic Medium and size to 16pt.
Step 30: Customize Buttons
Right-click any button then choose Edit Template > Edit a Copy and mark Apply to all. Then navigate to BackgroundGradient in the Object and Timeline tab. In the Properties, change the Fill color to gradient, such as in the image from Step 29.
Next, navigate to Background in the Object and Timeline tab and in the Properties tab change the Background color value to #494949.
Step 31: Customize Comboboxes
Right-click any combobox then choose Edit Template > Edit a Copy and mark Apply to all, then right-click DropDownToggle and choose Edit Template > Edit current.
Click on BackgroundGradient and from the Properties tab change the Fill color to gradient. Go back by clicking DropDownToggle from the upper menu then navigate to BtnArrow, which is inside DropDownToggle. From the Properties tab change the Fill color to #8D8D8D. Now go to [TextBlock] which is inside ContentPresenter and change the Fill color to #8D8D8D.
Next, go to PopupBorder and change its Background color to #FF1D1D1D. From the States tab click MouseOver, go to Objects and Timeline, click BackgroundGradient and change the gradient color to what you feel looks good.
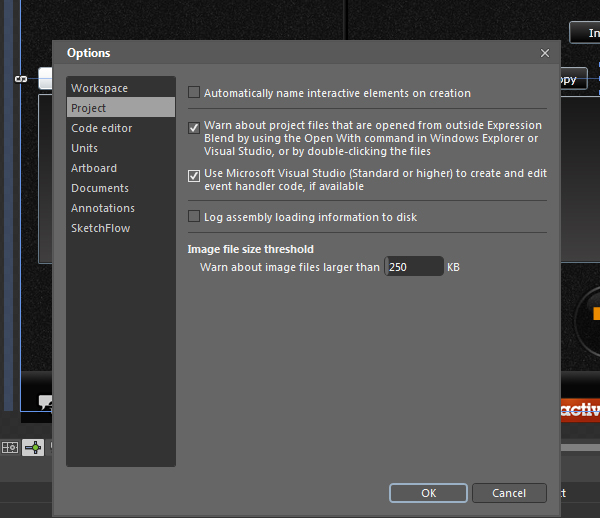
Step 32: Integrating Blend with Visual Studio
To edit your source code using Visual Studio just click Tools > Options > Project then mark Use Microsoft Visual Studio…
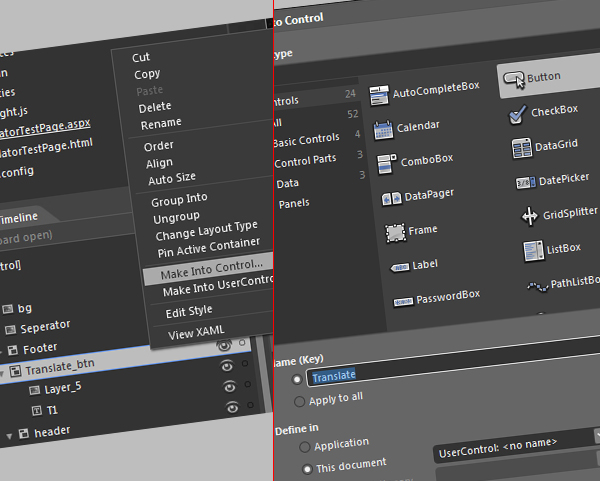
Step 33: Implement Translate Button
From the Object and Timeline tab right-click Translate_btn then click Make into Control and choose button. Name it “Translate”.
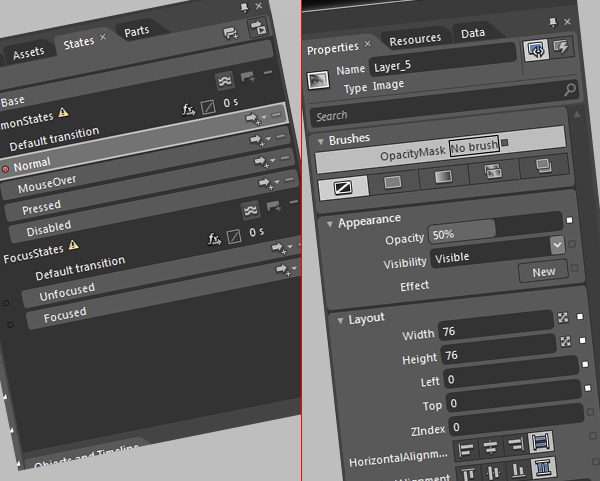
From the States tab click on “Normal” then from the Properties menu change the Opacity value to 50%. Again, from the States tab, click on “Mouse over” and change the Opacity to 70%. Lastly, click on Unfocused from the States tab and change the Opacity to 30%.
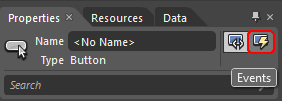
Now delete the old Translate button and go to the events by clicking on it. In the click box type Translate_Click.
Step 34: Install Icon
In the Project tab right-click on src_blend_images and choose Add Existing Item then add all PNG icons. After that double-click on any button’s event for Visual Studio to load. Click Project > Translator Properties then click Out-of-Browser Settings and add the icons from src_blend_images.
Conclusion
In this tutorial we covered the entire process of creating a Translator application. We also took a look at Microsoft Bing Translator Service and made use of it. I hope it was useful and enjoyable.