
Make a statement with your wedding stationery by learning how to make an InDesign menu template in just a few easy steps.
In this tutorial, we will cover how to set up a wedding menu template through the use of Layers and Paragraph styles. You will also learn how to prepare your wedding menu template in an InDesign template that users can edit easily. This menu format measures 9 in x 4 in, which makes it easy for you and other users to print at home.
In a hurry? We’ve got amazing dinner menu templates and menu card templates over at Envato Elements and GraphicRiver. Go check them out!
What You Will Need for Your InDesign Menu Template
You’ll need access to Adobe InDesign. If you don’t have the software, you can download a trial from the Adobe website. We’ll also be using:
Download the assets and make sure the fonts are installed on your system before starting. When you are ready, we can dive in!
1. Setting Up a Wedding Menu Template File in InDesign
Step 1
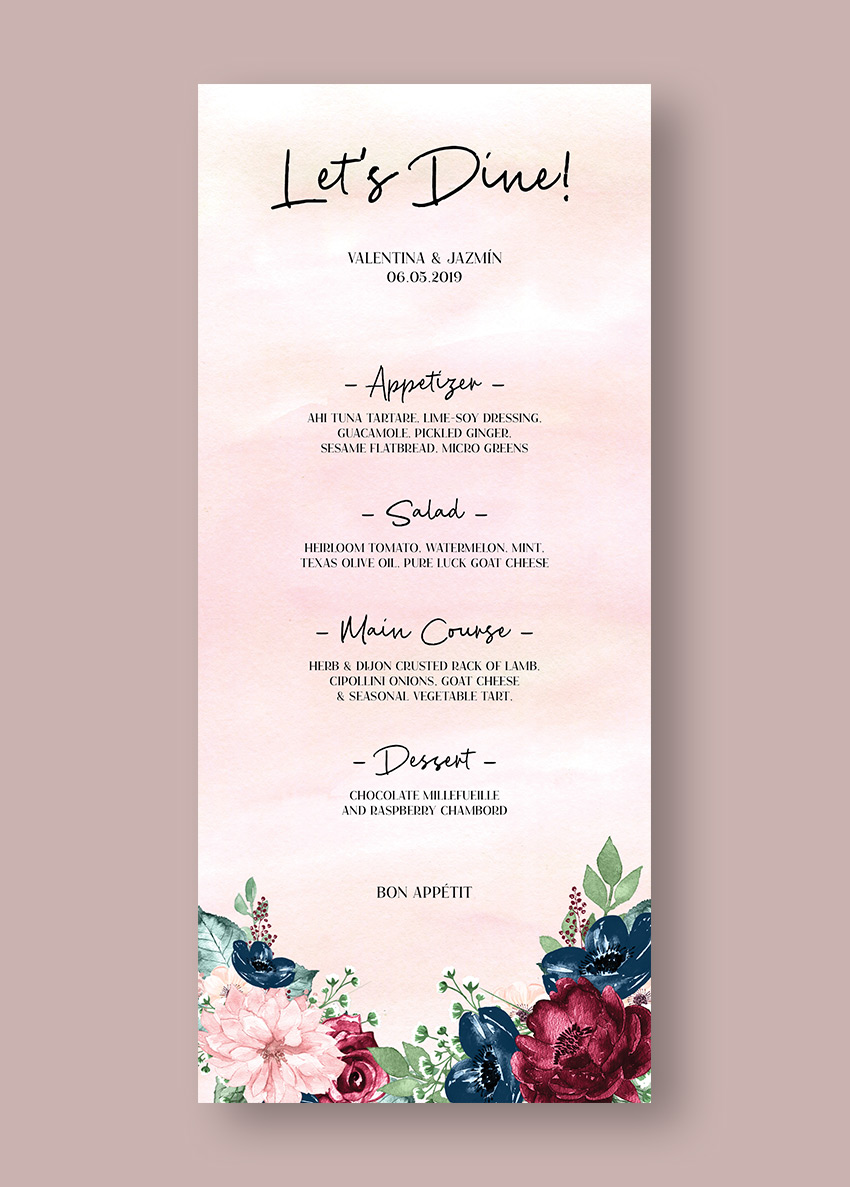
In InDesign, go to File > New. Name the document wedding menu template. Set the file to the following dimensions:
- Width to 4 in
- Height to 9 in
- Orientation to Portrait
- Units to Inches
- Pages to 1
- Uncheck Facing Pages
- Columns to 1
- Margins to 0.5 in
- Bleeds to 0.125 in (it’s best to seek your professional printer’s preference)
Click Create.

Step 2
Organizing layers is an important practice when designing an InDesign template. Bring up the Layers panel by going to Window > Layers. Double-click on Layer 1 and rename it Background.

Step 3
On the Layers panel main menu, select New Layer. Name it Copy. Click OK.
Create a new layer named Images. Click OK.

2. Designing Your Wedding Menu Layout in InDesign
Step 1
On the Layers panel, select the Background layer.
To Place an image, press Command-D. Locate the Watercolor pink backgrounds folder and select the 7.jpg file. Click Place.

Step 2
Click on the InDesign menu template to place the image. Using the Direct Selection Tool (V), resize the frame to cover the width of the wedding menu template and extend it to the bleed.

Step 3
Head over to the Layers panel and lock the Background layer. Select the Copy layer.

Step 4
Using the Text Tool (T), create a text frame at the very top of the InDesign menu template. Use the side margins to help you place the text box in the center of the page. Add text—in this case, I’ve added ‘Let’s Dine!’

Step 5
Open the Character panel by going to Window > Type & Tables > Character panel.
On the Character panel, set the Font to Cest Lavie Regular and the Size to 40 pt.
On the Control bar, set the Alignment to Center.

Step 6
Create a text box under the title using the Text Tool (T). Here, we will include the couple’s name and date on two lines.
On the Character panel, set the Font to Cest Lavie Serif and the Size to 10 pt.
On the Control bar, set the Alignment to Center.

Step 7
Create a text box under the names using the Text Tool (T). Here, we will include the menu for the day. We will use a combination of the Regular and Serif family. Add copy, and let’s start formatting:
- Subtitle: Add a hyphen before and after each subtitle as this will help create emphasis. Set the Font to Cest Lavie Regular and the Size to 20 pt.
- Menu items: set the Font to Cest Lavie Serif and the Size to 8 pt.
On the Control bar, set the Alignment to Center.

Step 8
Create a text box under the menu with the Text Tool (T). Include a line such as ‘Bon Appetit’.
On the Character panel, set the Font to Cest Lavie Serif and the Size to 10 pt.
On the Control bar, set the Alignment to Center.

Step 9
Head over to the Layers panel and lock the Copy layer. Select the Images layer.

Step 10
Press Command-D to Place an image on the InDesign menu template. Locate the arrange_6.png file and click Open.

Step 11
Click on the menu layout to place the image.
Head over to the Control panel and activate the Constrain Proportions button. Set the Percentage to 45%.
Place the image on the bottom left corner of the menu. Make sure that the image is touching the bleed marks.

Step 12
Press Command-D to Place an image on the menu card template. Locate the arrange_5.png file and click Open.
Click on the InDesign menu template to place the image.
Head over to the Control panel and activate the Constrain Proportions button. Set the Percentage to 55%.
Place the image on the bottom right corner of the menu. Make sure that the image is touching the bleed mark.

3. Converting Your Menu Layout Into an InDesign Template
Once you’ve finished designing your menu layout, it’s time to get it ready for easy customization. In this particular InDesign menu template, we will create Paragraph Styles for the content. The rest of the elements are JPEG files that don’t require specific formatting.
Step 1
Go to Window > Styles > Paragraph Styles. On the Paragraph Styles panel, we will create a number of formatting styles based on our menu design.
Select and activate the text box at the top of the page. Head over to the Paragraph Styles panel and click on the Create New Style button. This will create a new style based on the text you selected.

Step 2
Double-click on Paragraph Style 1 to open the Paragraph Style Options window.
Change the Style Name to Title. You will notice that the Style Settings will include the settings you used on the text—this is a great way to double-check everything is in order. Click OK.

Step 3
Select the couple’s name and date using the Text Tool (T). Head over to the Paragraph Styles panel and click on the Create New Style button.
Double-click on the new Paragraph Style and set the Style Name to Couple name.
Repeat the same procedure for the rest of the menu and create styles for the Subtitle and Menu Description.
Now your InDesign menu template is ready to be shared with others. Users will have the option to easily change the fonts and content through the paragraph styles. Users will also be able to change the images if they desire through the organized Layers panel.

4. How to Export a File for Printing
Before exporting a file for printing, it is useful to take a look around all the edges of the menu design. This is to make sure all the images bleeding out are touching the bleeds.
Step 1
To export the file, go to File > Export. Name the file Wedding Menu Template and choose Adobe PDF (Print) from the Format dropdown menu. Click Save.

Step 2
In the Export Adobe PDF window, set the Adobe PDF Preset to Press Quality.

On the left side of the panel, select Marks and Bleeds. Check All Printer’s Marks and Use Document Bleed Settings. Click Export. You will have a ready-to-print PDF file.

Great Job! You’ve Finished Your Wedding Menu Template!
In this tutorial, we learned how to make a wedding menu template in InDesign. We covered key tools that will help you create a ready-to-edit menu design. Today, we learned to:
- set up a ready-to-print InDesign menu template
- organize and create different layers
- use paragraph styles to create a template
- export a PDF file for printing
If you are new to InDesign and need menu layout ideas or menu design templates right away, head over to Envato Elements and GraphicRiver. We’ve got many options to explore!
If you liked this tutorial, you might like these:
 Flyers42 Best InDesign Template TutorialsLaura Keung
 Flyers27 Best Flyer Design Ideas Using a Flyer Maker (With Photo)Nona Blackman
 Invitation DesignHow to Create a Marble Wedding Invite in Adobe InDesignGrace Fussell
 Adobe InDesign19 New InDesign Templates Creatives Must Have in Their ArsenalMelody Nieves
 Fan ArtHow to Create an Alice in Wonderland Inspired Afternoon Tea Invite in Adobe InDesignGrace Fussell
 Adobe InDesignHow to Make a Restaurant Menu Template in InDesignLaura Keung
{excerpt}
Read More