A beautifully designed resume can spell the difference between securing that interview or being tossed onto a pile of overlooked applications. While a jazzy design might be appropriate for some creative roles, most employers will be looking for a CV that’s pleasant to look at and easy to read.
Here we’ll create a timeless resume design with a minimal, pared-back style in Adobe InDesign. Once you’ve created the layout, you can also easily customise the color scheme and fonts to adapt the resume to any job application.
If you’re looking for a different resume design, you’ll find CV templates in a range of easy-to-edit styles on GraphicRiver and Envato Elements.
 ResumesWhat is the Difference Between a CV vs Resume?Charley Mendoza
 ResumesHow to Design a Creative ResumeGrace Fussell
 Resumes50+ Professional Resume & CV TemplatesGrace Fussell
What You’ll Need to Create Your CV
Less is more when it comes to resumes. All you will need is two legible, professional fonts—one sans serif to use for subheadings, and one serif to use for your name and the body text.
To recreate the design pictured here, you’ll need to download and install the following fonts:
To add contact icons to your design, you can download this social media icons bundle too.
1. How to Establish a Grid for Your CV
Before you start designing your resume, it’s really important to establish a grid for the page, to help you guide the placement of text. Here, we’ll use guides to create a two-column grid.
Step 1
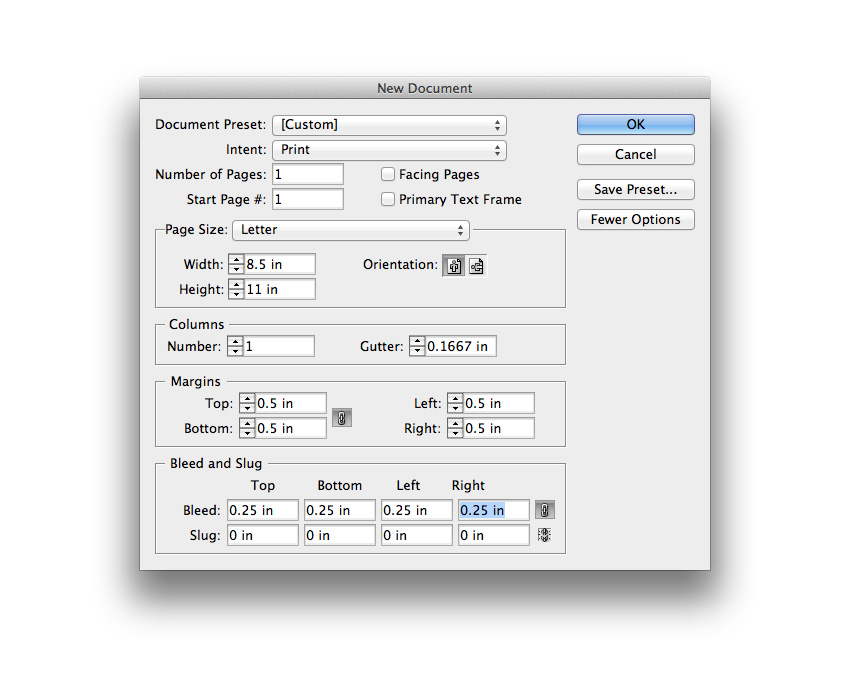
Open up Adobe InDesign and go to File > New > Document.
With the Intent set to Print, uncheck the Facing Pages box, to create a single sheet document.
From the Page Size menu, choose Letter*.
Add a Bleed of 0.25 in and click OK to create your new document.
* This is the standard US resume size. For Europe, Australia, and elsewhere, A4 tends to be the standard size. You can adapt the page size and position of the grid lines, described below, accordingly.
Step 2
Structuring your layout around a grid will be key to making this classic resume look really professional.
First up, make sure the rulers are visible (View > Show Rulers).
Then drag out a vertical guide from the left-hand ruler. In the Controls panel at the top of the workspace, you’ll be able to see the X position of the guide as you drag it across. Bring this first guide along to X:1.08 in.

Step 3
Drag out two more vertical guides to X:2.89 in and X:3.29 in.

Then drag another out to X:7.5 in.

Step 4
From the horizontal ruler running along the top, drag down three guides to Y:1.5 in, Y:2.01 in, and Y:3.16 in.

Drag down one more guide to Y:9.52 in.

Step 5
Expand the Layers panel (Window > Layers), and double-click on the Layer 1 name. In the Options window that opens, rename the layer Main Grid and click OK.

Choose New Layer from the panel’s drop-down menu (accessible at the top-right corner). Name this layer Type and click OK.

Lock the Main Grid layer so as not to disturb the position of your grid while you work.

2. How to Format Typography on Your CV
Paying attention to the details of your text formatting will ensure that your resume will really shine.
Step 1
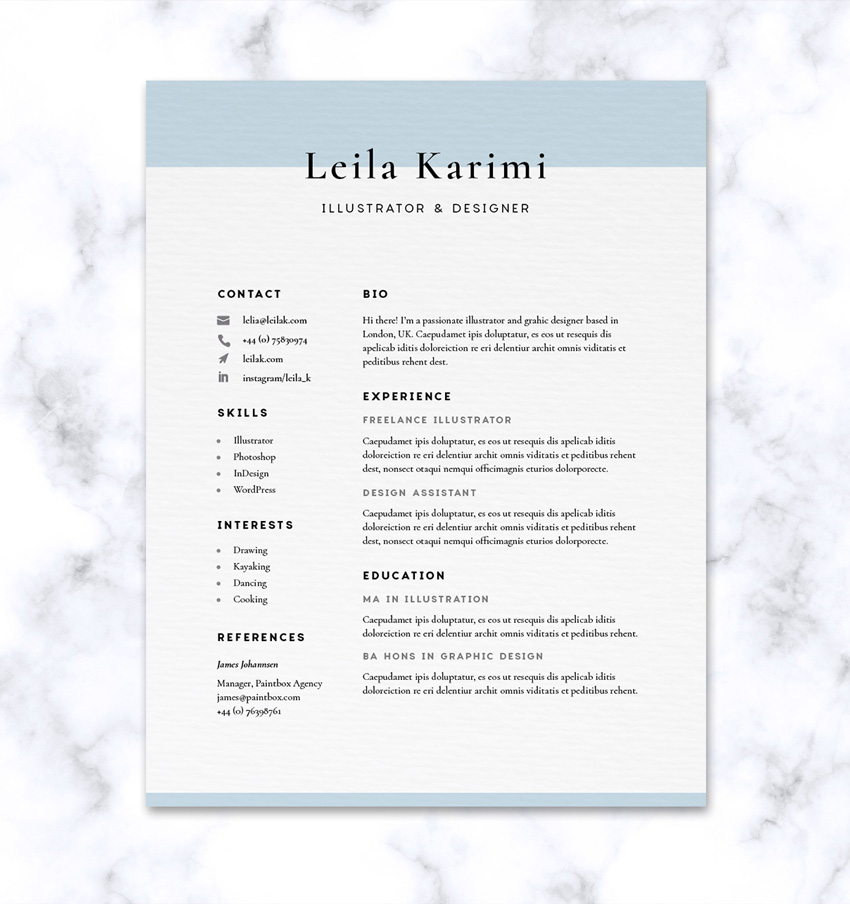
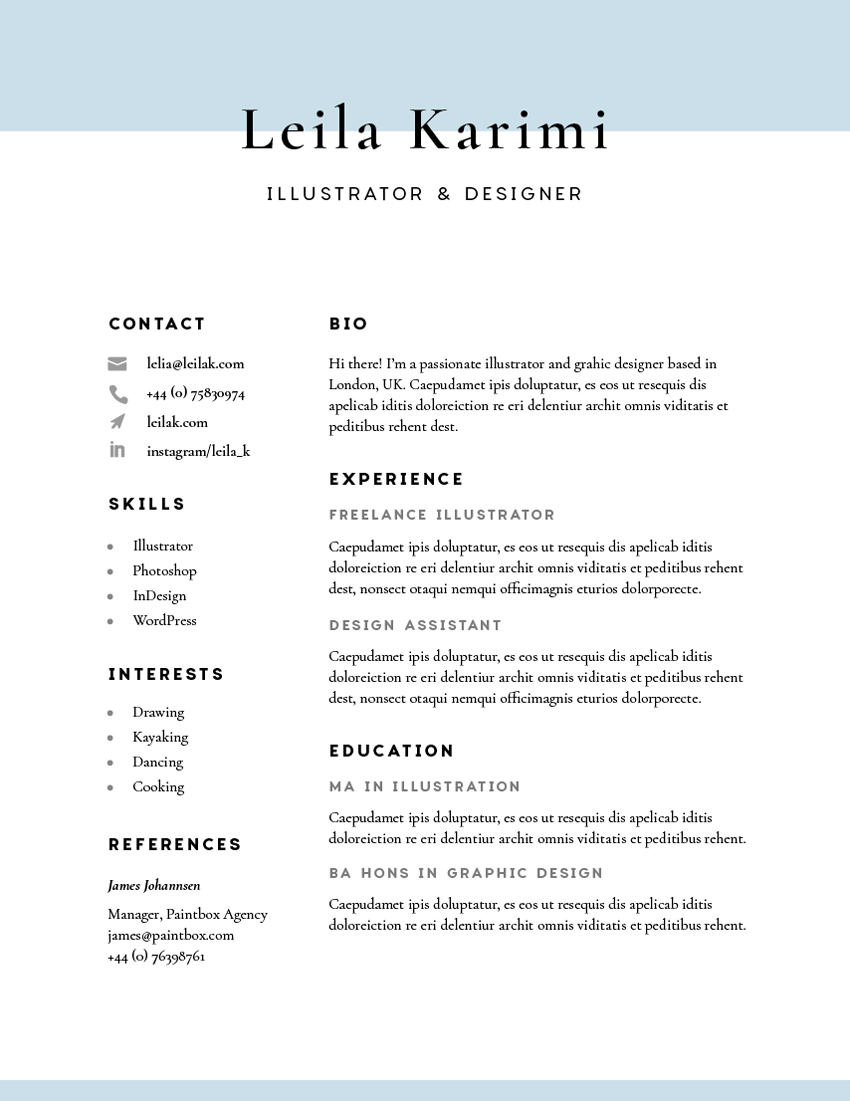
Zoom into the top of your resume. Take the Type Tool (T) and drag onto the page to create a text frame. Type in your name and allow the baseline of the text to sit on the top horizontal guide.
From the Character panel (Window > Type & Tables > Character), set the Font to Cormorant SemiBold, Size 45 pt. Increase the Tracking (letter-spacing) to 90.
From the Paragraph panel (Window > Type & Tables > Paragraph), adjust the text to Align Center.

Step 2
Take the Type Tool (T) again and create a text frame below the first, resting the baseline on the next guide down.
Type in your role (e.g. ‘Illustrator and Designer’) and set the Font to Charlevoix Pro Regular, Size 13 pt, Tracking 100 and flush the text to Align Center. From the Character panel’s main menu (at top-right), choose All Caps.

Step 3
Now it’s time to start building up sub-headings and sections on your resume. Create a text frame that fits snugly underneath the next horizontal guide down, and against the third vertical guide, as shown below.
Type in ‘BIO’ and set the Font to Charlevoix Pro Bold, Size to 12 pt, and Tracking to 140.

Create a larger text frame below the first, with a little spacing between the two. Type in your bio text, setting the Font to Cormorant Regular, Size to 11 pt, and Leading (line-spacing) to 15 pt.

Step 4
Return to the Layers panel and create a New Layer above Type, naming it Line Spacing Grid. On this layer you can place extra guides to help you space out the sections of text evenly.

Step 5
Lock the Type layer to avoid disturbing the text frames.
Drag three guides down from the top ruler to mark out the baseline of the ‘BIO’ sub-heading and the top and bottom of the body text frame.
Select all three guides and Edit > Copy, Edit > Paste, before dragging them down to sit below the text frames.

Then unlock the Type layer and Copy and Paste the two bio text frames, moving them to fit onto the guides you’ve just created.

Step 6
You can edit the sub-heading of this copy to read ‘EXPERIENCE’. To create another sub-heading for the job title, delete the body text frame, and create a text frame with the job title set in Charlevoix Pro SemiBold, Size 10 pt, Tracking 140.
From the Swatches panel (Window > Color > Swatches), you can adjust the Tint of the default [Black] color of the text, bringing it down to around 65%.

Copy and Paste the body text frame under ‘BIO’, above, and move below this tinted sub-heading.

Step 7
Bring down two more guides to mark out the baseline of the tinted sub-heading and the top of the body text frame beneath it.

Select and Copy all the guides marking out the ‘EXPERIENCE’ section…

… and move them below, resting the top guide in the group over the baseline of the body text frame.

Copy and Paste the tinted sub-heading and body text frame, moving this below, using the guides to position it accurately.

Step 8
Use two guides to mark out the spacing between the ‘BIO’ and ‘EXPERIENCE’ sections.

Then select all the guides which mark out the spacing, as well as the position of all the sub-sections under ‘EXPERIENCE’, and Copy them.

Move them below, sitting the top guide of the group on the baseline of the last line of body text.

Then Copy and Paste all the text frames from the Experience section, moving them below.

Adjust the pasted sub-heading to read ‘EDUCATION’, and edit the tinted sub-headings and body text to list your qualifications and details about them.

Step 9
With the text frames in the large column now formatted, you can start working on the sections in the left-hand, narrow column. This is a great place to put smaller items of info that need to be found by the interviewer quickly and easily, like contact details and references.

Copy and Paste the ‘BIO’ sub-heading and body text frame below, moving them over to the top of the left-hand column, and reducing the length to fit inside it, as marked out by the two vertical guides.
Edit the text to read ‘CONTACT’, and in the text frame below, type in your email address, phone number, etc. Increase the Leading (line-spacing) of the text to around 20 pt, to visually separate each line.

Step 10
Reduce the width of the body text frame so that there’s a little space available to the left side of the frame. Here you can place some optional icons to make the contact section more memorable and easy to read at a glance.
Switch to the Rectangle Frame Tool (F) and drag onto the page, creating a small frame to the left of the top line.

Go to File > Place and choose one of the vector icons from the icons bundle you downloaded earlier. Click Open, and allow it to fill the frame.
If the icons are set to a black color, you can pare down the boldness of them by selecting the image frame and going to Object > Effects > Transparency. Bring the Opacity down to around 40%.

Place more icons down along the length of the ‘CONTACT’ section.

Step 11
Select the two guides marking out the spacing between the ‘BIO’ and ‘EXPERIENCE’ sections, and Copy them.

Paste them, moving them down to mark out the same spacing between the ‘CONTACT’ section we’ve just created and the next section down, which is going to be ‘SKILLS’.

Edit the ‘SKILLS’ text to read a list of skills, like software you can use, for example.

Step 12
Highlight the list of skills you’ve typed up, and click on the Bulleted List icon in the top Controls panel to add bullet points to the list.

You can edit the look of the bullets by going to the menu at the top-right corner of the workspace (under the search bar) and clicking Bullets and Numbering.

In the window that opens, choose New Character Style from the Character Style drop-down menu.

From here, you can format the style of your bullets.

To create a very simple tinted bullet style, click on Character Color in the window’s left-hand menu. Bring the Tint of the [Black] swatch down to 60%, and click OK. Then click OK again to exit the window.


Step 13
Copy the two guides marking out the spacing between the ‘CONTACT’ and ‘SKILLS’ sections, and Paste them, moving them to sit below the ‘SKILLS’ section.

Copy and Paste the ‘SKILLS’ section, and move it below, editing the text to read ‘INTERESTS’.

Step 14
You can also add a ‘REFERENCES’ section below interests.
Try setting the name of the reference in Cormorant Bold Italic to create a bit of hierarchy.


3. How to Add a Touch of Color to Your CV
Step 1
Create a new layer sandwiched between Main Grid and Type. Name it Color, and lock all other layers.

Step 2
Take the Rectangle Tool (M) and drag across the top of the page, extending the shape up to the top, left and right edges of the bleed, and halfway down the name text below.

Step 3
Expand the Swatches panel (Window > Color > Swatches) and choose New Color Swatch from the panel’s drop-down menu (at top right).
Name the swatch Baby Blue, and set the Color Type to Process and Mode to CMYK. Adjust the percentage levels below to C=33 M=9 Y=9 K=0. Click Add and then OK.

Apply the Baby Blue swatch to the Fill Color of the rectangle shape.

Step 4
With the rectangle selected, head up to Object > Effects > Transparency. Bring the Opacity down to 80% to create more of a watermark effect.

Step 5
Copy and Paste the rectangle, moving it down to the bottom of the page.
Reduce the height of the rectangle so that only a small margin of color can be visible along the bottom edge.

Your CV design is finished—great work!

All that’s left for you to do is export it ready for printing. Read on to find out how…
4. How to Export Your CV for Printing
Note: These steps show you how to export your resume for professional printing. This is recommended if you want to print your CV to a high standard. If you’d rather print from a home printer, you can go straight to File > Print in InDesign.
Step 1
Go to File > Export.
In the window that opens, choose Adobe PDF (Print) from the Format drop-down menu, and hit Save.
In the Export Adobe PDF window, select [Press Quality] from the Adobe PDF Preset menu at the top.

Step 2
Click on Marks and Bleeds in the window’s left-hand menu.
Check All Printer’s Marks and Use Document Bleed Settings, before clicking Export at the bottom.

Ta-dah! Your CV is now ready for sending straight off for printing.

Conclusion: Your Finished CV
Awesome job—your resume’s ready to be sent off in the post. Fingers crossed you’ll get that interview!
In this tutorial you’ve picked up a range of handy print design skills you can apply to other print projects. You now know how to work with advanced grids and section spacing, and how to format type to a high standard.
If you’re looking for more resume templates, you can find easy-to-edit professional styles on GraphicRiver and Envato Elements.

{excerpt}
Read More