
In this tutorial you will learn how to turn your ordinary photos into energetic, rock blast photos. I will try to explain everything in so much detail that everyone can do it, even those who have just opened Photoshop for the first time.
The effect shown above is the one I will show you how to create here in this tutorial. If you would like to create the effects shown below, a rock blast with rain and rain splashes, and just using a single click, then check out my Dark Knight Photoshop Action.

What You’ll Need
To recreate the design above, you will need the following photo:
1. Let’s Get Started
First, open the photo that you want to work with. To open your photo, go to File > Open, choose your photo, and click Open. Now, before we get started, just check a couple of things:
- Your photo should be in RGB Color mode, 8 Bits/Channel. To check this, go to Image > Mode.
- For best results, your photo size should be 1500–3500 px wide/high. To check this, go to Image > Image Size.
- Your photo should be the Background layer. If it is not, go to Layer > New > Background from Layer.

2. How to Create the Background
Step 1
In this section, we are going to create the background that will replace the original one. Go to Layer > New Fill Layer > Solid Color to create a new solid color fill layer, name it Background Color, and set the color to #262626 as shown below:

Step 2
Now we need to add some texture to the background. Go to Layer > New > Layer to create a new layer and name it Background_Texture_1.

Step 3
Press D on your keyboard to reset the swatches and go to Filter > Render > Clouds.

Step 4
Now press Control-T on your keyboard and set Width and Height of the layer to 150% as shown below:

Step 5
Change this layer blending mode to Overlay, and set its Opacity to 25%.

Step 6
Now go to Layer > New > Layer to create a new layer and name it Background_Texture_2. Then press D on your keyboard to reset the swatches and go to Filter > Render > Clouds. After that, press Control-T on your keyboard and set the Width and Height of the layer to 150% as shown below:

Step 7
Change this layer blending mode to Hard Light, set its Opacity to 50%, and drag it just below the Background_Texture_1 layer in the Layers panel.

Step 8
Now, while the Background_Texture_2 layer is selected, Control-click on the Background_Texture_1 layer to select both layers together. Go to Layer > New > Group from Layers to create a group from the selected layers, and name it Background Textures.

Step 9
Set the Opacity of this group to 59%.

3. How to Cut the Subject From the Background
Step 1
In this section, we are going to select the subject and cut it from its original background. Select the Background layer and hide all other layers except this one. Then go to Select > Color Range and, using the Eyedropper Tool, click anywhere over the yellow background of the photo and set the Fuzziness to 100 as shown below:

Step 2
Now press Control-Shift-I on your keyboard to inverse the selection, Right-click on the currently selected layer and choose Duplicate Layer to duplicate it. Then drag this new layer to the top of the Layers panel, go to Layer > Layer Mask > Hide Selection, name it Subject, and show all layers.

Step 3
Alt-click on the currently selected layer mask to open mask view, choose the Brush Tool (B), pick a soft brush, and brush where needed so the subject area is completely white and the background area is completely black. After you’ve finished, Alt-click on this layer mask again to close mask view.

Step 4
Now Right-click on the currently selected layer mask and choose Apply Layer Mask.

4. How to Adjust Subject Lighting and Contrast
Step 1
In this section, we are going to work on subject lighting and contrast. Press Control-J on your keyboard to duplicate the Subject layer, go to Filter > Other > High Pass, and set the Radius to 20 px as shown below:

Step 2
Now press Control-Shift-U on your keyboard to desaturate this layer, change its blending mode to Overlay, set its Opacity to 87%, and name it Subject Contrast.

Step 3
Select the Subject layer, press Control-J on your keyboard to duplicate it, and drag this new layer to the top of the Layers panel. Then go to Filter > Other > High Pass and set the Radius to 30 px as shown below:

Step 4
Now press Control-Shift-U on your keyboard to desaturate this layer, change its blending mode to Screen, set its Opacity to 82%, and name it Subject Highlights.

Step 5
While this layer is selected, go to Image > Auto Tone and then Image > Auto Contrast to apply some automatic adjustments to this layer. Then Right-click on this layer, choose Blending Options, and use the settings below:

5. How to Create Rocks
Step 1
In this section, we are going to create rocks that we are going to disperse in the next section. Select the Subject layer, press Control-J to duplicate it, and drag this new layer to the top of the Layers panel. Then hide all other layers except this one, go to Filter > Pixelate > Crystallize, and set Cell Size to 30 as shown below:
Step 2
Now press Control-Shift-U to desaturate this layer, and go to Image > Auto tone and Image > Auto Contrast to apply some automatic adjustments to it. Then go to Select > Color Range and, using the Eyedropper Tool, click anywhere over your subject to make a selection of parts with the selected tonal range and set Fuzziness to 5. Then go to Select > Select and Mask and use the settings below:

Step 3
Select the Subject layer and press Control-J on your keyboard to create a new layer using a selection. As this is the first rocks layer we have created, name it R_1.

Step 4
Now we are going to create more rocks layers, so we are just going to repeat the same process. Select the Subject copy layer again, and go to Select > Color Range. Using the Eyedropper Tool, click anywhere over your subject to make a selection of parts with the selected tonal range, and set Fuzziness to 5. Then go to Select > Select and Mask and use the settings below:

Step 5
Select the Subject layer and press Control-J on your keyboard to create a new layer using a selection and name it R_2.

Step 6
Now you can repeat this same process as many times you want, depending on how many rocks layers you want to create. I have repeated this process 13 times more, so I have 15 rocks layers in total. For some parts I was changing Shift Edge settings to 50%, but feel free to change any Select and Mask and Color Range settings as well.

Step 7
Right-click on the Subject copy layer and choose Delete Layer. Then select the R_1 layer and Shift-click on your last rocks layer (in my case this is the R_15 layer) to select all rocks layers. Then go to Layer > New > Group from Layers to create a new group from the selected layers, and name it Rocks.

Step 8
Now select the Subject layer, press Control-J on your keyboard to duplicate it, and then drag this new layer to the top of the Layers panel. Show this layer, go to Filter > Pixelate > Crystallize, and set Cell Size to 50 as shown below:
Step 9
Now press Control-Shift-U to desaturate this layer, and go to Image > Auto tone and Image > Auto Contrast to apply some automatic adjustments to it. Then go to Select > Color Range and, using the Eyedropper Tool, click anywhere over your subject to make a selection of parts with the selected tonal range, and set Fuzziness to 5. Then go to Select > Select and Mask and use the settings below:

Step 10
Now select the Subject layer and press Control-J on your keyboard to create a new layer using a selection. As this is the first large rocks layer we have created, name it LR_1.

Step 11
You can repeat this same process as many times you want, depending on
how many large rocks layers you want to create. I have repeated this process
13 times, so I have 14 rocks layers in total. For some parts I was changing Shift Edge settings to 50%, but feel free to change any Select and Mask and Color Range settings as well.

Step 12
Now Right-click on the Subject copy layer and choose Delete Layer. Then select the LR_1 layer and Shift-click on your last large rocks layer (in my case this is the LR_14 layer) to select all large rocks layers. Then go to Layer > New > Group from Layers to create a new group from the selected layers and name it Large Rocks.

Step 13
Select the Subject layer, Control-J
on your keyboard to duplicate it, and drag this new layer to
the top of the Layers panel. Show this layer, go to Filter > Pixelate > Crystallize, and set Cell Size to 80 as shown below:
Step 14
Now press Control-Shift-U to desaturate this layer, and go to Image > Auto tone and Image > Auto Contrast to apply some automatic adjustments to it. Then go to Select > Color Range and, using the Eyedropper Tool, click anywhere over your subject to make a selection of parts with the selected tonal range, and set Fuzziness to 5. Then go to Select > Select and Mask and use the settings below:

Step 15
Select the Subject layer and press Control-J on your keyboard to create a new layer using a selection. As this is the first very large rocks layer we have created, name it VLR_1.

Step 16
You can repeat this same process as many times you want, depending on
how many very large rocks layers you want to create. I have repeated this process 9 times, so I have 10 rocks layers in total. For some parts, I was changing Shift Edge settings to 50%, but feel free to change any Select and Mask and Color Range settings as well.

Step 17
Right-click on the Subject copy layer and choose Delete Layer. Then select the VLR_1 layer and Shift-click on your last rocks layer (in my case this is the VLR_10 layer) to select all very large rocks layers. Then go to Layer > New > Group from Layers to create a new group from the selected layers and name it Very Large Rocks.

Step 18
Now, to make this part look more like rocks, Right-click on the R_1 layer, choose Blending options, check Bevel & Emboss, and use the settings below:

Step 19
Go to Layer > Layer Style > Copy Layer Style to copy this layer style, and then select each of the rocks layer and go to Layer > Layer Style > Paste Layer Style to paste this layer style to every rocks layer. Feel free to use the Control and Shift buttons to make multiple selections and paste this style to more rocks layers at once.

Step 20
Now Right-click on the each of rocks layers and choose Rasterize Layer Style. Feel free to use Control and Shift buttons to make multiple selections and rasterize the layer style of more rocks layers at once.

Step 21
Select each of the rocks layers and press Control-Shift-U to desaturate it. Then show all layers again.

6. How to Disperse Rocks
Step 1
In this section, we are going to disperse rocks that we have created. Select the R_1 layer, press Control-T on your keyboard, and change Width and Height to 114% as shown below:

Step 2
Now you can repeat this method to transform as many rocks layers as you want. Feel
free to use different transforming values. Here is my result:

Step 3
To add some depth to the effect, we are going to blur some of the rocks layers. Select one of the rocks layers and go to Filter > Blur > Gaussian Blur, and set the Radius to 5 px as shown below:

Step 4
You can repeat this method to blur as many rocks layers as you want. Feel
free to use different gaussian blur settings. Here is my result:

Step 5
Now we are going to make some final changes to the rocks by moving some of them, removing unnecessary rocks, and duplicating some of the layers to create more rocks.
- If you would like to move some rocks, select that rocks layer, choose the Move Tool (V), and click and drag anywhere inside the canvas to position them as you like.
- If there are some rocks you would like to remove, select that rocks layer and go to Layer > Layer Mask > Reveal All to add a blank layer mask to this layer. Then while the layer mask is selected, choose the Brush Tool (B), pick a soft brush, set the foreground color to
#000000, and brush over the rocks you want to remove. - If you would like to transform some rocks, select that rocks layer, press Control-T on your keyboard, and change the Width and Height to transform them as you like.
- If you would like to blur some rocks, select that rocks layer, go to Filter > Blur > Gaussian Blur, and set the Radius as you like.
Here is my result:

Step 6
Select the Rocks group and then Control-click on the Large Rocks and Very Large Rocks groups to select all rocks groups at once, and then drag them to the top of the Layers panel.

7. How to Add Lighting and Focus
Step 1
In this section, we are going to work on overall lighting and focus. Select the Rocks folder, go to Layer > New > Layer to create a new layer, and name it Darken Edges.

Step 2
Now press D on your keyboard to reset the swatches, go to Edit > Fill, and set Contents to Foreground Color, Blending to Normal, and Opacity to 100% as shown below:

Step 3
Press Control-A to make a selection of the canvas, and go to Layer > Layer Mask > Hide Selection to create a layer mask that hides the selected area of the layer. Then click on the link icon between this layer thumbnail and the layer mask to unlink them.

Step 4
Now, while this layer mask is selected, press Control-T on your keyboard and set the Width and Height to 89% as shown below:

Step 5
While the current layer mask is still selected, go to Filter > Blur > Gaussian Blur and set the Radius to 180 px as shown below:

Step 6
Set the Opacity of this layer to 83%, and then go to Layer > New > Layer to create a new layer and name it Light Source.

Step 7
Now press D on your keyboard to reset the swatches, go to Edit > Fill, and set Contents to Foreground Color, Blending to Normal, and Opacity to 100% as shown below:

Step 8
Press Control-A to make a selection of the canvas, and choose the Marquee Tool (M). Right click anywhere inside the canvas, choose Transform Selection, and set the Reference Point Location to top middle and Height to 50%.

Step 9
Now go to Layer > Layer Mask > Reveal Selection to add a layer mask that reveals the selected part of the layer, Right-click on it, and choose Apply Layer Mask. Then go to Filter > Blur > Motion Blur, set Angle to 90 and Distance to 1450 px as shown below:

Step 10
Right-click on this layer, choose Blending Options, check Gradient Overlay, and use the settings below:

Step 11
Change this layer Opacity to 50% and Fill to 0%.

Step 12
Now select the Subject layer, Right-click on it, choose Blending Options, check Gradient Overlay, and use the settings below:

Step 13
Select the Subject Highlights layer and set its Opacity to 31%.

8. How to Make the Final Adjustments
Step 1
In this section, we are going to make final adjustments to the design. Select the Light Source layer, press D on your keyboard to reset the swatches, go to Layer > New Adjustment Layer > Gradient Map to create a new gradient map adjustment layer, and name it Overall Contrast.

Step 2
Change this layer blending mode to Overlay and set its Opacity to 41%.

Step 3
Now go to Layer > New Adjustment Layer > Levels to create a new level adjustment layer and name it Overall Brightness.

Step 4
Double-click on this layer thumbnail, and inside the Properties panel enter the settings below:

Step 5
Now go to Layer > New Fill Layer > Solid Color to create a new solid color fill layer, name it Overall Color, and set the color to #455665 as shown below:

Step 6
Change this layer blending mode to Color, and then go to Layer > New Adjustment Layer > Saturation to create a new saturation adjustment layer and name it Overall Saturation.

Step 7
Double-click on this layer thumbnail and inside the Properties panel enter the settings below:

Step 8
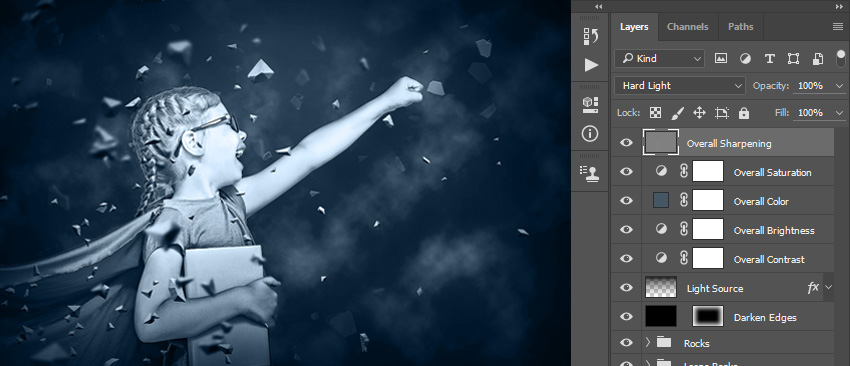
Now press Control-Alt-Shift-E on your keyboard to make a snapshot and press Control-Shift-U to desaturate this layer. Then go to Filter > Other > High Pass and set Radius to 2 px as shown below:

Step 9
Change this layer blending mode to Hard Light and name it Overall Sharpening.
You Made It!
Congratulations, you have succeeded! Here is our final result:

If you would like to create an even more advanced rock blast with a rain and rain splashes effect as shown below, and just using a single click, then check out
my Dark Knight Photoshop Action.
{excerpt}
Read More