
In this tutorial we’ll be creating a designer character at work, sitting at his desk and drawing on a tablet. In order to maintain a trendy flat style, we’ll be using a lot of basic geometric shapes, combining and transforming them with the help of Warp Effects, Pathfinder panel, Shape Builder Tool and other useful instruments that actually help us to create an illustration without using the graphic tablet and don’t require any outstanding drawing skills.
As you can see in the image below, we can actually add some more objects of the interior to our illustration, making it more detailed. Check out the expanded version of the Hipster Designer illustration on Envato Elements, where you’ll find additional elements and alternative color versions!

So let’s start!
1. How to Create a Table in Adobe Illustrator
Step 1
Let’s start by making a tabletop. Take the Rounded Rectangle Tool and create a 540 x 10 px light-brown shape with rounded corners.
We can adjust the Corner Radius of the shape if we select it with the Direct Selection Tool (A) and then either set the desired value (5 px) in the control panel on top or by dragging the circle marker of the Live Corners manually.
Copy the shape and Paste in Front (Control-C > Control-F). Make the new shape shorter (450 x 10 px) by moving its left edge to the right. Make its Fill color a bit lighter.

Step 2
Now let’s grab the Pencil Tool (N) and create a simple wooden texture on the table. Double-click the Pencil Tool (N) to adjust the settings and start to draw flowing wavy lines across the light-brown part of the tabletop.
Select all the lines, Group (Control-G) them and set the Weight to 1 px in the Stroke panel (Window > Stroke). Edit the Stroke color of the lines in the Color panel, making them slightly darker than the tabletop.

Step 3
Now let’s hide the unneeded tips of the lines with a Clipping Mask.
Duplicate (Control-C > Control-F) the light-brown shape of the tabletop and Bring to Front (Shift-Control-]).
Set the Fill and Stroke color of the top shape to None and select it together with the lines. Click the right mouse button and Make Clipping Mask. Here you go! Now all the lines are hidden inside the top shape.
Do the same for the darker part of the tabletop.

Step 4
Let’s proceed to the table-legs. Take the Rectangle Tool (M) and create two dark-grey 12 x 85 px pillars under the left side of the tabletop.
Duplicate (Control-C > Control-F) both shapes, make them darker and shrink them, moving the bottom side up, thus forming a shadow from the tabletop.
Duplicate the pillars again, hold Alt, and shrink the shapes to make them narrower. Pull the bottom edge down to make the legs taller (7 x 215 px).

Step 5
Create a 100 x 10 px rounded rectangle at the bottom of the table-legs. Duplicate it and make the top copy lighter and shorter (80 x 20 px), thus adding some dimension to our flat image.

Step 6
Group (Control-G) all the parts of the table-legs, hold Alt-Shift, and drag the shape to the opposite side of the table, making a copy.
Great work! Our table is ready. Let’s move on!

2. How to Make a Flat Computer & Graphics Tablet
Step 1
Let’s start by making a monitor. Grab the Rounded Rectangle Tool and let’s make a 135 x 85 px shape with 10 px Corner Radius.
Copy the shape and Paste in Front twice (Control-C > Control-F > Control-F). Move the top shape to the right, using the Right Arrow key or by dragging it with the Selection Tool (V) while holding down Shift.
Now select the top shape and the one beneath it. Take the Shape Builder Tool (Shift-M), hold down Alt, and hover the mouse over those parts we need to delete. Click the unwanted pieces, leaving only a narrow stripe at the left edge of the rectangle. Make the shape a bit lighter, forming a highlight.

Step 2
Now that the display is ready, let’s add a stand. Use the Rectangle Tool (M) to make a 45 x 55 px rectangle, slightly darker than the display.
Select the top right anchor point with the Direct Selection Tool (A) and make the corner rounded, setting its Radius to about 15 px.

Step 3
Duplicate (Control-C > Control-F) the stand and move the copy far to the left. Select both shapes and use the Shape Builder Tool (Shift-M) while holding Alt to delete the top shape and the piece where both copies overlap.
Add a highlight to the stand as we did for the display in Step 1.

Step 4
Place a dark-grey rectangle on the monitor, making a shadow from the stand. Press Control-[ a few times to Send the shape Backward.
Use the Rectangle Tool (M) to place a 60 x 5 px shape at the bottom of the stand. Make its left corners fully rounded.
Finish the computer by decorating it with a 20 x 20 px circle label with the help of the Ellipse Tool (L). Hold down Shift while making a circle to make it even.

Step 5
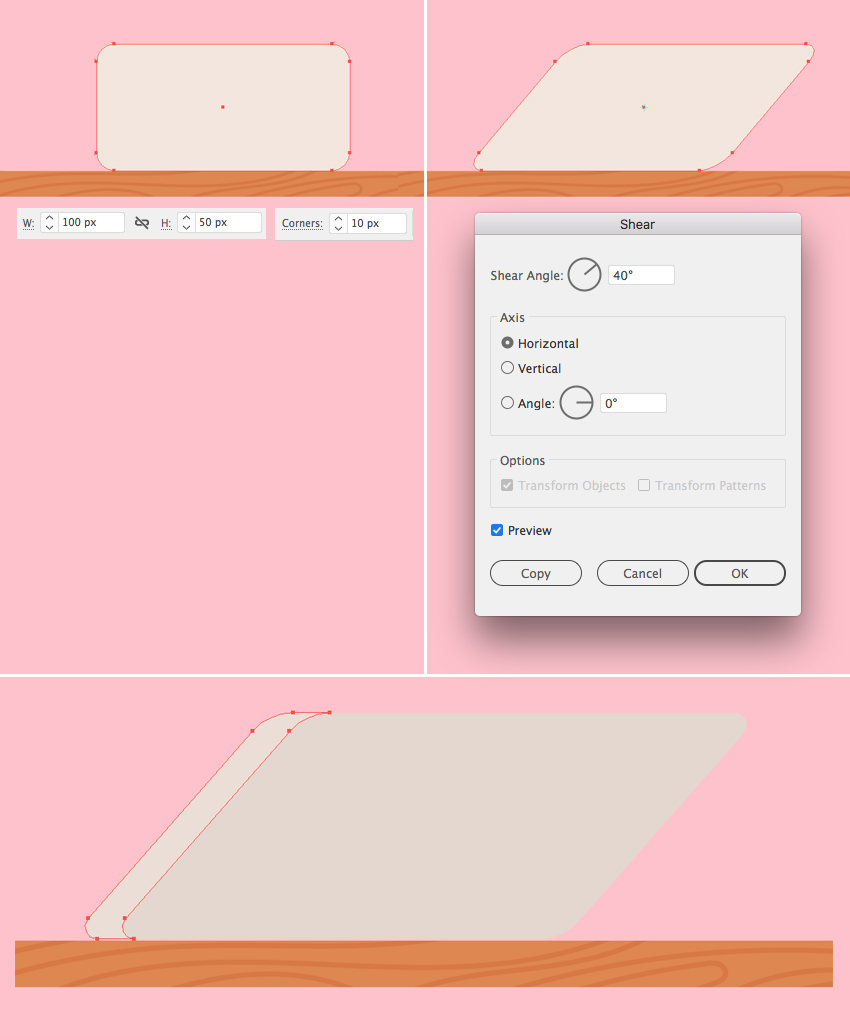
Now let’s depict a graphics tablet. Start by making a 100 x 50 px rounded rectangle with 10 px Corner Radius.
Keeping the shape selected, double-click the Shear Tool (you can find it in the same drop-down menu as the Scale Tool (S)) and set the Shear Angle to 40 degrees. Click OK to apply the changes.
Make a lighter stripe for the highlight on the left edge of the shape.
Step 6
Now let’s make a thin stand. Take the Rectangle Tool (M) and create a 60 x 33 px shape with dark-grey thin Stroke and no Fill.
Select the bottom anchor points with the Direct Selection Tool (A) and hit Enter to open the Move window. Set the Horizontal Position to 10 px, Vertical to 0 px and click OK to move the bottom edge of the shape to the right.

Step 7
Keeping the bottom anchor points selected with the Direct Selection Tool (A), make the corners 8 px rounded. Finish the tablet by adding a squashed elliptical label to its center.
Looks like the devices are finished! Let’s move on!

3. How to Draw a Flat Coffee Mug
Step 1
Let’s make a cup from a rectangle. Create a 32 x 25 px green shape. Make its top corners slightly rounded, and then move to the bottom corners and set the Radius to 9 px.
Create a light-green highlight on the left edge of the mug.

Step 2
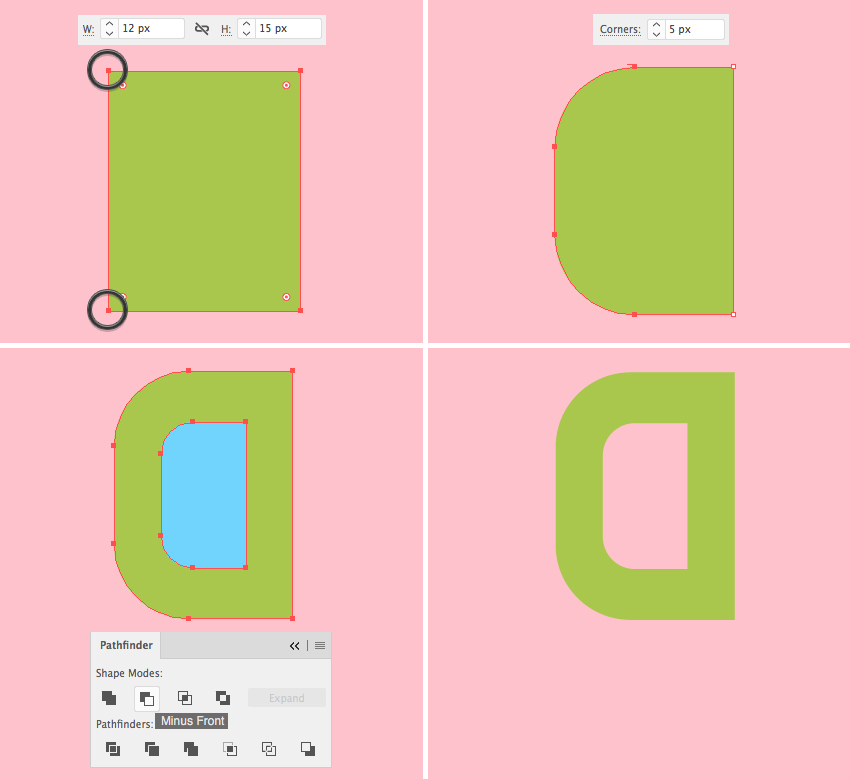
Let’s add a handle. Create a 12 x 15 px rectangle. Select its top and bottom left anchor points with the Direct Selection Tool (A) and make the corners 5 px rounded.
Duplicate (Control-C > Control-F) the shape, hold Alt-Shift and make the copy smaller. Select both shapes and use the Minus Front function of the Pathfinder to cut the top shape out, making a hole in the center of the handle.
Step 3
Attach the handle to the mug and Send to Back (Shift-Control-[). Finish the mug by adding a small narrow rectangle to its bottom edge.

4. How to Create a Flat Book
Step 1
Let’s create a 67 x 12 px dark-grey rectangle and make its left corners fully rounded. Go to Object > Path > Offset Path and set the Offset value to 2 px. Make the outer shape slightly lighter.
Duplicate the smaller shape twice (Control-C > Control-F > Control-F) and fill both copies with white color. Move the top copy to the right, making it overlap the right edge of the book.

Step 2
Select both the top copy and the larger light-grey shape and use Minus Front function of the Pathfinder to cut out a hole in the grey shape.
Make the tips of the book cover rounded.

Step 3
Use the Pen Tool (P) or the Line Segment Tool (\) and hold down Shift to make straight horizontal lines for the paper sheets. Hide the unwanted pieces inside the Clipping Mask as we did with the wooden texture of the tabletop.
Make a subtle shadow by duplicating the paper shape and moving it to the right. Delete the unwanted piece with the help of the Shape Builder Tool (Shift-M) while holding Alt.
And there we have it! Our book is ready!

Step 4
Now we can place all the objects on the table. You can add some more books if you like, and vary their size and colors.

5. How to Draw a Flat Hipster Character
Step 1
Let’s start with the head. Make a 50 x 80 px rounded rectangle. Set the Corner Radius of its top corners to 19 px and the bottom corners to 23 px.
Use the Rounded Rectangle Tool and the Ellipse Tool (L) to add eyes, brows, and nose to the face.

Step 2
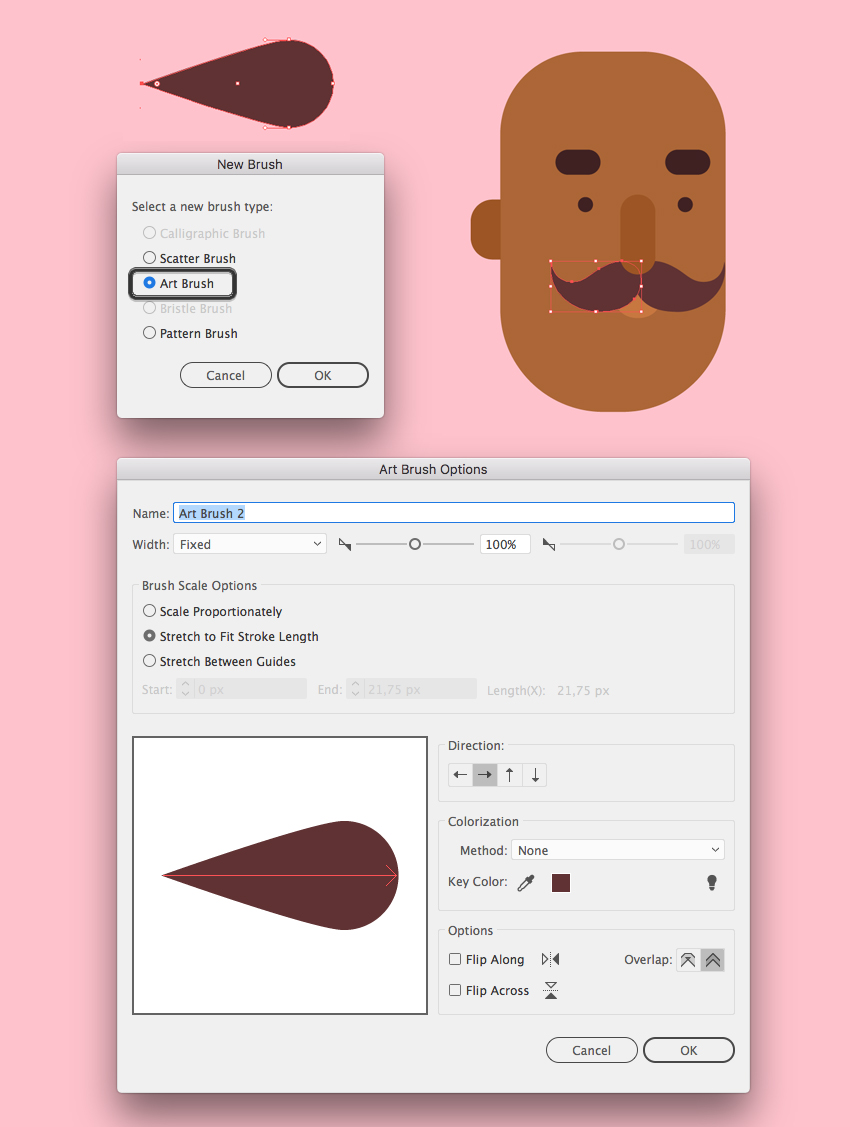
Now let’s create a brush to draw a hipster mustache! Start by making a small circle of about 10 x 10 px size. Select its left anchor point with the Direct Selection Tool (A) and drag it far to the left. Convert selected anchor point to corner from the control panel on top.

Step 3
Drag and drop the created shape to the Brushes panel (Window > Brushes) and make an Art Brush. Leave all the options as default. You can always return to this Options window by double-clicking the brush in the Brushes panel to adjust the settings.
Now take the Paintbrush Tool (B) and draw a curled mustache. Adjust the Stroke Weight if needed and Object > Expand Appearance of the shape once you’re happy with it. Press Control-[ a few times to place the mustache beneath the nose.
Step 4
Now let’s add some hair. Copy the head shape and Paste in Front twice (Control-C > Control-F > Control-F). Move the top copy down and to the right, as shown in the image below (the blue shape).
Select the top copy and the one beneath it and apply the Minus Front function in the Pathfinder panel. Fill the remaining shape with the same dark-brown color as we have for the mustache.
The sideburn is way too long, so let’s trim it. Take the Eraser Tool (Shift-E), hold Alt, and cut off the bottom part.

Step 5
Now let’s draw the beard, using the same technique. Duplicate the face shape twice and move the top copy up and to the right. Use the Minus Front function to get rid of the unneeded part. Make the beard darker than the hair.

Step 6
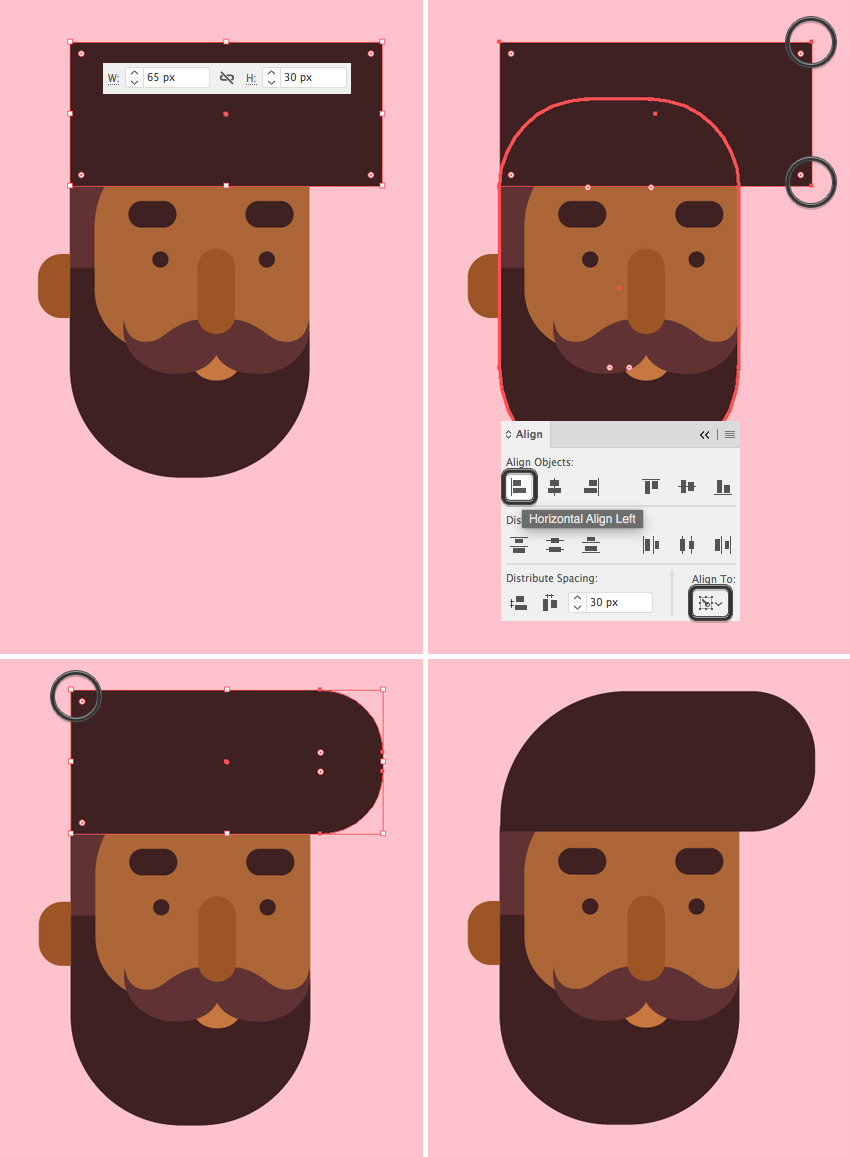
Let’s style our character’s hair. Take the Rectangle Tool (M) and make a 65 x 30 px dark-brown rectangle. We can use the Eyedropper Tool (I) to pick the color from the beard.
Let’s use the Align panel to attach the left edge of the hair to the left side of the head. Select both the hair shape and the head and click the head once again to make it a Key Object (you will see a thicker selection around it). Click Horizontal Align Left to align the hair to the head.
Select the top and bottom right corners of the hair with the Direct Selection Tool (A) and make them fully rounded.
Finally, select the top left anchor point and make this corner rounded as well.
Step 7
Now that the head is ready, let’s move on to the body! Start by making a shirt from a 70 x 135 px dark-blue rectangle. Double-click the Shear Tool and set the Shear Angle to 20 degrees. Make the corners 20 px rounded.

Step 8
Add a small dark-brown rectangle with a rounded bottom for the neck. Add a larger pink rounded rectangle for the neckband. Press Control-[ to place it beneath the neck shape.

Step 9
Now let’s form the arms. Create a rectangle of about 17 x 96 px size. It doesn’t have to be of exactly the same height; just make sure that it fits between the top edge of the shirt and the top edge of the table.
Select its bottom left anchor point and make the corner fully rounded, forming an elbow. Duplicate the created shape and rotate it 90 degrees while holding Shift.
Add a small circle for the fist and hide it beneath the drawing tablet.

Step 10
Create a white stylus from a narrow rectangle with rounded corners. Rotate it and place in the character’s hand.
Let’s add a sleeve to the top part of the arm. Duplicate the vertical element of the arm and use the Eraser Tool (Shift-E) while holding Alt to delete the bottom half of the copy. Fill the remaining shape with a bright pink color.
Let’s add the opposite arm. Select the vertical elements of the arm and double-click the Reflect Tool (O). Flip the shape over the Vertical Axis and click Copy. Attach the second arm to the body and Send to Back (Shift-Control-[), beneath the shirt.

Step 11
Duplicate the body shape and use the Eraser Tool (Shift-E) to delete the top part, leaving only a narrow piece under the table. Fill it with a darker color, depicting a shadow. Duplicate the new piece and erase again, filling the remaining part with dark-blue color for the jeans.

Step 12
Now let’s make the legs. Create a 23 x 130 px rectangle of a slightly lighter blue color. Select its top right anchor point and both bottom corners with the Direct Selection Tool (A) and make them fully rounded.
Add a smaller rectangle to the top part of the leg and make it fully rounded. This way we depict a bent knee.

Step 13
Duplicate the leg and use the Eraser Tool (Shift-E) to erase the copy from its top part, leaving only a small piece in the bottom. Fill it with brown skin tone color. Depict a rolled up trouser leg by adding a lighter blue rounded rectangle across the leg.
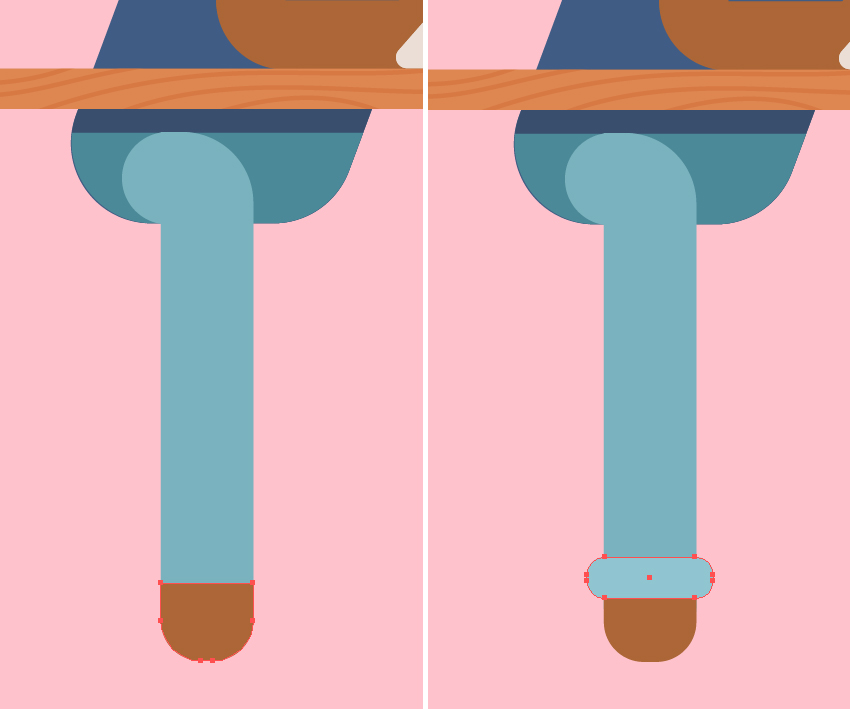
Step 14
Now let’s add a shoe. Start with a 40 x 20 px dark-blue rectangle, Send it to Back (Shift-Control-[) and attach it to the leg.
Make a 25 x 25 px white rectangle for the boot tip and attach it to the right edge of the dark-blue shape. Select its top corners and make them 12 px rounded.
Grab the Pencil Tool (N) and draw a few lines along the boot tip. Use the Clipping Mask to hide the unwanted pieces of the lines.
Finish the shoe by adding a narrow white rectangle in the bottom for the sole. Make its bottom left corner rounded and decorate the sole with a narrow dark-grey stripe.

Step 15
Now let’s add the second leg! Attach an 80 x 23 px rectangle to the bottom part of our character. Add a smaller rectangle of the lighter color on top, aligning it to the left edge of the previous shape.
Make the left corners of the new shape fully rounded.
Now let’s bend the leg in the knee by adding a rotated narrow rectangle. I just duplicated it from the first leg and used the Selection Tool (V) to rotate it to about 250 degrees, making it fit the knee area.

Step 16
Add a second shoe and make all the elements of the leg slightly darker, making the image a bit more three-dimensional.
Awesome! Looks like our character is finished. Let’s move to the final part of our tutorial.

6. How to Draw a Modern Chair
Step 1
Our character is still floating in the air, so let’s add a chair to make him sit comfortably.
Start by creating an 87 x 105 px brown rectangle for the back of the chair. Select its bottom left corner and hit Enter to open the Move window. Set the Horizontal Position value to 7 px, Vertical to 0 px, and click OK to move the anchor point 7 px to the right.
Repeat the same for the opposite anchor point, but this time set the Horizontal value to -7 px, moving the point to the left.
Finally, select both top corners and make them fully rounded.

Step 2
Keeping the shape selected, go to Object > Path > Offset Path and set the Offset value to -8 px. Select both shapes and click Minus Front to cut out a hole in the center.
Use the Eraser Tool (Shift-E) and hold down Alt to erase the bottom part of the frame.
Add three vertical wooden planks to the chair back, placing them beneath the frame (Shift-Control-[).

Step 3
Add the back of the chair and a wooden bottom. Decorate them with a simple wooden texture, using the same technique as we did for the wooden tabletop.

Step 4
Now we need to add a leg to our chair. I wanted to depict a tall chair like those in a bar. Use the Rectangle Tool (M) to form the elements, using the table legs as a reference for the shapes and colors.
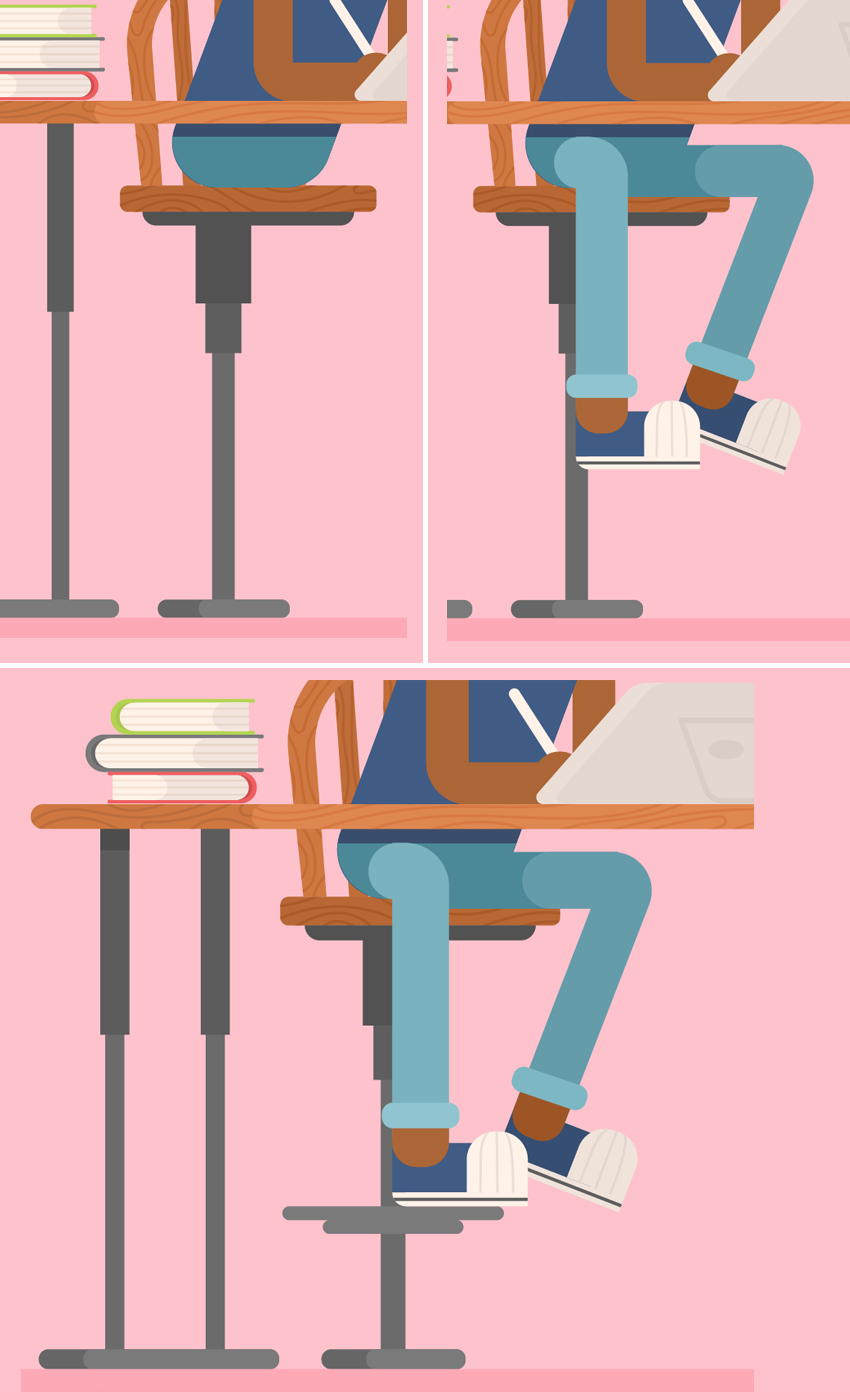
Awesome! Our Hipster Designer and His Creative Workspace Are Finished!
Great job! I hope you’ve enjoyed following this tutorial and discovered some new tips and tricks that will inspire you to create more flat style illustrations!

Don’t forget to download the Flat Hipster Designer Set on Envato Elements with all the additional elements and alternative blond character!
If you love to create flat characters and interiors, I have another interesting tutorial for you! Make sure you don’t miss this one:
-

How to Create a Cozy Flat Design Interior in Adobe Illustrator
Home Sweet Home! In this tutorial we’ll create the cozy atmosphere of a living room, designing a flat-style interior with a cute cartoon character sitting in…
Have fun!
{excerpt}
Read More