For Horror Movie Week, we’re turning some of your favorites into creepy tutorials right here on Envato Tuts+! I had the pleasure of creating a Frankenstein-inspired photo manipulation from the classic 1931 black and white film.
Learn how to create your own Frankenstein’s monster using Liquify, Adjustment Layers, and resources from Envato Market.
Tutorial Assets
The following assets were used during the production of this tutorial:
The Story
When scientist Henry Frankenstein decided to piece together a human body using various corpses, there was no telling what havoc his monstrosity would create. Born from the power of a lightning storm, Henry’s monster rises from the dead.
How does it end? Check out the movie to see, but for now let’s get started with our very own Frankenstein monster!
Gathering Inspiration From the 1931 Movie
As with any fan art, it’s important to keep track of notable details from the movie so you can incorporate them into your manipulation later.
Research your character through movie stills and posters to get a feel of what’s needed. Here are the details I recognize as the most important:
- Frankenstein’s monster is a beastly man with a large, square-shaped head.
- He has droopy eyes, a prominent brow bone, and a small mouth.
- Depending on your reference, Frankenstein’s monster has numerous scars on his face, staples across his forehead holding his head together, and two bolts in his neck.
- Though the original 1931 movie is filmed in black and white, Frankenstein is often portrayed with green skin. Keep in mind that green is a common color used to portray either death or a sickly state.
The Photo Reference
The base for Frankenstein’s monster will be this Male Portrait Stock because it’s very well lit and the angle of his face is similar to what I’ve seen from various movie posters and stills.
The other great thing about this photo is that the man’s face has great expression. Although it might seem almost comical in nature, his exaggerated expression is something I know I’ll be able to play with.

1. Remove the Facial Hair
Step 1
Don’t overlook the small details. The original monster is cleanly shaven, so we’ll have to replicate this look since our subject isn’t.
Open your reference image in Photoshop. To set this picture up for a higher resolution, go to Image > Image Size, and change the Resolution to 300 dpi. Next, use the Magic Wand Tool (W) to select and then Delete the white background. Create a New Layer and Fill it with white using the Paint Bucket Tool (G) to create a separate background. Then follow up by hitting Control-J to duplicate the layer and place the copy into its own Group.

Step 2
Now that we have the photo set up properly, it’s time to move on to the facial hair. The model only has a subtle five o’clock shadow, so we won’t have to do too much. Use the Stamp Tool (S) to clone pockets of skin without hair over his beard, mustache, and eyebrows.

Remove only as much hair as you’d like because a little texture will help in the long run. As you move on to the neck, it’s okay if you clone over some of the awkward bulge created by his head position. Just try not to overdo the skin retouching because we don’t want him to have that overly airbrushed look.
2. Manipulate the Face & Body
Step 1
With the hair mostly gone, let’s adjust the man’s face and head shape. Go to Filter > Liquify and use the Forward Warp Tool (W) to push the shape of his face around. Try to create a squarer head, prominent jawline, prominent brow bone, and angular cheekbones.

Step 2
Continue to push the face even further. Incorporate the Bloat Tool (B) and the Pucker Tool (S) into the mix. Use the Bloat Tool (B) to create a bigger nose and use the Pucker Tool (S) to make his lips smaller by focusing the tool on each individual lip. Return to the Forward Warp Tool (W) to emphasize the expression by pulling the corners of the mouth downward to create a scowl.

Step 3
There’s a lot of work that goes into his face before we get to the color. Next, use the Lasso Tool (L) to create a selection over both eyelids. Copy and Paste both lids onto New Layers and resize them using the Free Transform Tool (Control-T). Try to make his eyes look droopy by pulling his lids down further over his eyes.

Next, use the same techniques to create balance with his smile lines. Copy and paste a duplicate, and then flip the line by going to Edit > Transform > Flip Horizontal. Use the Eraser Tool (E) to erase any harsh lines.
Step 4
Let’s move on to his body. Using this Business Stock from Pixabay, use the Lasso Tool (L) again to create a selection over the man’s suit. Copy and Paste the suit onto the canvas and adjust it to fit Frankenstein’s monster using the Free Transform Tool (Control-T).

Using that same stock, create a selection over the subject’s brow bone and Copy and Paste it onto the monster. Adjust the brow to fit before finally Merging all of the monster’s layers together.
3. Add the Metal Details
Step 1
Don’t forget to add the monster’s metal details! Using the extraction method of your choice, extract the bolt from this Metal Bolt Stock and Rotate it to fit into his neck. Cut the bolt with the Rectangular Marquee Tool (M) if you need to make it shorter, and then create a Duplicate. Flip the copy and position it into place by going to Edit > Transform > Flip Horizontal.

Step 2
Now let’s add some bags under his eyes. Create a selection from this Eye Stock and Copy and Paste it onto the canvas. You may need to adjust the color slightly with Hue & Saturation before adjusting the Opacity to 60%. Use the Eraser Tool (E) at any point to remove any harsh edges.

Step 3
The last thing we need to add to the monster are the staples in his head. First I’ll use the Brush Tool (B) to create a quick sketch as a guideline for where I should place the staples.
Sometimes you have to get a little creative with your stocks. Here I made a selection on this Zipper Stock with the Polygonal Lasso Tool (L) and Pasted it onto the canvas. Create multiple duplicates of the staple and Rotate each one in different directions so that they don’t lie so perfectly on his head.

4. Color the Monster
Step 1
Take a deep breath because you’ve gotten past the hardest steps! Now let’s move on to the color. Select the monster layer and go to Image > Adjustments > Hue & Saturation. Adjust the Saturation to -60 to remove the warmth from his skin and make it paler.

Step 2
Now create a New Layer and Right-Click to set it as a Clipping Mask to the monster’s. This will help any color we add to apply only to him. Use a Hard Round Brush to paint the monster with a rich, medium brown color #9c5739. Set the layer to Color Burn and adjust the Opacity to 40%.
Create two more New Layers for more color tweaking. Paint the first layer with green #259a7f, set it to Vivid Light, and adjust the Opacity to 48%. For the second layer, paint dark green #0a1614 on only the suit, and set the Opacity to 24% and the Blend Mode to Multiply.

Next, color the staples. Set a New Layer as a Clipping Mask to the staples layer. Fill it with gray using the Paint Bucket Tool (G) and set the layer to Multiply.

Step 3
One of the best ways to get hold of the color is to use Adjustment Layers. Create a New Color Lookup Adjustment Layer with the following settings:

5. Add the Background
Step 1
Frankenstein’s monster doesn’t look so great on a white background, so let’s create something dark for the mood. First, set the Foreground Color to white and the Background Color to black. Create a New Layer underneath Frankenstein and go to Filter > Render > Clouds.

Please note, the color of the clouds render will appear green because of our previous Color Lookup adjustment. If you want to make the clouds darker, adjust the intensity with Levels and then Right-click to go to Blending Options. Add a Gradient Overlay with the following settings:

Step 2
To color the background even further, add a New Color Lookup Adjustment Layer with the following settings:

Step 3
Since Frankenstein’s monster was created with the power of a lightning bolt, it’ll be fun to incorporate some lightning into the scene. Use a Hard Round Brush to draw some white squiggly lines for lightning bolts on a New Layer. To make the lightning glow, go to Blending Options and add an Outer Glow with the following settings.

6. Add the Finishing Details
Step 1
The major parts of the photo manipulation are done, but we will need to add more details using digital painting techniques. Set New Layers as Clipping Masks to Frankenstein’s monster and change the Layer Blend Mode to Multiply.

Tackle all the shading, wrinkles, and darker tones first. Use the Brush Tool (B) to paint shadows onto the hair and underneath the brown bone, and black out the eyes. Carve out the structure of the face with angular shadows on the cheekbones and paint a dark shadow underneath the neck.
Step 2
Now use a smaller brush to draw fine lines for the wrinkles all over the skin. Emphasize the scarring over his cuts, the bags underneath his eyes, and all his expression lines.

When it comes to the scars along his neck and face, paint darker pockets of shadow in the middle and leave the sides lighter to create the appearance of depth. Then incorporate a Chalk Brush to add some grunge and texture to his face.
Step 3
If you want to incorporate some red into his face without appearing too gorey, use a veiny brush. Here I created my own by drawing a quick vein first before adding it to my Brush Presets. Set a New Layer to Multiply, adjust the Opacity to 10%, and use a bright red color to paint veins all over his face.

Add some more color onto his face by painting red onto a New Layer set to Overlay. Use a Soft Round Brush to concentrate red on his face and neck.
Step 4
To color Frankenstein’s monster’s metal details, clip New Layers to those base layers as we’ve done in similar steps. Set those layers to Multiply and use a combination of a Soft Round Brush and a Dry Brush to add the appropriate shadows according to the current light setup.

Step 5
Continue to add more quirky details to the monster. Emphasize his suit lapel and begin incorporating highlights into the scene.

Continue to paint more white and light green highlights onto the staples, scars, and wrinkles. The highlights will help instantly make Frankenstein’s monster appear more realistic by making his skin appear dead and on the verge of decomposing. Don’t forget to paint the white part of his eyes too. Show that he’s looking off into the distance to go along with his disgruntled look.
Step 6
Let’s do some more color tweaking before we finish this manipulation. First add a New Adjustment Layer of Levels and then follow up with Color Lookup to intensify the ghoulish color scheme.

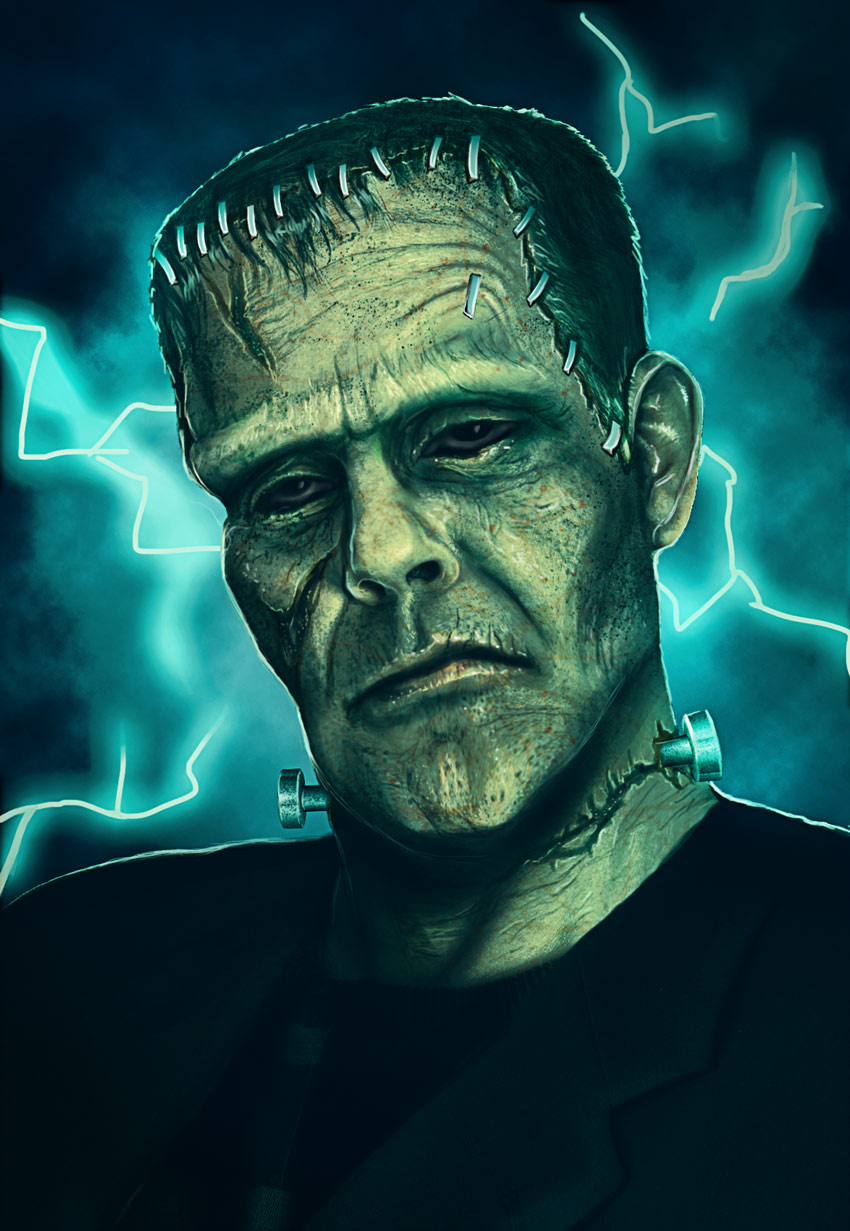
Almost done! If your art appears a little blurry, simply sharpen it a bit. Merge all the layers together. Create a duplicate of your final result by hitting Control-J, and then go to Filter > Other > High Pass, adjusting the Radius to 5 pixels. Set the altered copy to Overlay and lower the Opacity to 74%. Instantly the image is much sharper! Here is the final image below.

It’s Alive!!
The key to great photo manipulations is to plan them out before you tackle the photo. Try to foresee the changes you’ll need to make and adapt by skillfully utilizing Photoshop’s diverse tools.
Strengthen your digital painting skills by taking these manipulations on, and keep pushing the details until you’re happy with the results. I hope you’ve enjoyed this tutorial! If you need any help, feel free to ask any questions in the comments below. And for more photo manipulations, check out these tutorials:
- Create an Apocalypse-Inspired Photo Manipulation in Adobe Photoshop
- Create a Dory-Inspired Photo Manipulation in Adobe Photoshop
- How to Create a Dark Lady Photo Manipulation With Adobe Photoshop

{excerpt}
Read More