
In this
tutorial we will make a simple yet beautiful oriental pattern in Adobe
Illustrator. Various objects of Asian culture will be created with basic shapes
and then combined into a neat composition, forming a seamless pattern, that
will fit perfectly as a background for your blog, an ornamental wrapping paper
for your gift or a festive piece of fabric for clothing. Interested? Let’s get
started then!
1. Create Traditional Paper Lanterns
Step 1
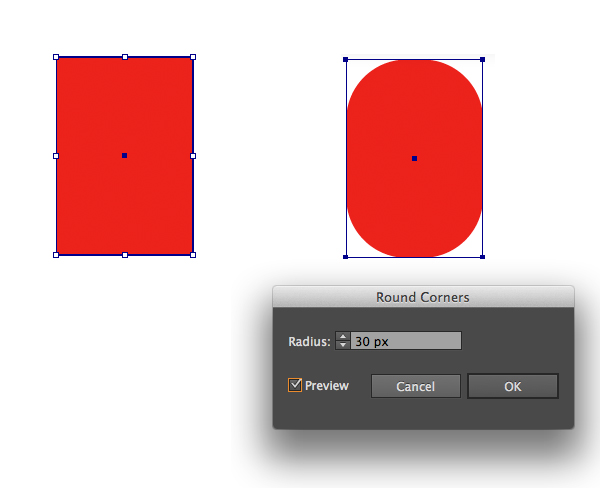
We’ll start
by forming the first element of our texture – a red paper lantern. Firstly,
make a rectangle using the Rectangle
Tool (M) and fill it with pure red color. Secondly, go to Effect > Stylize > Round corners
and set the Radius to approximately 30 px, to give our shape a lantern
look.
Step 2
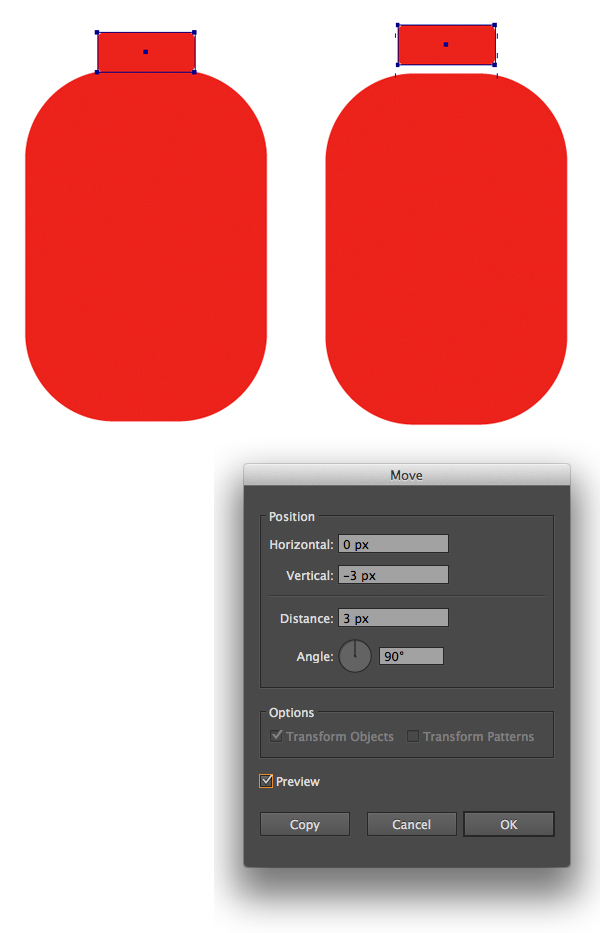
Add a small
rectangle on top of the basic lantern shape and press the Enter. Set the Vertical
value in the pop-up Move window to -3 px in order to separate the
rectangle from the lantern and to maintain our simple style.
Step 3
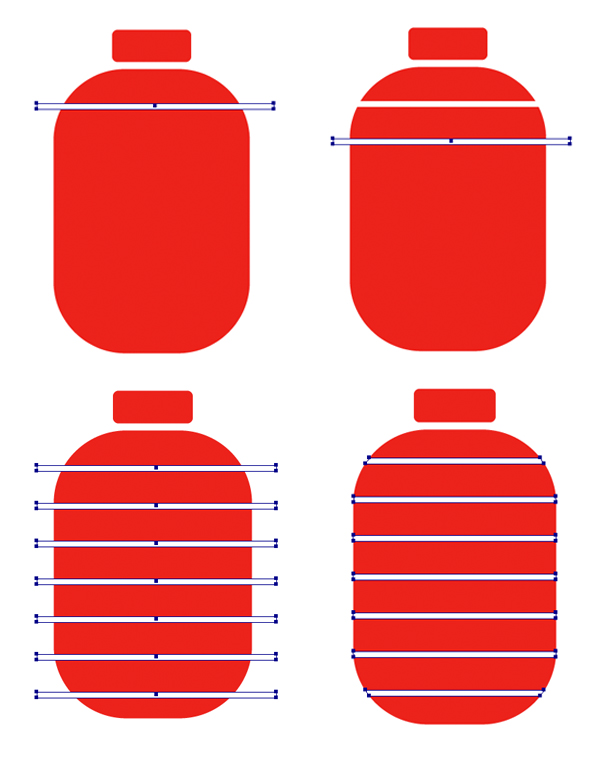
Add a thin
white stripe using the Rectangle Tool
(M) again, hold the Alt key and drag the stripe down a bit, so that we
get the copy of our first stripe. Hit the Control-D
combination a few times to repeat your last action, creating more copies. Use
the Shape Builder Tool (Shift-M) to
cut off those parts you don’t need.
Step 4
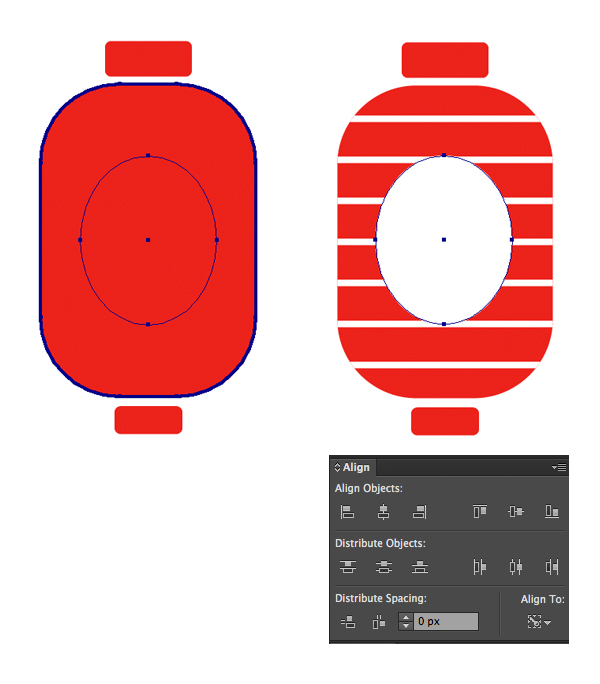
Let’s add a
white shape using the Ellipse Tool (L)
and put it into the center with the help
of the Align panel.
Step 5
Further, we
need to add a tiny handle on top of our lantern. Make an oval shape with the Ellipse tool (L). Set the stroke to 2px and switch it to red color. We
need only the upper arc of the ellipse, so we’ll use the Scissors Tool (S) to click
on side anchor points of the ellipse and break it apart. Then just delete
the unneeded part (blue on the screenshot). Check the Stroke options window to set the Cap and Corner to middle
positions (Round).
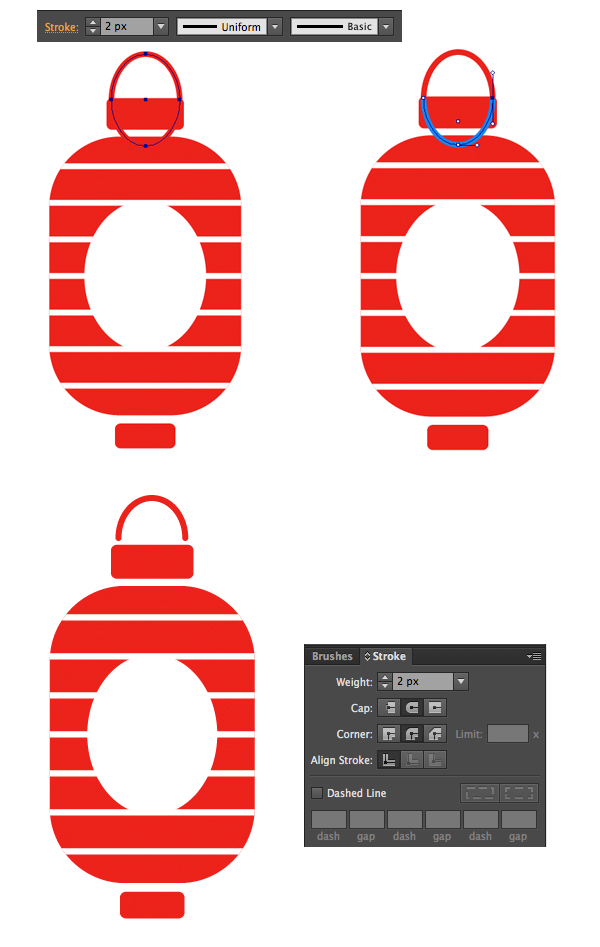
Step 6
Add a few
simple details to make our lantern more eye-catching. Add several stripes and
edit them using the Shape Builder Tool
(Shift-M). Put a red spot in the center of our lantern, so that it reminds
a Japanese banner.
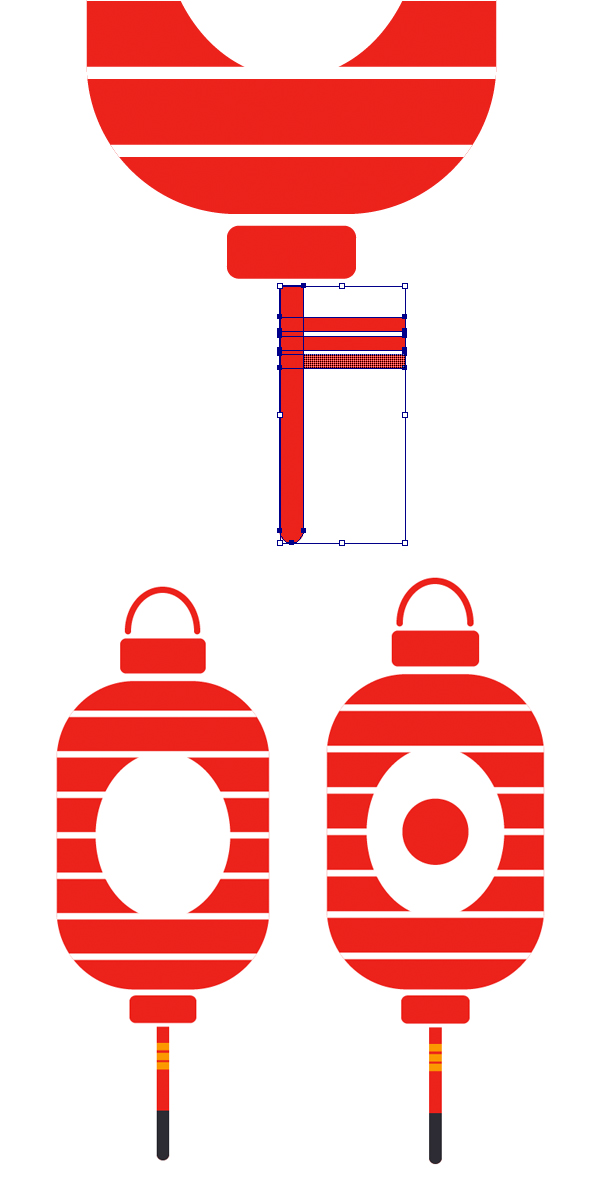
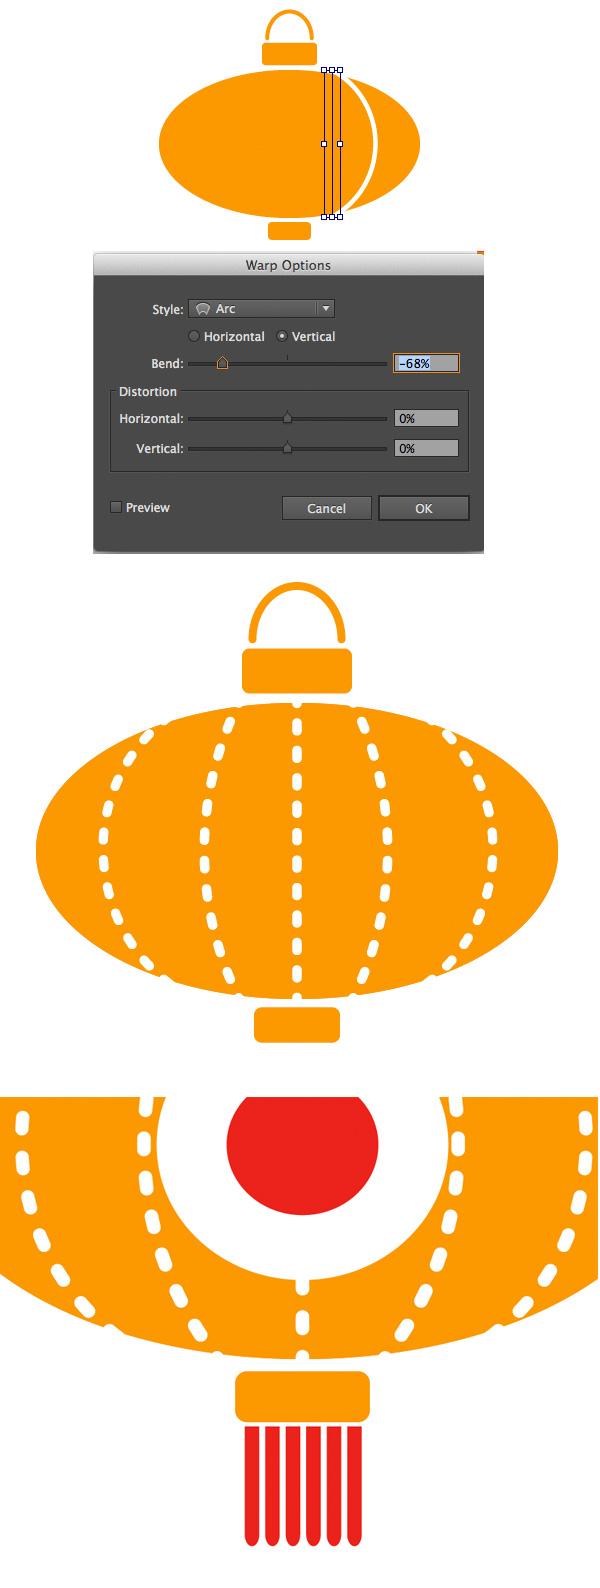
Step 7
Let’s form
a second lantern, but of the other shape. Make an ellipse and place a handle
from the red lantern. Add a thin white line using the Line Segment Tool (\) and go to Effect > Warp > Arc. Set the Bend slider to –68%. The
line will become arched, following the form of our lantern and making it more
dimensional. Make the line dashed using the Stroke panel and add the finishing touch by drawing a fringe in the bottom of our lantern.
Step 8
Vary the
length of the fringe elements and add a festive lace to the bottom of our
lantern.

2. Render
a Bamboo Fence
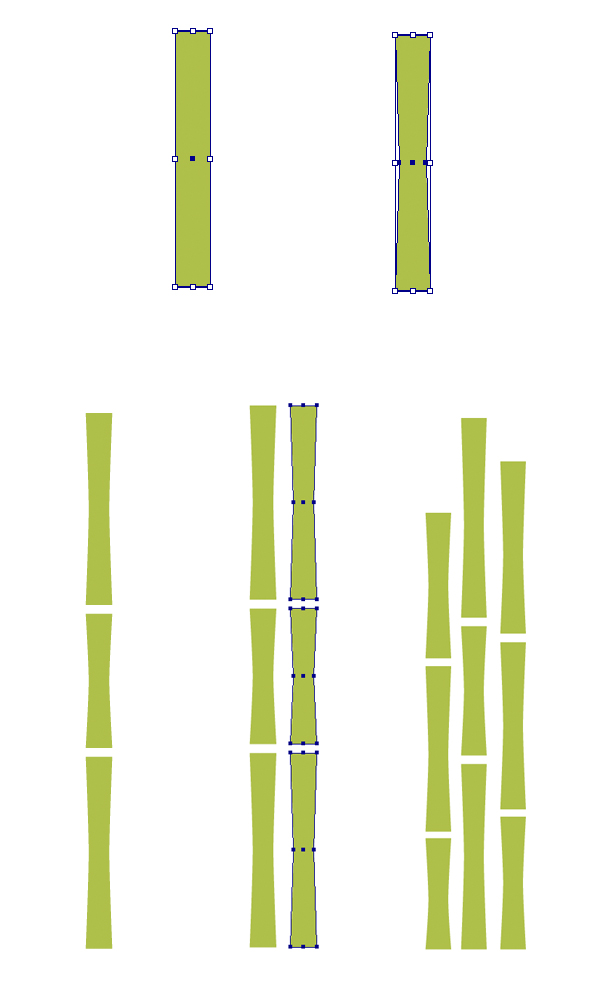
Step 1
An essential part of Asian
pattern is a bamboo. Let’s make one! Draw a shape using the Rectangle Tool (M) and transform it by
selecting the side anchor points with Direct
Selection Tool (A) and moving them closer to the center. Make several
copies of the bamboo and put the segments one above another. Duplicate the
column and form a fence by varying the height of separate segments.
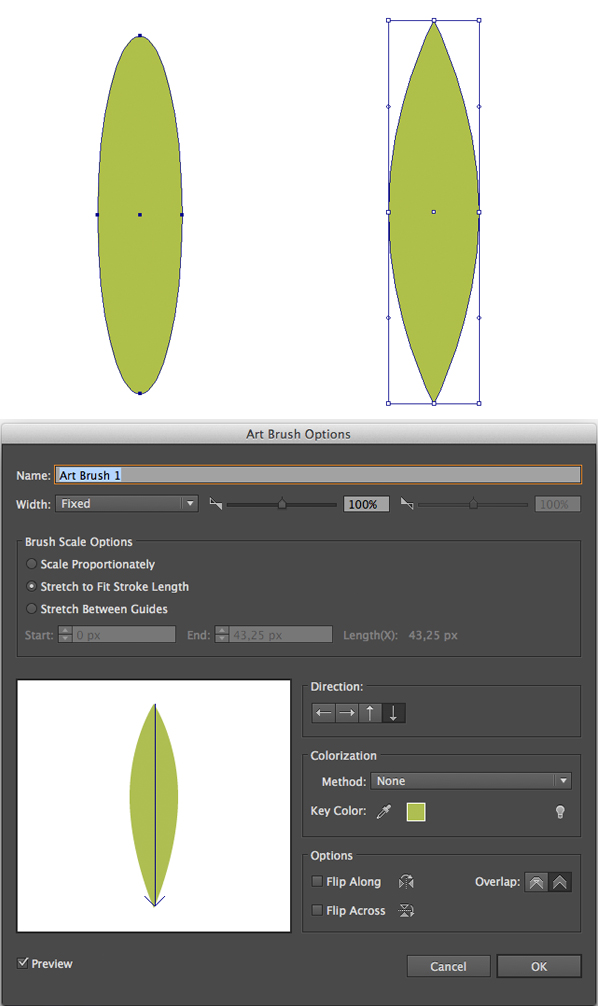
Step 2
Move on and
make a simple brush for the leaves. Draw an oval with the Ellipse Tool (L) and convert the upper and lower anchor points to
corner, making them sharp. Drag and drop the leaf to the Brushes panel and create the Art
Brush, leaving the settings as default.
Step 3
Grab the Paintbrush Tool (B) and draw a few
leaves around our fence.

3. Form a
Gentle Sakura Blossom
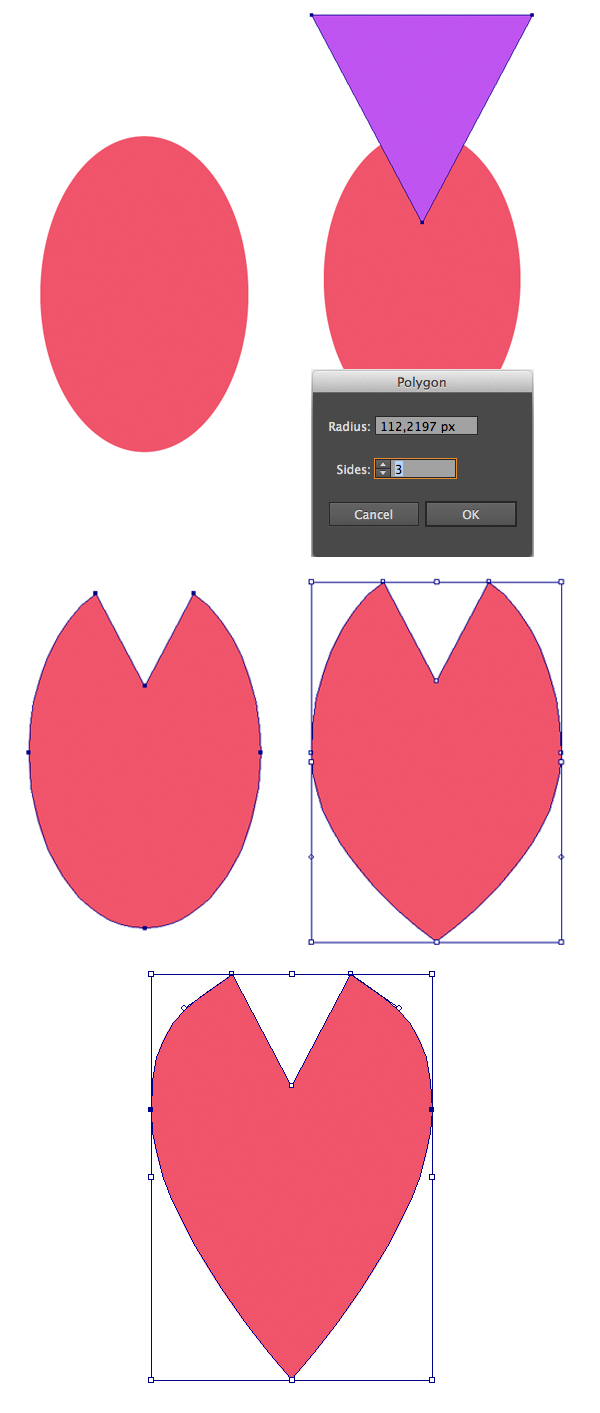
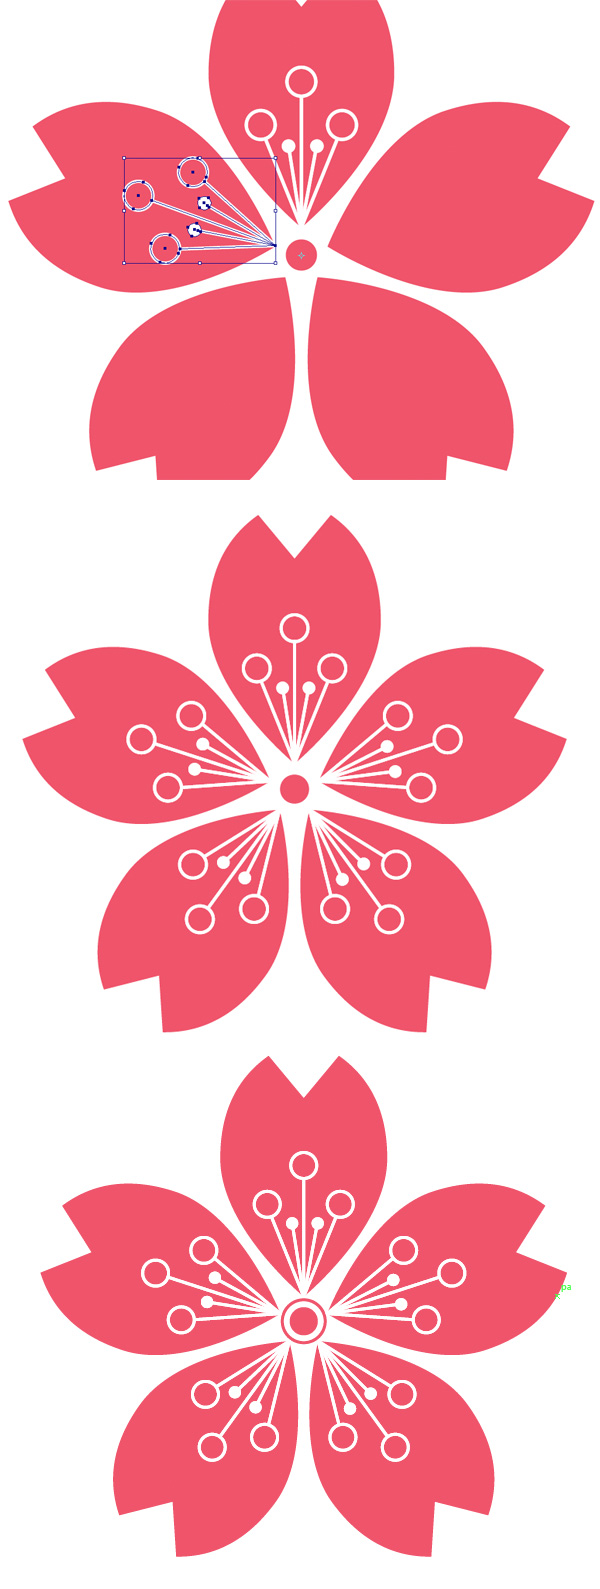
Step 1
Beautiful
eastern culture always reminds me of soft cherry petals. In order to make one, start
by forming a shape with the Ellipse Tool
(L). Cut off a segment from the ellipse by adding a triangle above the
shape and modifying it with the Shape
Builder Tool (Shift-M). Now we have something like a hoof-print. Convert
the lower anchor point to corner by clicking it with the Convert Anchor Point Tool (Shift-C). Finally, select both side
anchor points and move them up a bit, to make the upper part of the petal
wider.
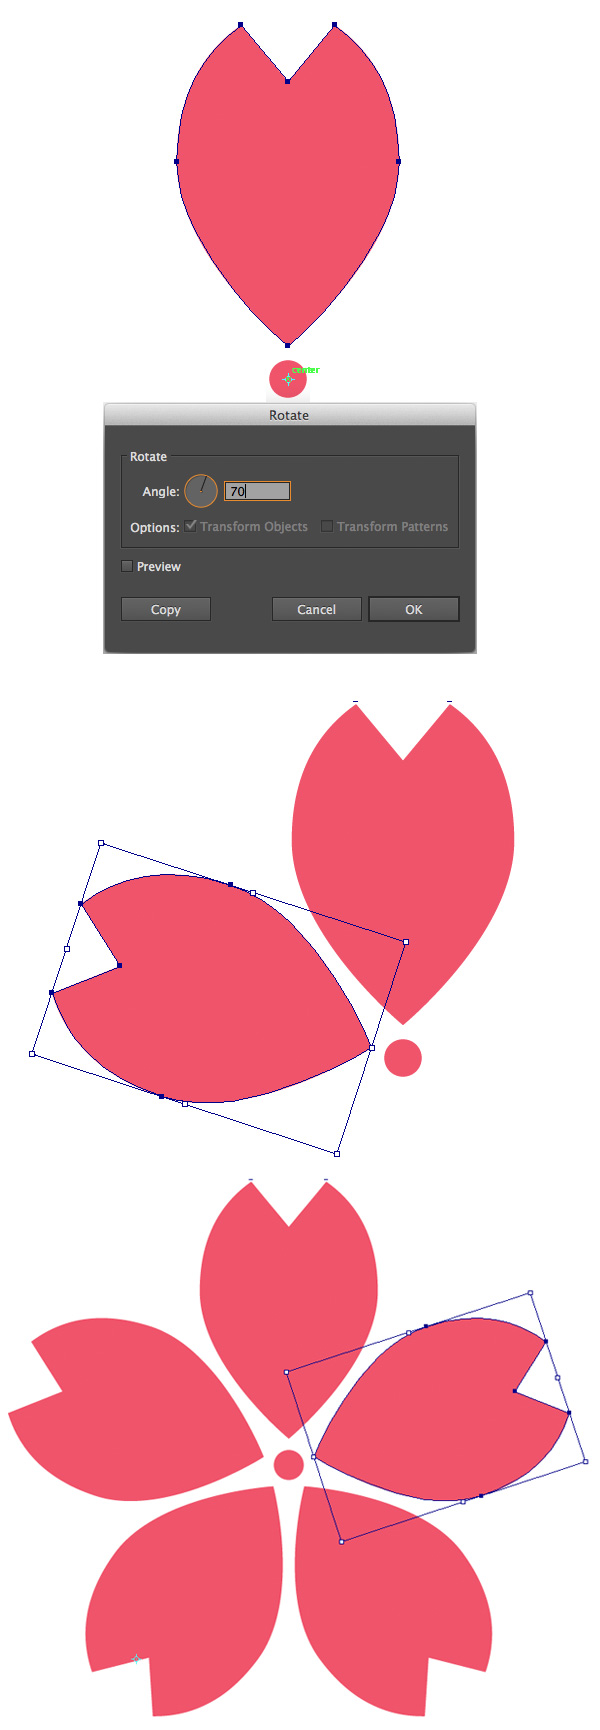
Step 2
Now we can
shape our petals into a nice cherry blossom. Add a small circle under the
petal. Take the Rotate Tool (R),
hold the Alt key and click into the
center of the circle. This will be our pivot point, over which we’ll be
rotating the copies of the petal. Release the mouse button, set the Rotate Angle to 70 degrees in the pop-up options window and hit the Copy button. Press Control-D several times to repeat the last action, thus forming a
flower.
Step 3
Add simple
details to make the flower more fancy. Draw several lines with Line Segment Tool (\) and decorate them
with circles.
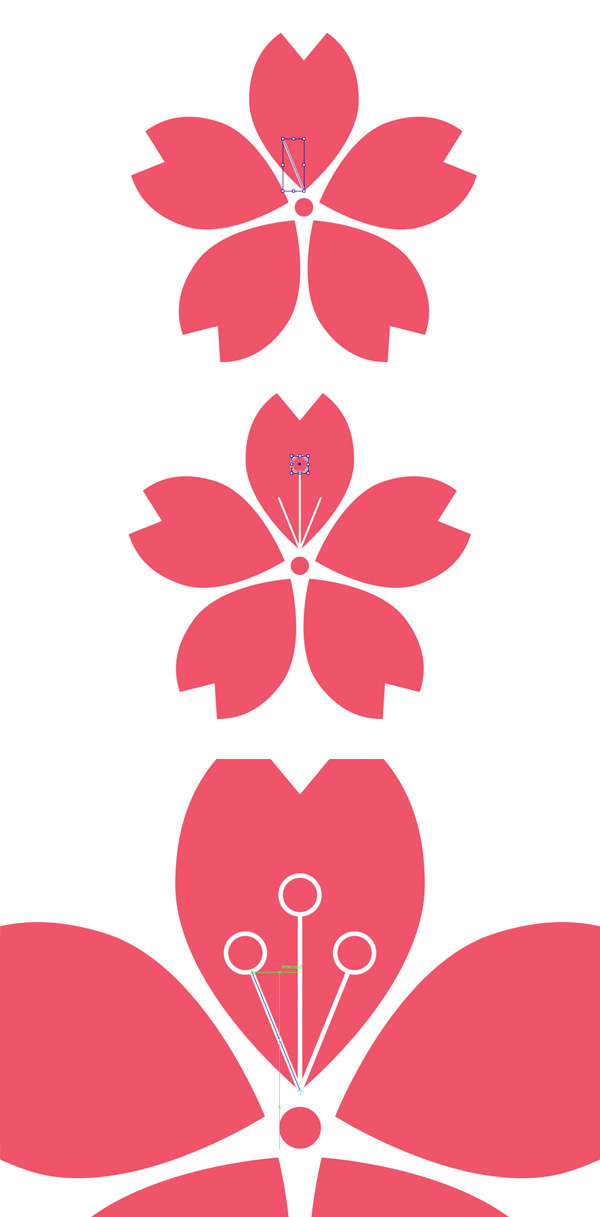
Step 4
Group the
created decorative elements and use the same trick with the Rotate Tool (R) to add them to every
petal.
4. Render an Ornate Red Fan
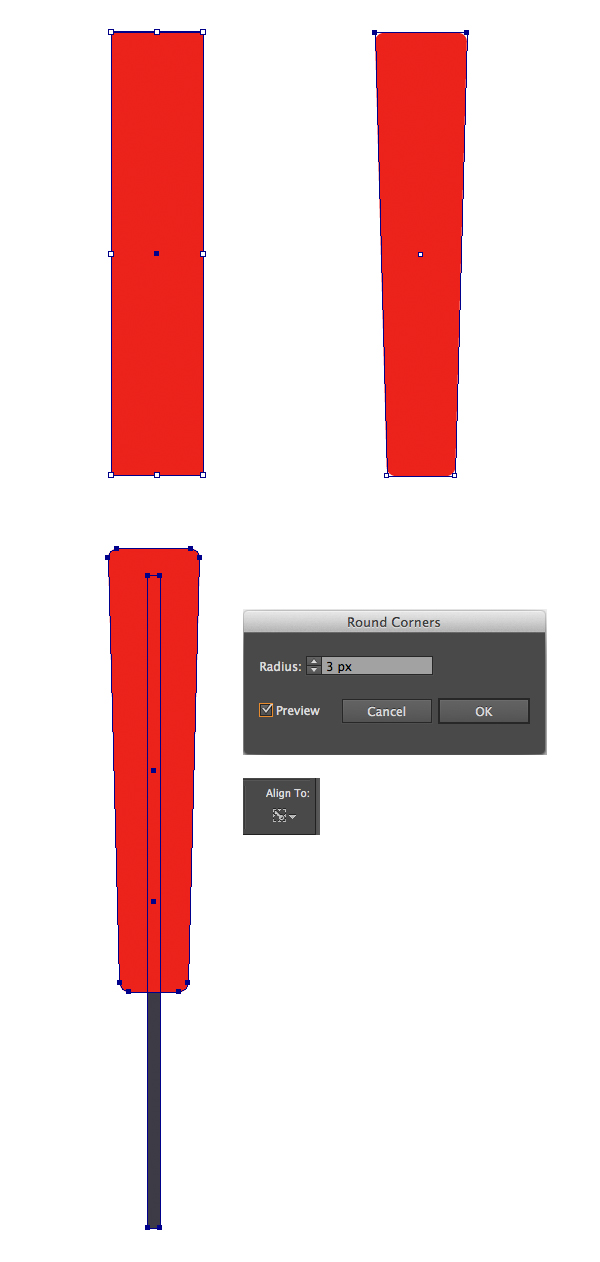
Step 1
Start by
drawing a rectangle and transform it by moving its lower anchor points closer
to the center. Go to Effect > Stylize
> Round Corners and set the Radius
to 3 px to make the shape more
smooth. Add a thin stick with the Rectangle
Tool (M), Sent it to Back (Shift-Control-[)
and Align to Key Object, thus
putting the stick in the center of the red shape.
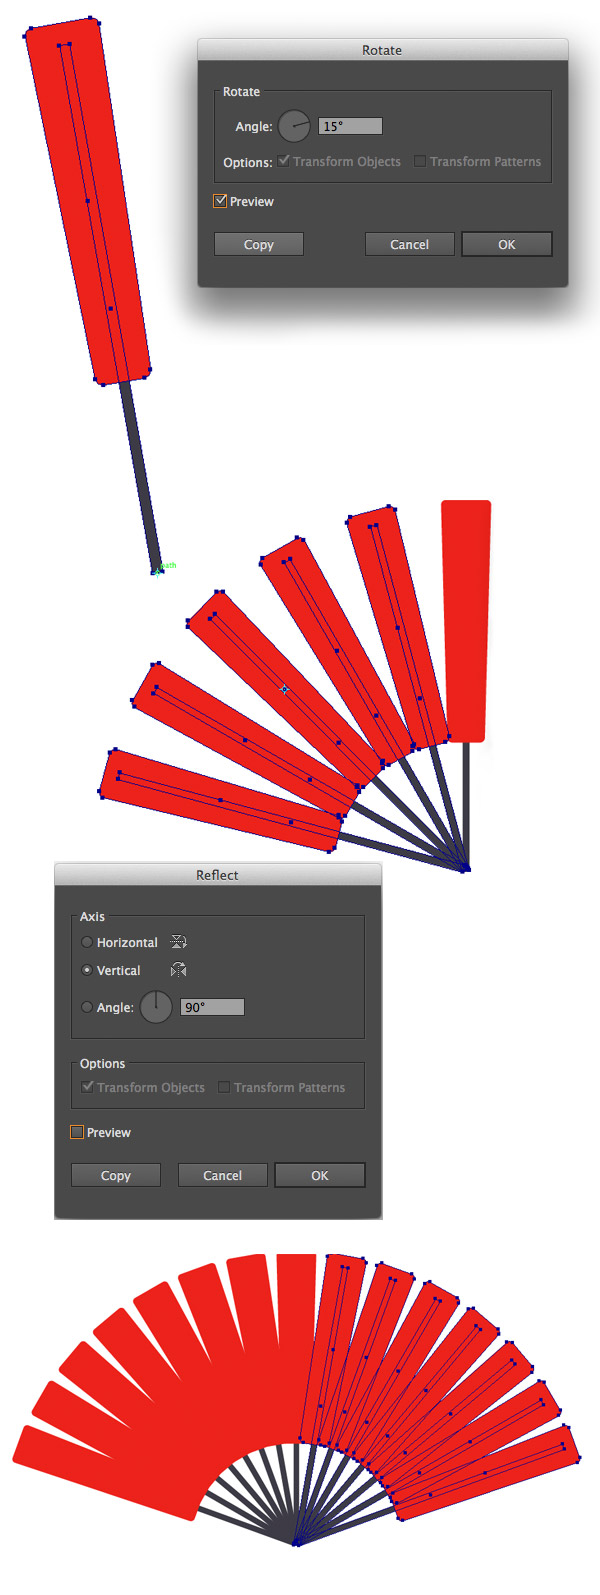
Step 2
Now we need
to form a fan. Use the Rotate Tool (R) by
holding the Alt key and clicking at
the bottom of the stick. Set the Rotate
Angle to 15 degrees and hit the Copy button. Press Control-D, forming the left part of our fan. Use the Reflect Tool (O) to reflect the created
group of objects over the vertical axis.
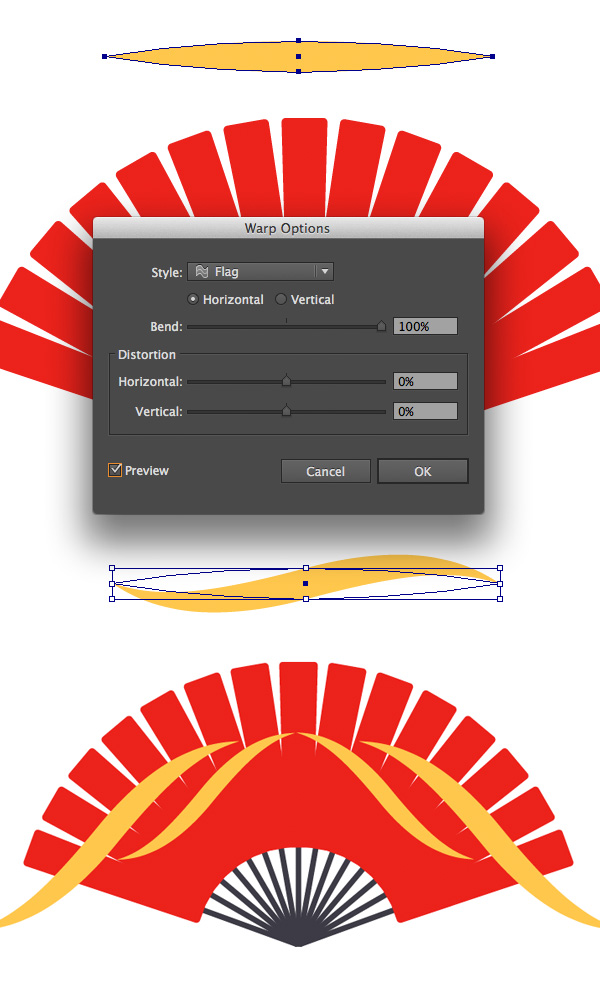
Step 3
Let’s make
our fan more whimsy and ornate. Draw a squashed ellipse and convert its side
anchor points to corners. Go to Effect
> Warp > Flag and set the Bend
value to maximum. Object > Expand
Appearance of our shape and decorate the fan with newly created wavy lines.
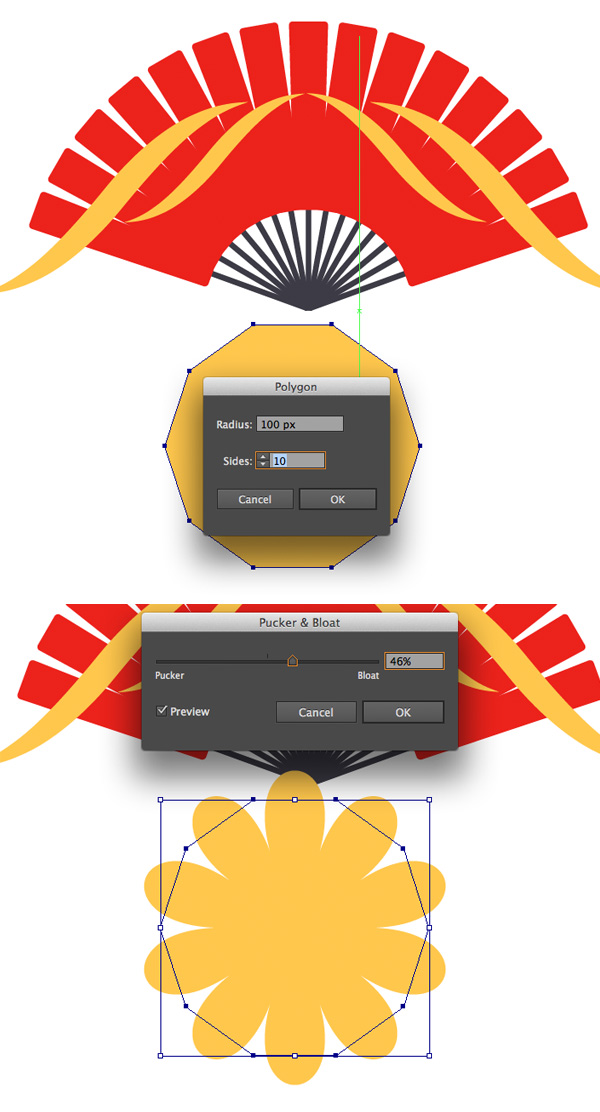
Step 5
Create a 10-sides Polygon and go to Effect > Distort & Transform >
Pucker & Bloat to make a simple flower by moving the slider to the Bloat side. Don’t forget to apply Object > Expand Appearance to your flower.
Step 6
Decorate
our fan with flowers, varying the size of each element. Select all the red
shapes, Copy and Paste in Front. Unite the shapes in Pathfinder
and use the Shape Builder Tool (Shift-M)
to delete the unneeded parts, which left outside of the fan.
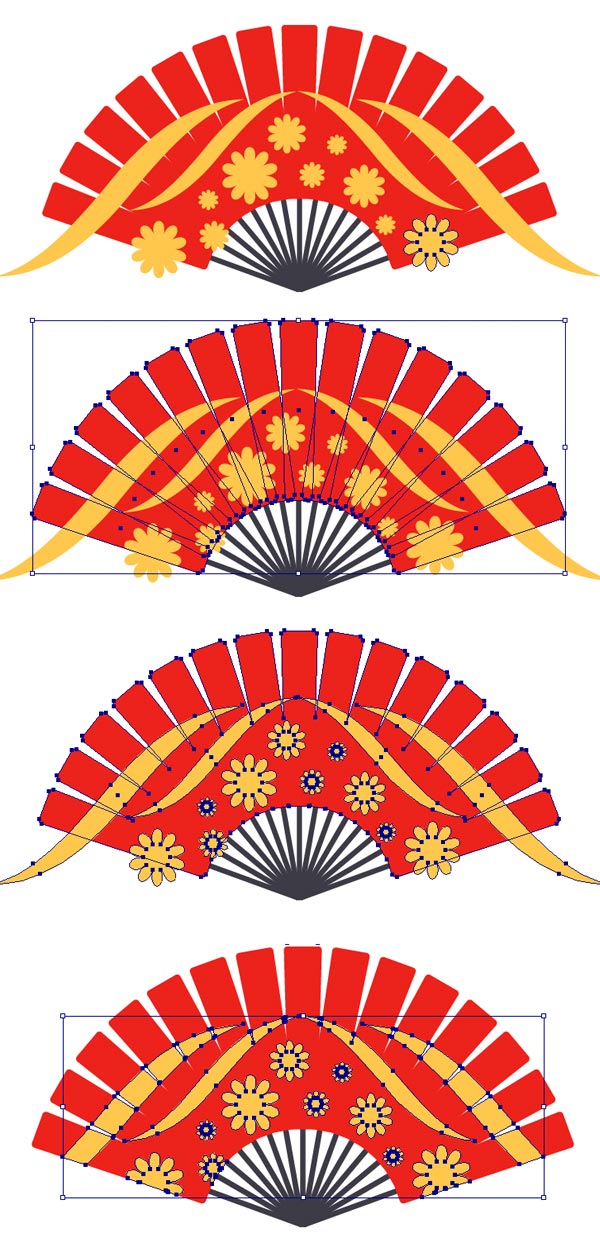
Make the
ornament fill a bit darker, add a small circle handle in the bottom and –
voila! – our fan is completed.

5. Add Some
Zen Garden Stones
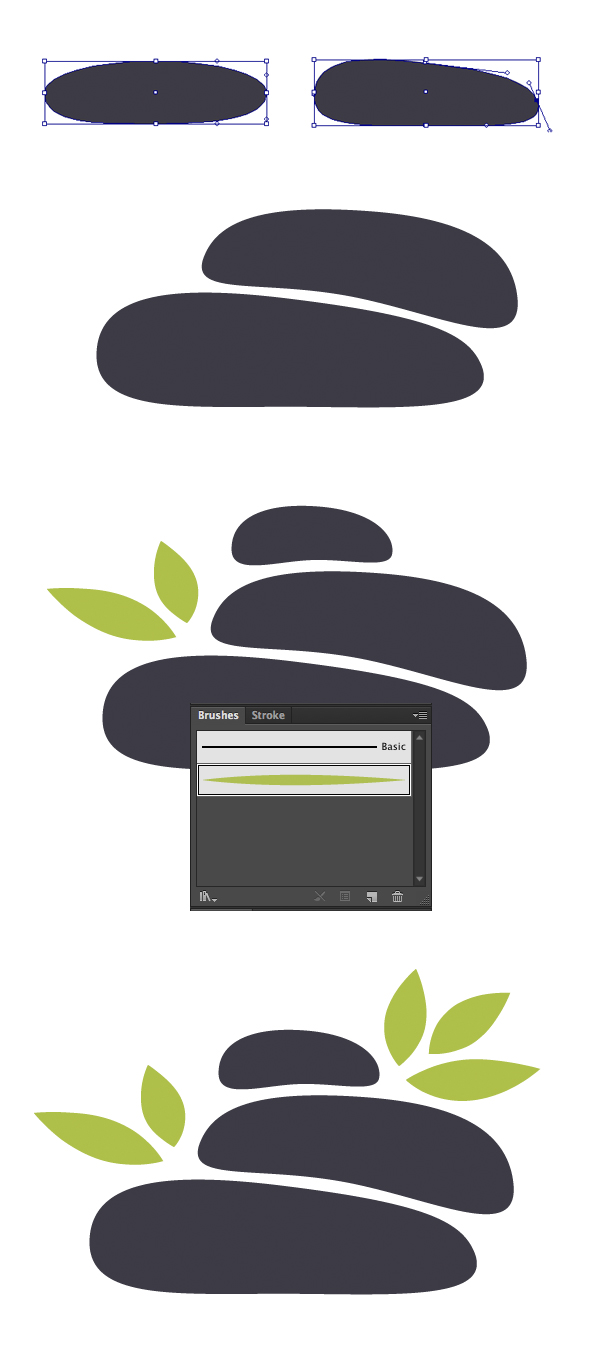
Step 1
Let’s add
harmony to our composition by drawing a few smooth stones. Shape the first stone
out of the ellipse by moving its anchor handles with Direct Selection Tool (A) and making the right part of the object
narrower. Add another ellipse above the first one and reshape it to fit the composition. Add a small stone on top and use the leaf brush that we’ve made for the bamboo fence to add some cute leaves on both sides of the stones.
6. Render
a Japanese Gate
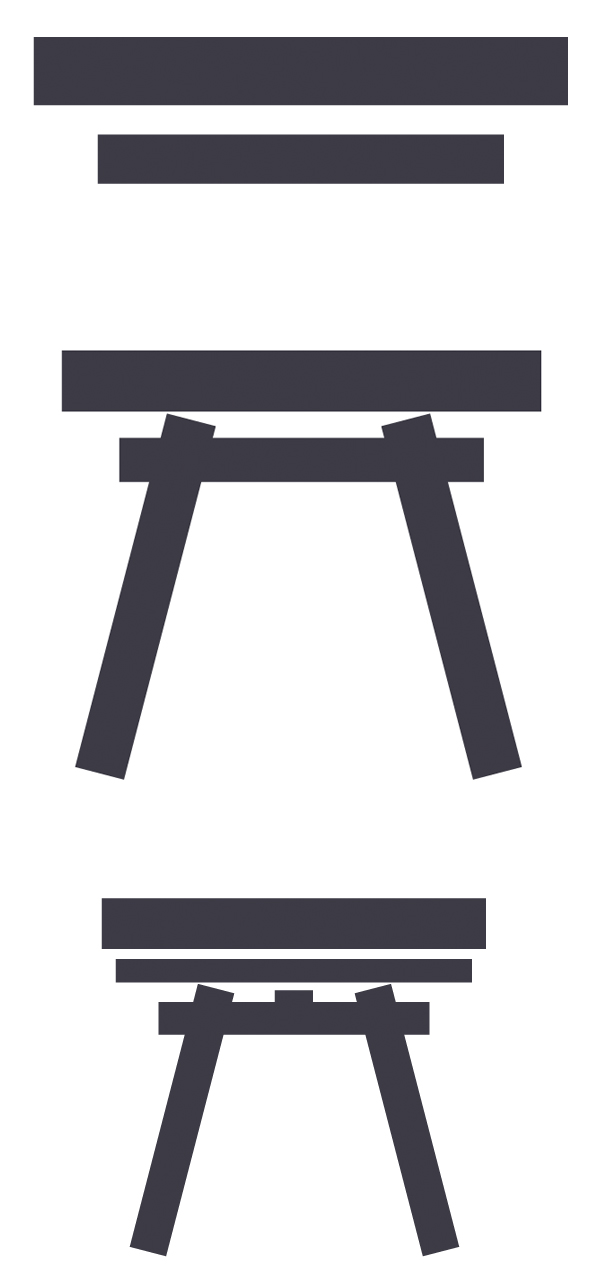
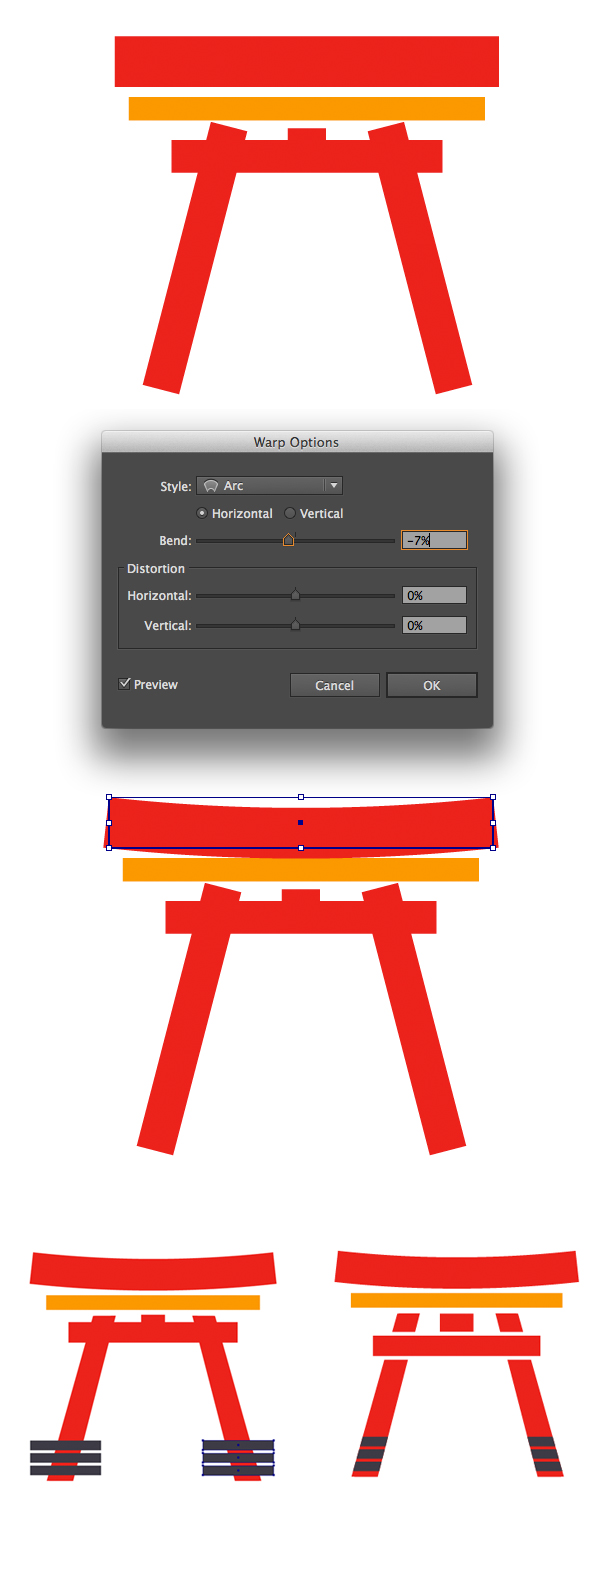
Step 1
The only
tool we need to create the stylized Japanese Gate is the Rectangle Tool (M). Create two rectangles, one above the other,
making the lower rectangle slightly smaller. Add the pillars by
placing another rectangle at one side of the gate and rotating it a bit. Reflect the pillar over the vertical
axis and place its copy on the other side of the gate. Add some minor details,
making the gate more fancy.
Step 2
Change the
fill color of the elements to bright red and orange that we’ve used in our
palette. Select the upper part of the gate and go to Effect > Warp > Arc, setting the Bend value to approximately –7%.
Add some dark stripes in the bottom of the pillars. Use the Eraser Tool (Shift-E) with 1 pt size to separate the
parts of the gate from each other by holding the Shift key to move the tool straight horizontally.
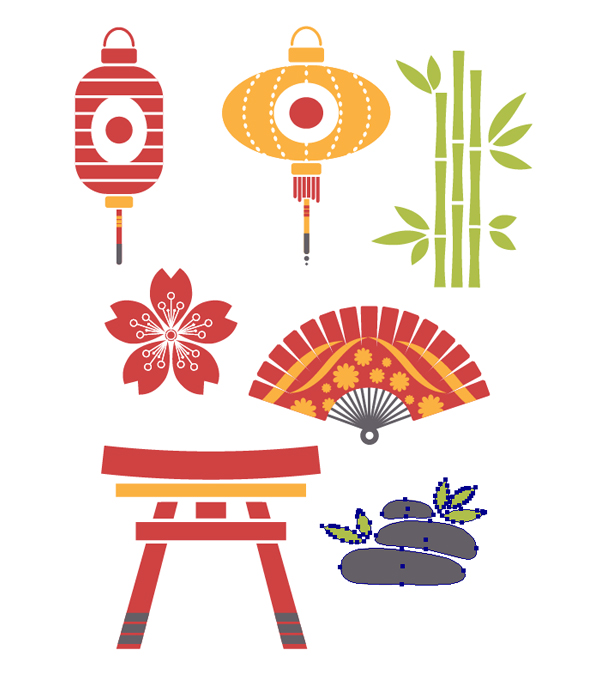
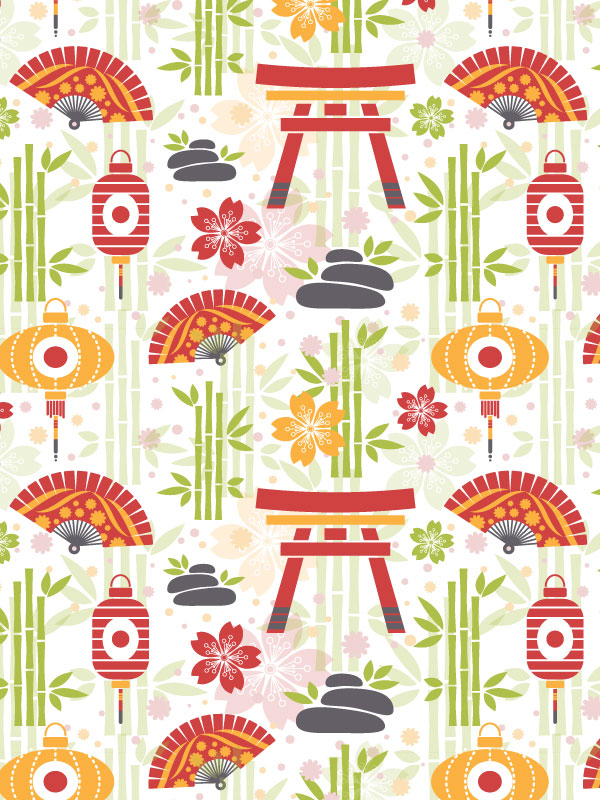
7. Compose
a Neat Oriental Pattern
All the
elements of our composition are ready! You can change the colors to your liking. Here I’ve made them a little more pale.
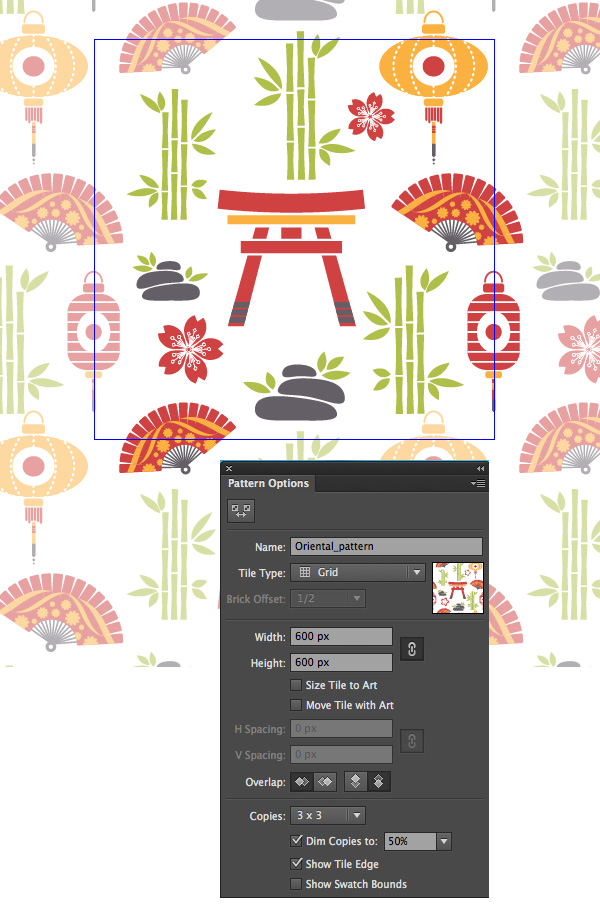
Step 1
Now the fun
part! Select all the elements and go to Object
> Pattern > Make, entering into the Pattern mode. You can play with the settings in the Pattern Options
window, however the only thing I change here it the Width and Height (600×600 px). We make the tile square, so that our pattern remains seamless
and we can use it not only for filling the shapes that we’re creating in AI, but we’re be able to export out pattern and use it for any purpose – print, set as
a background, etc.
Spread the
elements around the canvas and you’ll see how your pattern will look like with
the help of semi-transparent copies of our objects.
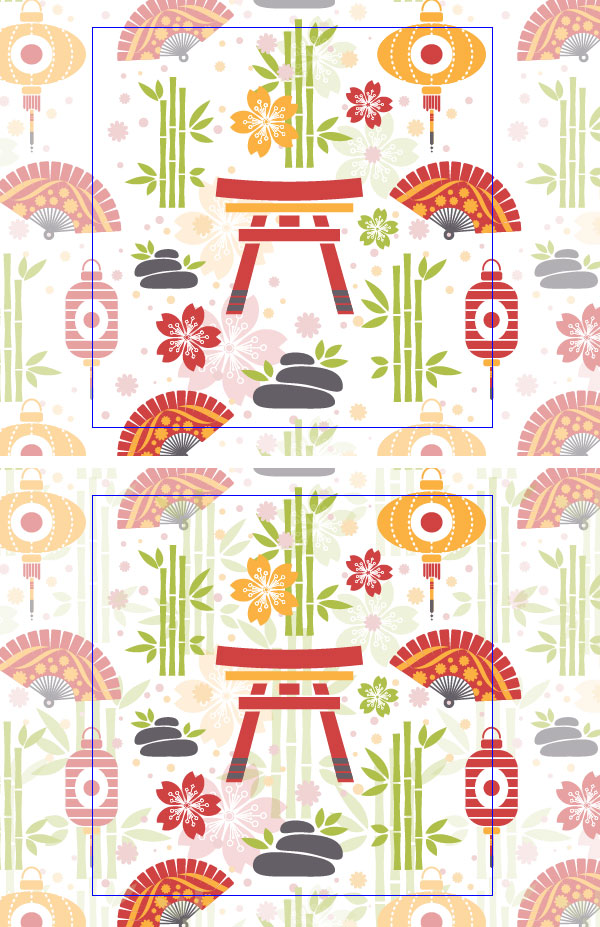
Step 2
Copy the
blossoms and recolor them according to the overall color palette. Add more
copies of the blossoms behind all other objects, making them
more transparent by lowering the Opacity
in the Transparency panel.

Step 3
Continue
adding more elements in order to get rid of blank spaces. Add the
semi-transparent copies of the bamboo fence and spread the circles and simple
flowers all over the canvas.
Step 4
Exit the Pattern Mode by pressing Done in the control panel
above or just clicking twice on the empty space outside the Artboard. Now you
can find your pattern in the Swatches
panel and edit it anytime by clicking the Swatch
Options button.
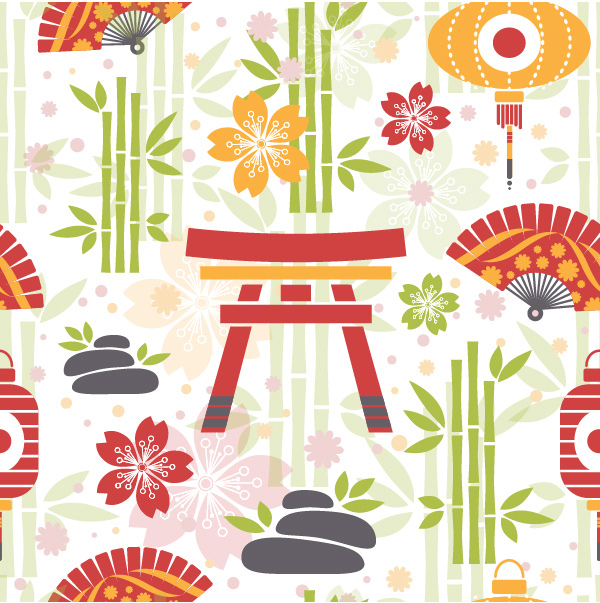
Congratulations!
Our Gentle Oriental Pattern is finished!
Now you
have a nice seamless pattern that can be used anywhere you like. Hope you’ve
enjoyed the tutorial and discovered some useful things! Good luck in making new
patterns!
{excerpt}
Read More