Ever thought screen architecture was a needlessly painful and tedious task? Then this tutorial is your friend.
We found this awesome author thanks to FlashGameLicense.com, the place to buy and sell Flash games!
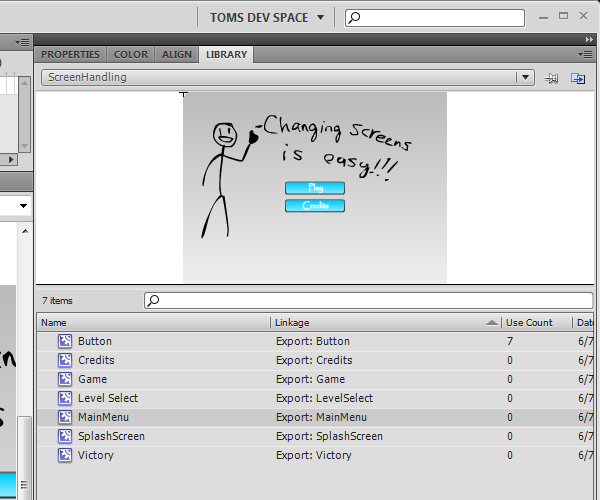
Final Result Preview
Let’s take a look at the final result we will be working towards:
Step 1: The Screening Process
If you are anything like I was, I always hated the beginning of a project, because I would have to set up all of the screens. After I stopped coding on the timeline, I lost the ease of just saying: gotoAndStop(x).
As we all know, timeline coding is just wrong; It pollutes the environment and causes tooth decay. It was simple to switch screens however. I spent a lot of time online trying to find an efficient method of screen switching, but all I found was methods full of pain, punishing the developer for having complex screen architectures. And not changing screens from the base screen caused me to slap ugly code into my game such as:
parent.parent.parent.dispatchEvent(Event.CUSTOM_EVENT, screen1_to_screen2);
See what I mean? Custom event after custom event, I grew tired of this absurdity. There has to be a better way.
Step 2: The Light at the End of the Tunnel
So, I set out to find a method of handling complex screen architectures without all of that pesky mental trauma. No events. I turned to my favorite way of handling tasks that need to be referenced from anywhere in the game: Static variables and methods.
Using static variables would allow me to reference an object from anywhere I wanted in the game, even in a popup of a popup of a popup. I decided to couple this with the simplicity and usability of Flash’s display list.
Enter the ScreenHandler class.
Step 3: Your Game
It probably has many screens. You likely have your splash screen, main menu, game screen, credits, victory screen, and many others. We need to set up our screens first. We won’t put any content into it yet, the gameplay is up to you.
Here are the screens I have:
As you can see, I have left out the preloader. Preloading correctly is a whole other tutorial. You can learn about it here:
Active Tuts+: The comprehensive guide to preloading a single swf file
I’ll explain how to combine this with that tutorial near the end. Now on to the part you’ve all been waiting for!
Step 4: The ScreenHandler Class
Essentially, the ScreenHandler class is a display object that holds all of your screens and internally switches them at will. The code is surprisingly simple. However, I won’t just lay a wall of code for you to run into. It would be a waste if you didn’t fully understand the code. So I will break it down into a couple of sections.
The first thing we need to do is create the actual class. Here is the code:
package  {
	import flash.display.Sprite;
	public class ScreenHandler extends Sprite{
		//Variables go here
		public function ScreenHandler() {
			//Constructor goes here
		}
		//Functions go here
	}
}
Wow, that is extremely empty.
Next we’ll add in our screens as variables:
private var splashScreen:SplashScreen;
private var mainMenu:MainMenu;
private var levelSelect:LevelSelect;
private var game:Game;
private var credits:Credits;
private var victory:Victory;
Just throw those under the “Variables go here” comment.
And just like that, we’re 1/10th of the way there!
Step 5: What Makes it Tick
This is the function that you will call to switch your screens. The good news is that it’s only 4 lines of code. The bad news is that it’s only because I like to break down my code into manageable chunks. This is the only public function in the entire class, as this is all you need to call to get the class to function. Encapsulation at it’s finest!
public function switchTo(screenName:String):void{
	newScreenName = screenName;
	switchScreens();
}
That goes under the “Functions go here” comment. Simple, no? Now you need to make a variable called newScreenName and a function called switchScreens.
private var newScreenName:String = "";
You already know where that goes. And here is the switchScreens function:
private function switchScreens():void{
	removeOldScreen();
	makeNewScreen();
}
I warned you: manageable chunks.
Step 6: I Still Don’t Know Anything!!!
Before you get angry with me, realize that I’m doing this for your own good. No, really. Breaking it up into manageable chunks like this makes it easier for you to find and alter the code if you need custom functionality. I myself always find the need to change code later on in the game, so I just adopted this coding practice. Also, if you are writing code and something’s broken, it’s easier to find the source of the problem. Ok, enough of my sidetracking. Here are the functions that make it happen (for real this time).
Step 7: The Beauty of the Display List
The removeOldScreen function takes its miraculous functionality from AS3’s display list. This was probably the best improvement from AS2. The parent-child relationship that the display list has is extremely useful in almost any visual manipulation, and looping through children in a display object is faster than looping through MovieClips in an array. It really is great. Before we write the removeOldScreen and makeNewScreen functions, we need a parent to hold the screens. Here’s another variable:
private var screenLayer:Sprite = new Sprite();
and add this line of code to your constructor:
this.addChild(screenLayer);
Alright, now we have a parent foundation that allows for easy modification and debugging. All that’s left to do is write the removeOldScreen function. Here is the code:
private function removeOldScreen():void{
	var oldScreen:MovieClip;
	oldScreen = screenLayer.getChildAt(0) as MovieClip;
	screenLayer.removeChild(oldScreen);
}
What we are doing is creating a placeholder variable that is going to ‘become’ our current screen. We then grab the child at the index of ‘0’ (which is the first child of the parent object) and set our placeholder equal to it. This convenient method allows us to do whatever we like to any screen without having to call the screens specific variable name. We then use the removeChild method to get rid of the screen for good. Just beautiful.
Well, now we can make a blank screen. It would be nice to be able to put something there, right? Well I’m about to tell you how to do that.
Step 8: Rectifying the Blank Screen
This is the most verbose section of the code, but it’s very easy to make, understand, and customize. This section of the code is basically a giant switch statement that contains all of your screens. The argument that we pass into the switch function is that newScreenName variable we set in the switchTo function.
private function makeNewScreen():void{
	switch(newScreenName){
		case "SplashScreen":
			splashScreen = new SplashScreen();
			screenLayer.addChild(splashScreen);
		break;
		case "MainMenu":
			mainMenu = new MainMenu();
			screenLayer.addChild(mainMenu);
		break;
		case "LevelSelect":
			levelSelect = new LevelSelect();
			screenLayer.addChild(levelSelect);
		break;
		case "Game":
			game = new Game();
			screenLayer.addChild(game);
		break;
		case "Credits":
			credits = new Credits();
			screenLayer.addChild(credits);
		break;
		case "Victory":
			victory = new Victory();
			screenLayer.addChild(victory);
		break;
		default:
			mainMenu = new MainMenu();
			screenLayer.addChild(mainMenu);
		break;
	}
	newScreenName = "";
}
The code is pretty self-explanatory, but I will explain it anyways.
case "Screen":
	screen = new Screen();
	screenLayer.addChild(screen);
break;
You associate a string to a screen. That string is the argument that you will pass into the switchTo function. It then goes through the switch statement and selects the correct screen to add. It then constructs an instance of the variable and adds it to the screenLayer. You aren’t required to set a default, but it’s useful to have a default for any switch statement you have for debugging purposes. It activates if none of the other cases match the argument.
Note: The registration point of the screens need to be at the top left corner for the screens to be displayed correctly.
Now we have the functionality behind the ScreenHandler class. Now it’s time to apply it to our program! Before we apply it to our program, we need to add a child to the screenLayer otherwise, we’ll have nothing to remove when we call removeOldScreen the first time. This will give us an error, and errors are bad. Mkay?
splashScreen = new SplashScreen();
screenLayer.addChild(splashScreen);
Add that underneath the rest of the constructor. Now go to the top of the class and import flash.display.MovieClip, if you haven’t already done so, and we can move on.
Step 9: Making it Work
If you haven’t looked at the tutorial I referenced earlier, now might be the time to do so.
Active Tuts+: The comprehensive guide to preloading a single swf file
Back? Great.
The screen handler will be added to the Application class. The actual sprite itself will be a public static variable, so you can reference it from anywhere in your code and it will switch the screen. Easy, right?
public static var screens:ScreenHandler = new ScreenHandler();
then add this to the Application class’ constructor:
this.addChild(screens);
If you ever need to switch screens from anywhere in your code, this is how you do it:
Application.screens.switchTo("SelectedScreen");
Step 10: There’s More?
Well, we’re done with the screen handler per se. After I code all of the buttons to switch to whatever screen I wish, it works.
You may say: “Thomas, this screen switching is ugly! I want screen transitions!”
Well, it’s a good thing the codes are easily customizable. Just ask nicely next time.
Step 11: Making it Look Good
The first step in adding screen transitions is deciding what kind of screen transition you want. For this example, I’m just going to make a simple fade out and in. Easy right?
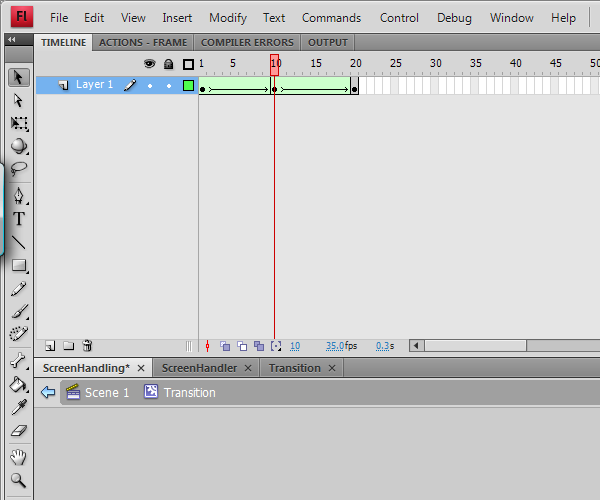
- Start by making a new Symbol.
- Name it Transition, and export it for actionscript.
- Draw a rectangle the size of your screen.
- Make a new keyframe on frame 10.
- Make a new keyframe on frame 20.
- Return to frame one and convert the alpha to 0;
- Go to frame 20 and convert the alpha to 0;
- Right click on the space between the keyframes and select ‘Create Shape Tween’.
Your finished Screen Transition should look like this:
Now that we have that set up, lets code our Transition class!
Step 12: A Little Class
This is a simple class to set up for our purposes, although you can always customize it to fix your needs. It needs to extend MovieClip, and the only thing we are adding to it is a variable.
package  {
	import flash.display.MovieClip;
	import flash.events.Event;
	public class Transition extends MovieClip{
		public static var exitFrames:Number = 11;
		private var timer:Number = 0;
		public function ScreenTransition() {
			this.addEventListener(Event.ENTER_FRAME, remove);
			this.addEventListener(Event.REMOVED_FROM_STAGE, removeListeners);
		}
		private function remove(e:Event):void{
			timer++;
			if(timer >= 20){
				parent.removeChild(this);
			}
		}
		private function removeListeners(e:Event):void{
			this.removeEventListener(Event.ENTER_FRAME, remove);
			this.removeEventListener(Event.REMOVED_FROM_STAGE, removeListeners);
		}
	}
}
The variable we added was exitFrames. We set it to 11. Why? Because that’s the frame that the transition reaches 100% alpha, and it’s the frame we are going to switch the screens on. The other functions handle the removing of the clip itself and handle the removing of event listeners once it’s been removed. Less garbage collection, eh?
Step 13: But You Said No Events!
Remember how I said we wouldn’t use events? Well, I lied. The screen transition requires a few events so that the switching of the screen properly delays and the transition is removed after it has finished its job.
Since the beginning, my goal was to make this class as versatile and easy to use as possible. I didn’t want any headache when I set up my screen architecture. In keeping up with those guidelines, I will make the adding of screen transitions an option, since sometimes, a screen transition is not necessary.
Step 14: Changing Things Around
To add in screen transitions, we don’t even have to touch the removeOldScreen or makeNewScreen code because I separated them beforehand. It’s almost like I knew this was going to happen…
We are going to need a slew of new variables:
private var transitionLayer:Sprite = new Sprite();
private var transition:Transition;
private var transTimer:Number = 0;
private var makeTransition:Boolean;
The transitionLayer is going to house our transition clip. That way it doesn’t interfere with our screenLayer’s number of children. The transition timer is going to be used for timing our actions in the event just right. The make transition variable is going to control whether a screen transition will be used, that’s up to you!
Next, we are going to need to change things around in the constructor as well. This is what your new constructor should look like:
this.addChild(screenLayer);
this.addChild(transitionLayer);
splashScreen = new SplashScreen();
screenLayer.addChild(splashScreen);
And last but not least, go to you import area and import flash.events.Event. After that we can make way.
Step 15: Re-working the switchTo Function
I still want to keep this function short and sweet, as to not complicate the user end result. Encapsulation is great, no?
public function switchTo(screenName:String, trans:Boolean = true):void{
	newScreenName = screenName;
	makeTransition = trans;
	this.addEventListener(Event.ENTER_FRAME, switchScreens);
}
There are a lot of new things in here. In the arguments section, we added trans, which is set to true by default. This means, that unless you say otherwise, it is automatically set to make a screen transition. This saves you the trouble of having to type out ‘true’ every time you switch screens. Our makeTransition variable is then set equal to trans. The switchScreens function now will accept an event argument, which leads us to the next section.
Step 16: Re-working the switchScreens Function
Let’s focus on the code to make the screen transition work first. This will feature a good amount of change from our previously simple code.
private function switchScreens(e:Event):void{
	transTimer++;
	if(transTimer == 1 && transitionLayer.numChildren < 1){
		transition = new Transition();
		transitionLayer.addChild(transition);
	}
	if(transTimer >= transition.exitFrames){
		removeOldScreen();
		makeNewScreen();
       transTimer = 0;
       this.removeEventListener(Event.ENTER_FRAME, switchScreens);
	}
}
Let me break it down:
private function switchScreens(e:Event):void{
	transTimer++;
	if(transTimer == 1 && transitionLayer.numChildren < 1){
		transition = new Transition();
		transitionLayer.addChild(transition);
	}
First we add an Event argument into the function. We set the transTimer to increase by one every frame. If the transTimer is equal to one, and the transitionLayer has no children, we add a transition.
       if(transTimer == transition.exitFrames){
		removeOldScreen();
		makeNewScreen();
		transTimer = 0;
		this.removeEventListener(Event.ENTER_FRAME, switchScreens);

	}
Once the transTimer reaches the exitFrames we set earlier, we make the screen change happen. Because that’s what it’s all about, right? Then it resets the transTimer, then removes the event listener. Now it switches screens with a smooth screen transition!
Step 17: Re-working the switchScreen Function (Part 2)
We will now accommodate the possibility that you don’t want a screen transition to happen. We are going to wrap all of our current switchScreens code in an if statement:
if(makeTransition){
	//All of your current switchScreens code goes here
}
Wasn’t that easy? Now we make an else section for when makeTransition isn’t true:
if(makeTransition){
	//All of your current switchScreens code goes here
} else {
	removeOldScreen();
	makeNewScreen();
	this.removeEventListener(Event.ENTER_FRAME, switchScreens);
}
And there you have it, a fully functional screen handling class with the ablility to control the adding of screen transitions! Great stuff.
Step 18: The Full ScreenHandler Class
This is what the finished code will look like:
package  {
	import flash.display.Sprite;
	import flash.display.MovieClip;
	import flash.events.Event;

	public class ScreenHandler extends Sprite{
		private var splashScreen:SplashScreen;
		private var mainMenu:MainMenu;
		private var levelSelect:LevelSelect;
		private var game:Game;
		private var credits:Credits;
		private var victory:Victory;

		private var newScreenName:String = "";

		private var screenLayer:Sprite = new Sprite();
		private var transitionLayer:Sprite = new Sprite();
		private var transition:Transition;
		private var transTimer:Number = 0;
		private var makeTransition:Boolean;

		public function ScreenHandler() {
			this.addChild(screenLayer);
			this.addChild(transitionLayer);
			splashScreen = new SplashScreen();
			screenLayer.addChild(splashScreen);
		}

		public function switchTo(screenName:String, trans:Boolean = true):void{
			newScreenName = screenName;
			makeTransition = trans;
			this.addEventListener(Event.ENTER_FRAME, switchScreens);
		}

		private function switchScreens(e:Event):void{
			if(makeTransition){
				transTimer++;
				if(transTimer == 1 && transitionLayer.numChildren < 1){
					transition = new Transition();
					transitionLayer.addChild(transition);
				}
				if(transTimer == transition.exitFrames){
					removeOldScreen();
					makeNewScreen();
					transTimer = 0;
					this.removeEventListener(Event.ENTER_FRAME, switchScreens);
				}
			} else {
				removeOldScreen();
				makeNewScreen();
				this.removeEventListener(Event.ENTER_FRAME, switchScreens);
			}
		}

		private function removeOldScreen():void{
			var oldScreen:MovieClip;
			oldScreen = screenLayer.getChildAt(0) as MovieClip;
			screenLayer.removeChild(oldScreen);
		}

		private function makeNewScreen():void{
			switch(newScreenName){
				case "SplashScreen":
					splashScreen = new SplashScreen();
					screenLayer.addChild(splashScreen);
				break;
				case "MainMenu":
					mainMenu = new MainMenu();
					screenLayer.addChild(mainMenu);
				break;
				case "LevelSelect":
					levelSelect = new LevelSelect();
					screenLayer.addChild(levelSelect);
				break;
				case "Game":
					game = new Game();
					screenLayer.addChild(game);
				break;
				case "Credits":
					credits = new Credits();
					screenLayer.addChild(credits);
				break;
				case "Victory":
					victory = new Victory();
					screenLayer.addChild(victory);
				break;
				default:
					mainMenu = new MainMenu();
					screenLayer.addChild(mainMenu);
				break;
			}
			newScreenName = "";
		}
	}
}
This is how you implement it in the Application class:
public static var screens:ScreenHandler = new ScreenHandler();
in the Applications constructor, add
this.addChild(screens);
and use this function from anywhere in your code to switch screens:
Application.screens.switchTo("SelectedScreen");
If you don’t want a screen transition:
Application.screens.switchTo("SelectedScreen", false);
Step 19: The Finished Product
Step 20: Enjoy
I believe I accomplished what I set out to do. The class is easy to use and even more versatile in adding screen transitions than the good ole’ timeline. I hope you get some use out of this class, and even improve upon it and make it even more versatile. The sky is the limit with screen transitions, and maybe (probably), you can come up with improved methods of handling screen architecture: the painless way!
Conclusion
I hope you liked this tutorial, thanks for reading!