In Deploy a Tank in an Isometric War Zone, you learned how to make an object rotate to face the pointer and move towards a location on click. In this Quick Tip, we’ll take a general look at the math behind it: trigonometry.
Final Result Preview
This is the final result from my previous tutorial. It makes use of the trigonometry principles we’ll cover in this Quick Tip:
Move the mouse to make the turret aim at it, and click anywhere to get the tank to drive to that point.
Any programmer, especially any game programmer, faces a need to move objects on the screen sooner or later. It’s a simple task if you need to move an object in one direction, for example along the x- or y-axis. But suppose you want to make an object follow your mouse pointer wherever you move it, or create a racing game where you control acceleration of a car by pressing up arrow key and use the left and right arrows to steer.
Let’s say you press the right arrow key once and it adds 10 degrees to your car’s rotation property but you still want the car to move forward (i.e. accelerate) when you press an up arrow key, even if a car is turned towards the bottom of the screen or a left or right side etc. and you don’t want it to look like it’s sliding sideways. So, how would you do that? That’s where a little trigonometry helps!
For those, who are good at math it won’t be a problem, but there are lots of people who don’t understand it at all, or are even scared of it. I’ll try to break it down as clearly as possible in this Quick Tip.
Step 1: The Flash Coordinate System
At the outset, let’s remember the Cartesian coordinate system. Sound complicated? If so, just look at the image below and I’m sure it will be familiar:
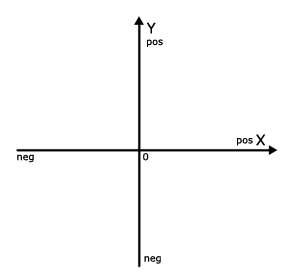
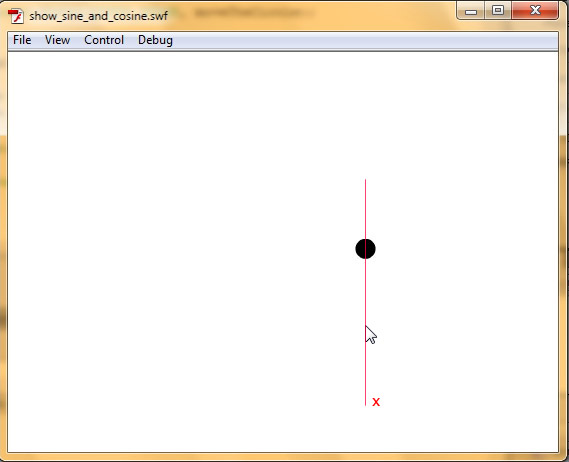
It has X and Y axes; you can clearly see where X and Y are positive and negative. When it comes to coordinates in Flash, the situation is slightly different. Flash also has its system of coordinates but it looks like the Cartesian system upside down:
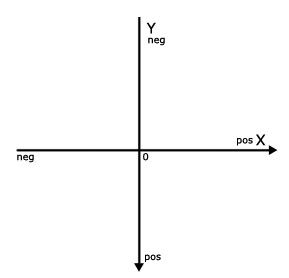
It also has X and Y axes and the Point of Origin, the only difference being that the Y axis is positive below the X axis.
Any symbol created in Flash has its own built-in coordinate system. If you create a new symbol, whether it’s a movie clip or a button, you might see a “registration point” property in the symbol creation dialog box. What is it? The registration point is a point of origin of a symbol. The point that the object will rotate around if you change its rotation property.
Note: the origin point of the stage instance is in its left top corner. This means that all points on the stage have positive X and Y coordinates.
In this Quick Tip we’ll look at the three most commonly used trigonometric functions in Flash; Sine, Cosine and Atan2. Some people might ask, how can we use these functions in Flash? Well, let’s look at some practical examples, and understand why we need them and how they can make our life a bit easier.
Step 2: Calculating Angle
Let’s calculate the angle between two points. Create a new Flash File (ActionScript 3.0). Select the first frame of the timeline and hit F9 to open an Actions Panel.
At this point let’s make something simple. Just type this into the Actions Panel:
stage.addEventListener(MouseEvent.CLICK,  calculateAngle)

function calculateAngle(e:MouseEvent):void
{
	trace("stage X " + e.stageX);
	trace("stage Y " + e.stageY)
}
This will give us the position of the mouse pointer every time we click the stage. Not exactly fascinating, is it?
Ok, now suppose you want to “tell” some object your mouse pointer’s coordinates relative to this object, then show it the direction to travel to reach the pointer’s position.
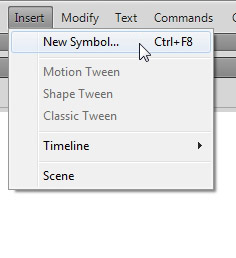
Close the Actions Panel and go to Insert > New Symbol or just hit Ctrl + F8.
Give it any name (or leave a default name) and press OK. The little crosshair in the middle of the screen is the registration point of the symbol or its point of origin. This will be the object’s X and Y positions. Now grab the Oval tool (O key) and draw a circle (with Shift key pressed) anywhere on the screen.
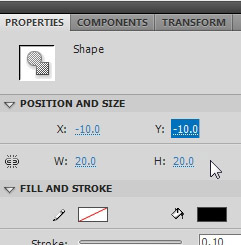
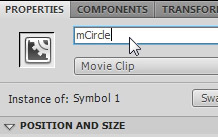
Click the circle to select it and go to its Properties panel > Position and size. For W (width) type in 20, the same for H (height) and for X and Y position type in (-10). This will make the circle 20×20 px and exactly center it to the registration point. Now quit the symbol editing mode (Click Scene 1 above), grab this symbol in your library and simply drag it to the stage (anywhere, we’ll get it’s position dynamically later). Once your object is on the stage, give it an instance name of mCircle.
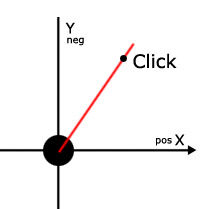
Now we want to calculate the direction from our circle’s Y and X position to the mouse pointer’s Y and X position. The red line in the image below is the direction we need to know. It can be found by using a standard Math.atan2() function.
Let’s do it now. Delete the “trace” statements from the code and create a new variable instead. Then trace this variable to see what you get:
stage.addEventListener(MouseEvent.CLICK, calculateAngle);

var myAtan2:Number;

function calculateAngle(e:MouseEvent):void
{
	myAtan2 = Math.atan2(e.stageY - mCircle.y, e.stageX - mCircle.x);
	trace(myAtan2);
}
Note that e.stageY - mCircle.y is the vertical distance from the mouse to the circle, and e.stageX - mCircle.x is the horizontal distance.
You’ll be getting these types of numbers in the output panel:
-2.419017353128333
3.0118660246925346
2.5704959452340326
1.6726588917423932
1.0238847495551058
0.21368467849101092
These are the relative angles (between the X axis line and the red line) in radians. Why not degrees? Well, Flash uses radians to calculate sine and cosine, but if you want to know what these angles are in degrees you can always multiply “myAtan2″ by 180 and divide it by Math.PI. Like this:
trace(myAtan2 * 180 / Math.PI) // gives you the angle in degrees;
Editor: As an additional resource, here’s a great set of functions for degree/radian conversion. It’s stored as a snippet on snipplr.com, the latest member of Envato’s network!
Step 3: Understanding Sine and Cosine
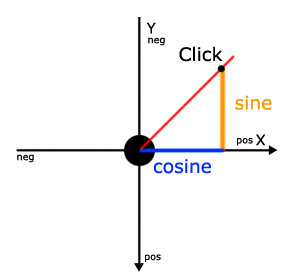
As we know the angle between two points we can now calculate how many pixels we have to add to the circle’s X and Y properties every frame until it reaches the click point. Let’s examine what we need to know here:

The blue line is the Cosine of the angle, and the the orange is the Sine of the angle. In other words,
- Sine(angle) == e.stageY – mCircle.y
- Cosine(angle) == e.stageX – mCircle.x
Rather than explain how sine and cosine work, I’ll demonstrate how to use them with some practical examples. Bluntly speaking the sine and cosine are the relations between Y and X in our angle.
Imagine the angle between two objects is 45 degrees. In this case the relation between sine and cosine is 1:1 (see the image below), which means we have to increase X and Y properties of our circle by the same amount every frame to reach the destination. For example you have to add 5 pixels to X and 5 pixels to Y every frame.
In this diagram, the angle has changed and the relation between sine and cosine has changed too. It’s about 1:2 now.
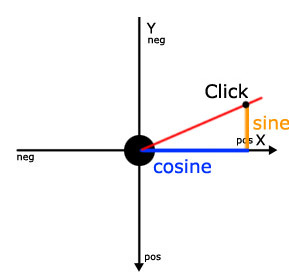
In this case we must add twice as many pixels to our circle’s X property than to Y. E.g. X += 10, Y += 5;
Step 4: Practical Examples
You will probably ask why we need sine and cosine if we already know the click point’s coordinates – we can just move our mCircle to them right away? Well, you could have done it this way if you wanted your circle (or any other object) to “teleport” at a click point coordinates as soon as click occurs. But what if you want it to move gradually in the direction of the click? To do this you need to add a particular amount of pixels to its X and Y properties, for example, every frame or every second.
Let’s now calculate how many pixels we should add to its X and Y properties based on sine and cosine of the angle between our object and a click point. Remember, Flash knows the angle between them from this operation:
myAtan2 = Math.atan2(e.stageY - mCircle.y, e.stageX - mCircle.x);
For this purpose we should update our code a little bit.
stage.addEventListener(MouseEvent.CLICK, calculateAngle);

// 2 is the maximum amount of pixels to add to the objects X and Y properties every frame
// you can use any number you like
var moveAmount:Number = 2;
var myAtan2:Number;
var mouseClickX:Number;
var mouseClickY:Number;

function calculateAngle(e:MouseEvent):void
{
	mouseClickX = e.stageX;
	mouseClickY = e.stageY;

	myAtan2 = Math.atan2(mouseClickY - mCircle.y, mouseClickX - mCircle.x);

	addEventListener(Event.ENTER_FRAME, moveTheCircle);
}

function moveTheCircle(e:Event):void
{
	mCircle.x += Math.cos(myAtan2) * moveAmount;
	mCircle.y += Math.sin(myAtan2) * moveAmount;
}
Note what I’ve done here: I promoted all of my variables outside any functions, because now I have more than one function and I want these variables to be accessible from every function.
var moveAmount:Number = 2;
var myAtan2:Number;
var mouseClickX:Number;
var mouseClickY:Number;
The stage has an event listener for mouse clicks, so when the click occurs, the method calculateAngle() gets called and the next variables are instantiated:
mouseClickX = e.stageX;
mouseClickY = e.stageY;
myAtan2 = Math.atan2(mouseClickY - mCircle.y, mouseClickX - mCircle.x);
This function also adds an event listener for enter frame to the stage, which calls the moveTheCircle() method every frame.
addEventListener(Event.ENTER_FRAME, moveTheCircle);
Step 5: Calculating Pixels
Now, let’s break down our moveTheCircle() method itself. For now it does only two things:
mCircle.x += Math.cos(myAtan2) * moveAmount;
mCircle.y += Math.sin(myAtan2) * moveAmount;
As you can see, the first line calculates how many pixels it should add to the X property and the second deals with Y. Let me explain. Math.cos finds the cosine (x property) of the “myAtan2″ angle, Math.sin does the same with its sine (y property). If our myAtan2 angle equals roughly 0.785 radians (45 degrees) the cosine and sine will both be equal to about 0.707… You can use a calculator to check it out.
A simple calculation will show how many pixels the code above will add to our object’s X and Y properties if the angle is 45 degrees.
Cosine(45 degrees) = 0.707 * 2 = 1.414;
Sine(45 degrees) = 0.707 * 2 = 1.414;

so the code will work out these results:
mCircle.x += 1.414 pixels;
mCircle.y += 1.414 pixels;
If the angle e.g is. 60 degrees then the results would be like this:
Cosine(60 degrees) = 0.5 * 2 = 1;
Sine(60 degrees) = 0.866 * 2 = 1.732;

And the code would work out this way:
mCircle.x += 1 pixel;
mCircle.y += 1.732 pixels;
Step 6: Fixing a Problem With the Code
Well, we’re almost done. But there is still a little problem with our code. You may have noticed that our object never stops, even if it reaches the click point it still keeps on moving. We can fix this problem very easily. As our object moves towards the click point, the distance between them shortens so the absolute value of the distance lessens too. We can keep track of it like this:
trace(Math.abs(mCircle.x - mouseClickX) );
trace(Math.abs(mCircle.y - mouseClickY) );
(Math.abs() turns negative numbers into positive ones by simply multiplying them by -1. It doesn’t do anything to numbers that are already positive.)
You don’t need to add this trace statement to your code, I’ve put it here just to show you the way you can see the absolute value. In this case both absolute values are less than 3 when the object reaches the click point. So what we need now is to add one if statement inside our moveTheCircle() function.
function moveTheCircle(e:Event):void
{
	mCircle.x += Math.cos(myAtan2) * moveAmount;
	mCircle.y += Math.sin(myAtan2) * moveAmount;

	//Check if the horizontal and vertical distances from the circle to the mouse point are very close
	if (Math.abs(mCircle.x - mouseClickX) < 3 && Math.abs(mCircle.y - mouseClickY) < 3)
	{
		removeEventListener(Event.ENTER_FRAME, moveTheCircle);
	}
}
When the absolute value gets below 3, the enter frame listener is removed. We must check both the X and Y’s absolute values because one of them might reach 3 even when the second hasn’t. This means the objects might stop like this:
The image above shows the version in which only X’s absolute value is checked. The X distance’s absolute value is already less than 3 so it stopped paying any attention to the the Y value.
Conclusion
Well, that’s it. I hope this Quick Tip will help you understand some trigonometry used in Flash development ![]()