So you’ve saved every penny, and your piggy bank is full to bursting. It’s time to cash that in money and buy a new lens. And what better choice than a fast prime lens? These offer plenty of benefit’s, and we’re going to dive into one of those benefit’s today: that shallow, professional and silky shallow depth of field.

Getting In-Depth with Depth-Of-Field
I’m about to get all Mr. Wizard on you, so hold on tight. I’magine a lens in profile. It looks sort of like football or a pointy oval. If you cut that shape in half between those two points, you would have two shapes that look like triangles. Now think back to those early school days. What are triangle-shaped pieces of glass called? If you said “prisms”, you get a gold star and a extra five minutes at recess. Check out what I’m talking about in the illustration below.

Now think about what a prism does. It creates rainbows from white light. It essentially “pulls” light apart. That’s almost the opposite of what a camera is trying to do, it’s trying to focus light and keep it together.
Using a wide aperture reveals those narrower, pointy parts of the lens. When you’re stopped down, you’re only using the center part which isn’t shaped as much like prism. The more your lens looks like two prisms, the more things will be out of focus, and the less depth-of-field you’ll have.
And who doesn’t want that shallowness? In fact, we pay big bucks to get it. By understanding how depth-of-field works and the concepts above, you’ll really be able to handle that pricey lens. And you’ll be able to better understand the other topics we’re going to cover.

From A Distant Land
There are three things that affect your depth-of-field. The first is aperture, which we just talked about. The second thing is distance. If you have an old manual focus lens with distance markings on it, you’ll see that the short distance markings cover much more area than the longer distances.
The 1 meter marking might be two centimeters away from the 2 meter marking, but the 10 meter marking might only be half a centimeter away from the 20 meter marking. The reasoning behind this is hard to explain and involves a graphing exponential curves, but it’s connected with the fact that the further away you are from something, the more depth-of-field, you’ll have.
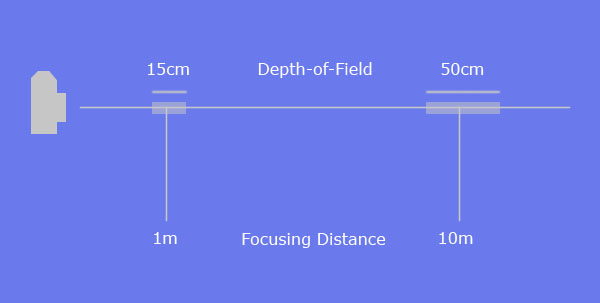
If you’re shooting a lens at f/2 and your subject is 1 meter away, the distance your depth-of-field is covering may only be 15 cm. But if you’re focusing on something 10 meters away, you might have a range of 50 cm. Basically, the greater the distance, the greater the depth-of-field. You can see an illustration of this concept below.
The Two-Thirds/One-Third Rule
As I hinted at above, depth-of-field is a definable range. At a certain distance with a certain f/stop, you might have 30 cm of depth in focus. Keep in mind that two-thirds of this depth extends behind your subject (the thing your focusing on), and one-third extends in front of it.
For example, lets say you’re focusing at 90 cm and, due to your lens, you have a depth-of-field of 30 cm. Everything from 80cm to 110 cm will be in focus. 20 cm behind of your subject, 10 cm in front. Two-thirds, one-third. See the illustration below to visualize this idea.

Sidenote
For those of you who have advanced degrees in physics, you may have connected the two-thirds/one-third rule with distance. You get less depth-of-field at closer ranges, which is why the depth-of-field doesn’t extend as far in front of your subject as it does behind.
This isn’t an important connection to make or understand, it’s just interesting. If you look at the chairs in the photos below, you can see how this idea might affect your images.

Length Matters
The last thing that affects your depth-of-field is the focal length of your lens. The longer the focal length, the less depth-of-field. If you have a 50mm lens set at f/1.4 and an 85mm lens set at f/1.4, and they are both focused on thing at the same distance: The 85mm lens will have a shallower depth-of-field. This phenomenon is related to how optics are set-up and again, physics.
It’s just important to note that a longer lens inherently has a shallower depth-of-field than a short lens. The image below was made with an 85mm lens set at f/1.4. I was pretty far away, and yet the depth-of-field was shallow enough to create a cool effect.

Chromatic Aberration
Back to the prism issue for a moment. Because lenses with wide apertures are shaped more like prisms, they are more likely to suffer from chromatic aberration. Chromatic aberration is literally the “pulling apart of colors that I mentioned early. Modern lens coatings and aspherical lens shapes help cut down on this, but it’s still a risk, especially in older lenses.
Chromatic aberration can make things on one color appear foggy or sometimes make them appear slightly shifted in position. The pinks of the flowers and the light green leaves at the top of this image have a slight haze around them due to chromatic aberration. They are not out of focus, but they are a much different color than the surrounding background color, which emphasizes the aberration.

Flare
Lens flare is a little more commonly encountered than chromatic aberration. Flare occurs when a light source is directly hitting your lens. It might not even be in the image, it might be just out of frame. It cause circles or streaks of light to appear in the final image. Point a wide angle lens at the sun, and you’ll see what I’m talking about.
This problem is also related to the prism issue, and wide aperture lenses are much more prone to flare than lenses with smaller apertures. Lens coatings help, but the best solution for flare is a lens hood. While hoods dont help if the light source in your frame, they do a great job of blocking that light coming from just outside the image.
A completely unrelated benefit is that they protect you lens from unintentional bumps and drops as well. The images below has a huge amount of flare, this is due to the wide aperture of the lens, and the wide angle of the lens. Wide angle lenses are more prone to flare as well.

Focusing in Brackets
Focusing a lens at f/2.8 can be difficult. The ultra fast lenses, like the f/1.2 and f/1.4, can be so touchy that autofocus systems can have trouble with them. Autofocus works best in high contrast situations, so in low contrast scenes it might be necessary to do a little bracketing.
Most people know about exposure bracketing, and the perfectionists among us might even dabble with white balance bracketing. Focus bracketing follows the same process. This technique will only really work with stationary or mostly stationary objects. Just use your autofocus to start. Once it’s locked on, just turn it off. Manually back the focus up a little, shoot, and then go a little past where it was before, and shoot again.
We are talking about half a millimeter in both directions. Less is more with this one. If you look closely at this photo, the nose of the dog is in focus, but the eyes are just a little off. If I bracketed my focus, I probably could have corrected this.

What Do I Do With It?
There are many reasons for using a shallow depth-of-field. The most common is a compositional technique called selective focus. This brings attention to something in a cluttered situation by making it the only thing in focus. This can be used to clean up cluttered backgrounds. But using a shallow depth-of-field while it’s snowing or raining, allows you to essentially make the precipitation disappear.
Another thing is using a shallow depth-of-field when there are small light sources in the background like traffic lights or holiday lights. The depth-of-field will turn these lights into beautiful glowing orbs. But using a shallow depth-of-field can also give your images a dream-like quality or make them appear nostalgic like the image below.

Some Gear Recommendations
Most of the photos shown in this tutorial were shot with a Nikon 50mm f/1.2 and a Nikon 85mm f/1.4. These are both manual focus lenses and, needless to say, they are a pain to focus on a Digital SLR.
If I had unlimited funds, I would purchase a new ground glass screen for my camera. If you’re camera allows you to interchange these, you can buy one with split-screen rangefinder patch or other good focusing aides. If you have manual focus lenses, read through your manual to decide what the best settings for focusing your lenses.
When you purchase your lenses, I highly suggest getting the brand-name, dedicated lens hood. Most lenses come with them, but the high-end lenses always at least offer them as an accessory. An after-market lens hood will usually involve using your filter threads, which will make it hard to use filters.
So if you havent made the plunge, start saving your pennies, because it is totally worth it. And after reading this, you won’t be dummy about using shallow depth-of-field…