First impressions do count! Stunning our viewers with a visually compelling portfolio is one of the most important things that a designer can do to court a new client. Today we will demonstrate how to use photos, brushes, and textures, and 3D objects to design a creative multimedia website layout in Photoshop. Let’s get started!
Resources
The following resources were used in the production of this tutorial:
- Classical camera
- Director’s chair
- TV camera
- Laptop
- Microphone
- Hotair baloon 1
- Hotair baloon 2
- Small Tree
- Cityscape Brushes by Terf
- Clouds brushes by JavierZhx
- Abstract glow brushes by Ro-stock
- Rust Textures by Princess of Shadows
- Armored Metal Textures by Wen Jr
- Render Pack Textures 1 by Angelus Hellion
- Render Pack Textures 2 by Xcellcior
Step 1
Create a 960px by 620px canvas in Photoshop. This is a good resolution for websites as most screens can accommodate it.

Press Cmd + R to add the ruler and draw some guides to mark the limits for the main content area. These will be useful to center your design.

Step 2
Now that the main content area is properly delimited, let’s resize the canvas to 1224px by 620px (Image > Canvas Size) to create a bigger background. This spill-over area will be useful for visitors with large screens and create a ‘borderless’ look.

Step 3
The last step in preparing our document is to add a guide in the center. This guide will be handy when you have to center the design elements. A quick way to find the center is to create a new layer and press the Cmd + T shortcut keys to activate "Free Transform".

Step 4
Let’s make the cloud platform on which the main design will sit. Make a grey gradient background. Layer > Layer Style > Gradient Overlay. Gradient #434344 to #EAECEC. Leave all the other settings as default.


Step 5
Create a new layer “Clouds”. Load your Clouds brushes and paint in white a few clouds of various shapes, sizes and opacity until you’ve achieved a similar result as shown below.

Step 6
Create a second layer “clouds 2″, add a few clouds in the center.

Step 7
Create a third layer “clouds 3″. This time use the Abstract glow brushes, the 2nd brush, size 420px. Flip it, press Cmd + T > Flip Horizontal. This will help in giving the clouds a more wispy and ethereal look.

Step 8
Now we’ll create a big 3D “M” for “Multimedia”. You could substitute your company’s initials here.
Open up Illustrator and paste the cloud background that you just created into a new layer. Use it as guide to design the 3D “M”. Type the letter “M”: font Handel Gothic Ex, 181pt, white; you can substitute any other wide thick font. To give the text a 3D effect, go to: Effect > 3D > Extrude & Bevel. See image below for the settings.

Step 9
Copy the 3D “M” and go back to Photoshop to paste it in your document. Rename the layer to “m”. We’ll now apply some effects and textures to make it more realistic and interesting. First apply the following Layer Style to layer “m”.

Step 10
Create a New Folder “m textures”. Select the letter “M” with the Magic Wand Tool and with this selection, add a Layer Mask to the folder. We will now have all our textures for the 3D “M” inside this folder.

Use “texture 4.jpg” from the Rust Textures pack. Copy, paste and call the layer “texture”. Duplicate it and scale the duplicated layer “texture2″ down to 12.5%.

Step 11
Adjust the Layer Opacity to 40% and change its Blending Mode to Color Burn for both layers.

Step 12
Add another texture layer “texture3″ using “metal_plaque_bump_seam.jpg” Armored Metal Textures. Adjust the Layer Opacity to 26% and change its Blending Mode to Hard Light. Shift the layer around until you are satisfied with the texture’s position.

Step 13
Use a Soft Round brush with Opacity of about 30% to apply a shadow below the “M”. Use the Smudge Tool to adjust and create a slanted shadow as below.

Step 14
Add your company name, in this case “Multimedia”. Use Heritage Extra Bold, 32px, black. Next add a faint shadow below it.
Duplicate the layer, rename it "multimedia shadow". Cmd + T to access the Transform Tool, right click and select Flip Vertical. Add Motion Blur. Change the Layer Opacity to 50%. Add a Layer Mask and finally, apply a gradient to fade out the bottom.

Step 15
Now we’ll create the cityscape for our Multimedia world. You can use Cityscape Brushes for the buildings. Download a few abstract render packs : Render Pack Textures 1 and Render Pack Textures 2 for the textures. First use the brushes to draw a few buildings. Draw each building on a separate layer, between layers “clouds” and “clouds2″.

Step 16
Resize, position and cut out part of the buildings that you don’t need.

Step 17
For each building, create a New Folder which will contain their respective textures. Using the same method to apply texture for the letter “M”, select each building, one at a time, with the Magic Wand Tool and add the selection as a Layer Mask to the folder. Set the folder layer’s Blending Mode to Lighten.

Step 18
Now apply the abstract textures to the cityscape as below. Move, rotate, resize the textures until you’re satisfied with the effects.

Step 19
It is a good practice to clean up and organize your layers. Though a bit tedious at first, this practice will actually save you precious time when searching for files, let’s say a month later. Place all the buildings layers in a new folder “Buildings”. Bring this folder down between layer “clouds” and “clouds 2″.

Step 20
Use your cloud brushes to paint a few small clouds on layer “clouds2″ to cover up the buildings’ base.

Step 21
Let’s add our multimedia props: Classical camera, Director’s chair, TV camera, Laptop, Microphone, Hotair baloon 1, Hotair baloon 2, Small Tree. For each of these objects extract their background by using the Magic Wand Tool (W) and then click on the button Refine Edge to adjust the edges. To remove any remaining rough edges, use the Eraser Tool (E) with a small round brush.

Step 22
Resize and then apply Filter > Smart Sharpen (Cmd+F) to each object. Position them as below.

Step 23
Add shadows to the chair, TV camera, laptop, microphone, camera and car by following the same techniques used for the letter “M”. For the tree, use natural brushes and adjust the shapes using the Smudge Tool.

Step 24
Spring cleaning time! Link up each object layer with its respective shadow layer so that it will be easy to turn each object on and off as needed. To do this, Press Shift + click on both layers. Right click and select Link Layers. Then place all the props layers in a new folder “Props”.

Step 25
When designing a homepage, the interactive elements play a major role in determining the website’s success. Therefore we should make our main buttons enticing and prominent for users to want to click them. We’ll create 3D boxes that are connected with the cityscape through colorful wires. They will represent our different page sections. Here’s a preview of what you’ll be designing.

Step 26
Go back to Illustrator to draw the 3D boxes and colorful wires. Use the Rectangle Tool (M) to draw 6 white boxes of different width depending on the length of the text the box will contain. Example “Web” will have a smaller box and “Contact” will have a wider box.

Step 27
Apply Effect > 3D > Extrude & Bevel for each box. See image for each box’s effect settings, from left to right.

Step 28
Copy over the artwork you created in Photoshop so far and paste it in a “background” layer as a guide. Draw a few lines with either the Pen Tool (P) or the Pencil Tool (T), whichever is easier for you.

Step 29
We’ll now make some rainbow brushes. Use the Rectangle Tool (M) to draw a rectangle. Then copy and paste four to five rectangles one beside each other vertically. Change their colors. Select all the rectangle and use Align Left to align them.

Step 30
Make a few rainbow variations. Here are some samples.

Step 31
To make the brush, select a rainbow cluster, drag and drop it into your Brushes Panel. Select New Art Brush. Name your Art Brush “Rainbow1″ and keep the default setting with a horizontal right direction.

Step 32
Now apply your rainbow brushes to the different lines.

Step 33
Copy and paste each rainbow wire(line) individually in Photoshop. Paste the layers in front of the buildings but behind your props and the letter “M”. Apply a Layer Mask on the wire layers and use the Cloud brushes to make part of the wires transparent.

Step 34
To give the wires a 3D look and make them shinier, apply a Bevel & Emboss Layer Style with similar settings as shown below. Each wire requires some slight settings tweaking to achieve the desired look.

Step 35
Copy and paste the 3D boxes from Illustrator into individual layers.

Step 36
Apply texture “metal_plaque_bump_seam.jpg” from Armored Metal Textures, using the same techniques as in Step 10 and Step 17. Set the texture layer’s Blending Mode to Hard Light with Opacity 26%.

Step 37
Add text to the boxes. Use Heritage Extra Bold, 14px, black. Rotate the text where needed to follow the angle of the boxes.

Step 38
Clean up your layers and organize the buttons into folders, if you haven’t already done so.

Step 39
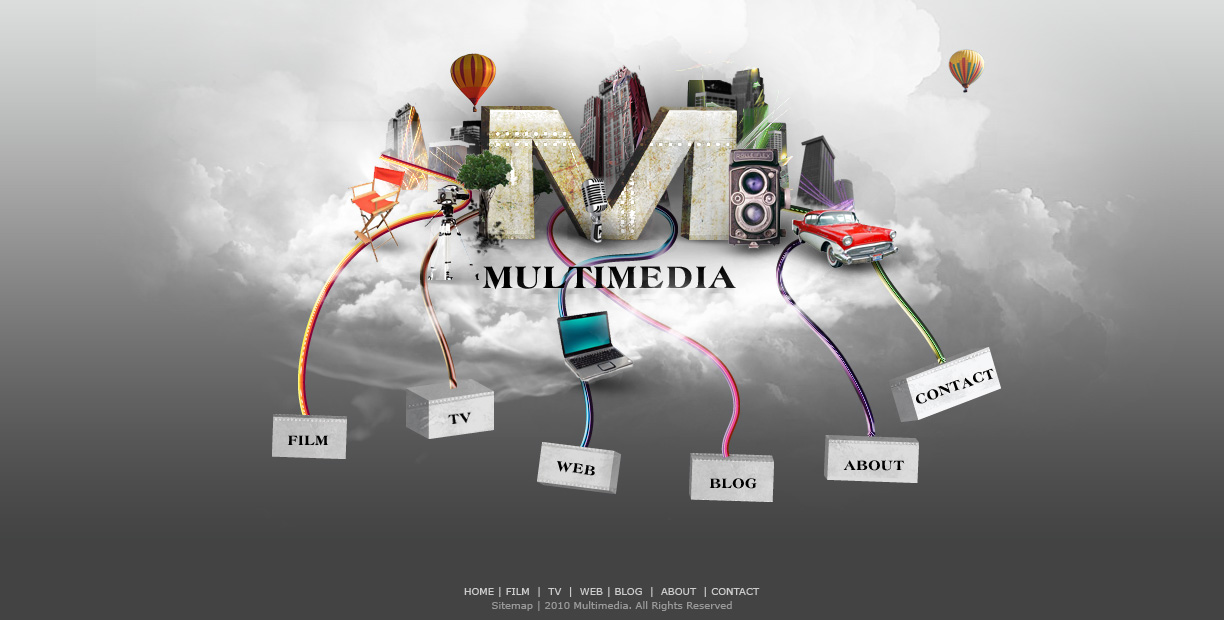
The last step!! Add the footer and you’re done! Use Verdana, 10px, #cccccc for the first line and #999999 for the bottom line. These are safe web colors.

Conclusion
I hope you found this tutorial helpful. Do share your opinions, ideas, and I will be glad to help you if you have questions. Be creative and explore the techniques you’ve learned here – I can’t wait to see what you come up with!