In this tutorial you will learn how to create spooky, Halloween theme text in Adobe Illustrator. We will use the Transform effect to obtain a 3D style and create new Art Brushes for highlights, as well as adding spooky details such as cobwebs and spiders! So let’s begin…
Step 1
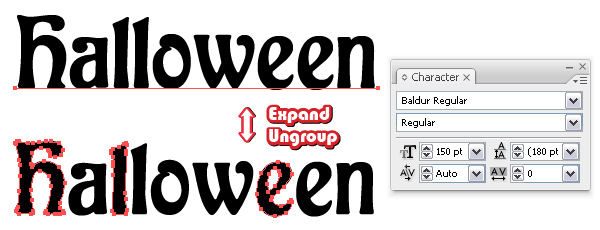
First start a New web document. Using the Type Tool (T) and type "Halloween" using a font called Baldur Regular, size of 150pt. You can find it here: Baldur Font|dafont.com. From the Object menu select Expand and Ungroup to obtain individual letters (Shift + Ctrl + G).
Step 2
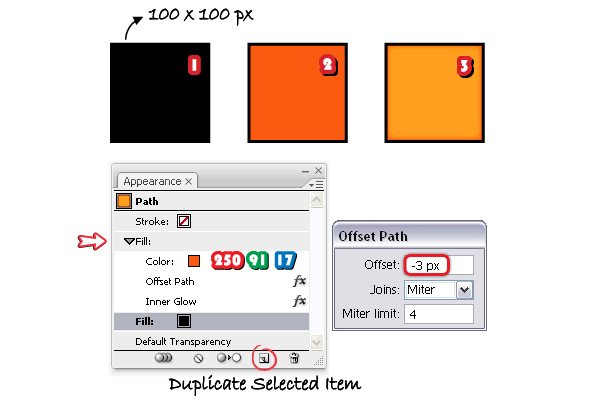
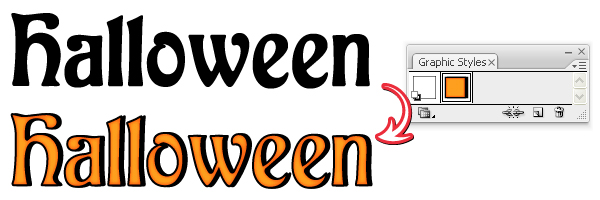
Now, we will create a new Graphic Style. Use the Rectangle Tool (M) to draw a 100 x 100px square and give it a black fill (1).
Go to the Appearance panel, select this black Fill and click on the Duplicate Selected Item icon at the bottom of the panel. As a result you will get a second fill. Change the color from black to orange. With the orange fill selected in the Appearance panel, go to Effect menu > Path > Offset Path and apply a -3px Offset (2).
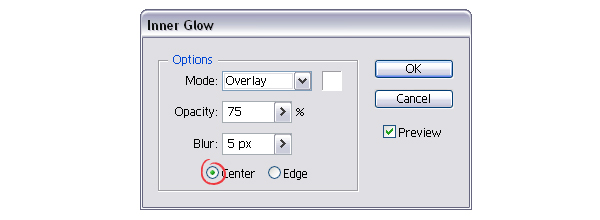
Next, go to Effect menu > Stylize > Inner Glow and apply this effect using the settings shown below.
Use white and this time check Center instead of Edge.
Step 3
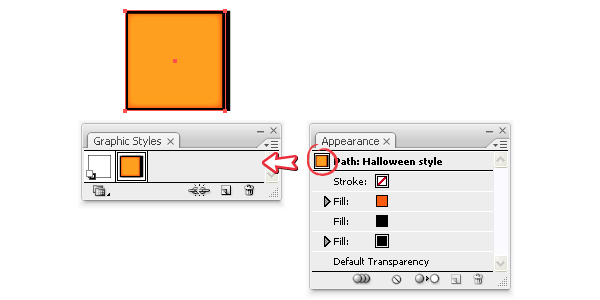
Duplicate the black fill as you did earlier. Select the black fill from the bottom of the Appearance panel and go to Effect > Distort & Transform > Transform. Select to move this black fill 5px horizontally and click OK. This way you will obtain a fake 3D look.

Step 4
Select the square and from the Appearance panel drag the thumbnail into the Graphic Styles panel (Window menu > Graphic Styles) to save it.
Tip: You can save it permanently in the library and use it anytime, this way: having only this style saved in the Graphic Styles panel, open the Graphic Styles Libraries Menu from the bottom of the panel and select Save Graphic Styles. Type a name and hit OK. Now, you can access it anytime you want by going to Graphic Styles Libraries Menu > User Defined > "name".
Step 5
Apply this style to all the letters by simply selecting it from the Graphic Styles Panel.
Step 6
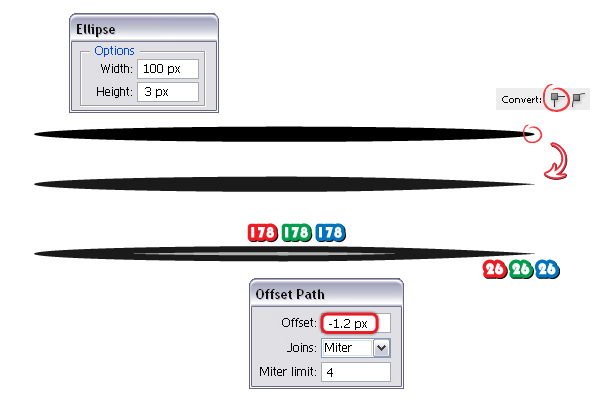
Next we will create a new Art Brush. Using the Ellipse Tool (L), draw a 100 x 3px flat ellipse. Select only the right point using the Direct Selection Tool (A) and click on the Convert selected anchor points to corner option. Now, having this shape selected go to Object > Path > Offset Path and apply a minus 1.2px Offset to obtain a smaller shape in the center. The first shape is filled with 90% black and the smaller shape with light gray (30% black).
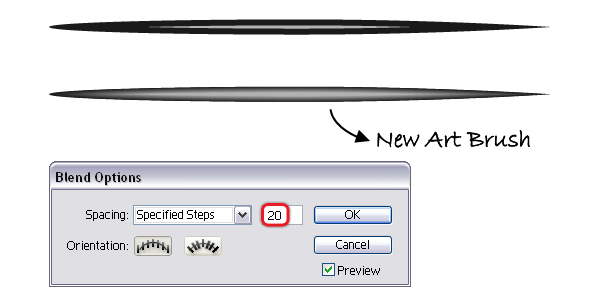
Select both shapes and go to Object > Blend > Blend Options. Choose 20 Specified Steps then go back to Object > Blend > Make. Drag the resulting blend-group into the Brushes panel to save the new Art Brush.
Step 7
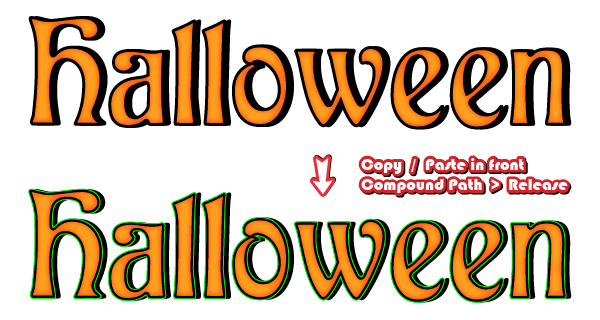
Select all of the letters and Copy and Paste in Front then remove all the existing appearances. Give them only a stroke then go to Object menu > Compound Path > Release.
Step 8
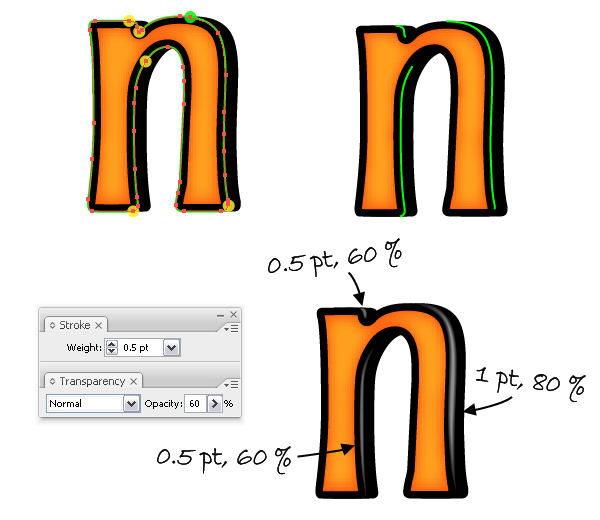
Next, we will focus on each letter and cut these green paths. Let’s start with the letter "H". Take the Scissors Tool (C) and click on the anchor points highlighted with yellow. If some points are not where you want them you can always add others using the Add Anchor Point Tool (+). In this case I added the points highlighted with green. When you’re done with the cutting, keep only the green segments shown below and delete the rest.
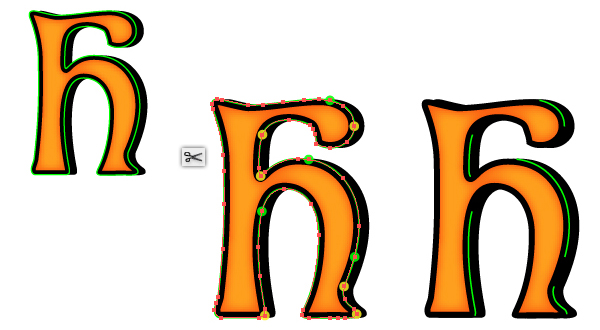
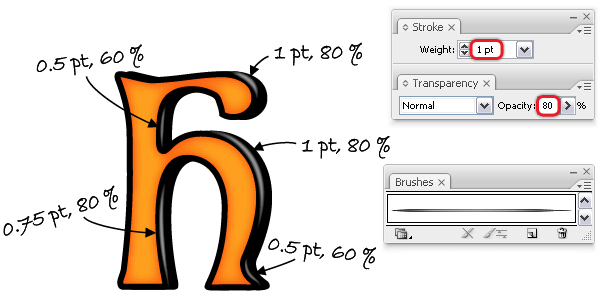
Step 9
Apply your new Art Brush to the lines you’ve created then set the Stroke Weights and the Opacity values as indicated for each one. For example, the path on the top right has a 1pt Stroke Weight and 80% Opacity.
Step 10
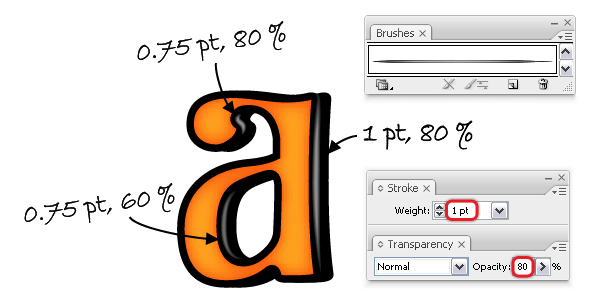
The next letter is "A". You should have two paths (red and green) because you released the Compound Path at Step 7. Take the Scissors Tool (C) and click on the points indicated to cut these two paths into smaller segments. Keep only the ones shown in the image below.

Step 11
As before, apply the Art Brush to the lines you’ve created with the values below.
Step 12
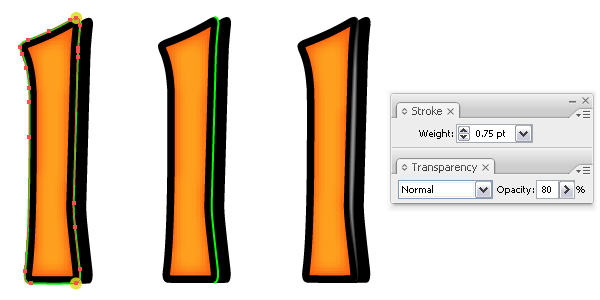
Do the same things for the letter "L". This time we have only one path. Apply the Art Brush, then set the Stroke Weight to 0.75pt and reduce the Opacity to 80%.
Step 13
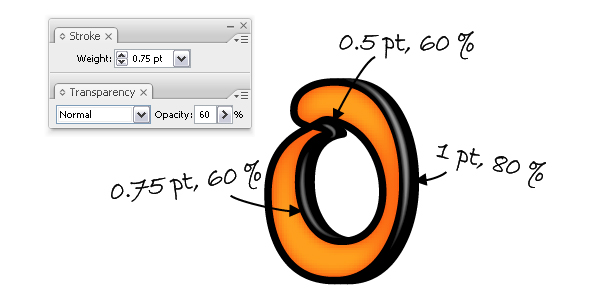
For the letter "O" you should have two paths (release Compound Path). Repeat the same process and cut these paths. Delete the segments that you don’t need.
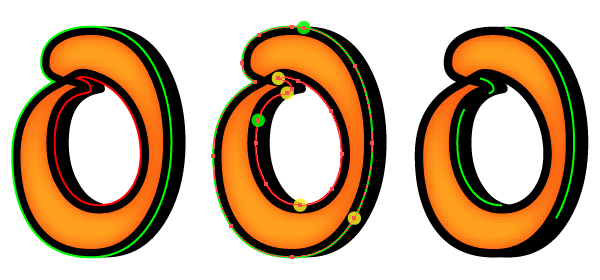
Step 14
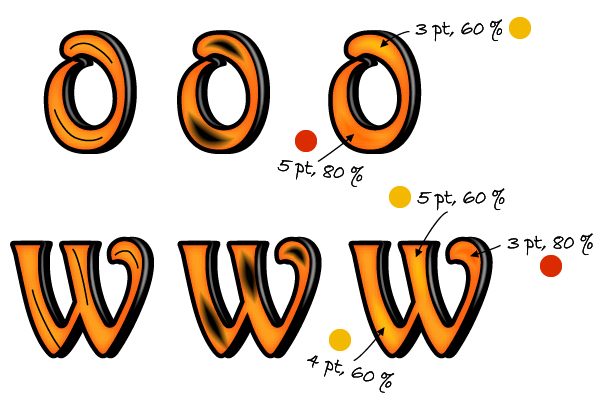
Apply the Art Brush and use the settings below for the three paths.
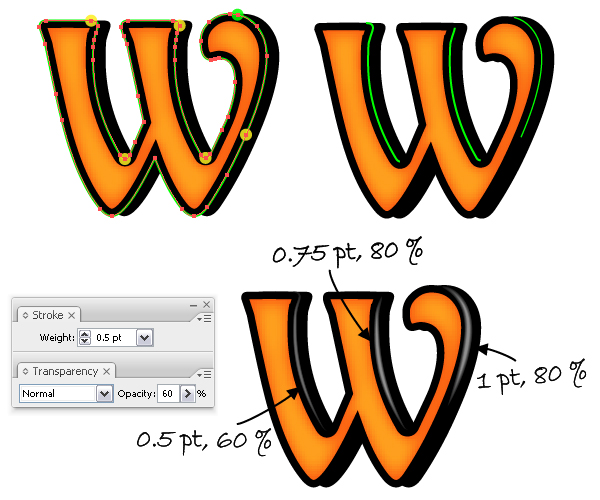
Step 15
Do the same things for the letter "W":
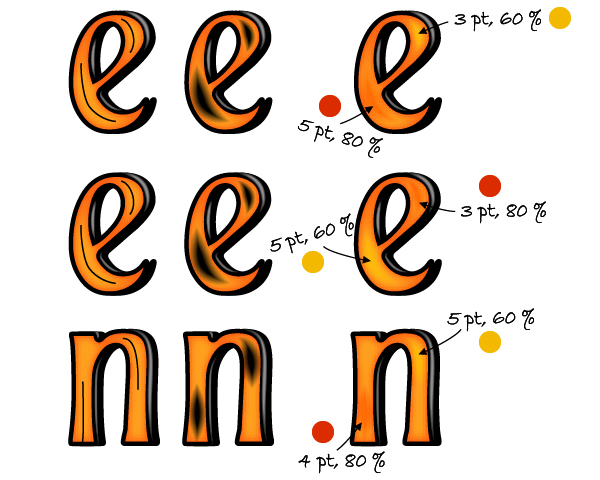
The next letter is "E":
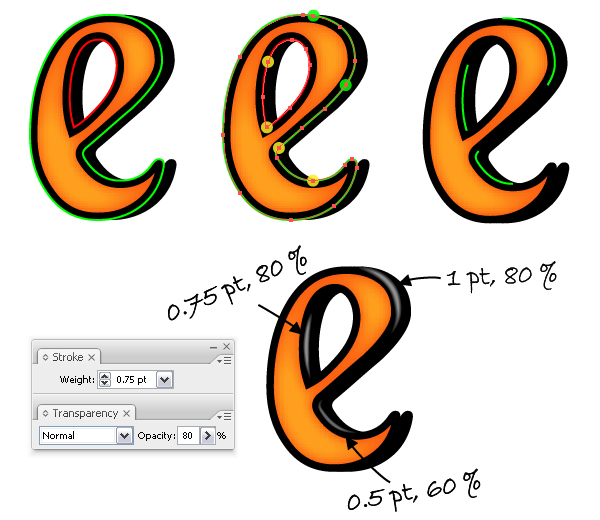
…and the last letter:
At this point the text looks like this:

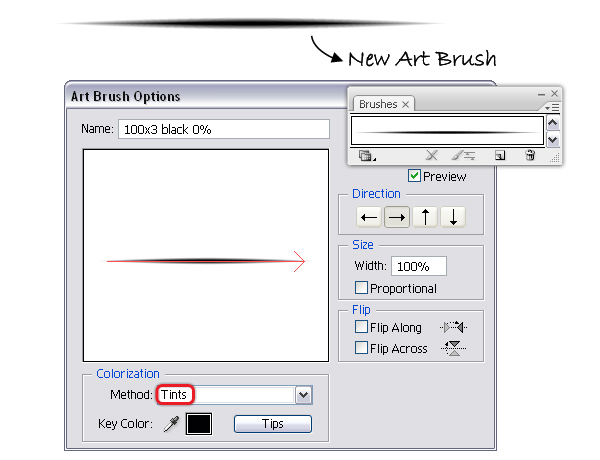
Step 16
Now, we need another Art Brush. We have used it already in another tutorial of mine Create a Set of Glossy Labels, therefore follow Step 18 to create it. When you are done, drag it into the Brushes panel and select New Art Brush. In the Art Brush Options window, choose Tints as the Colorization method then click OK.
Tip: If you want to permanently save this brush in the library, first make sure that you don’t have other brushes in the Brushes panel except this one. Open the Brush Libraries Menu from the bottom of the panel, choose Save Brushes then type a name and hit OK. Now, you can load it anytime you want by going to Brush Libraries Menu > User Defined > "name".
Step 17
Next, take the Pen Tool (P) and draw the blue paths shown below:

Step 18
We will focus again on each letter. Stroke the two paths drawn over the letter "H" with the Art Brush saved earlier then set the Stroke Weight and the Opacity values as indicated for each one. We don’t want them black so we will change this by simply selecting another stroke color, in this case shades of yellow and red (Colorization method). All the paths drawn at the previous step have to be on Overlay even though I won’t mention this every time.

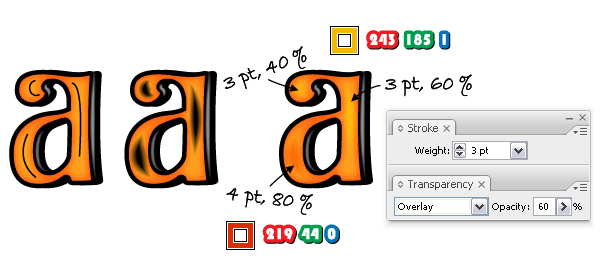
Step 19
Let’s continue with the letter "A". Stroke the three paths with the same Art Brush then change the Stroke colors, the weight and Opacity values as indicated. For example, the path on the right has a 3pt yellow Stroke, 60% Opacity and of course the Blending Mode on Overlay.
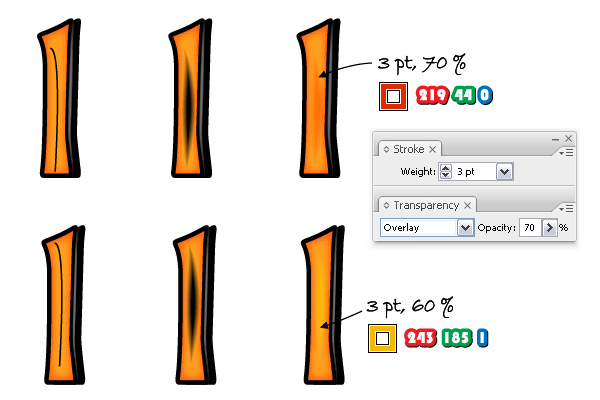
Step 20
Here are the two letters "L". Stroke the two paths with this Art Brush then set the Stroke Weight to 3pt and reduce the Opacity. Select for one of them the yellow shade as the Stroke color and for the other the red shade.
Step 21
Repeat the same process for the rest of the letters. Here are the next two:
…and the last ones:
At this point the text should look like below:

Step 22
We will continue with the spider web. Using the Pen Tool (P) or the Line Segment Tool (\) and draw six radial lines (radial thread) as in image below. When you are done, use the Ellipse Tool (L) to draw a circle in the center.
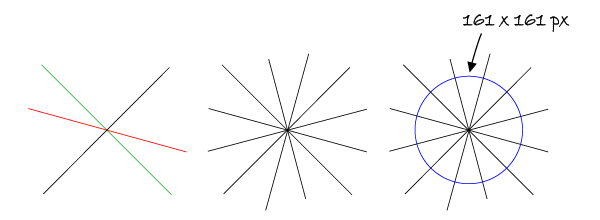
Step 23
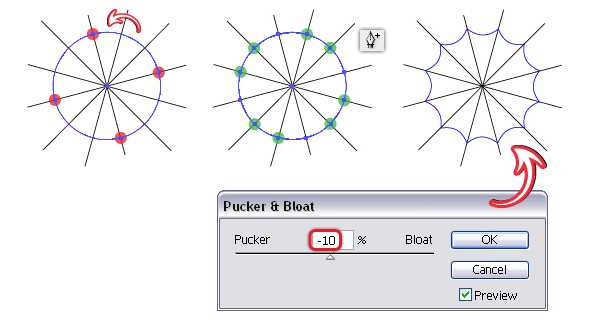
Rotate the circle so that its four anchor points to intersect the lines. Now, take the Add Anchor Point Tool (+) and add other eight points exactly where the circle intersects the rest of the lines. Having the circle selected, go to Effect > Distort & Transform and apply the Pucker & Bloat effect.
Step 24
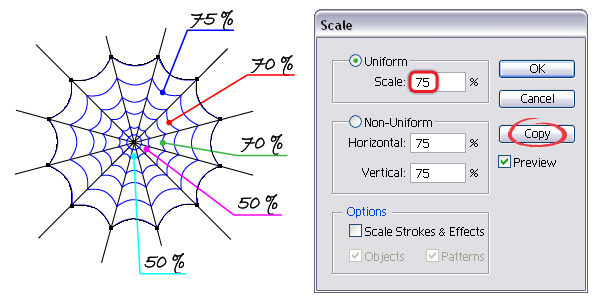
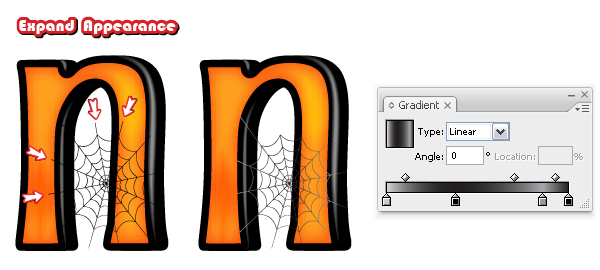
Select the first spiral thread and from the Object > Expand Appearance in order to expand the effect applied. Next, go to Object menu > Transform > Scale, select 75% and click Copy. You will get the second spiral thread. Now, use this second thread to obtain the third by scaling it 70% this time. Continue in this manner until you get them all.
Step 25
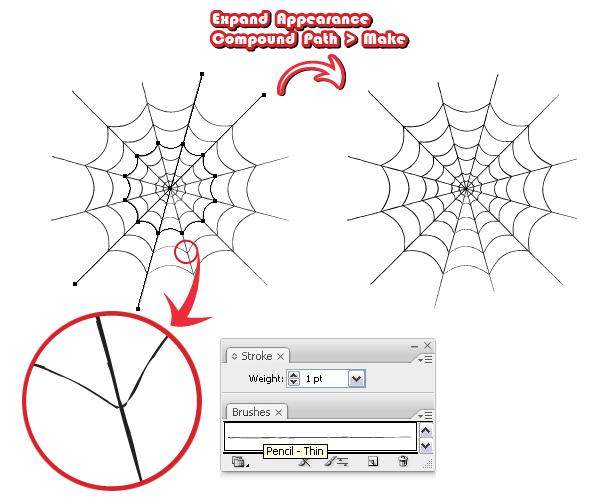
Select everything (radial and spiral threads) and stroke them with an Art brush called Pencil – Thin that you can find in the Brush Libraries Menu under Artistic > Artistic_ChalkCharcoalPencil. In order to transform the strokes into fills select Expand Appearance then go to Object > Compound Path > Make. As a result you will get a single compound path, the spider web.
Step 26
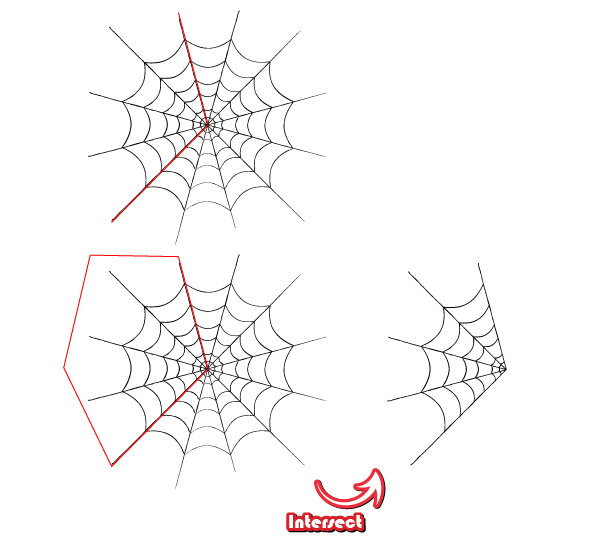
To create a smaller spider web, first make a copy of the first one. With the Pen Tool (P), draw the red path as shown below then surround the radial threads and close the path. Select the spider web and also the red shape and click Intersect shape areas > Expand from the Pathfinder panel.
Step 27
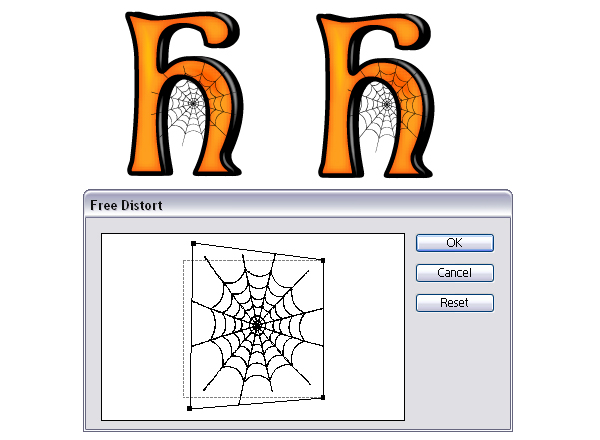
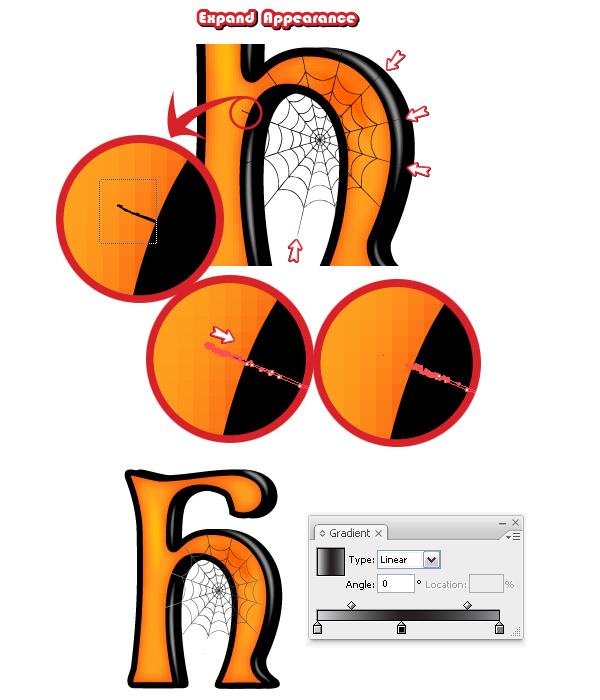
Focus on the letter "H". Place a copy of the spider web above it then go to Effect > Distort & Transform > Free Distort. Drag the corner points to distort the shape as shown below.
Step 28
Select Expand Appearance from the Object menu to expand the effect and now we need to fix some of the radial threads. Zoom as much as you need then take the Direct Selection Tool (A) and drag a selection over the portion that surpasses the black area. In this way you will select only the anchor points from that portion and you can drag them into the black area.
Do the same thing for the other radial threads and when you are done fill the spider web with the linear gradient shown using shades of gray.
Step 29
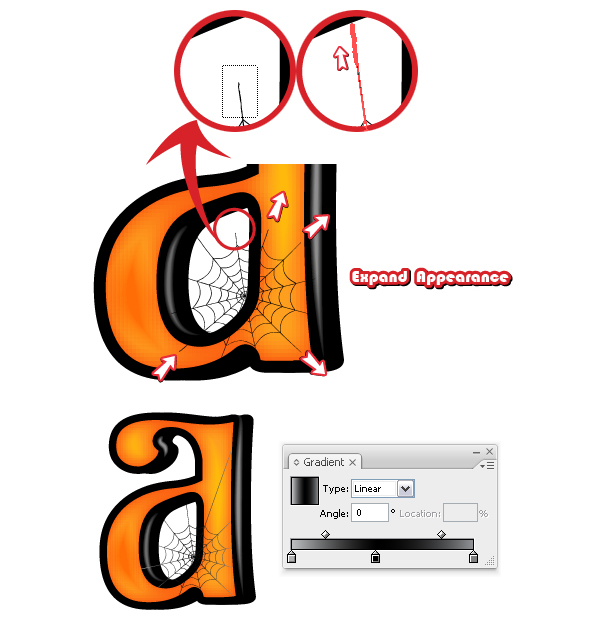
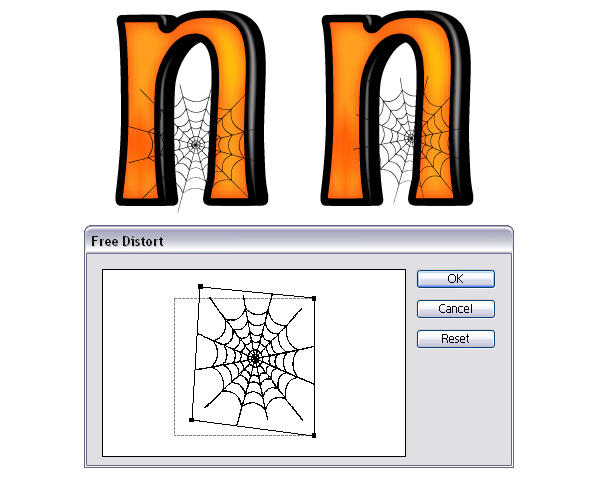
Let’s continue with the letter "A". Place a spider web above it then apply again the Free Distort effect.
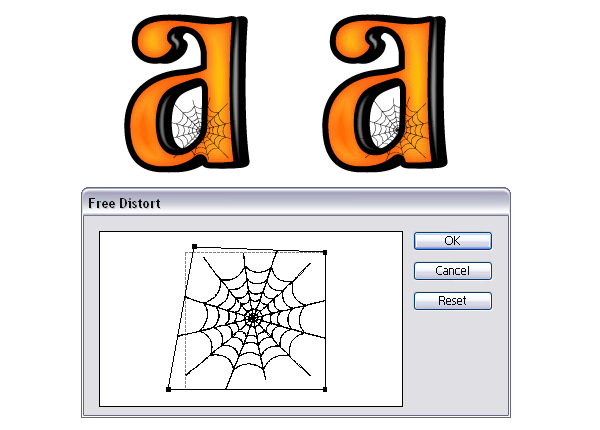
Step 30
Select Expand Appearance to expand the effect then we need to fix some of the radial threads. The process is the same to make them longer. Use the Direct Selection Tool (A) to drag a selection over the anchor points from the top of the thread and then drag them up to the black area. Repeat this process for the other radial threads then fill the web with the gradient shown.
Step 31
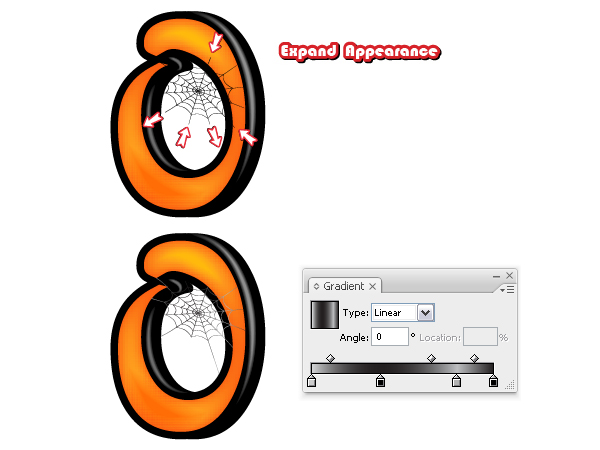
Now, focus on the letter "O". Arrange the spider web and apply the Free Distort effect. After that, select Expand Appearance.
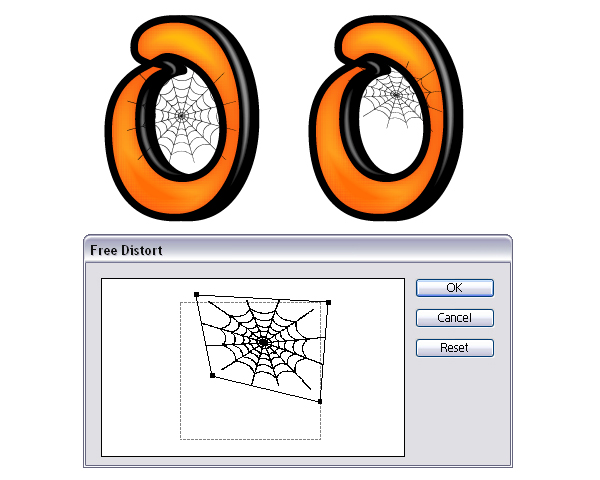
Fix the threads that don’t fit as you did before then fill the spider web with the gradient shown.
Step 32
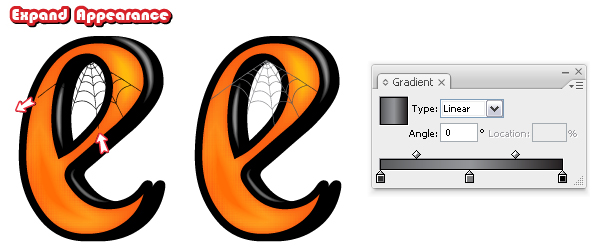
For the letter "E" I used the smaller spider web but the process remains the same. First apply the Free Distort effect then select Expand Appearance from the Object menu.
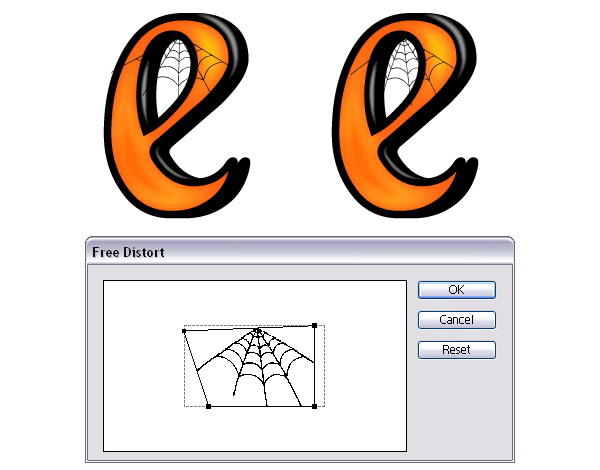
Next, fix the threads that don’t look good and use the gradient to fill the shape.
Step 33
We finally got to the last letter. Follow the two images and do the same things.
Step 34
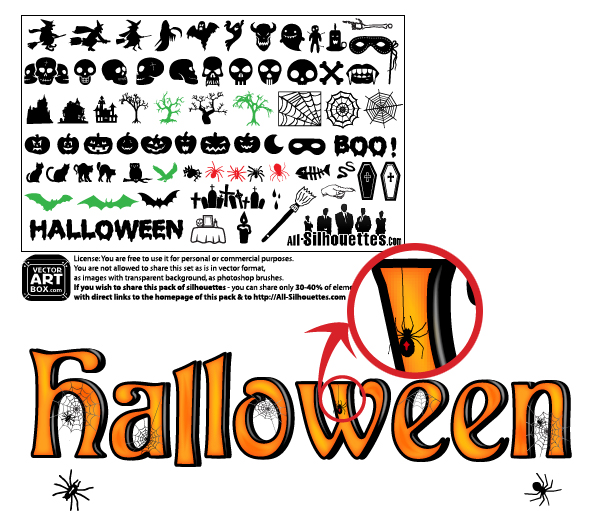
It’s time for some final details. I’ll be using a free download, Halloween Silhouettes. I used the red spiders for the text. Arrange the spiders on the webs to complete the Halloween look.
Step 35
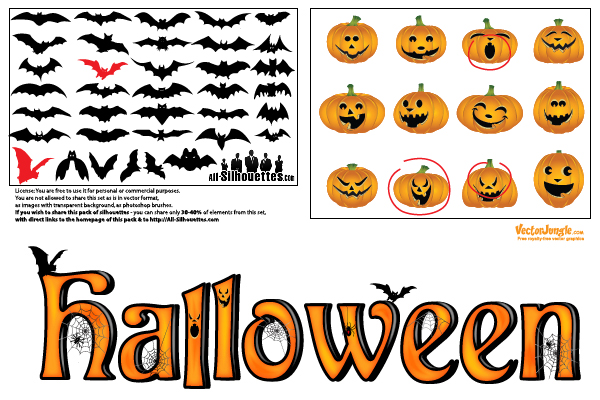
Next, go here Vector Bats | All Silhouettes and download this set of bats. I used two of them. From here Halloween Pumpkins | All Silhouettes download these great vector pumpkins. Ungroup them and select only their scary faces. Put them on top of the two letters "l".
Step 36
Use the Ellipse Tool (L) to draw these circles under each letter. Fill them with a radial gradient from black to white then go to Effect > Blur > Gaussian Blur and apply a 2.2px Radius. Set the Blending Mode to Multiply (white becomes transparent) if you have a colorful background.
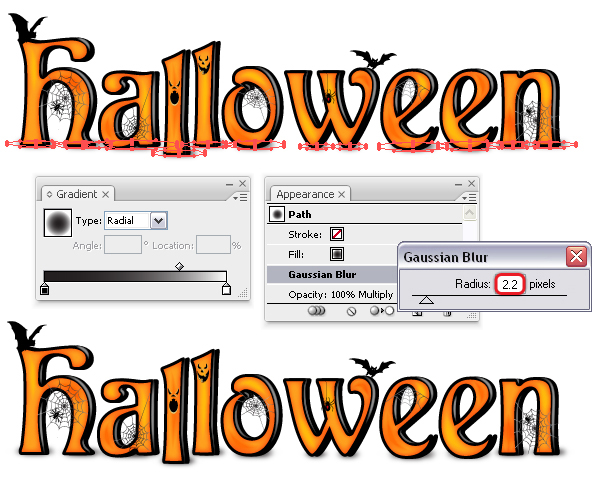
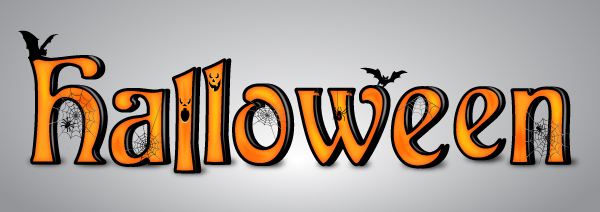
Final Image
The Halloween text effect is complete! I’m sure you could use these effects for a variety of projects, as well as the cobwebs in other illustrations. Happy Halloween!
{excerpt}
Read More