In today’s tutorial you will learn how to polish your knowledge of perspective with a simple but very useful technique widely used by concept artists and professionals in the entertainment industry. Let’s get started!
Step 1
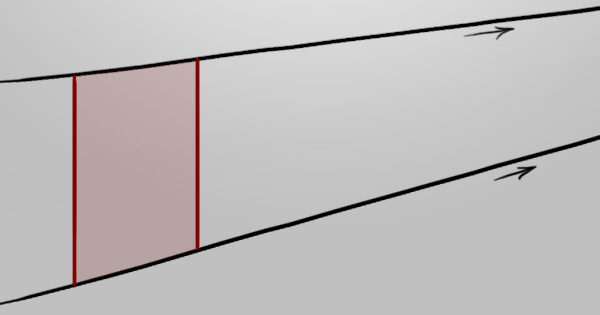
Even without special equipment and measurements, we can easily repeat a quadrilateral towards a vanishing point. Let’s start off with a basic scenario that will evolve a little as we proceed.
Assuming you know the basics of one, two, and three-point perspectives, we’ll begin with a rectangle drawn in one-point perspective – aiming to repeat it towards the vanishing point.
Step 2
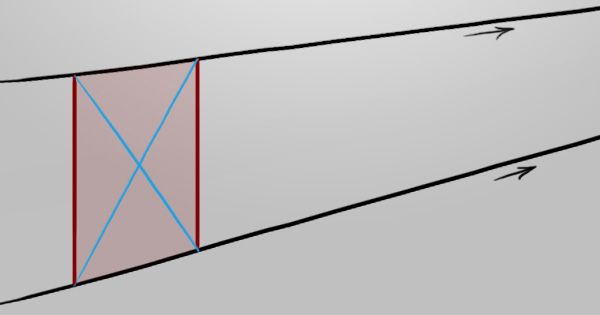
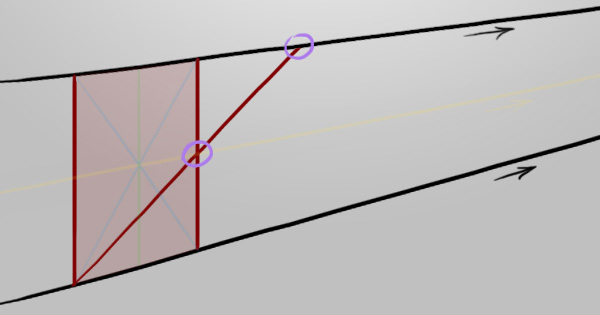
Draw a cross using the corners to establish the center of the rectangle.
Step 3
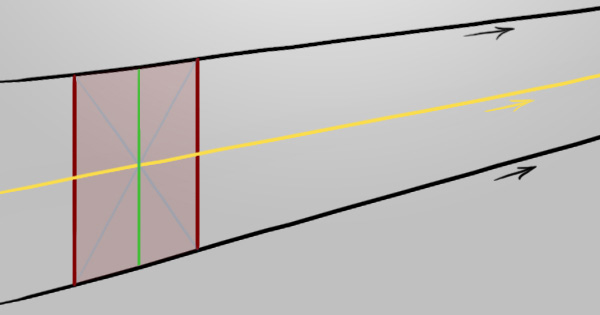
Using this center point, we now know where the center of the x-axis would be (green), but more importantly the center of the y-axis (yellow).
Step 4
Starting from the lower left corner we can strike a line through the center of the y-axis we just established, stopping at the vanishing point line (black). Starting from the upper left corner would work the same, as long as the line passes through the middle.
Step 5
Can you see what just happened? We successfully found the corner of the next rectangle. Draw a line directly downwards to finish the rectangle off, like in the example below. This technique is extremely useful and could be used in one-point perspective drawing things such as walls, floor tiles, cabinets, etc.

Step 6
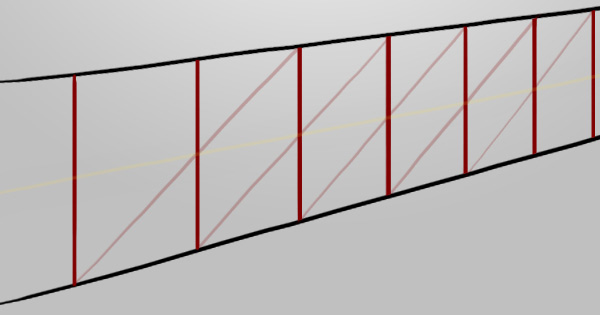
As long as we have the corner, we can repeat this technique as much as we like, eventually ending up very small near the vanishing point. There are obviously digital transform tools and such to achieve this effect much quicker but this makes for another check-box in your skills list, especially when working on paper.
Step 7
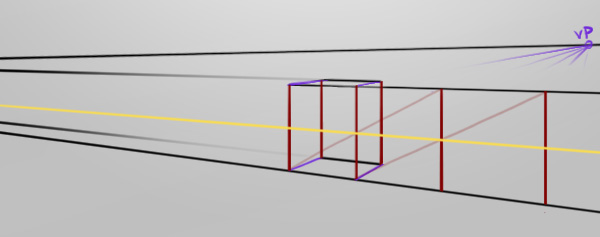
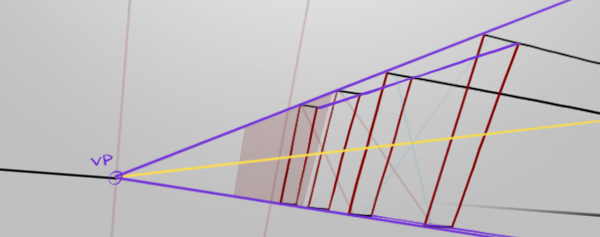
Let’s try that technique with a second vanishing point (two-point perspective). As you can see in the example below, there’s a purple vanishing point (to the right) and a black vanishing point (off the image, to the left).

Step 8
Again, if we find the center of the y-axis (yellow), we can use that information to strike a line from a corner through it to reveal where the next shape’s opposite corner would be. Any combination of corners and center lines work but only for their individual sides, so try it out for yourself!
Step 9
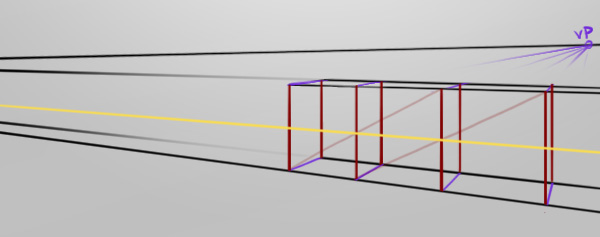
If we continue the black lines, we can use the purple vanishing point to see when the purple lines at the bottom collide with the black vanishing point’s line. This gives us the information to map out what these repeating shapes look like on the other side.
Step 10
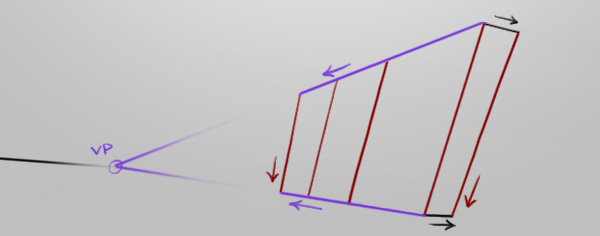
Now let’s jump to a three-point perspective. The rule for joining the corners of the vertical lines (red) still applies, as the center line (yellow) can still be drawn with an initial cross (faded blue).
Step 11
As demonstrated, this technique can be used to repeat geometry very effectively and in large scales, accurately as well. Just don’t get your axes all mixed up! If it helps, then by all means visually differentiate the separate axes like the example below.
Step 12
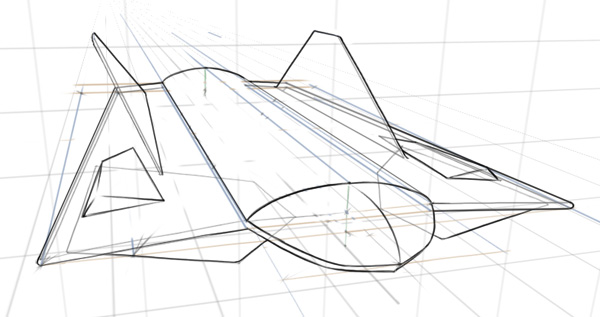
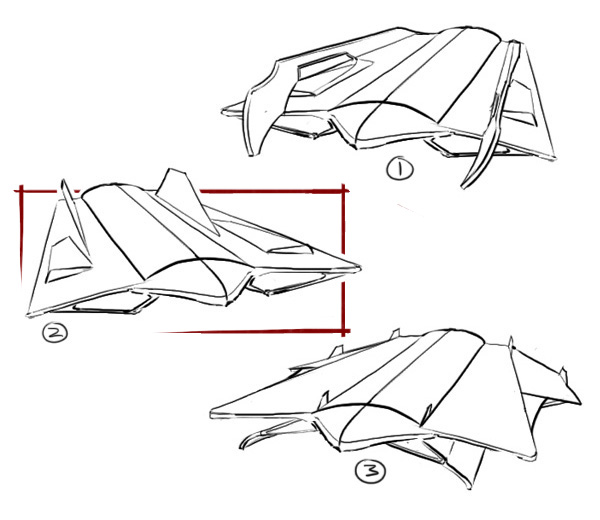
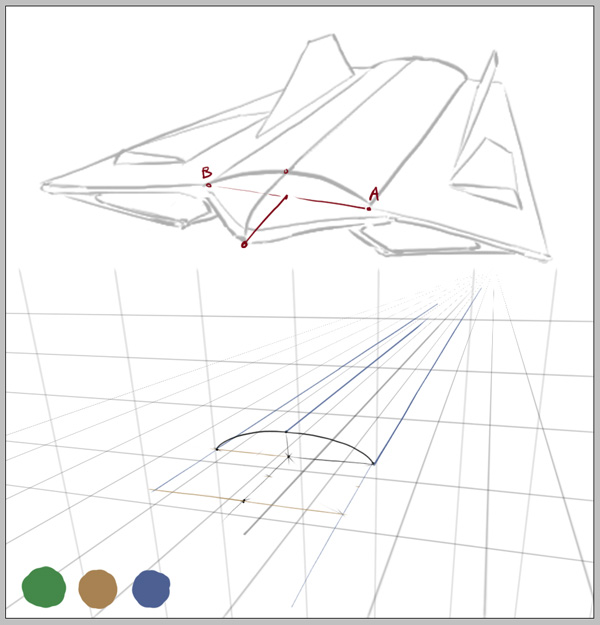
Now that we’ve learned that simple technique, we’ll use it to draw a spaceship ![]() This is just to show accuracy though, so don’t judge the design. (If the accuracy doesn’t impress you however, that’s clearly because I’m doing it strictly to show off the design) So, let’s pick a thumbnail and get drawing! I think design two has some nice clear forms.
This is just to show accuracy though, so don’t judge the design. (If the accuracy doesn’t impress you however, that’s clearly because I’m doing it strictly to show off the design) So, let’s pick a thumbnail and get drawing! I think design two has some nice clear forms.
Step 13
To make things easier, the perspective lines will be drawn as a consistent reference. In the example, I’ve drawn some thin lines with the Brush Tool (B) on a New Layer (Ctrl+Shift+N or Cmd+Shift+N) and used the Transform Tool (Ctrl+T or Cmd+T) to lift a corner up, mimicking the existing yet rough perspective in the drawing. The lines can be kept straight while drawing by holding down Shift.
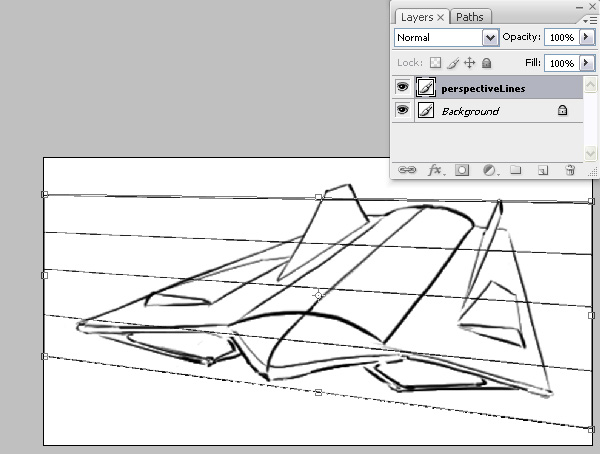
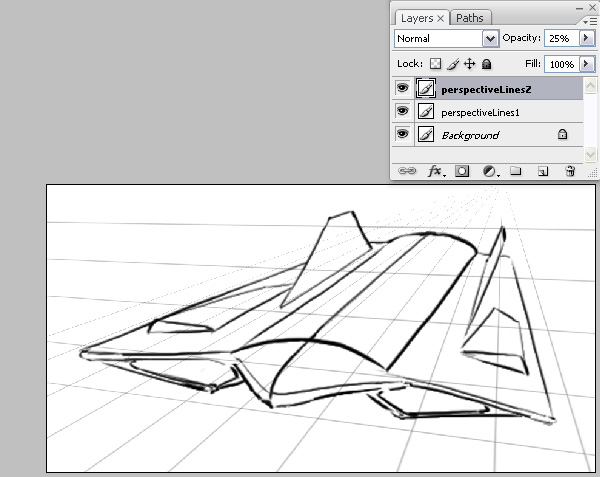
Step 14
The same is done for the second vanishing point and both opacities are lowered in the Layers Palette (F7) giving us a clearer view of our own line art.
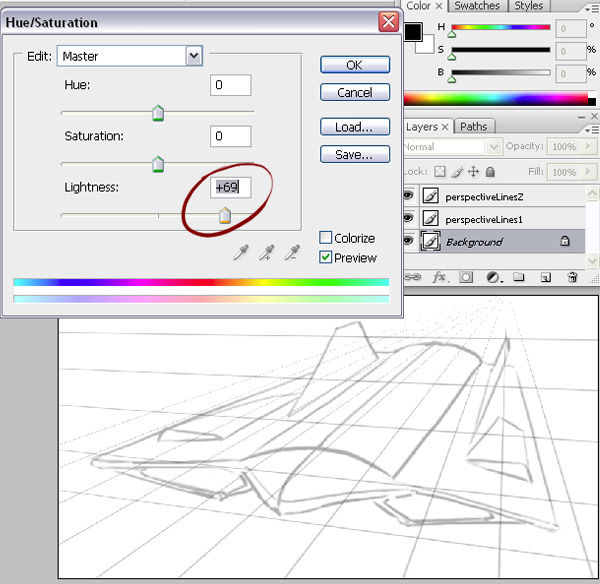
Step 15
The sketch is still too apparent and would interfere heavily with my weak and precious drawing to come. Use the Hue/Saturation (Ctrl+U or Cmd+U) window to slide the Lightness values higher.
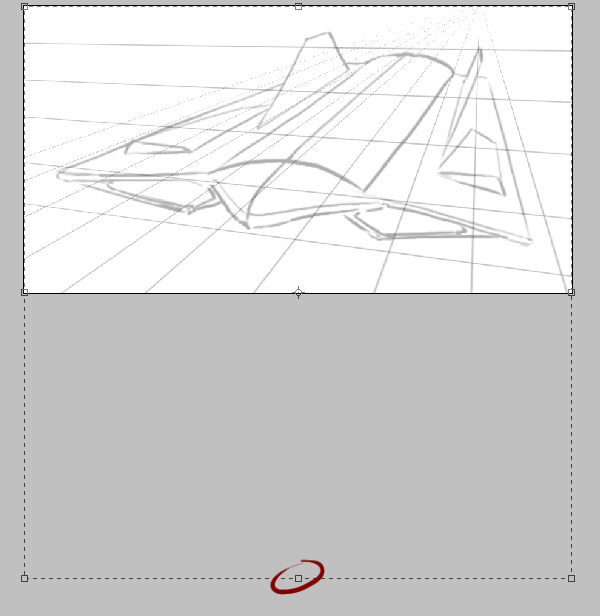
Step 16
The canvas feels quite limited so let’s use the Crop Tool (C) to extend the canvas space. In the example below I’ve dragged across the entire image with Left-click and then dragged the center-bottom control point lower, pressing Enter to perform the crop.
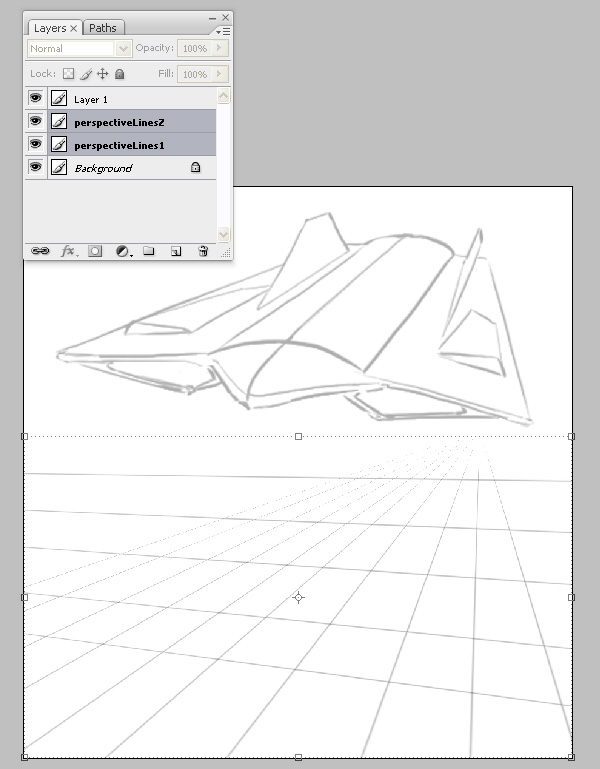
Step 17
Let’s drag the perspective lines down with the Move Tool (V) and draw on top of those. We can keep the rough sketch above as a visual reference. If you’ve got multiple layers to handle like in the example, you can hold Ctrl or Cmd and Left-click the layers you want to highlight to move.
Step 18
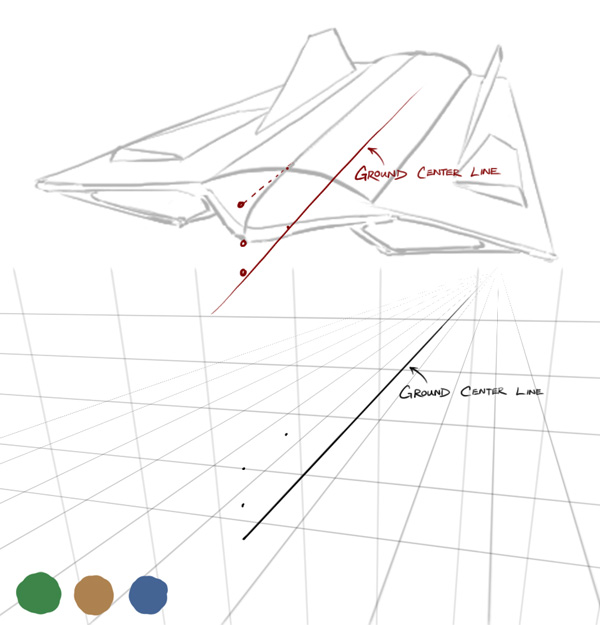
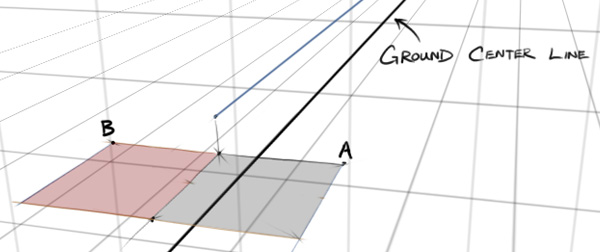
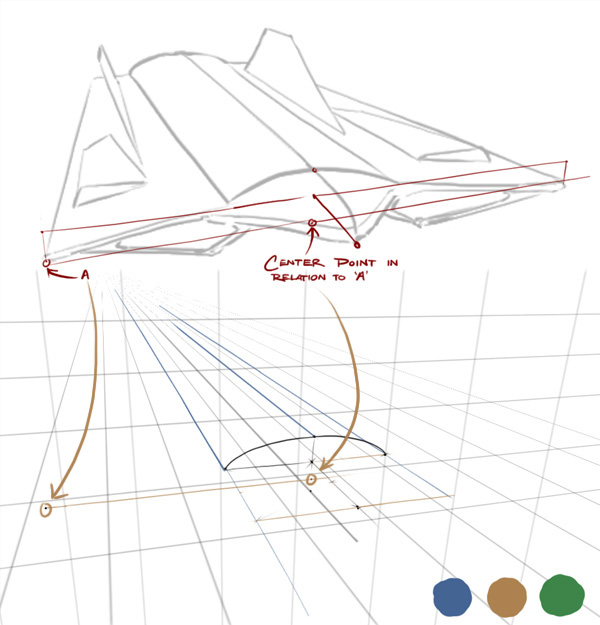
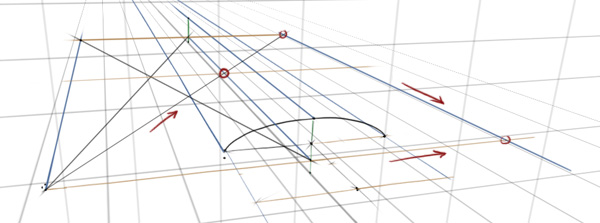
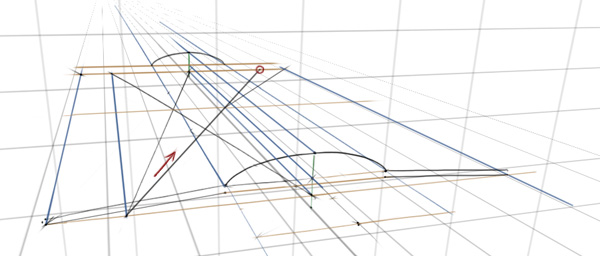
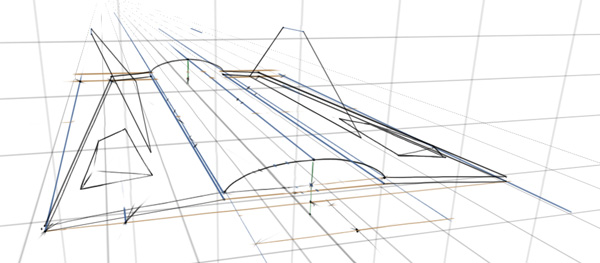
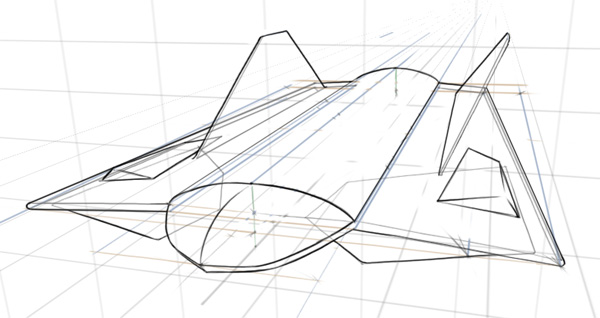
When drawing complex shapes, it is often crucial knowing where on the ground it is for reference. We’re essentially mapping out a lot of the actual spaceship’s virtual form, not just simply the lines we can see.
Let’s dot in the height of the ship’s nose and neck. By following the axis, we can see the spatial relationships of the dots. I’ve added a third vanishing point as well as some colours to differentiate the three axis.
Step 19
Let’s focus on establishing the points in the example labeled ‘A’ and ‘B’. We can estimate ‘A’ judging from the sketch above, but what will be challenge is finding out where to dot in ‘B’. This is where we’ll use the new technique we just learned.
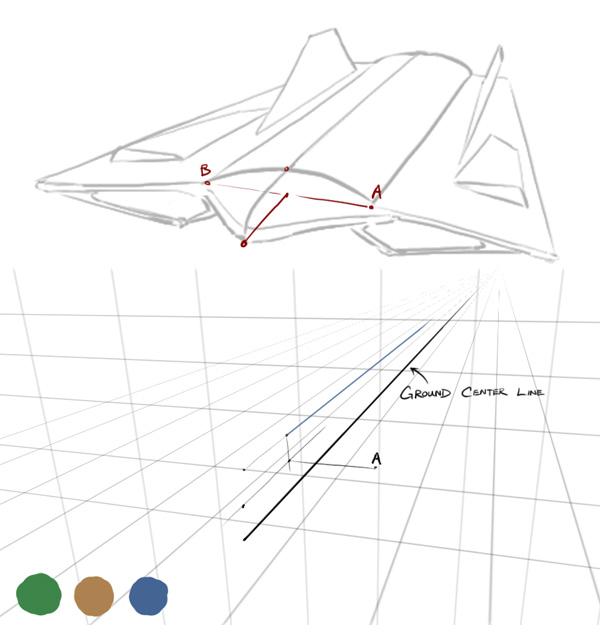
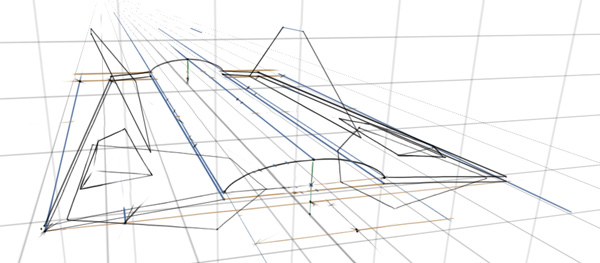
Step 20
Let’s extend a line from ‘A’ to show the blue axis associated with it (blue line). Then we’ll pick a point from the noise that’s of equal height to ‘A’ and extend a line from it to show its brown axis (brown line). Now we have another corner and a perfect square.
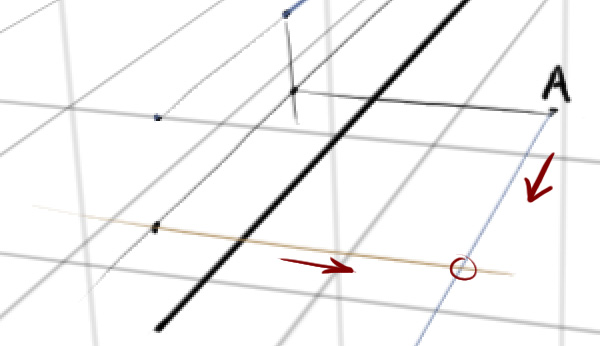
Step 21
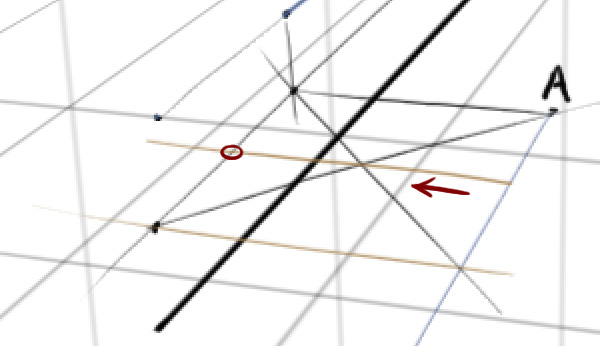
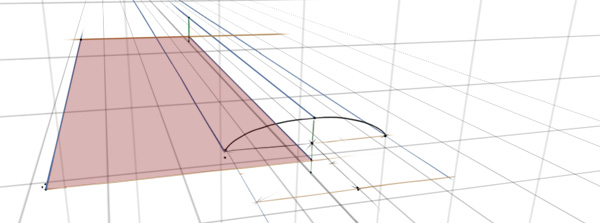
This square is touching the center line, now all we need to do is repeat this square towards the brown vanishing point once to reveal where the symmetrical equivalent to point ‘A’ would be. Does this feel familiar? Let’s make a cross using the four corners.
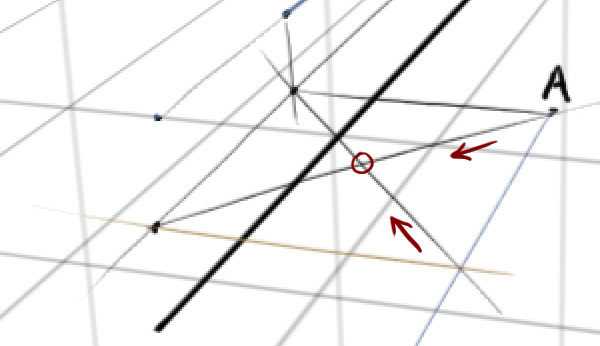
Step 22
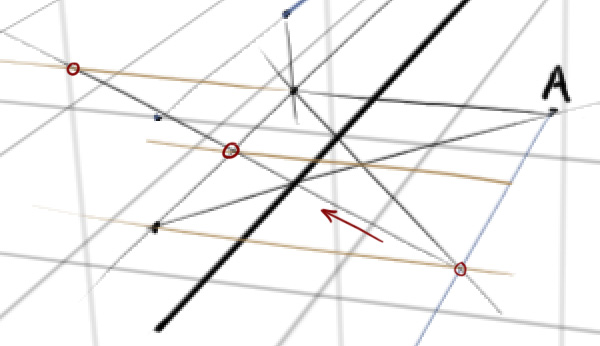
We have the middle point we need (circled red).
Step 23
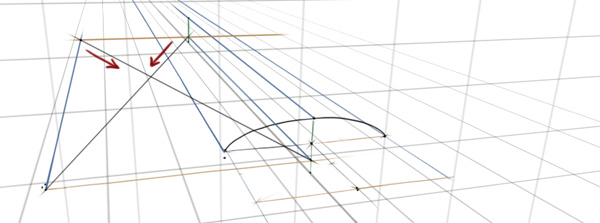
Now strike a line from a corner through that middle point until it touches the same brown vanishing point line as ‘A’, as shown in the example. When it touches, we can repeat the square shape and thus, we have B.
Step 24
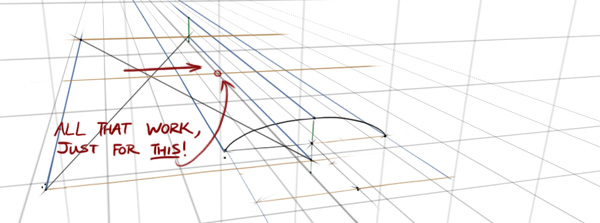
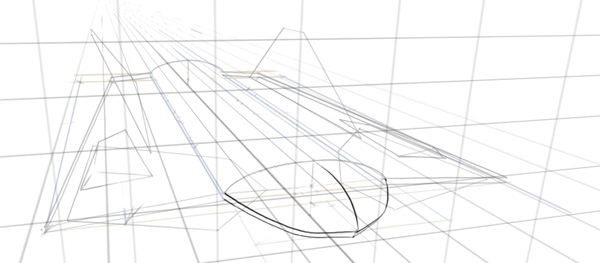
We can draw in the shape of the fuselage because we have the three points. Very nice.
Step 25
Yes. Very nice, moving on…
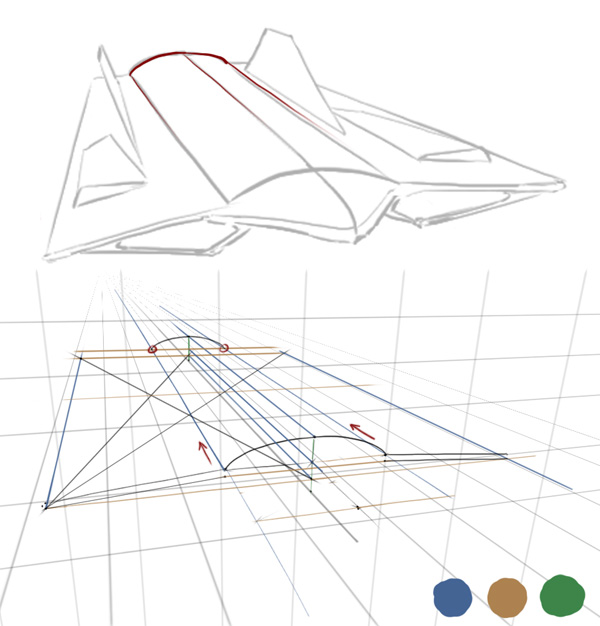
Step 26
Let’s do a similar process for the upper tip of the wings now. I’ve flipped the canvas in the example because I find it more convenient to strike lines in that direction. You can do this by choosing Image > Rotate Canvas > Flip Canvas Horizontally.
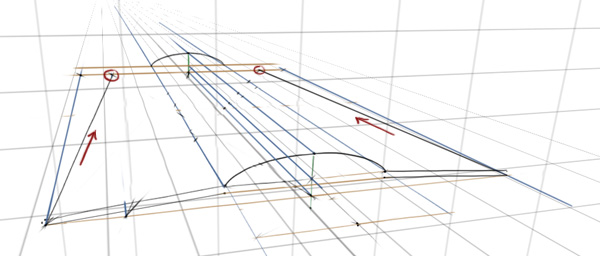
Step 27
We’ll extend the lower left corner upwards along the blue axis towards the vanishing point, then along the brown axis until it hits the center line. Now we have a square once again. Remember, it is very important that the heights of the corners are symmetrically consistent, otherwise the new point on the other side of the center line will be miscalculated.
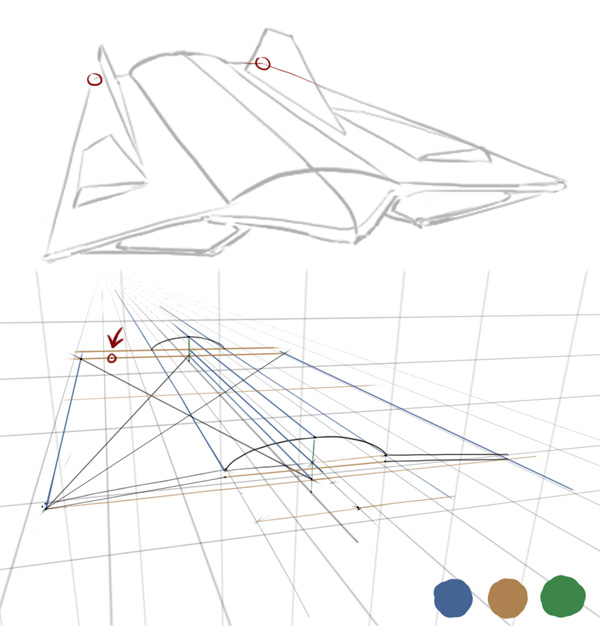
Step 28
The same simple steps as before – make a cross with two lines using the four corners, like in the example below. Make sure it’s fairly accurate.
Step 29
Now we have a center point, we’ll run a line through it along the brown axis to find the mid-point, which in the example, is on the center line.
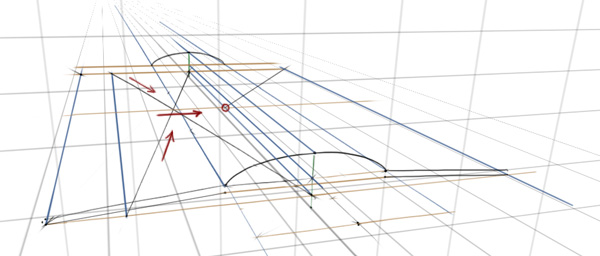
Step 30
From the lower left corner, we can draw a line through that mid-point we just revealed until it hits the brown line at the back of the spaceship. Using that point we can extend a line from it along the blue axis until it hits the brown axis of the original corner again.
Step 31
With the three main points that we established on Step 24, we can run a line on the blue axis from each point until it hits the back of the spaceship (brown line). The point representing the upper tip of the fuselage stops when it collides with the height (green axis).
Step 32
The back of the spaceship isn’t as wide as the front, so we’ll place a point it where it looks ideal, then begin the technique to reveal the point on the other side of the center line.
Step 33
A little quicker this time. Find the center point. Find the mid-point on the side.
Step 34
Run a line through it.
Step 35
Now we have the upper points for both outer ends of the wings, we can join them together.
Step 36
Then the back-end points to the fuselage.

Step 37
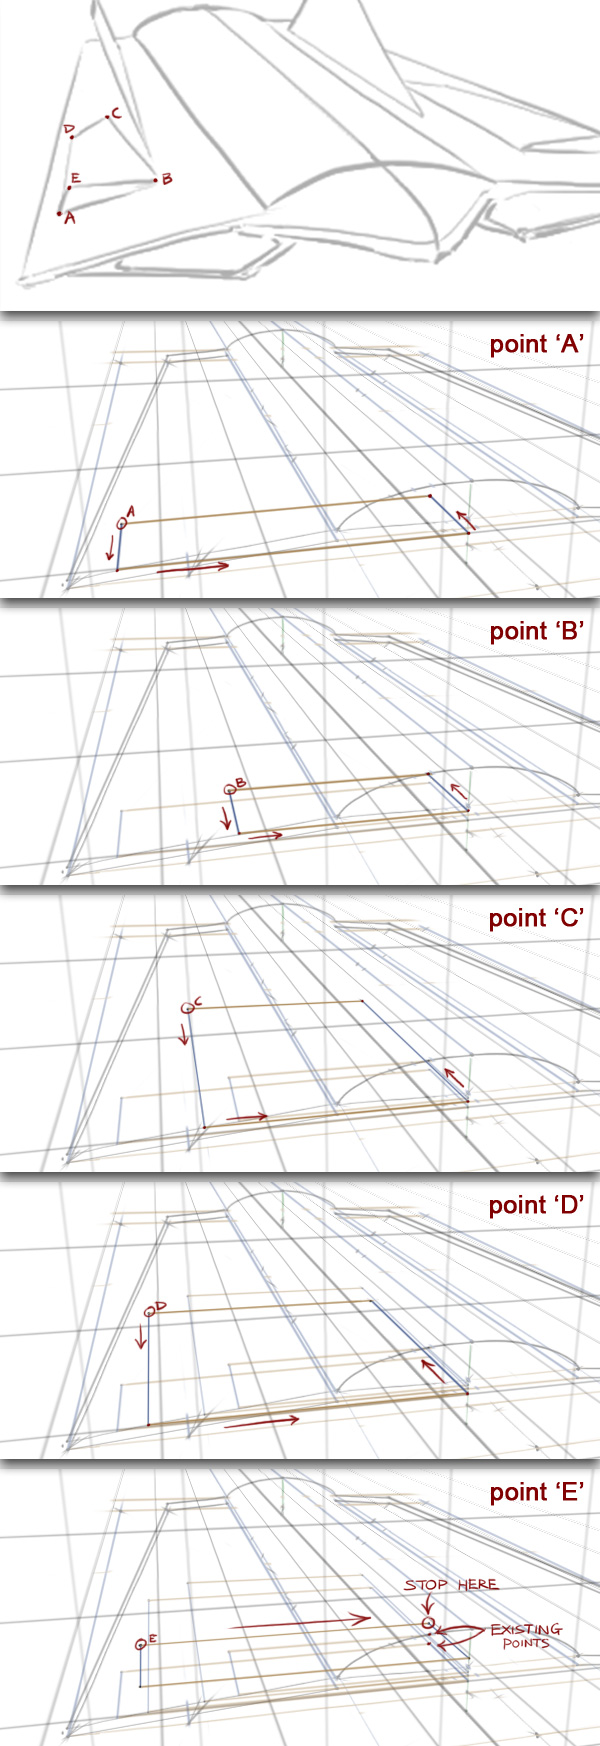
There’s some small air intakes on the wings which will be trickier but will follow the same rules. The points just need to be drawn one by one, starting with ‘A’. We have to make sure the boxes for each point are in line with the center line.
For points ‘A’ to ‘D’, we’ll extend a line along the blue axis until it hits the brown line. ‘E’ is a different height so we can’t just run a line along the wing like the others. Instead we’ll draw a line along the brown axis straight towards the center line.
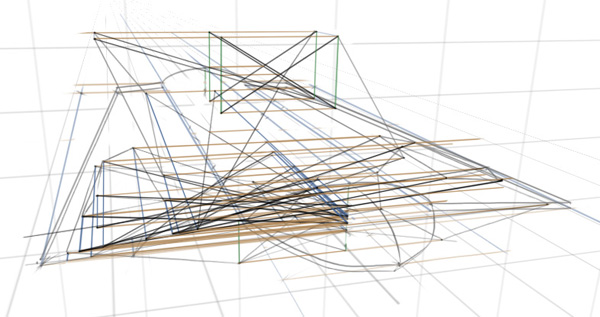
Things are about to get pretty messy, so I’d highly recommend either using layers for your guides or erasing them after you’re done with it.
Step 38
From the 5 points we just established, we can dot-to-dot them together.
Step 39
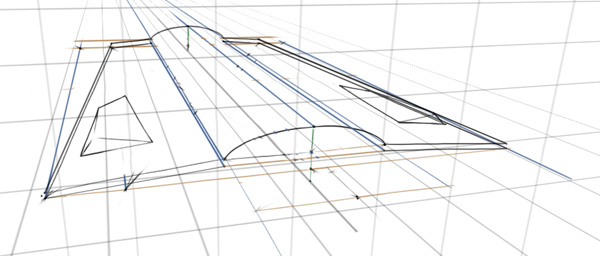
Then using the same technique, we can establish the points for the wings, too.
Step 40
And the large air intakes under the wings ![]()
Step 41
We’ve already dotted in the point for the tip of the nose, now it’s just a case of joining them. We could place dots around the first curve and match them perfectly on the other side of the center line using the same technique as before, but you’re getting pretty good at that now ![]()
Step 42
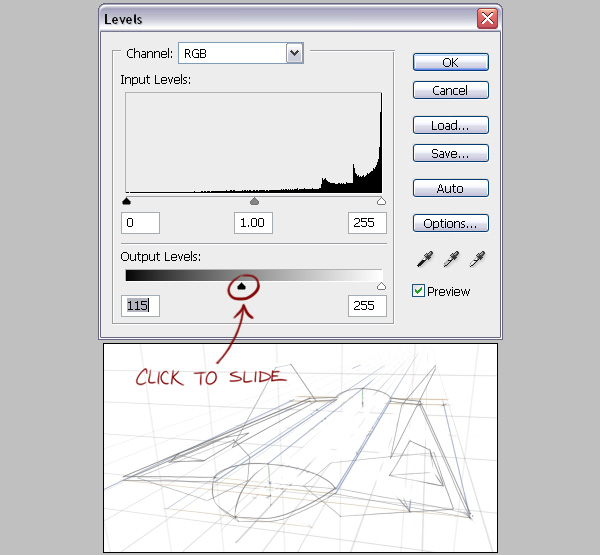
It’s getting a little too messy now. Let’s grab all the scruffy guide lines and lighten them. Select the layer with the scruffy lines and click the Create New Fill Or Adjustment Layer icon, then choose Levels.
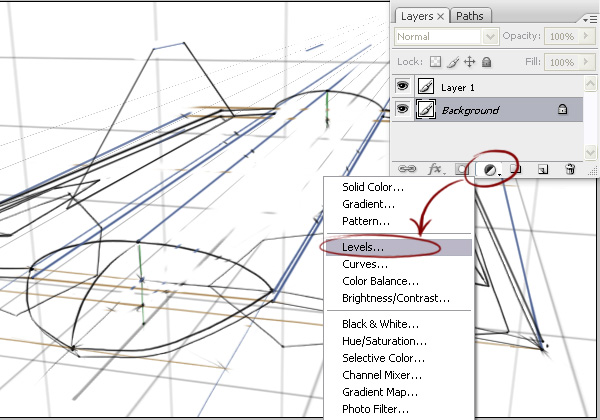
Step 43
In the Output Levels section, slide the black triangle to the right to lighten the darker values until it’s light enough to draw a cleaner revision over the top. If the result isn’t being previewed as you make the change, you may have the Preview option unchecked or you may have accidently made a selection prior to this step. Use Ctrl+D or Cmd+D to deselect the current selection.
Step 44
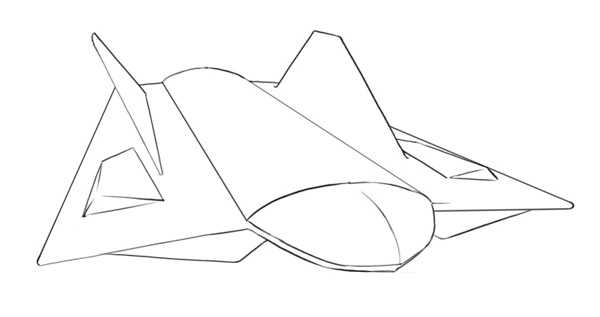
With the old lines in, we can trace over it on a new layer with some nice, clean line art. If it suits your purpose though, you can leave the underlying line art in, maybe lower the opacity a little for a rough blueprint-esque look.
Step 45
You may have noticed, I erased the box guide lines earlier for the air intakes and elevons as the images would otherwise have been extremely cluttered, like this!
Step 46
Thank Photoshop for layers.
Step 47
As you can imagine, with this clean sketch you can take it further to more polished levels. It’s often very useful to have a clean line-art, working great with tasks such as vector tracing and shading with selection tools.
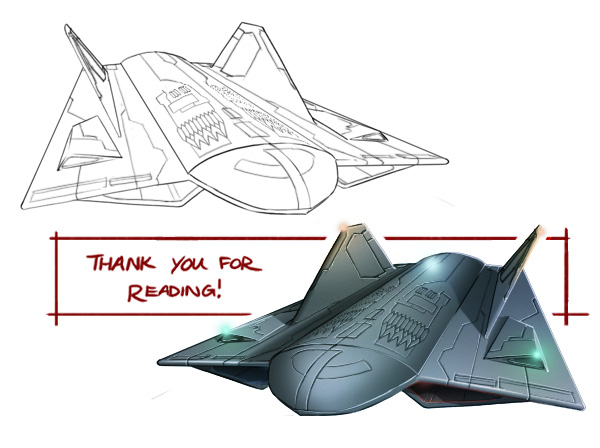
Conclusion
Be it for a design, illustration or just for leisure, you can use this new technique to assist you with your work. If you were trying to communicate designs quickly it wouldn’t be realistic to try and incorporate this technique perfectly every time. But I hope that learning this may improve your overall work flow where you need it ![]()
I hope you’ve learned something in this tutorial – feel free to comment any questions or share your own samples!