This is the third and final tutorial in a series covering the basics of song demo production in Apple’s GarageBand. The aim of these tutorials is to show you the basics of recording your own song demos, covering the creative process as well as how to use the software.
In Part 2, we got as far as programming the backing track and recording the guitar parts for a song. All being well, you now have a completed rough demo recording of your song.
In this third and final part, we’re going to look at some simple steps you can take to polish up your demo and share it with your band mates. Remember, though, that we’re only making a demo; the idea is to develop and communicate a musical idea. While it’s certainly worth spending some time to make sure everything sounds clear and balanced, it definitely isn’t worth tying ourselves in knots trying to get a super-slick studio sound.
Here is a short track demonstrating what you will achieve with this tutorial:
Download audio file (audiotutsjam.mp3)
So, let’s work through some key tasks in order:
1. Trim and Align
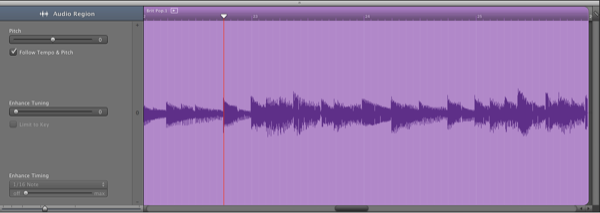
You’ve probably got some unwanted noise at the very beginning and end of the tracks which you want to trim off. Move the playhead to where the song starts, select the guitar track(s) you want to trim, and hit Command+T. This will snip the track in two at the playhead, so that you can delete the unwanted part before the song begins. Do the same at the end of the song and anywhere else where you want a clean stop, for example in places where the guitar pauses for a section.
To do this, examine the waveform by double clicking on the audio track; this will open the audio the Track Editor (also accessible by clicking the “scissors” icon), showing you the audio waveform of the performance in question. You can use this see where the attack or decay begins or ends, and cut there. This may mean you have a small area overhanging a bar line, but that’s fine as long as it sounds natural.
When you’ve done this with all the tracks that need it, you may want to select all tracks (Command+A) and drag them back to the left so that the song starts at the very fist bar line.
2. Adding Effects
Before we get all the levels balanced, you might want to add some subtle effects to bring things to life a little. For the purposes of this demo, it should be sufficient to restrict ourselves to a little compression and reverb for polish, and we’ll re-create the effect of stepping on a guitar effects pedal to add interest.
Compression
Adding compression helps to smooth out differences in volume in a track, and is used a lot to add punch to drum and bass tracks. To hear the effect, select your drum track and, in the Track Info panel under Details, check the Compressor box and, from the drop-down menu, select one of the drum pre-sets.
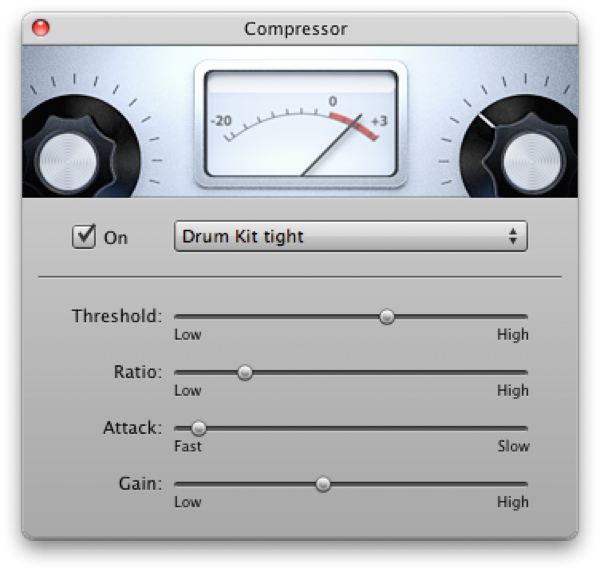
Now solo the drum track by clicking the headphone icon on the track stub, and listen to your track to hear the change. Play around with different pre-sets to see which one suits your song best, and go through the same process for the bass track.
Reverb
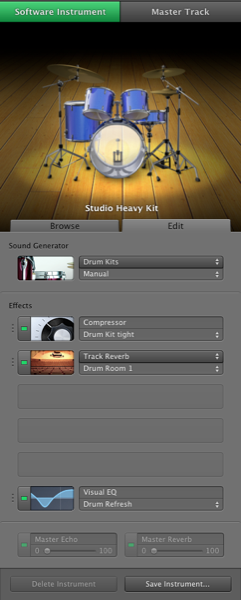
For our purposes, this is will be most useful for the drums, since adding reverb helps to give a sense of an instrument being further back in the stereo field. Select your drum track and, under Details in the Track Info panel, ensure that the reverb box is checked and move the slider around while playing the track until you find a level you like. For more sophisticated reverb sounds, try using the AUMatrixReverb effect in an empty effect slot.
Adding a little reverb to the guitar tracks can work well too, although how much depends on the style of music. If you’ve used one of the pre-set guitar tones, it will already have an appropriate amount of reverb set, but play around with the level anyway to find a sound that suits your song.
It’s easy to overdo it with reverb so, unless you’re using it as a special effect (for example, a super-twangy surf guitar sound), use it sparingly. For most applications, it’s enough just to add a tiny bit to get a sense of space and energy and, if that’s your aim, I find a good rule of thumb is that if I can clearly hear the reverb effect, I’m using too much.
Amping Up Software Bass
The software bass sounds are pretty good on their own, but I find that applying GarageBand’s amp simulator to them helps give them a little more life and realism.
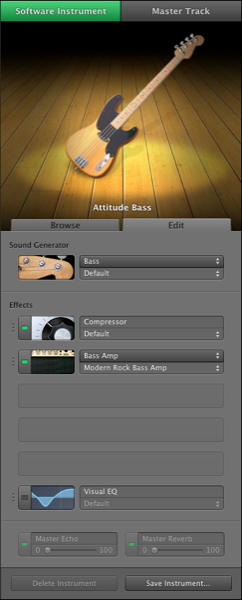
Select your bass track and, under Details in the Track Info panel, select Bass Amp from one of the unused effect drop-down menus. Try different ones to get the sound you’re looking for and, if necessary, open up the amp’s settings and play around. Even some of the guitar amps can work well used in this way. Experiment!
Re-Amping Guitars
When you recorded your guitar parts, GarageBand only recorded the direct signal of your guitar, so you can always change the amp and effect sounds at any time after recording. This process is called re-amping. I really recommend spending some time trying different combinations here, since the tonal possibilities are wide and varied and the obvious choices aren’t always the best.
For example, you might not think to use a Fender style combo sound on a heavy rock track but, set the right way and with the right effects chain, it might be just the thing to give a little clarity. Using two or more distinct amp models on different guitar tracks is a great way to get a good, balanced tone and compensate for some of the shortcomings of software amp models, too.
Imaginary Stomp Boxes!
One of the things you can’t do if you’re relying on GarageBand to provide the amp and effect sounds is to step on your favourite FX pedals to add interest to your guitar parts. The good news is there are ways to replicate the effect. One of them is to use the track automation feature, but we can only automate one parameter (e.g., volume, panning) per track in GarageBand so, to keep options open, there is another way.
Quite simply, all we need to do is to chop a section out of a guitar track, and copy it to a duplicate track with the desired effect added. So let’s take a rhythm guitar part where we want to step on a phaser to add some colour:

- Select the guitar Track Header and hit Command+D to duplicate the track. You should now have a new track with the same amp, effects, and panned to the same place in the stereo field.
- Go in to Track Info and, either in the edit pane or with the graphical stomp box chain, add in the phaser effect and dial it in to taste.
- Now we can replicate stepping on a phaser pedal during the performance by using Command+T to chop out the desired section from the original guitar track and pasting it into exactly the same place but on the new, phaser equipped track.
Simple!
3. Setting Levels
Generally, the easiest way to get your levels right is to work from the ground up. Bring all of the instrument levels down to zero and, starting with the drums, raise the track volume until it’s at a suitable level without “peaking”, i.e. hitting the red lights, or staying consistently in the orange, on the level meter. When doing this, bear the dynamics of your track in mind: it’s fine for areas that are supposed to be loud to get up into the orange bars of the level meter occasionally but, if the level is up there throughout, you’ll want to bring the level down.
Now work through one track at a time, starting with the bass. The usual rule of thumb with bass is to set its level such that it is roughly as loud as the bass drum. If you’ve programmed your drum and bass parts well, they should lock together and produce a nice, full sound. Carry on working through your tracks, making sure that there is a good balance in volume, that dynamics are preserved, and that no one instrument dominates the mix (unless it’s supposed to, of course).
Shiting Levels with Automation
There may be areas where you need to temporarily boost or cut the level of an instrument, for example, during a guitar solo or in a quieter passage. This is where automation comes in. In each track, you can access the automation function by clicking the down arrow at the far left of the Track Header. You’ll see a drop down menu from which you can select the parameter you wish to automate for that track. The most common use for this is to produce fade in and fade out effects, or to boost or cut the volume of an instrument for a certain section of a song.
To apply automation, first click the button to the right of the drop down menu and select the parameter you want to automate. I’ll use volume in my example. You’ll notice a new track has opened beneath the track you selected, within which there’s a coloured line. That line represents the parameter setting; so, in the case of volume, wherever that line is represents the existing volume level of the track.

So, let’s say I want to fade a guitar track in. All I need to do is click on the volume line where I want to the fade to start and again where it will end. This will put two little “handles” on the volume line, which I can drag around, and add new points in between them, to control the volume level.
Tip: Before boosting or cutting levels, consider the other options. For example, in the case of a guitar solo, you can help the lead guitar to stand out of the mix by using different EQ settings, panning, and different guitar tones. Rhythm guitars will usually be panned to the left and right, but a guitar solo could be moved closer to the centre. Also, since a guitar solo usually relies on mid and high register notes, we can alter the EQ to enhance these frequencies and take out the lower frequencies. Using these techniques, we may not need to boost the level at all.
To take another example, in a quieter section, it makes sense to reduce the velocity of the drum and bass notes to get a softer sound. This will achieve a softer and more fitting sound than merely reducing the volume.
4. The Equaliser
Judicious use of EQ can help to balance the mix between instruments, ensuring that everything is audible and well defined. However, using EQ properly is an art in itself and beyond the scope of this tutorial. If you’re new to EQ, I recommend reading some of the excellent EQ tutorials already available on Audiotuts. For the purposes of this exercise, we’ll rely on some of GarageBand’s EQ pre-sets and make some minor adjustments of our own.
There is one, easy EQ trick which, in most cases, will make a huge difference: it’s called a high-pass (or low-cut) filter, whereby we reduce or completely remove frequencies below a certain point. That may sound counter-intuitive. After all, bass makes things sound big and impressive, right? Not necessarily. In fact, you can often give your sound more focus and punch by taking certain bass frequencies out on certain instruments.
For a good, clear sound, the bass in your track should come from the right instruments, e.g., kick drum, toms and bass guitar. Too much of the wrong low frequencies in higher pitched instruments, like guitar, can upset the whole picture and introduce an unpleasant, flabby sound which obscures detail.
So, let’s take a guitar track as an example. Go into Track Info and, in the effects panel, turn on Visual EQ and, from the drop down menu, select Bass Boom Control. This will reduce the frequencies below 100Hz. Solo the track and listen back to it while turning the EQ on and off, and you should notice that, with the EQ on, the guitar sounds more focussed, tighter and less “flabby”.
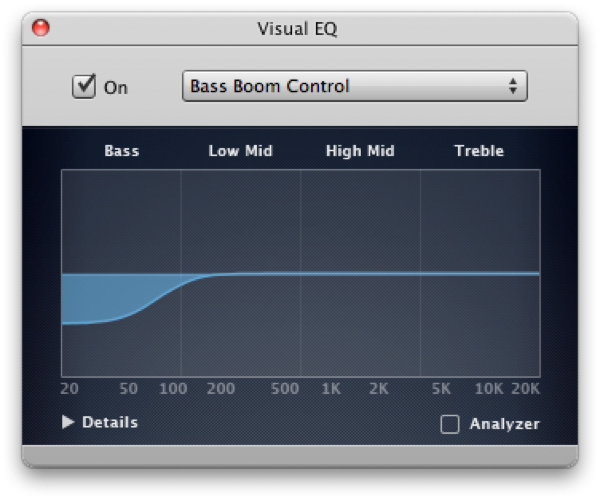
Now listen back to the full mix and you should notice that the drums and bass sound a little clearer. What we’ve done, essentially, is cut a hole in the guitar sound allowing the bass and low-tuned drums to show through, while at the same time cutting out frequencies which tend to have a “boomy” sound.
Try using some of the pre-set EQs for the other instruments, too. For example, there are settings to give the bass drum or snare more oomph. In each case, take a look at the EQ settings and play around to understand what’s happening.
Tip: Experienced audio engineers can listen to a track and know precisely which frequencies they want to work on. For the rest of us, the process can involve a little more guesswork. I find the easiest way to home in on the frequencies I want to address is to apply the AUGraphicEQ to the track in question, set it to the 32 band mode, and try boosting and cutting individual frequencies until I find the ones I want more or less of.
5. The Master Track
Now things are a little tidier and more polished, the last job is to add a little sheen to the whole track. First, go into Track on the toolbar and select Show Master Track (or hit Command+B). In the Track Info panel, select Master Track from the tab at the top, and you’ll see a menu of musical styles at the top, and a series of effect drop-downs just like you’ve seen on the instrument tracks.
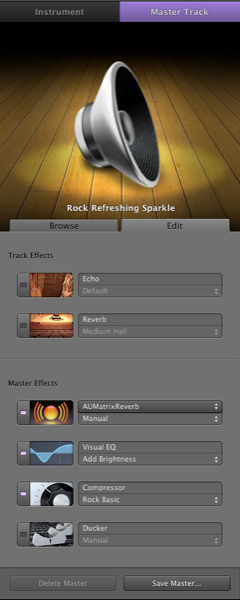
To begin with, as before, try selecting one of the pre-sets from the top left panel, and then one of the options from the right hand panel. In my case, I’m opting for Rock and Rock Basic Finalizer.
When you do this, you’ll notice in the Details section of the panel that a number of effects have been added, such as EQ and compression. These will help your track to achieve the right kind of sound for the genre of music that suits your song but, as with the instrument pre-sets, it pays to play around with the settings and find a sound that suits you.
Last but not least, on the Master Track in the Arrange Window, you’ll see that you can use automation to control the master volume. So, if you want the whole song to fade in or fade out, this is the tool you need (no need to fade out every individual track!).
One again, don’t go too crazy with this stage. For one thing, overdoing it with effects can make a track sound messy and amateurish. More importantly, though, it’s not the point of this project to create something to rival Bohemian Rhapsody: we just need to get an idea across and make it sound good enough that someone listening to your demo will be able to understand how you envisage your song.
6. Prepare for Export!
Before we make the final MP3, have one last listen to the complete track. Listen for any major mistakes, and check that the instrument levels are well balanced and that the track and master level meters are not being pushed into the red.
When you’re happy, all you need do is go to Share on the Toolbar and select an option. You can send the song direct to iTunes, burn it to a CD, or export it in one of several formats to any location on your Mac. I recommend choosing Export Song To Disk, since you can then do anything you like with the resulting audio file: email it to friends, upload it to MySpace, or import it to iTunes or any other media player.
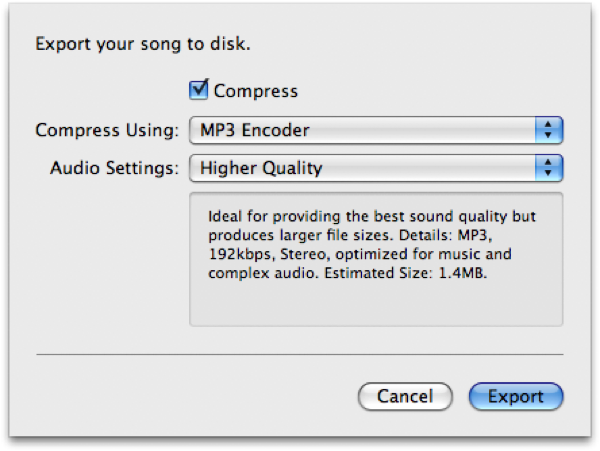
When you click Export… you’ll see options for the file type and audio quality. I recommend choosing MP3 for file type since this is the most widely used format, and choose a level of quality that best suits the intended purpose. When you choose the quality level, the info below the drop down menu will give you an estimated file size. If you plan on uploading your track to a service like MySpace or PureVolume, it’s worth making sure that your track is smaller than their upload limit.

7. Taking the Next Steps
Going through this process will have introduced you to the basics of recording. There’s a wealth of things to learn, but remember that the music itself is the most important thing and what we’ve covered here is all about demonstrating your musical ideas.
I find the following points useful to keep in mind:
- Keep it simple: Don’t go overboard with multiple parts and special effects. Think of this as the musical equivalent of a sketch on the back of a napkin: just put down what you need to communicate your idea.
- Get it down: Don’t spend too long tweaking. Get a basic “meat and potatoes” backing track down and record your parts over it. You can always expand and improve it later; don’t let the inspiration fade while you’re programming a tambourine part!
- Come back to it: When you’re done, leave it alone and do something else for a while. Come back to it later with fresh ears and see how it sounds.
- Don’t be too hard on yourself: Don’t worry that your demo doesn’t sound like a professional recording. Remember that a demo is only meant to communicate an idea, and many of your favourite songs will have started life in the same way.
- Experiment: If you don’t know what something does, use it. The more you play around with things, the more you’ll learn and the better your recordings skills will become.
So there we have it. I hope that, by now, you’ve got the skills you need to explore GarageBand on your own and capture your creative ideas in a way that enables you to put them across to your friends and bandmates. Have fun!