Magento is a stunningly powerful e-commerce platform. In this miniseries, we’ll learn how to get started with the platform, getting to know the terminologies, setting up a store and all related aspects of it and finally learn how to customize it to make it our very own.
In this fourth part, we’ll lay the groundwork for our theme which we’ll be building completely from scratch. Excited? Let’s get started!
The Full Series
- Part 1: Installation and Setup
- Part 2: Products, Taxes, Categories, Payment Gateways, etc.
- Part 3: Theming
- Part 4: Building the Theme
A Quick Recap
In the last parts, we learned how to get your Magento store from installed to ready for deployment including how to set up your products, product categories, taxes, shipping, payment gateways and many more.
We also took a look at the basics of Magento theming. We learnt the general idea behind Magento themes, the various terminologies behind it and the basic structure of a theme.
Goals for our Theme
Our goal for building this theme is fairly straightforward: to practically understand how to build a Magento theme. With that in mind, I’m going to keep the theme as simple as possible.
- Everything but the bare essential features stripped out
- No images other than the product images and the logo
- Single column to keep it visually simple
What are We Building Today?
Since the Magento coding process is reasonably complicated for someone used to WordPress, we’re going to take it extremely slow. Today, we’ll build just the core part our theme, the skeleton that gets used in each view of the site. I’ll also explain the general principle behind the process so we can move on to each individual view in future parts.
The source files, both the front end and back end, are included but try to not use it just yet. We’ll be defining just the core parts without defining what content is to be displayed, how it should be displayed and where the content is to be pulled from. So, if you try to use this right now, you’re going to see a bunch of gibberish since Magento pulls in all absent files from its default theme thus completely ruining our look. So my advice is, wait for a bit.
The Basic Template
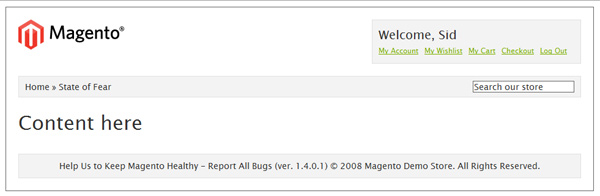
The basic template looks like so. We have a generic logo up top along with a simple menu which lets the user access his account, wish list and cart along with letting him checkout or logout.
Below that, we have a utility bar that contains a breadcrumb style navigation to let the user know the contextual hierarchy of the site. We also let the user search through our store through the search input on the right.
The content area is currently empty since its contents will vary depending on which view Magento is loading. So we’ll keep is empty for now and handle it later when we’re building each individual page.
The footer is fairly generic with a link to report bugs and copyright information.
Step 1 – The HTML
We’ll first look at the HTML for the theme’s skeleton. I’m assuming you’re fairly fluent in HTML and CSS so I’ll skip to the more important parts.
<!-- Lumos!--> <!DOCTYPE html> <html lang="en-GB"> <head> <title>Cirrus - Magento Theme</title> <link rel="stylesheet" href="css/cirrus.css" /> </head> <body> <div id="wrapper" class="border"> <div id="header"> <div id="logo"><img src="images/logo.gif" /></div> <div id="hud"> <h3>Welcome, Sid</h3> <ul class="links"> <li><a href="#" title="My Account">My Account</a></li> <li ><a href="#" title="My Wish list">My Wish list</a></li> <li ><a href="#" title="My Cart">My Cart</a></li> <li ><a href="#" title="Checkout">Checkout</a></li> <li><a href="#" title="Log Out" >Log Out</a></li> </ul> </div> </div> <div id="utilities"> <div id="breadcrumbs">Home » State of Fear</div> <div id="header-search"><input type="text" class="border" value="Search our store" /></div> </div> <div id="content" class="product"> <h1>Content here</h1> </div> <div id="footer" class="border"> Help Us to Keep Magento Healthy - Report All Bugs (ver. 1.4.0.1) © 2008 Magento Demo Store. All Rights Reserved. </div> </div> </body> </html>
First up, note that I’ve wrapped everything under a wrapper div to make it easier to manage things. Also note that the header, content and footer section get their individual blocks.
The search input is fairly useless at this point. We’ll hook it up properly during when we’re integrating with Magento. Same with the various links. Currently, I’ve put them there as placeholders. Once we dig into Magento, we’ll get them working.
Step 2 – The CSS
* {
	margin: 0;
	padding: 0;
	border: none;
	outline: none;
	color: #333;
	font-family: "Lucida Sans Unicode", "Lucida Grande", sans-serif;
	font-size: 14px;
	list-style: none;
	line-height: 1.3em;
}

a {
	color : #7db000;
}

h1, h2, h3, h4 {
	font-weight: normal;
}

h1 {
	font-size: 32px;
	margin-bottom: 10px;
}

h2 {
	font-size: 24px;
	margin: 10px 0 12px 0;
}

h3 {
	font-size: 20px;
	margin-bottom: 5px;
}

h4 {
	font-size: 20px;
}

.border {
	border: 1px solid #666;
}

/* Base Elements */

#wrapper {
	width: 920px;
	margin: 10px auto;
	padding: 20px;
}

#header {
	margin: 0 0 20px 0;
	overflow: auto;
}

#content {
	margin: 20px 0;
	overflow: auto;
}

#footer {
	padding: 10px;
	border: 1px solid #E1E1E1;
	background: #F3F3F3;
	text-align: center;
}

/* Header content */

#logo {
	float: left;
}

#hud {
	float: right;
	width: 320px;
	height: 50px;
	padding: 10px;
	border: 1px solid #E1E1E1;
	background: #F3F3F3;
}

#hud li a {
	float: left;
	font-size: 12px;
	margin: 0 10px 0 0;
}

#utilities {
	clear: both;
	margin: 20px 0;
	overflow: auto;
	padding: 7px 10px;
	border: 1px solid #E1E1E1;
	background: #F3F3F3;
}

#breadcrumbs {
	float: left;
}

#header-search {
	float: right;
}
Nothing fancy here. Very basic CSS to place the elements in position and style it just a tiny bit. Let’s move on.
Step 3 – Creating our page.xml File
This part is a little tricky so stay with me here. Magento uses XML files to handle a page’s layout and also to define which elements are available to be rendered. The aim is that instead of mucking around with arcane code, you can just edit the XML file and be done with it without worrying about dependencies.
Each view/screen/module gets its own XML file along with a master file to define the general layout of the site. That master file is the page.xml file we’re going to create now.
The complete file for today looks like so. I’ll explain each bit part by part below.
<?xml version="1.0"?>
<layout version="0.1.0">
    <default translate="label" module="page">
        <label>All Pages</label>
        <block type="page/html" name="root" output="toHtml" template="page/1column.phtml">
		<block type="page/html_head" name="head" as="head">
                <action method="addCss"><stylesheet>css/cirrus.css</stylesheet></action>
            </block>

            <block type="page/html_header" name="header" as="header">
				<block type="page/template_links" name="top.links" as="topLinks"/>
				<block type="page/html_breadcrumbs" name="breadcrumbs" as="breadcrumbs"/>
                <block type="core/template" name="top.search" as="topSearch"/>
            </block>

            <block type="core/text_list" name="content" as="content"/>

            <block type="page/html_footer" name="footer" as="footer" template="page/html/footer.phtml"/>
        </block>
    </default>
</layout>
Disregard the initial XML and layout version declarations. They’re of no significance to us now.
<block type="page/html" name="root" output="toHtml" template="page/1column.phtml">
First, we create a master block for all the data. Consider this the equivalent of the wrapper DIV element we used in our HTML. Next, we instruct it to use page/1column.phtml as the template for our page. Don’t worry, we haven’t created the file yet. We’ll do so later in this tutorial.
<block type="page/html_head" name="head" as="head">
       <action method="addCss"><stylesheet>css/cirrus.css</stylesheet></action>
</block>
Next, we define the elements to be included in the head section of the page. Magento, by default, includes a load of CSS and JS files but we won’t be requiring any of their functionality today. So, we’ll just include our CSS file.
<block type="page/html_header" name="header" as="header">
				<block type="page/template_links" name="top.links" as="topLinks"/>
				<block type="page/html_breadcrumbs" name="breadcrumbs" as="breadcrumbs"/>
                <block type="core/template" name="top.search" as="topSearch"/>
            </block>
We’re defining what goes into the header of our site. We want the menu/links at the top as well as the breadcrumbs and the search.
<block type="core/text_list" name="content" as="content"/>
We’ll need the content part, of course, so we’re including the content part. We won’t define anything about this section here since Magento just loads up all the necessary content into this block.
<block type="page/html_footer" name="footer" as="footer" template="page/html/footer.phtml"/>
And finally, we’ve included our footer. We also tell Magento where to load its template from.
You’re probably wondering why we specify a template path for some blocks whilst omitting it for others. It’s a rather higher level topic but did you note that each block has a type attribute? When it’s type matches one of those predefined by Magento, you need not specify a template. It’s auto loaded. Nifty, no?
And with this, our base page.xml file is complete.
Step 4 – Creating our Skeleton Template
Ok, now that we’ve specified our layout we can move on to creating the 1column.phtml file that we specified in the XML earlier.
This file is nothing but a skeleton template which calls in the header, content area and footer as needed. Our file looks like so:
<!-- Lumos!
This is pretty much our original HTML file except that we use the getChildHtml method to acquire each block’s content. The template needs to be pretty page agnostic as it’s the master page from which each page is rendered.
Step 5 – Creating the Templates for our Blocks
Now comes the slightly hard part: cutting up our core HTML blocks by functionality, creating the required templates files for each functionality and then populating those files.
We’ll tackle each in order of appearance
head Section
getChildHtml(‘head’) maps directly to page/html/head.phtml. Our file looks like so:
<title><?php echo $this->getTitle() ?></title>
<link rel="icon" href="<?php echo $this->getSkinUrl('favicon.ico') ?>" type="image/x-icon" />
<link rel="shortcut icon" href="<?php echo $this->getSkinUrl('favicon.ico') ?>" type="image/x-icon" />
<?php echo $this->getCssJsHtml() ?>
<?php echo $this->getChildHtml() ?>
<?php echo $this->getIncludes() ?>
You’ll see that we let Magento dynamically create the titles. Other than that, do notice the getCssJsHtml method being called. This method imports all the CSS and JS files that we specified in the page.xml file.
Page Header
getChildHtml(‘header’) maps directly to page/html/header.phtml. Our file looks like so:
<div id="header">
<div id="logo"><a href="<?php echo $this->getUrl('') ?>" title="<?php echo $this->getLogoAlt() ?>" class="logo"><img src="<?php echo $this->getLogoSrc() ?>" alt="<?php echo $this->getLogoAlt() ?>" /></a></div>
<div id="hud">
<h3>Welcome</h3>
<?php echo $this->getChildHtml('topLinks') ?>
</div>
</div>

<div id="utilities">
<?php echo $this->getChildHtml('breadcrumbs') ?>
<?php echo $this->getChildHtml('topSearch') ?>
</div>
We use Magento’s API to acquire the logo first. Then to further modularize things, we get the HTML for the breadcrumbs, links and the search function.
Note that the name is purely semantic. As you can see, you’re not limited to the header in it’s purest, strict technical sense. You can also tack on other elements as needed.
Page Footer
getChildHtml(‘footer’) maps directly to page/html/footer.phtml as specified in the XML file. Our file looks like so:
<div id="footer" class="border">
<?php echo $this->__('Help Us to Keep Magento Healthy') ?> - <a href="http://www.magentocommerce.com/bug-tracking"
onclick="this.target='_blank'"><strong><?php echo $this->__('Report All Bugs') ?></strong></a>
<?php echo $this->__('(ver. %s)', Mage::getVersion()) ?> <?php echo $this->getCopyright() ?></address>
</div>
With the footer, you’re free to include any info you deem fit. I just included the default content since I couldn’t think of anything clever to say there.
With the core elements finished, we can move on to the smaller functional blocks specified in the header section now i.e. the breadcrumbs, links and the search feature.
Top Links
getChildHtml(‘topLinks’) maps directly to page/html/template/links.phtml. Our file looks like so:
<?php $_links = $this->getLinks(); ?>
<?php if(count($_links)>0): ?>
<ul class="links"<?php if($this->getName()): ?> id="<?php echo $this->getName() ?>"<?php endif;?>>
    <?php foreach($_links as $_link): ?>
        <li<?php if($_link->getIsFirst()||$_link->getIsLast()): ?> class="<?php if($_link->getIsFirst()): ?>first<?php endif; ?><?php if($_link->getIsLast()): ?> last<?php endif; ?>"<?php endif; ?> <?php echo $_link->getLiParams() ?>><?php echo $_link->getBeforeText() ?><a href="<?php echo $_link->getUrl() ?>" title="<?php echo $_link->getTitle() ?>" <?php echo $_link->getAParams() ?>><?php echo $_link->getLabel() ?></a> <?php echo $_link->getAfterText() ?></li>
    <?php endforeach; ?>
</ul>
<?php endif; ?>
I know it looks a little complicated, but all it does is loop through an array of links and then spit it out, whilst adding a special class if it’s the first or last item in the list. If you’d prefer, you can scrap all this, and just hard code your top menu.
Breadcrumbs
getChildHtml(‘breadcrumbs’) maps directly to page/html/breadcrumbs.phtml. Our file looks like so:
<?php if($crumbs && is_array($crumbs)): ?>
<div id="breadcrumbs">
        <?php foreach($crumbs as $_crumbName=>$_crumbInfo): ?>
            <?php if($_crumbInfo['link']): ?>
                <a href="<?php echo $_crumbInfo['link'] ?>" title="<?php echo $this->htmlEscape($_crumbInfo['title']) ?>"><?php echo $this->htmlEscape($_crumbInfo['label']) ?></a>
            <?php elseif($_crumbInfo['last']): ?>
                <strong><?php echo $this->htmlEscape($_crumbInfo['label']) ?></strong>
            <?php else: ?>
                <?php echo $this->htmlEscape($_crumbInfo['label']) ?>
            <?php endif; ?>
            <?php if(!$_crumbInfo['last']): ?>
                <span>» </span>
            <?php endif; ?>
        <?php endforeach; ?>
</div>
<?php endif; ?>
As with before, it merely loops through the crumbs to render the text. The naughty bits in there checks whether the crumb is a link, to format it as such, and check whether it’s the final element so it doesn’t have to render a separator. There’s nothing else to this block.
Search
getChildHtml(‘topSearch’) maps directly to catalogsearch/form.mini.phtml. Our file looks like so:
<div id="header-search">
		<form id="search_mini_form" action="<?php echo $this->helper('catalogsearch')->getResultUrl() ?>" method="get">
        <input id="search" type="text" name="<?php echo $this->helper('catalogsearch')->getQueryParamName() ?>" value="<?php echo $this->helper('catalogsearch')->getEscapedQueryText() ?>" class="input-text border" />

</form>
</div>
Magento does all the weight lifting here. All you need to do is call the proper API method for the URLs and such.
If you’ve noticed that the string passed on to the getChildHtml method maps directly to the as attribute used in the page.xml file, then congrats, you’re an astute reader and you get a delicious cookie!
What We’ll be Building in the Next Part

Now that we’ve built a very strong core, we can now move on to building the individual views of the store. In the next part, we’re going to build one of the core views of any store, the product view. Stay tuned!
The Last Word
And we are done! Today, we took the first step in creating our custom Magento theme, Cirrus. Hopefully this has been useful to you and you found it interesting. Since this is a rather new topic for a lot of readers, I’ll be closely watching the comments section so chime in there if you’re having any doubts.
Questions? Nice things to say? Criticisms? Hit the comments section and leave me a comment. Happy coding!