Over the last three tutorials we have discussed FL Studio’s Mixer, Piano Roll windows, and Playlist and how they all work together and play into the music creation process inside FL Studio. But one more ingredient is still left before our recipe is complete, and that my friend is the Browser.
The Browser is essentially the data hub of our projects. While the Playlist takes all of the data and lets your organize it musically, the Browser organize it logically. In addition, it can help you streamline certain aspects of your workflow as well. So if organization and a streamlined workflow are what make you happy, then open FL and start reading!
The Browser Window
Before we can begin to look at the different fun features of the browser we first need a good understanding of the browsers layout and what the different sections do functionally. However it will not do you much good to hear me talk about the browser if you do not know where to find it! Here are two simple ways to access the browser inside FL Studio…
- The easiest way to access the browser is by pressing the shortcut F8. This will hide and show the browser from its last docking position on the screen.
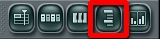
- If you are more of a button person, simply click the browser icon on the tool bar at the top of the screen…
A Closer Look
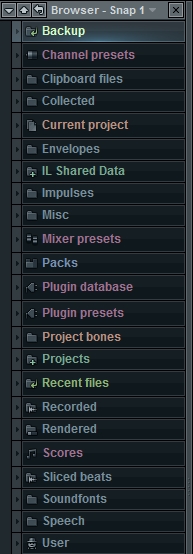
Since the browser is simply an hierarchical organization system, understanding the basics of browser is very simple; click on a folder and the content or other folders inside appear. What may not be so obvious is what some of folders hold data wise and why we would need them. So lets briefly touch on each folder tree.
- Backup: Any data that was auto saved by FL Studio (such as projects) or other backed-up data can be found here
- Clipboard Files: Data created by clipboard files
- Collected: The collection of samples used by the project
- Current Project: Gives you access to the edit history of the project and information and control over the patterns, effects, synths, etc.
- Envelopes: Contains various envelope data presets
- IL Shared Data: Holds various files FL uses for synths such as presets, samples, etc. Especially those that use the Download Manager.
- Impulses: Contains the impulse responses for the Convolver reverb plugin inside FL
- Misc: Houses a variety of patches and samples, particularly those used by the demo projects
- Mixer Presets: Contains preset effect chains for FL’s mixer
- Packs: Quick easy access to all the sample packs that come with FL
- Plugin Database: An organized list of FL’s plugins; not external plugins
- Plugin Presets: Presets for FL’s plugins
- Project Bones: A means to import and export various aspects from one project to another
- Projects: Allows you to sort through your various FL project files
- Recent Files: Shows all the files you have used most recently in your project
- Recorded: Shows any audio files you have recorded to FL
- Rendered: Shows the bounces of any projects you have completed
- Scores: A combination of MIDI sequences and automation presets for your piano roll or playlist
- Sliced Beats: Any beats sliced using SliceX or audio files dumped straight from Edison to the playlist without being saved first.
- Soundfonts: Contains soundfonts for a soundfont player that comes with FL
- Speech: Contains various speech presets for FL’s speech synthesizer
- User: A place for all of your own files
Phew! I know that is a lot to take in but thankfully you will probably not use it all as some trees will have no place in some workflows. If you never slice beats then you will not need to have the Sliced Beats folder, if you never use speech synths then the Speech folder will do you no good.
Since we do not need everything in the browser let’s take a look at how we can trim it down, and use some more advanced features.
- To remove a folder tree from the browser, right click it and select Window Shell Menu and then go to the Folders Properties and hide the folder. Keep in mind a few folder trees you cannot delete.
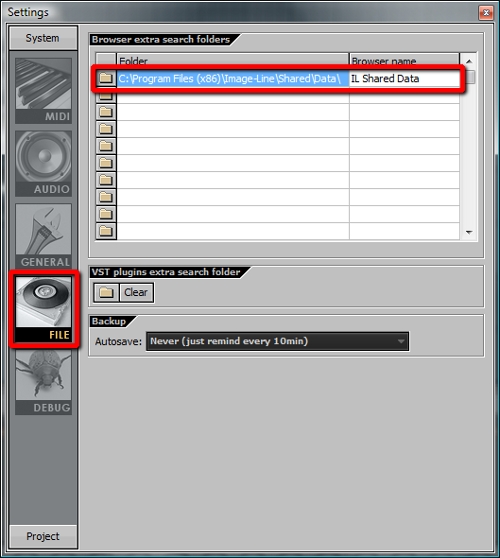
- Another option for some folders is to go to Options>File Settings and delete the folder reference so FL does not see it
- If you want to add another folder of your own go to Options>File Settings and add a folder path and then give it a name; it should appear with green text.
- If you want certain folders to automatically open when you click on certain windows, change the snapshot from Snap1-4 to Auto. An example of why you would want this is when you click on the mixer, the mixer presets folder will open.
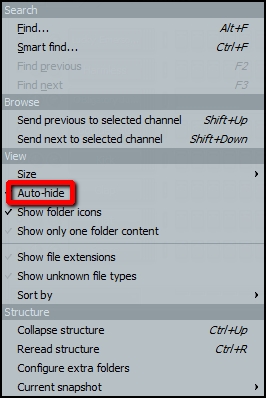
- If you want to quickly bring up the browser without having to hit a key select the pull down tab in the top left of the browser and select the Auto Hide option. This will make it so when you mouse over the edge of the FL window, the browser will appear and when your mouse leaves the browser it will collapse itself back.
- Finally if you have so many things that you need to search hit either Alt+F or Ctrl+F to use either the strict or advanced search functions that will search the browser for you
Tips and Tricks
How that we have a better handle on the browser let’s look at some ways in which it can help us with our projects.
- Often times when working inside FL, for whatever reason may be, you adjust the levels of a fader or channel gain and upon hitting play the volume goes right to where it was. But you could swear you just changed it didn’t you? To fix this problem from occurring you need to go to Current Project>Patterns>Initialized Controls and delete the offending control. The reason this happens is when you automate a control, you also create an initialized control position. What this means is at the beginning of the song the control will start at a given point even if you have no automation data there. Initialized controls are actually very useful but, when you delete your automation data it is no fun at all to see your knobs and faders move around anyways!
- One of the benefits of the browser is how quickly you can audition and grab samples. If you linked your sample library to the browser then all you need to do to hear it is to click on a sample! If you want to use it simply drag and drop it onto a sampler, playlist, or simply as a new instrument in the channel window.
- If you want to create your own mixer presets you first need to create your desired effects chain on a single channel. After that is done you simply need to go to the top left corner of the mixer in the drop down menu and hit File>Save Mixer Track State As and save it to the Mixer Presets folder. Then to use it simply drag it off the browser and onto a channel.
- Finally say you always use the fancy Plugin Picker (ctrl+F8) but want to use external VST plugins. The way you do this is by going first manually adding the VST to a track or a synth to the channel window. Next, in the browser go to Plugin Database> Effects (or Generators for synths)> and pick the appropriate sub category (dynamics, delay, filter, etc.) Finally you go back to your effect or synth and under the main dropdown menu select Add to Plugin Database, which then adds your VST to the selected sub category from the browser.
Conclusion
So what have we learned? FL Studio’s Browser, while not always the flashiest tool, is very full featured and designed to make your life easier. Just get rid of the folder trees you do not need and add folders that you do and you will never have to exit FL Studio to check samples or anything ever again! Thanks for reading!
{excerpt}
Read More