In this tutorial we’ll make a reusable countdown timer with a dynamic target date that can be set via XML. We’ll animate the numbers flipping down in the style of an old airport or train station status board. We’ll cover code, graphics creation and animation. What are you waiting for..?
Step 1: Set Up Your Flash File
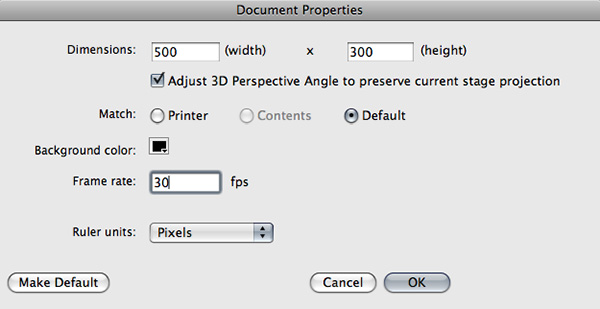
Create a new Flash file (Actionscript 3) with these settings: 500×300, black background, and 30 fps.
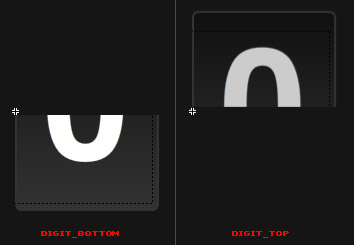
Step 2: Create the digit_bottom MovieClip
Create a new MovieClip called ‘digit_bottom’ and draw a rounded rectangle inside it approximately 36px wide by 50px tall. (A quick way to draw a rectangle with precise dimensions is to select the rectangle tool and Alt-click on the stage.)
Give the rectangle a gradient fill from #111111 (top) to #333333 (bottom) and a 2 px outline colored #333333.

Step 3: Position the Rectangle
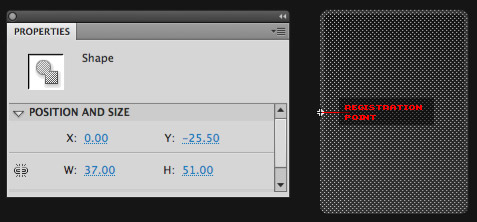
Position the rectangle so that the registration point of the MovieClip (the little ‘+’) is exactly halfway between the top and bottom and the left edge. If you made your rectangle 50px tall, then the y value should be -25.
Step 4: Add the Number
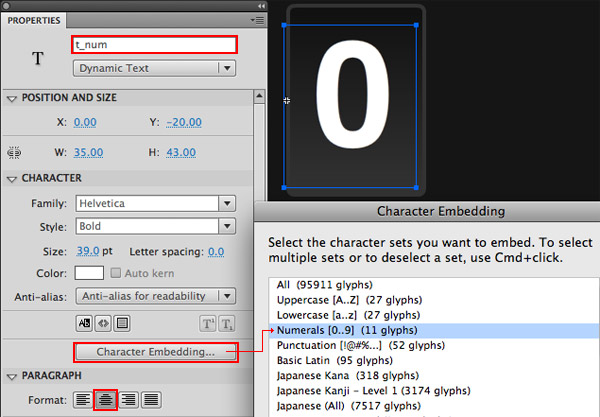
Create a new layer and add a dynamic text field called ‘t_num’. Choose a font that has an airport or train station feel to it (like Helvetica, DIN, or Interstate). I’m using Helvetica Bold.
Set the Paragraph Format to centered, and remember to embed the fonts for the numbers 0–9.
Position the text field so it’s centered on the background rectangle.
We’re going to be using this MovieClip as the base for another graphic, so take a moment to make sure it looks good.
Step 5: Add a Mask
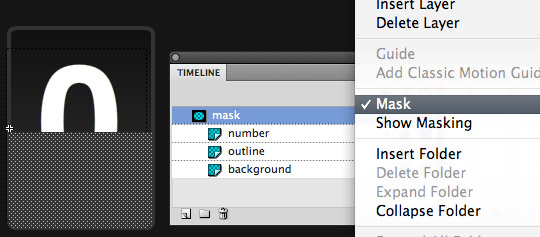
Create a new layer on the timeline of the digit_bottom MovieClip and call it ‘mask’. Copy the rounded rectangle and Paste in Place on the mask layer (Edit > Paste in Place, or Command-Shift-V).
Select the top half of the mask rectangle and delete it.
Right-click the mask layer, choose Mask and make sure that it is masking all of the layers below it.
Step 6: Create the digit_top MovieClip
Go into the Library, duplicate the digit_bottom MovieClip and name the new copy ‘digit_top’.
This MovieClip will be virtually identical to the digit_bottom clip, except the mask will be showing the top half of the graphics instead of the bottom.
Delete the graphics currently on the mask layer. Copy the rounded rectangle and again Paste in Place on the mask layer. This time select the bottom half and delete it.
The only other adjustment you might want to make here is to adjust the color of the text and the shading of the background rounded rectangle. I made the graphics in my digit_top clip a bit darker to simulate light coming from the top.
Step 7: Create the Digit MovieClip
Create a new MovieClip named ‘Digit’. Drag in the digit_top and digit_bottom MovieClips and position them both at 0,0. Give them the instance names ‘top1′ and ‘bottom1′.
Now copy both of the MovieClips (digit_top and digit_bottom), create a new layer, and Paste in Place a copy of each. Name the new copies ‘top2′ and ‘bottom2′.
You should now have 4 MovieClips inside your Digit MovieClip: 2 copies of digit_top and 2 copies of digit_bottom. I’ll explain why we’re setting it up like this in the next step.
Step 8: Animation Strategy
We have to do a bit of animation trickery to get the flipping numbers effect we want. Take a look at the diagram below of our Digit MovieClip (I’m rendering it in 3D just so you can see the layering more easily):
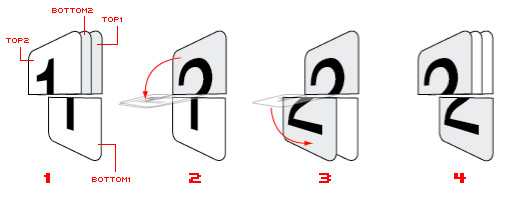
Animation Step 1:
We start out with the bottom2 clip flipped upside down (using the scaleY property) and placed behind the top2 clip. At this point the 2 clips that are visible are top2 and bottom1. The numbers on these two clips correspond to each other, so they form a complete digit.
Animation Step 2:
Now we flip down the top2 clip to the center of the digit. At this point scaleY will be zero, so the clip won’t be visible. At the same time, we’re also flipping down the bottom2 clip, but this one we’ll flip all the way to the bottom. Since it’s behind top2, it won’t show until it flips past the halfway point. Now the 2 visible clips are top1 and bottom1. The numbers on these two clips don’t match, but that’s okay because this step only lasts for a brief moment.
Animation Step 3:
The top2 clip stays in the center as bottom2 continues to fall all the way down to the bottom. Once it’s in place the numbers on the visible clips (top1 and bottom2) again match to form a complete digit.
Animation Step 4:
At this point we’ll relayer and reset the positions of the 2 hidden clips to get ready for the next flip. Notice how the clips are in the same positions as Step 1, only reversed.
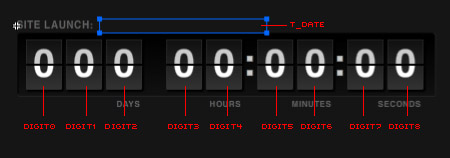
Step 9: Create the Clock MovieClip
Now that we have the individual Digit MovieClip set up, let’s build the clock.
Create a new MovieClip on the stage called ‘Clock’ with the instance name ‘clock’. Inside the new MovieClip place 9 copies of your Digit MovieClip; 2 for seconds, 2 for minutes, 2 for hours, and 3 for days. Give each digit an instance name. From left to right name them ‘digit0′, ‘digit1′, ‘digit2′, and so on.
Add some colons to separate the MovieClips and labels for each section. The design is up to you. I added a dark rounded rectangle as a background for my clock.
Lastly, add a dynamic text field called ‘t_date’. This is where we’ll show the target date the clock is counting down to. Remember to embed the font for this text field if you’re not using a system font.
Step 10: Create the Digit Class
Create a new Actionscript file called ‘Digit.as’ and add this code to create the empty shell for the class:
package {

	import flash.display.MovieClip;

	public class Digit extends MovieClip {
		private const TOP:int = 0;
		private const BOTTOM:int = 1;

		private var _currentDigit:Array;
		private var _nextDigit:Array;
		private var _number:String = "0";

		// CONSTRUCTOR
		public function Digit() {
			_currentDigit = new Array( top1, bottom1 );
			_nextDigit = new Array( top2, bottom2 );

		}

	}

}
This doesn’t do much yet. We’ve got a couple of arrays to hold the 2 sets of digit_top and digit_bottom MovieClips. I’ve set up 2 constants, TOP and BOTTOM to help keep track of the top and bottom clips within those arrays. The _number variable will hold the digit that’s on display at any given time.
(Note: I’m using the underscore in my variable names to indicate private variables.)
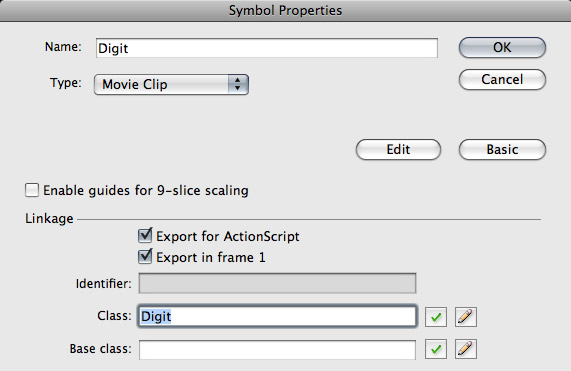
Find your Digit MovieClip in the Library and assign this class to it in the Linkage settings.
Step 11: Import the TweenLite Library
We’re going to be using the TweenLite library to animate our Digit MovieClip.
Download the AS3 version of the TweenLite library here.
Place the ‘com’ folder in the same directory as your main Flash file (or in your source path, if you’ve set up a different class path).
Add these two lines at the top of your Digit class, just below the MovieClip import:
import com.greensock.*
import com.greensock.easing.*
We’re barely going to scratch the surface of what TweenLite can do in this tutorial. For more information check out the TweenLite Documentation.
Step 12: Program the flipTo Animation
Add this function to your Digit class:
public function flipTo(num:String):void {
	_number = num;
	_nextDigit[TOP].t_num.text = num;
	_nextDigit[BOTTOM].t_num.text = num;

	// flip down the top of the digit to the halfway point
	TweenLite.to(_currentDigit[TOP], .15, {scaleY: 0, ease: Linear.easeNone});
	// flip the next digit bottom down
	TweenLite.to(_nextDigit[BOTTOM], .3, {scaleY:1, onComplete: flipComplete,  ease: Bounce.easeOut});
}
Here’s what’s happening, line by line:
- This function accepts a String that will hold the digit we’ll be flipping to. The first line just sets our _number variable to hold that digit.
- Next we set the text fields in the TOP and BOTTOM MovieClips in our _nextDigit array to display that same digit.
- Then we use TweenLite to tween the scaleY property of the TOP MovieClip of the _currentDigit to 0. This gives the effect that it’s ‘falling’ toward the center of the digit.
- The last line is another tween, this time animating the BOTTOM clip of the _nextDigit from the the top of the digit down to the bottom. Again we’re using the scaleY property to simulate this effect, but this time from -1 to 1. Since it’s tweening twice as far as the TOP clip, we give it twice the amount of time (.3 seconds instead of .15). When this tween finishes it will call a function called ‘flipComplete’. We’ll write that function in the next step.
Take another look at the diagram in Step 8 if you’re confused about the animation here.
Step 13: Add the flipComplete() Function
Add this function to the Digit class just below the flipTo function:
private function flipComplete():void {
	// swap digits
	var next:Array = _currentDigit;
	_currentDigit = _nextDigit;
	_nextDigit = next;

	// reset layering
	reset();
}
Once the flip animation completes we’ll run this function. It swaps the _currentDigit and _nextDigit arrays. After that’s done it calls a function named ‘reset’ to reset the clip layering and positions for the next flip. Let’s write that function now.
Step 14: Add the reset() Function
Add this function to the Digit class:
private function reset():void {
	addChild(_nextDigit[BOTTOM]);
	addChild(_currentDigit[TOP]);

	// flip up the next bottom to be behind the current top
	_nextDigit[BOTTOM].scaleY = -1;
	_nextDigit[TOP].scaleY = 1;
}
The first two lines in this function pop the _nextDigit BOTTOM and then the _currentDigit TOP to the top of the display list. I usually just use addChild() to do this because it requires less typing than using setChildIndex().
After the clips are re-layered, we set the scaleY properties so they’ll be ready for the next flip. This means changing _nextDigit[BOTTOM] from 1 to -1 and _nextDigit[TOP] from 0 to 1.
Again, check the diagram in Step 8 if you’re getting lost.
Step 15: Add to the Constructor
One thing we forgot to do is position the clips properly for the first flip animation. We can do that easily by adding a call to the reset function right in the Digit class constructor:
// CONSTRUCTOR
public function Digit() {
	_currentDigit = new Array( top1, bottom1 );
	_nextDigit = new Array ( top2, bottom2 );

	reset();
}
Step 16: Add the number() Function
One last thing we’ll need in our Digit class is a way to access the private _number variable from outside the class. We’ll add a simple accessor function:
public function get number():String {
	return _number;
}
Step 17: Create the Clock Class
Create a new ActionScript file named ‘Clock.as’. Paste in this code:
package {

	import flash.display.MovieClip;
	import flash.events.TimerEvent;
	import flash.media.Sound;
	import flash.utils.Timer;

	public class Clock extends MovieClip {
		private var _clockTimer:Timer;
		private var _targetDate:Date;

		// CONSTRUCTOR
		public function Clock() {

		}

	}

}
Not much here yet. Just importing some of the classes we’ll need. I also have a couple of private variables. _clockTimer will count down the seconds for us, and _targetDate will hold the date that we’re counting down to.
Step 18: Add the set() Function
Add this function to the Clock class just below the constructor:
// set the target date and start the countdown timer
public function set(date:Date):void {
	_targetDate = date;

	_clockTimer = new Timer(1000) // tick every second (1000 milliseconds)
	_clockTimer.addEventListener(TimerEvent.TIMER, update);
	_clockTimer.start();

	// display the target date above the clock
	t_date.text = _targetDate.toLocaleString().toUpperCase();

	// update the clock once here so it starts with the correct time
	update();
}
This is the function that we’ll use to set the target date for the clock. It accepts a date (of course) and assigns that to the _targetDate variable. It then instantiates our _clockTimer. The _clockTimer will call the update function once per second to update the digits.
After starting the timer, the function sets the t_date text with the target date. The toLocaleString() function ensures the date is displayed in the user’s local time zone.
The last line of this function calls update once to set the clock to the proper time. Otherwise it would display “000 00:00:00″ for one second until the first timer event.
Step 19: Add the update() Function
This function is a bit long because it’s where most of the work gets done. Add it to your Clock class:
private function update(e:TimerEvent = null):void {
	var now:Date = new Date(); // get the current time

	// find the difference (in ms) between the target and now
	var diff:Number = _targetDate.valueOf() - now.valueOf();
	if(diff <=0){
		// TIME'S UP!
		// do something cool here
		_clockTimer.stop();
		_clockTimer.removeEventListener(TimerEvent.TIMER, update);
		diff = 0;
	}

	// convert to seconds
	diff = Math.round(diff/1000);

	// number of days
	var days:int = Math.floor(diff/ (24 * 60 * 60));
	diff -= days*(24 * 60 * 60 );

	// number of hours
	var hours:int = Math.floor(diff / (60 * 60))
	diff -= hours*60 * 60;

	// number of minutes
	var min:int = Math.floor(diff/ 60);
	diff -= min*60;

	// seconds are all that remain
	var sec:int = diff;

	// create an array of strings to hold the number for each value
	var diffArr:Array = new Array(String(days), String(hours), String(min), String(sec));
	var diffString:String = ""
	var len:int = 3; // the first value (days) has 3 digits. All the rest have 2
	for each(var s:String in diffArr){
		// pad the string with a leading zero if needed
		while(s.length < len){
			s = "0"+s;
		}

		len = 2; // all the other values are 2 digits in length
		diffString += s; // add the padded string to the diffString
	}

	// go through each character in the diffString and set the corresponding digit
	for(var i:int = 0; i< diffString.length; i++){
		if(diffString.substr(i, 1) != this["digit"+i].number){
			this["digit"+i].flipTo(diffString.substr(i, 1));
		}
	}

}
This function accepts a TimerEvent as its parameter. The default value for this parameter is null. This allows us to call the function without sending a parameter, as we’re doing in the set function.
The first line of this function gets the current date and time as a Date object. Next, we find the difference between the current date and the target date (line 37). If the difference is 0 or less, then it’s past the target date, so we stop the _clockTimer (lines 38-44).
Since the difference in time between now and the target is calculated in milliseconds, we need to convert that into a nice readable display of days, hours, minutes, and seconds (lines 46-62). The math here is pretty simple as long as you know that there are 1000 milliseconds in a second, 60 seconds in a minute, 60 minutes in an hour and 24 hours in a day.
On line 65 we store all those values as elements in an array. Starting on line 68 we loop through each element and add it to a String of characters called ‘diffString’. While doing this we also add leading zeroes where necessary (line 71). So if our values for the clock were 30 days, 5 hours, 56 minutes, and 6 seconds the diffString would look like this: “030055606″.
The last thing this function does is loop through the characters in the diffString (using the charAt() method). For each character in the string we check to see if it’s different from the number currently displayed on the corresponding digit. This is easy because of the way we named our digit instances. If the number is not the same as the one currently displayed we tell that digit to flip to the number in the diffString.
Step 20: Add Sound
Find (or create) a good ticking sound that will play every time the clock updates. Import it into the Library of your Flash file and set the class name to ‘TickSound’ in the Linkage settings.
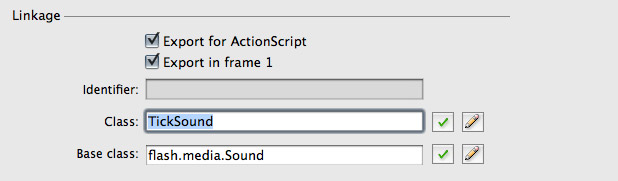
Add the _tickSound variable to the top of your Clock class just below the two other variables:
private var _clockTimer:Timer;
private var _targetDate:Date;
private var _tickSound:Sound = new TickSound();
And play the sound inside the update function:
_tickSound.play();
Step 21: Add the Main Document Class
Our countdown timer is complete, we just need some way to set the target date. Create a new Actionscript file called ‘Main.as’ with this code:
package {

	import flash.display.MovieClip;

	public class Main extends MovieClip {

		public function Main() {

			// set the target date for the clock
			var targetDate:Date = new Date();
			targetDate.setTime( Date.UTC(2010, 4, 28, 20, 00) );
			clock.set(targetDate);
		}
	}

}
All this does is set the target date for the Clock instance on the Stage. I’m using setTime() and Date.UTC() to convert the date to Universal Timecode. This way the date will be correct when it gets converted back to local time on the user’s computer. Also, remember that the months are zero-based. So, the month 4 is actually May, not April.
In your Flash file set the Document class to ‘Main’.
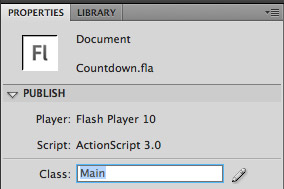
If you need a refresher on using the Document Class check out this Quick Tip.
Step 22: Test
Test your movie now and everything should work. Try changing the target date in the Main class and see how the countdown changes.
One potential downside to how we’ve set this up is that the target date is hard-coded in our SWF. That’s fine, but it would be cool if we could dynamically load the date so that we could reuse the countdown for different things.
Let’s see what we can do about that…
Step 23: Create the XML File
Create a new XML file in the same folder as your Flash file called ‘targetDate.xml’ (an XML file is just a plain text file). Add this to the XML file:
<targetDate>
	<year>2011</year>
	<month>3</month>
	<day>25</day>
	<hour>20</hour>
	<minute>21</minute>
</targetDate>
Using this format for our target date is pretty bloated (there is more markup than there is actual data), but it will keep things very clear for the purposes of this tutorial.
Step 24: Load the XML
Now let’s make some changes to our Main document class. Replace everything in that file with this code:
package {

	import flash.display.MovieClip;
	import flash.net.URLLoader;
	import flash.net.URLRequest;
	import flash.events.Event;

	public class Main extends MovieClip {

		// CONSTRUCTOR
		public function Main() {
			// load the XML
			var xmlLoader:URLLoader = new URLLoader();
			xmlLoader.addEventListener(Event.COMPLETE, onDataLoaded);
			xmlLoader.load( new URLRequest("targetDate.xml") );

		}

	}

}
You’ll notice we’ve imported some additional classes to help us load the XML file. In the constructor function we’re creating a new URLLoader instance to load the file for us. We attach an event listener that will call a function named ‘onDataLoaded’ when the file is finished loading.
Step 25: Add the onDataLoaded() Function
Add this function to the Main class:
private function onDataLoaded(e:Event):void {
	var xml:XML = new XML(e.target.data);

	var targetDate:Date = new Date();
	targetDate.setTime(Date.UTC(int(xml.year), int(xml.month), int(xml.day), int(xml.hour), int(xml.minute) ));

	clock.set(targetDate);
}
This function creates a new XML object from the file we loaded. We then create a new Date object from the values in the XML. We’re again using setTime() and Date.UTC() to convert the date to Universal Timecode. The final line is the same as before, it just sends the target date to our Clock instance.
Step 26: Wrap Up
That’s pretty much it for this one. There are a couple of enhancements you might like to make though:
- Depending on what you’re using the countdown for, you might want to do something special for the user when the countdown hits zero. You’d add this to the Clock class in the part of the update function that checks if the timer is at zero.
- As I mentioned, the format of our XML is pretty wasteful as it is. You might rather just pass in the date as a string via FlashVars, use a different data format (like JSON), or just reformat the XML to be a bit more compact.
Good luck! As always, post a comment and let me know what you think.