In this tutorial we’ll use the new features of Flash CS5’s Deco tool to create an animated cartoon backdrop.
Adobe Flash in Creative Suite 5 has been furnished with some great updates and enhancements. Adobe Flash CS5 includes brand new features for both designers and developers such as the new Code Snippet panel, integration with Flash Builder and the new Spring for Bones tool.
One of the new features in Flash CS5 is the Deco drawing tool (although, actually, the Deco tool is not a new feature as it was first added to Flash CS4.) It allows you to create drawings and animation based on dynamic shapes and colors. It is one of the smart tools that can save time and effort by creating drawing objects and animation using ready symbols and objects, or loading custom symbols from the library.
In Adobe Flash CS5, the Deco tool has been improved to include new shapes and functions as we will see in this tut. The example we will cover should provide in depth understanding to the Deco tool by creating an animated cartoon background with the Deco tools. Almost all the work in this example is done using the Deco tool and its functions. However, the aim of this example is to show how to use the Deco tool and understand its functions through creating Flash animated backgrounds or other designs and using objects that you will take from the Deco list of objects.
This tut will demonstrate just how much time and effort can be saved by utilizing the Deco tool. While the cartoon background example below takes hours to create using the drawing tools in Flash along with some drawing skills, we can create this example in less than an hour using the Deco tool, and we don’t need any drawing skills.
You need to have basic knowledge of Flash tools, since I will dig directly into the Deco tool, showing how to customize it to create the background and the animation. However, let’s start with Step 1..
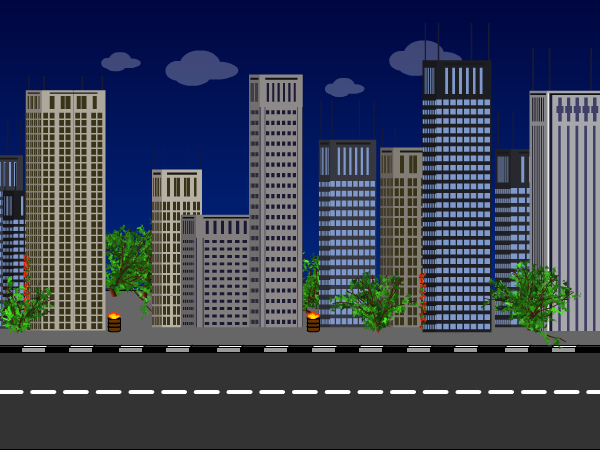
Final Result Preview
Let’s take a look at the final result we will be working towards:
Step 1: Build the Scene Base
We will start by creating the Flash document, preparing it before we start to add the Deco tool objects.
Create a new Flash document with the dimensions 600px X 450 px. Add a rectangle with the same dimensions as the document and fill the rectangle with a linear fill (like the figure below) to create the effect of dark sky.

Step 2: Road and Buildings
Now we will create the road background, using the Line tool, create the outline shape of the road and fill it with gray colors to simulate real tarmac. Then create clouds using the Oval tool and the final result should look as follows:

Now, we will start using the Deco tool to create the buildings to go by the road sidewalk we created above. You can set the skyscraper type you like to use or use random buildings. Also, you can set the size of the buildings.
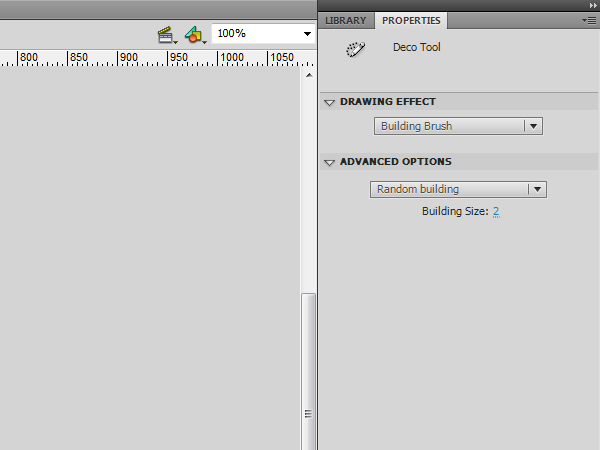
Step 3: Random Buildings
Select the Deco tool or press the key U on the keyboard. In the Properties panel, select “Building Brush” from the Drawing Effect drop-down list. Then, go to the Advanced Options choose “Random building” and set the size to 2.
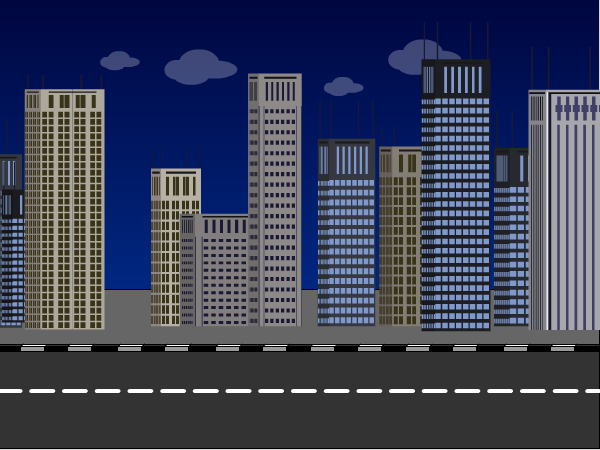
Step 4: Construction
Click on the road, then drag to the top and release the mouse to create the first building. Repeat the above step to create other buildings on the road as seen in the figure below
In the following steps, we will use the Tree Brush to create trees on the sidewalk and use the Flower Brush to create flowered branches over some buildings. With this brush, you can set the size of the tree and its branch, leaf and flower/fruit colors.
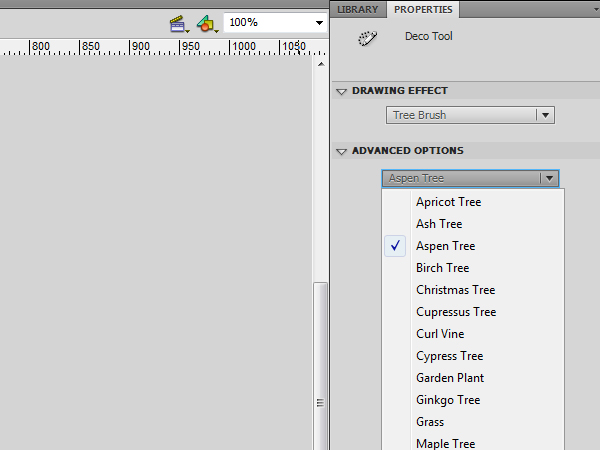
Step 5: Tree Brush
Create a new layer over the buildings layer. Select the Deco tool. In the properties panel, choose Tree Brush from the drop-down menu and in the Advanced option, select “Aspen Tree.”
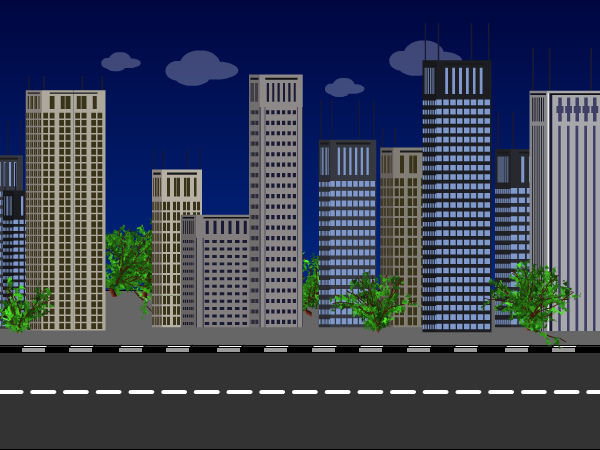
Step 6: Growth
Click on the sidewalk between buildings to create the trees. Make sure to drag for a few pixels to create small trees. The longer you drag, the bigger the tree size becomes. The final effect after adding the trees, should be as below:
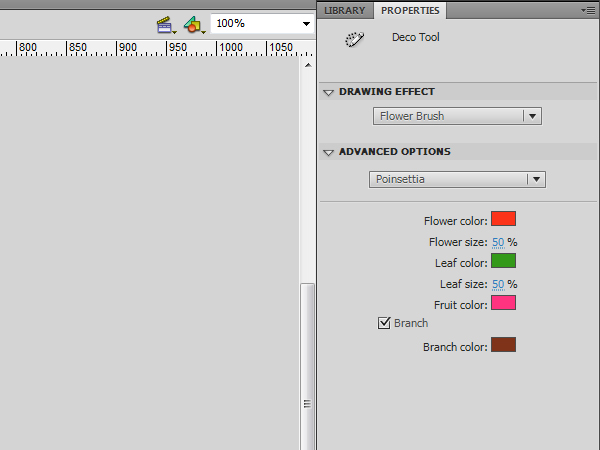
Step 7: Flowers
Now, select the Flower Brush, then from the Advanced option choose “Poinsettia.” Set the size of the Flower and leaf to 50% and make sure that the Branch checkbox is checked
Step 8:
Drag up the screen to create branches of flowers. They should be tall to display them as a branch. If the resultant branch is too large you can select it and reduce its size. Then place the resized flower branch on the buildings as seen in the figure below:

The following steps explain how to create animated barrels of fire. We will also use the Fire Animation brush which allows you to create animated vector fire. You can set the size of the fire, speed and the frame duration. Additionally, you can set the flame color and spark.
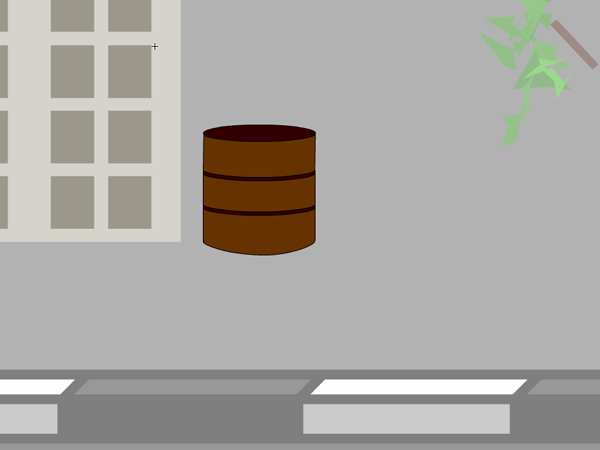
Step 9: Great Barrels of Fire
Create a new symbol by going Insert > New Symbol or use the shortcut Ctrl+F8 (Command+F8 in Mac) and set it as movie clip.
In the active layer, create a circle to represent the top of the barrel and another one to make the bottom of the barrel. Drag two lines between them and complete the barrel fill with intermediate lines to look like the example below:
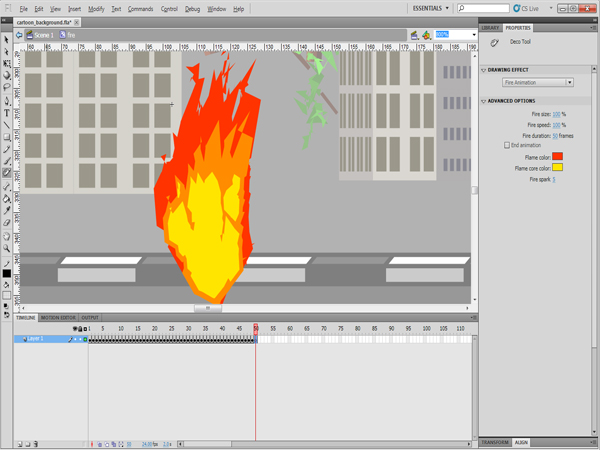
Step 10: Fire Animation
Create a new layer to hold the fire animation. Select the Deco tool or press U in keyboard, choose Fire Animation from the drop-down list in the Properties panel and set the fire animation to 50 frames.

Step 11: Applying Fire
- Click and hold on the screen to start the fire’s animation.
- Currently, the created fire animation starts small and get bigger till the end of the animation. This will create an unwanted cut in the looping animation. To solve this, we will remove the starting frames for the fire. In the timeline, select all the frames where the fire is still growing. In this example, we selected the first 15 frames. Right-click the timeline and choose Remove Frames (or press Shift+F5).
- Make sure that the barrel has the same number of frames as the fire animation.
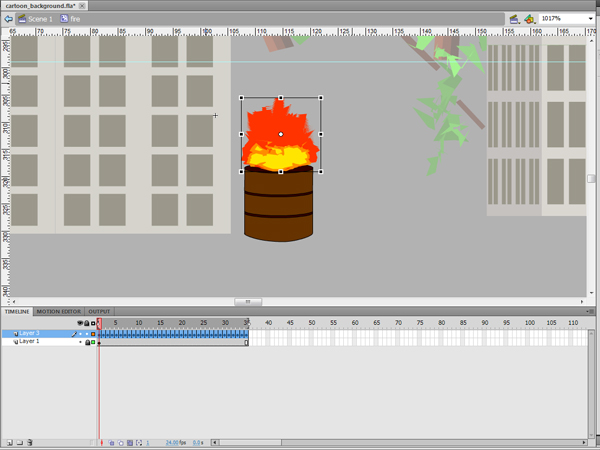
Step 12: Reposition
Now we will change the size and position of the fire to make it appear like flames are rising out of the barrel:
- To change the size of the fire to fit with the barrel, select all the frames and click the Edit Multiple Frames icon below the timeline.
- Click the Onion Skin icon on the bottom and choose Onion All from the list.
- Select the Free Transform tool and make sure that all the frames are selected.
- Resize the fire ball to fit into the barrel.
Step 13:
Go back to the main stage and add the fire barrel movie clip on the stage next to the buildings as seen in the figure below. You can test the movie by pressing Ctrl+Enter (Command+Enter in Mac)
Step 14: Creating Snow
While the Deco tool does not provide all the possible brushes or shapes, you can customize it based on your needs using the symbols or the colors you would like to display. Now, we will use the Particle System which allows you to create flowing animation such as snow falling, fireworks and other effects that depend on small particles exploding from a source.
This brush is based on two particles which can be default symbols or you can use symbols from the library. Also, you can set other options such as the length of the animation, rate per frame and other options as we will see below:
Create a new symbol using Insert > New Symbol or use the shortcut Ctrl+F8 (Command+F8 in Mac) and set it as a movie clip. Go back to the stage and drag the newly created empty symbol from the library to the stage, then double-click the symbol to enter its editing mode
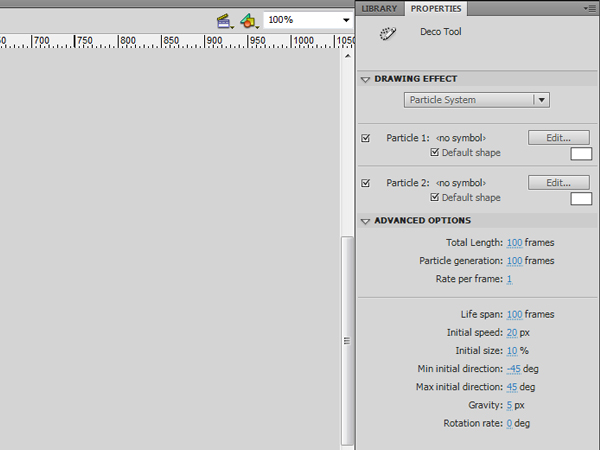
Step 15: Particle System
Select the Deco tool or click the U key on keyboard and choose Particle System from the Drawing Effect drop-down list in the Properties panel. Select both Particle 1 and Particle 2, set their color to white to simulate the snow falling and use the Default shape. Set the other values as follows:
- Set the Total Length and particle Generation to 100 frames
- Rate per frame: 1
- Life span: 100 frames
- Initial speed: 10px
- Initial size: 10%
- Gravity: 5px
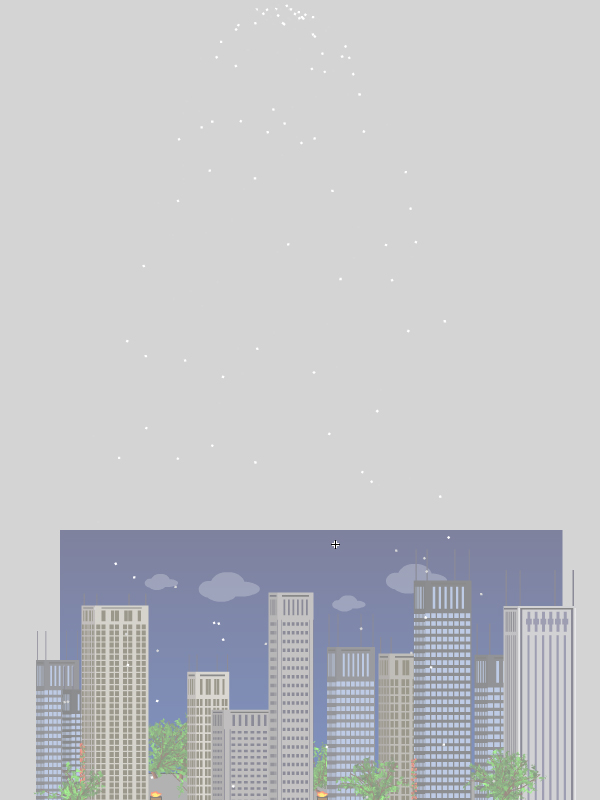
Step 16: Generation
Now, click the top of the stage to have the particle system fall from top of the stage to the bottom. You will notice that the particle animation is generated and the frames are created.
Step 17:
The snow animation starts small and get bigger till the end of the animation. This (as with the fire) will create an unwanted cut in the looping animation. To solve this, we can again remove the starting frames for the starting snow particles. Select the frame up to the point where the snowfall covers all the stage. In this example, we’ll select the first 40 frames. Right-click and choose Remove Frames or press Shift+F5.
If you notice that the animation is moving fast, you can add an extra frame after each keyframe by selecting the keyframe and pressing F5.
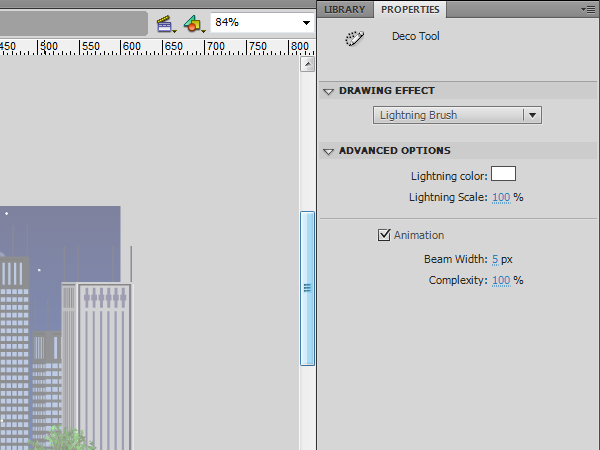
Step 18: Adding Lightning
Let’s add some lightning effects using the Lightning Brush. This lightning should animate and appear randomly. You can set loads of options with this brush such as the color of the lighting, its scale, beam width and complexity. Also, you can choose whether or not it should be animated.
Create a new movie clip symbol and add it to the stage behind the buildings layer. In the movie clip symbol, press F7 to create an empty frame in the beginning of the movie clip and go to frame 20.
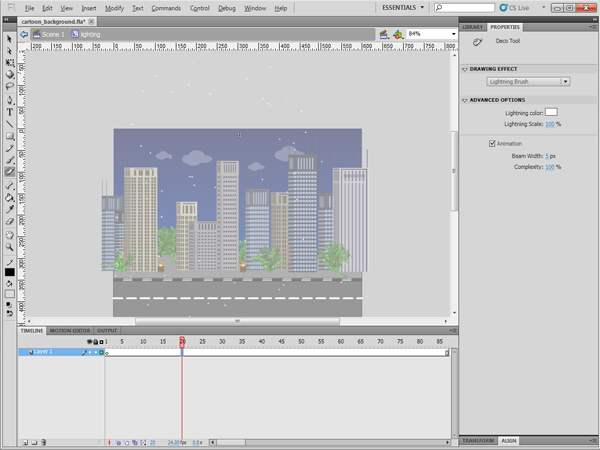
Step 19: Lighting Brush
Select the Deco tool and from the Properties panel choose Lighting Brush. Keep the settings the same, just change the color to white and check the Animation checkbox.
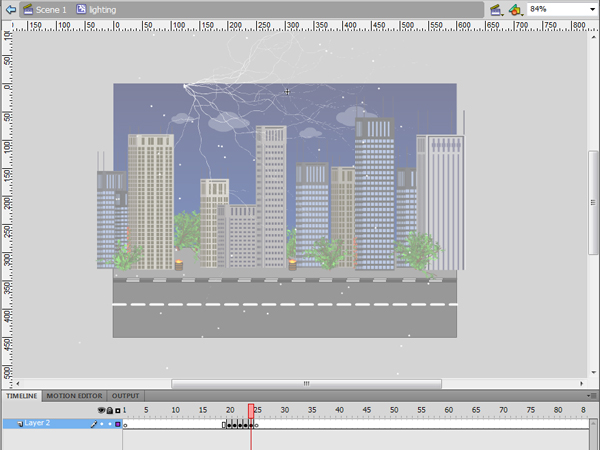
Step 20: Complexity
Point your mouse cursor at the top left of the stage, click and hold your mouse until the lightning reaches the desired complexity, then release the mouse. Press F7 after the animation to add a blank frame after it.
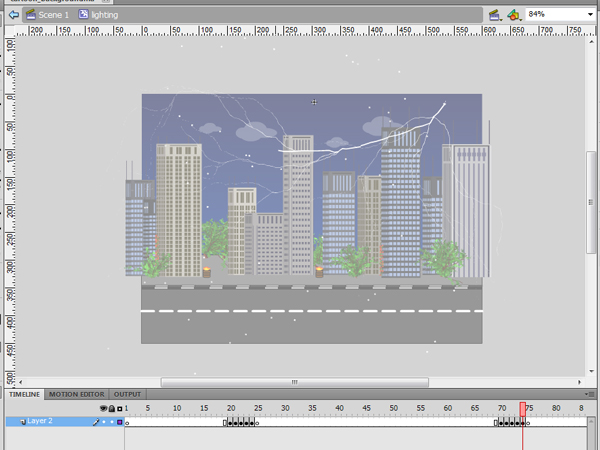
Step 21: More Lightning
Go to frame 70, repeat the above steps to create more lightning on the right hand of the stage with different complexity and press F7 after the animation to remove the lightning from the stage.
Step 22: Test
You can test the movie by clicking Ctrl+Enter (Command+Enter in Mac) or choose File > Publish to export the movie as SWF and HTML files.
Step 23: Optimization
Generally, the files that uses the Deco tool generate large size SWFs because the Deco tool generates the brushes and the animation as ungrouped shapes and frame-by-frame animations. These two methods increases the total size of the file. However, it is best practice to optimize the file after reaching the required results. There are some tips to decrease the file size as below:
- Converted frequently used objects, such as the similar trees and fire barrels, into symbols; this will make Flash count them as one symbol no matter how many times the symbol is used.
- Break apart the overlapped groups to minimize the hardware processing needed to load it as well as the SWF size.
- Try to use motion tweening when possible as frame-by-frame animation increases SWF size.
Conclusion
In the above example, we learnt how to use the Deco tool to create an animated cartoon background. This saves time and does not require special cartoon or drawing skills. You can discover the rest of brushes available in the Deco drawing tools, see how to use them and the different options associated with each one.
I hope you liked this tutorial, thanks for reading!