During this tut we’ll take a look at using the YouTube API to build a custom YouTube player with ActionScript 3.0.
Final Result Preview
Let’s take a look at the final result we will be working towards:
Step 1: File Setup
Here’s how this is going to work:
- We’ll create a YouTube player wrapper that will receive the video’s ID
- We’ll create a document class to instantiate the player and set its controls
- We’ll build the player’s UI with the design tools in Flash IDE and reference them in the document class
For this we’ll need the following files:

Step 2: Stage Setup
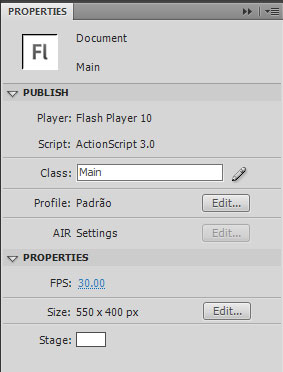
Open up Main.fla and edit the stage to make it 500×440 with 30 frames per second. Set the document class to “Main.”
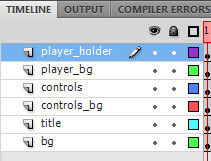
Step 3: Layers Setup
We only need two layers for this tutorial: the player holder, which will be populated by our YouTube player and the controls layer, which will have all the buttons used to control the player. In this case we’ll have a “play/pause” a “mute/unmute” a progress bar(represents amount loaded) and a fullness bar (represents the playhead time).
I’ve added a bunch of other frames just for graphical appearance, you don’t really need those.
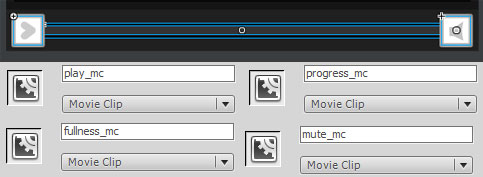
Step 4: Controls
These are simple movieclip symbols with the instance names “play_mc” and “mute_mc”, “progress_mc” and “fullness_mc.”
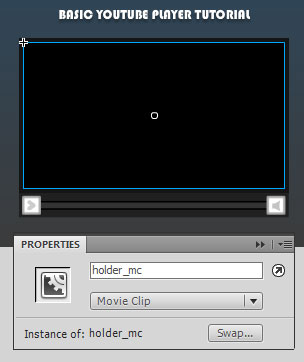
Step 5: Player Holder
The player is also a simple black shape converted to a movieclip with the instance name “holder_mc.”
Step 6: YoutubePlayer Class
Open YoutubePlayer.as and build a skeleton base class that extends a MovieClip class
package
{

	public class  YoutubePlayer extends MovieClip
	{

		public function YoutubePlayer() {

		}
}
Step 7: YoutubePlayer.as Imports
We need to import the following classes:
	import flash.display.MovieClip;
	import flash.display.Loader;
	import flash.events.Event;
	import flash.system.Security;
	import flash.net.URLRequest;
Step 8: YoutubePlayer.as Variables
..and then setup the following variables (all the code in the coming steps is commented):
		var player:Object; //the object which will have the player loaded to
		var loader:Loader; //the loader which will load the player
		var id:String; //the video's id
		var playerStatus:String; //returns the players current playing status
		var progressRatio:Number; //returns the ratio difference between the bytes loaded and the bytes total, from 0 to 1, (useful for the progress bar)
		var fullnessRatio:Number; //returns the ratio difference between the playhead and the total seconds, from 0 to 1, (useful for the fullness bar)
		var ismuted:Boolean; // returns true if player is muted
Step 9: YoutubePlayer.as YoutubePlayer()
When instantiated we need the video’s id passed to the YoutubePlayer() function:
		public function YoutubePlayer($id:String) {
			Security.allowDomain("www.youtube.com"); //allow access from youtube
			id = $id //sets the id
			loader = new Loader(); //instantiates the loader
			loader.contentLoaderInfo.addEventListener(Event.INIT, onLoaderInit); //After loading, calls onLoaderInit
			loader.load(new URLRequest("http://www.youtube.com/apiplayer?version=3")); //starts loading process
		}
Step 10: YoutubePlayer.as onLoaderInit()
Here’s the onLoaderInit() function, called after the loader is instantiated (see previous code block).
		private function onLoaderInit(event:Event):void {
			addChild(loader); //adds the loader to stage
			loader.content.addEventListener("onReady", onPlayerReady); //called when the player is ready
			loader.content.addEventListener("onError", onPlayerError); //called when the player has errors
			loader.content.addEventListener("onStateChange", onPlayerStateChange); //called when the playing state is changed
		}
Step 11: YoutubePlayer.as onPlayerReady()
If everything’s gone OK so far, the onPlayerReady() function is called:
		private function onPlayerReady(event:Event):void {
			player = loader.content; //sets the player
			player.setSize(400, 225); //sets the display size
			player.loadVideoById(id) //loads the video by the id
			addEventListener(Event.ENTER_FRAME, updatePlayer); //updates the player
		}
Step 12: YoutubePlayer.as Other Useful Events()
These traces come in handy for debugging:
		private function onPlayerError(event:Event):void {
			trace("player error:", Object(event).data);
		}
		//I could have used this to update the playerStatus variable but I wanted to show you another method
		private function onPlayerStateChange(event:Event):void {
			trace("player state:", Object(event).data);
		}
Step 13: YoutubePlayer.as Wrappers
These are the wrappers for external controlling:
		public function playVideo() {
			player.playVideo()
		}

		public function pauseVideo() {
			player.pauseVideo()
		}

		public function stopVideo() {
			player.stopVideo()
		}

		public function muteVideo() {
			player.mute()
		}

		public function unmuteVideo() {
			player.unMute()
		}
Step 14: YoutubePlayer.as updatePlayer()
Just one last function and the class is done:
	public function updatePlayer(e) {

		ismuted = player.isMuted() //returns true if muted

		//sets the progress ratio
		progressRatio = player.getVideoBytesLoaded() / player.getVideoBytesTotal()

		//sets the fullness ratio
		fullnessRatio = player.getCurrentTime()/player.getDuration()

		//sets the playerStatus for outside use
		switch(player.getPlayerState()) {
			case -1:
				playerStatus = "unstarted"
				break;
			case 0:
				playerStatus = "ended"
				break;
			case 1:
				playerStatus = "playing"
				break;
			case 2:
				playerStatus = "paused"
				break;
		}
	}
Step 15: Main.as Imports
Hopefully you already know how to build a basic document class (though if not, check out this quick introduction). Inside, import these classes:
	import flash.display.MovieClip;
	import flash.events.Event;
	import flash.events.MouseEvent;

	import YoutubePlayer;
Step 17: Main.as Main()
Here’s our Main() function.
	public function Main() {
			addEventListener(Event.ADDED_TO_STAGE, init); //prevents calls to stage before it's ready
		}
Step 16: Main.as Init()
One question you might be asking is, “How do I know the video’s id?”
It’s very simple: take the url of the film you’re after “http://www.youtube.com/watch?v=fJGLAo_7F_I”, for instance; the video id is the 11 digit number carried by the v var – in this case “fJGLAo_7F_I”.
	private function init(e) {
			removeEventListener(Event.ADDED_TO_STAGE, init); //removes the previous listener
			youtubeplayer = new YoutubePlayer("txqiwrbYGrs"); //instantiates the player with this video id

			//sets up the buttons
			play_mc.buttonMode = mute_mc.buttonMode = true;
			play_mc.addEventListener(MouseEvent.CLICK, playPausePlayer);
			mute_mc.addEventListener(MouseEvent.CLICK, muteUnmutePlayer);

			holder_mc.addChild(youtubeplayer) //adds the player to the player holder

			//resets the fullness and progress
			fullness_mc.width = 1
			progress_mc.width = 1

			//updates the fullness and progress
			addEventListener(Event.ENTER_FRAME, loop);
		}
Step 17: Main.as playPausePlayer()
Here’s the function for our simple button that uses “playerStatus” to toggle between playing and paused:
	private function playPausePlayer(e) {
		if (youtubeplayer.playerStatus == "playing") {
			youtubeplayer.pauseVideo();
		}else {
			youtubeplayer.playVideo();
		}
	}
Step 18: Main.as muteUnmutePlayer()
Similarly, here’s the function for our button that uses “ismuted” to toggle between mute and unmute:
	private function muteUnmutePlayer(e) {
		if (youtubeplayer.ismuted) {
			youtubeplayer.unmuteVideo();
		}else {
			youtubeplayer.muteVideo();
		}
	}
Step 19: Main.as loop()
Let’s figure out how the film’s progress is doing..
		//multiplying the ratio by the total width of the bars will give us the desired length since the ratio goes from 0 to 1
		private function loop(e) {
			fullness_mc.width = youtubeplayer.fullnessRatio * 350
			progress_mc.width = youtubeplayer.progressRatio * 350
		}
Conclusion
As you can see, it’s fairly simple to create a basic youtube player in AS3, be sure to check out the Player API reference for a list of functions and parameters you can use to extend this one.
I hope you liked this tutorial, thanks for reading!