Hello, my name is Adam Clark and I am a product designer for the gift and home décor market. For the past six years, I have designed and developed products that have been sold nationwide in many well-known retail stores. Many of my friends and fellow designers always ask me what exactly do I design and how do I do it? So follow me as I explain what is involved in the product development and design process.
The Product
In this article, the products I will be designing and developing will make a complete bath line. My target market will be youth boys. The products that make up a complete bath set are:
- Wall Border
- Shower Curtain
- Lotion Pump
- Tooth Brush Holder
- Soap Dish
- Shower Hooks
Remember that most retail buyers will only accept presentations with complete lines and not select odd ball items. They do this because it is much easier to market and sell a complete set rather than mix and match products. It also makes your presentation look more professional, and shows your product line is well thought out.
The Research
Before I begin any product design I always do my research. Since I will be designing products for the youth boy market I need to narrow down the age group so I can develop the most age appropriate product. The best selling age group for youth boys is the ages from six to twelve years old. I want to target this age group because it will give me the best chance for my products to fly off the shelf. Next, I need to decide if I want to pick a theme for my product line or do I want to design a pattern?
In this article I will be developing a themed bath line because, well, it’s a lot more intriguing and I usually will only develop a patterned line if I know that’s what the buyer is looking for. Now, I will do some cruising on the net looking for different ideas for my target theme. I will look at different retailer’s websites that sell similar products and try to get inspired by the products they currently sell.
Sometimes I will also check out the clothing department to see what my target audience is wearing. Don’t worry if this doesn’t come to you right away, take your time and pick a theme that you feel is best. It has taken me anywhere from one day to two weeks to decide on a theme. Remember that you want to have a fresh idea, but you also want to develop a product that mom and dad have no problem buying!
Sketching it Out
After doing some research I have decided my theme will be “Comic Books.” After choosing my theme, then it’s time to make some quick rough sketches to get some ideas of how to portray my theme into the product. I sketch out each product in many different views, angles, and layouts. Remember that the product has to be functional as well. I always sketch the image to be portrayed in 3D because you want your image to pop off the page and get your buyer excited. Plus, 3D images look more professional and give your buyer a better feel for the design than a flat 2D image.
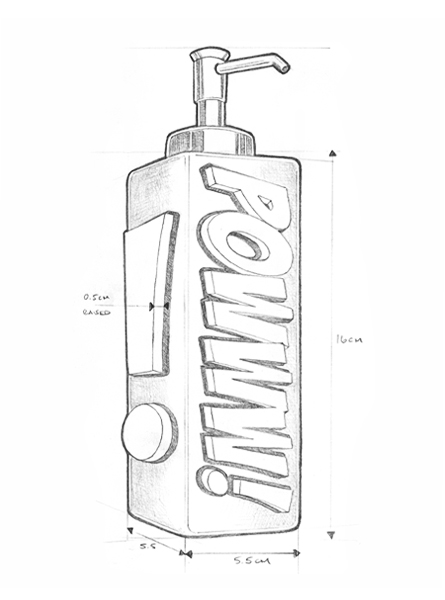
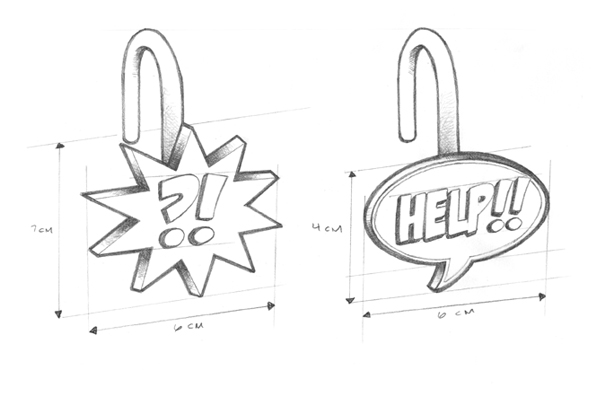
After I have quickly sketched out some rough ideas to my liking, then I will make a clean and final sketch of each product. These sketches will be the exact images I will bring in to Illustrator to start bringing the product to life. Here are some of my final sketches!

From Sketch to Vector
After I complete all of my final sketches, it’s time to bring each individual image into Illustrator and begin to create outlines. First, I make a quick outline of each design to see if it proportioned correctly. Remember that these are actual functional products, so you need to be precise with your ideas. Here are some of my outlines:

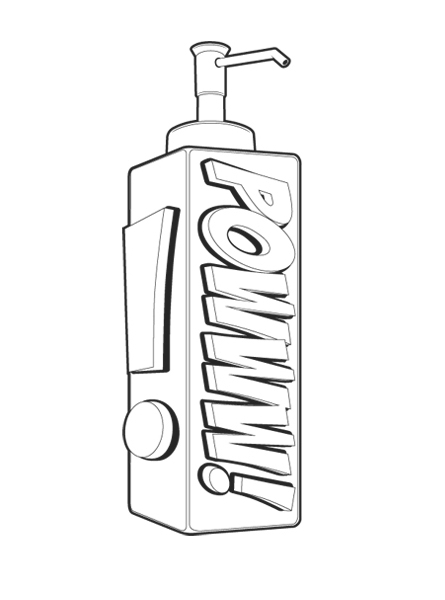
Here you can see in my sketches that I have called out the dimensions and different functionalities of the product. The dimensions and functionalities are not only for my satisfaction, but it reinforces the goal of the project, which is to turn these designs into actual working products and not just concept designs.
Also when presenting to the buyer he or she may ask you what the dimensions and the functionalities are. Many times, the buyer already knows how much retail space they have available. So, it is helpful to know the dimensions of the product you are presenting. However, be flexible. Let the buyer know that you will be happy to modify your design and dimensions to fit into the space they have available.
Fill’er Up!
The next stage of the development process is to pick out the colors or pantones I want to use. Here in our studio we have a variety of pantone books, but when developing bath products we tend to use the textile pantone book, but it’s not necessary. After I have chosen the colors I want to use, I then begin to fill in the outlines like so:

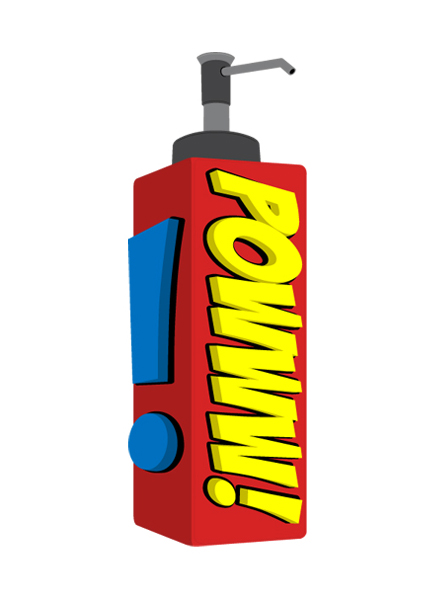
These will be the base colors of the designs so they need to complement each other, and be an actual color that your manufacturer can match to or re-produce. As you can see, I have chosen some basic primary colors to give it that overall comic book feel.
Illustrator to Photoshop
Now this is one of my favorite parts in the product development process. We are now going to bring our products to life with Photoshop! Bring each individual color filled product into Photoshop. Since we sketched our designs in a 3D view, now we need to add the shadows, highlights, glares, and what I like to call Bling to help portray our 3D image. Like so:


I picked one to two light sources for each design. The material I want my products to be made out of is polyresin. Polyresin is a high gloss material that is commonly used for bath products. It is low in cost which will help in the overall price to produce the products.
Since polyresin can have a glossy look, I need to apply that glossy shine to my designs as well. Another benefit to polyresin is it can be easily molded, which gives you more flexibility in your design. So, if you have designed very detailed concepts, when it comes time make your products the manufacturer will be able to capture all that detail during production. Here is another example of products that were designed to be made out of polyresin and the concepts I created before production.

Presentation
At last, my designs are fully completed and brought to life. So, now I need to bring them all together in an awesome presentation so that they can be presented to the buyer.
First I will need to make a slick. A slick is a presentation background designed especially for product design presentations. The slick should have your logo or name on it as well as the product’s name. Whenever possible, I will make a logo for my product line. It makes for a more complete product line presentation and the buyer can get some advertisement ideas while viewing the design. Plus it’s just the cherry on top for a good design.
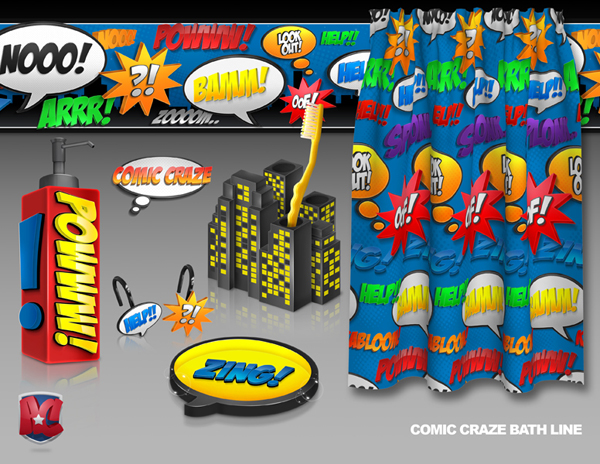
As you can see, I used a black to light gray gradient for my background, if you have used any 3D programs you have probably seen this background in the program’s standard working screen. I also kept my personal logo small and out of the way in the bottom left hand corner so that it doesn’t distract any attention away from the product design. When laying out your products on the slick you want to be careful not to have any weird empty spaces or products in areas that don’t make sense.
As you can see the border is along the top while all the accessories are at the bottom. I put some drop shadows and some reflective shine on the accessories giving them some depth and overall visual appeal. This also makes the accessories pop giving you a more 3D look to it. Finally, I added a tooth brush to the tooth brush holder to show the functionality and some soap bubbles to the soap dish for a little extra flare.
And there you go, a full bath line design ready for presentation!
At the End
There is so much more that goes into developing and designing a full product line, but hopefully you were able to get the logistics of it. A lot of designers don’t take advantage of product designing as a lucrative income or don’t know that they could develop products as easily as this.
If you are interested in developing products of your own contact a licensing agent who can give you more information in getting your presentations in front of actual buyers. Product development is very rewarding because you get a sense of satisfaction seeing the product you designed show up on the shelves of big name retailers and it’s also good for your wallet!