In the following steps you will learn how to create a simple volume bar. It’s a pretty simple tutorial that will introduce you to the basic tools, effect and techniques used in Adobe Illustrator. You will start with a simple rectangle and circle then using multiple fills, strokes and several simple effects along with some nice blending and masking techniques you will create your own volume bar.
Step 1
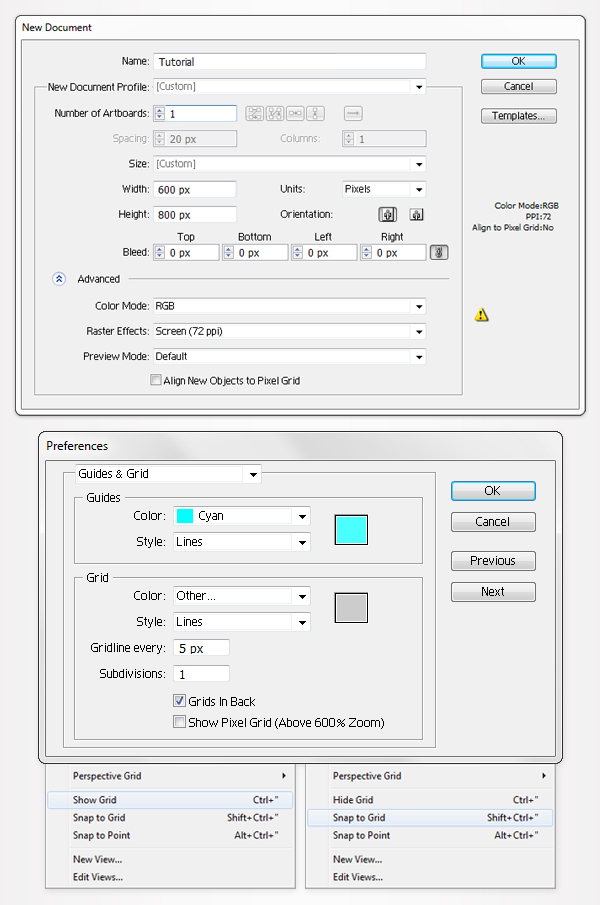
Create a 600 by 800px, RGB document. First, enable the Grid (View > Show Grid) and the Snap to Grid (View > Snap to Grid). Next, you’ll need a grid every 5px. Go to Edit > Preferences > Guides > Grid, enter 5 in the Gridline every box and 1 in the Subdivisions box. You can also open the Info panel (Window > Info) for a live preview with the size and position of your shapes. Do not forget to replace the unit of measurement to pixels from Edit > Preferences > Unit > General. Al these options will significantly increase your work speed.
Step 2
Pick the Rectangle Tool (M) and create a 20 by 410px shape. Fill it with the linear gradient shown below and remove the color from the stroke.

Step 3
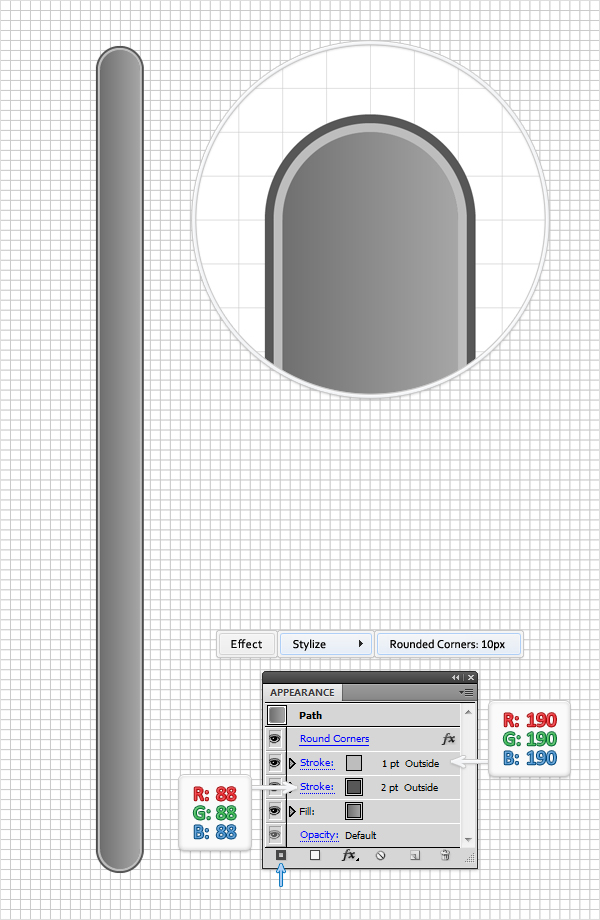
Reselect the shape created in the previous step and add a first stroke. Set its color at R=88 G=88 B=88, make it 2pt wide and align it to outside. Make sure that this shape is still selected and move to the Appearance panel (Window > Appearance). Simply click on the Add new Stroke button. It’s the little black square from the bottom of the Appearance panel.
Obviously, this will add a new stroke for your shape. Select it from the Appearance panel, set its color at R=190 G=190 B=190, make it 1pt wide and align it to outside. Continue in the Appearance panel, make sure that no fill or stroke is selected and go to Effect > Stylize > Rounded Corners. Enter a 10px radius and click OK. In the end, the effect should be placed in the top of the Appearance panel.
Step 4
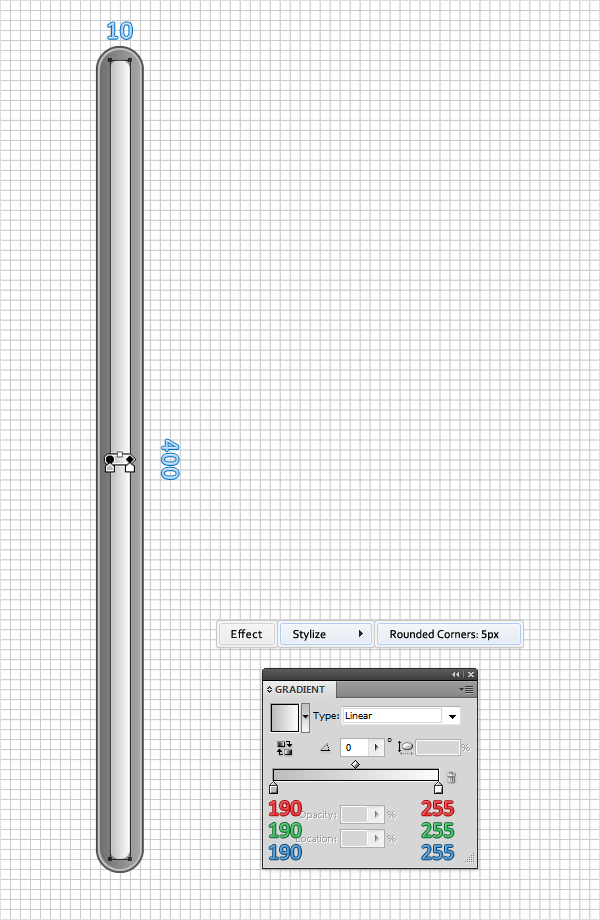
Pick the Rectangle Tool (M), create a 10 by 400px shape and place it as shown in the following image. Fill it with the linear gradient shown below, remove the color from the stroke and go to Effect > Stylize > Rounded Corners. Enter a 5px radius and click OK.
Step 5
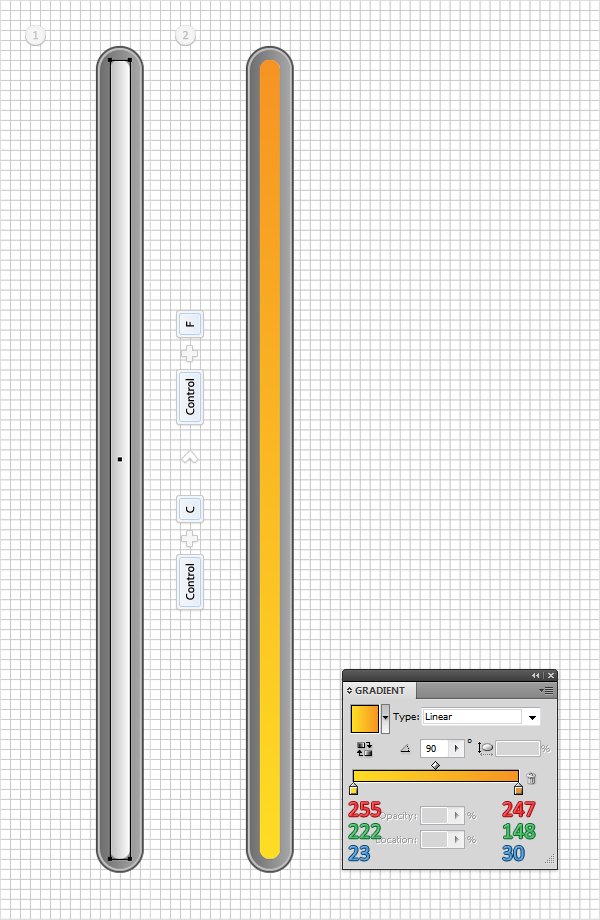
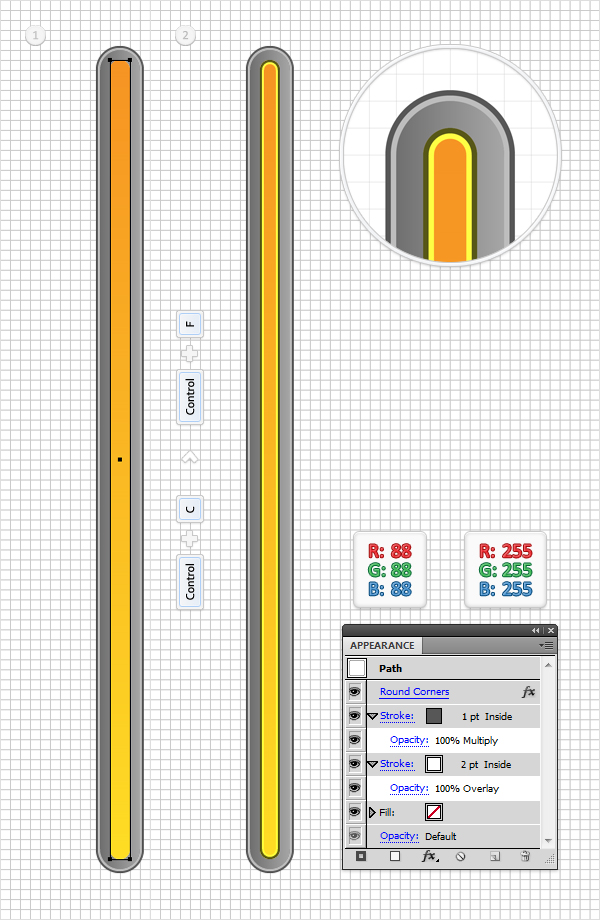
Reselect the shape created in the previous step and make a copy in front (Command + C > Command + F). Select this copy and fill it with the linear gradient shown below.
Step 6
Reselect the shape created in the previous step and make a copy in front (Command + C > Command + F). Select this copy and focus on the Appearance panel. First, remove the linear gradient from the fill. Next, add a white stroke. Select it from the Appearance panel, make it 2pt wide, align it to inside and change its blending mode to Overlay. Add a second stroke for this shape and make it 1pt wide. Again, select it from the Appearance panel, set its color at R=88 G=88 B=88, align it to inside and change its blending mode to Multiply.
Step 7
Pick the Pen Tool (P), draw a 400px vertical path and place it as shown in the first image. Select it, remove the color from the fill and add a simple 1pt, black stroke. Reselect it, increase the stroke size to 10pt and open the Stroke panel (Window > Stroke). First, check the Dashed Line box and the "Align dashed to corners…" button. Next, enter 1pt in the dash box and 40pt in the gap box. In the end your path should look like in the second image.

Step 8
Reselect the path created in the previous step and go to Object > Path > Outline Stroke. This will create a group with a compound path and two, simple paths. Move to the Layers panel open this group and delete the two paths. Select the compound path and ungroup it (Command + Shift + G). Fill it with the linear gradient shown below and change its blending mode to Multiply. The yellow zeros from the gradient image stand for opacity percentage.

Step 9
Pick the Rectangle Tool (M), create a 20 by 165px shape, fill it with black and place it as shown in the first image. Move to the Layers panel select this black path and drag it above the shape filled with the yellow to orange gradient. Now, select these two shapes and go to the Transparency panel. Open the fly-out menu, click on Make Opacity Mask then uncheck the Clip box. In the end your yellow/orange shape should look like in the second image.

Step 10
Pick the Ellipse Tool (L) and crate a two, 20px circles. Place them as shown in the following image and fill them with the linear gradient shown below. Focus on the Appearance panel, make sure that these to circles are still selected and add the two strokes shown in the following image.

Step 11
For the following step you will need a grid every 1px. So, go to Edit > Preferences > Guides > Grid and enter 1 in the Gridline every box. Pick the Rectangle Tool (M) and focus on the top circle created in the previous step. Draw a 2 by 8px, fill it with white and place it as shown in the first image. Make sure that this white rectangle is still selected and go to Object > Transform > Rotate.
Enter a 90 degrees angle and click on the Copy button. Now, select these two, white rectangles and click on the Unite button from the Pathfinder panel (Window > Pathfinder). Continue with the Rectangle Tool (M) and focus and the second circle created in the previous step. Create an 8 by 2px shape, fill it with white and place it as shown in the third image.

Step 12
Pick the Ellipse Tool (L) and create a 14px circle. Fill it with the linear gradient shown below and place it as shown in the following image.

Step 13
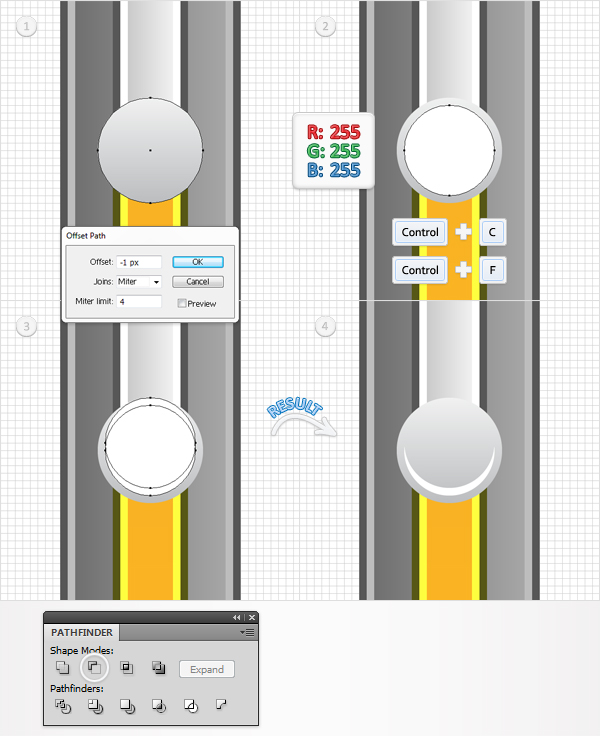
Reselect the shape created in the previous step and go to Object > Path > Offset Path. Enter a -1px Offset and click OK. Fill the resulting shape with white then make a copy in front (Command + C > Command + F). Select this copy and hit the up arrow once. Reselect these two, white circles and click on the Minus Front button from the Pathfinder panel. The resulting shape should look like in the fourth image.
Step 14
Reselect the shape created in the twelfth step and add a 1pt stroke. Align it to inside, set its color at R=130 G=130 B=130 and go to Effect > Stylize > Drop Shadow. Enter the data shown below and click OK.

Step 15
Let’s continue with the background. Pick the Rectangle Tool (M), create a shape the size of your artboard, fill it with R=188 G=188 B=188 and send it to back (Shift + Command + Left Square Bracket). Make sure that this new shape is still selected, move to the Appearance panel and add a new fill using the Add New Fill button. It’s the little, white square icon from the bottom of the Apperceive panel. Select this new fill, make it black, lower its opacity to 3%, change the blending mode to Multiply and go to Effect > Artistic > Film Grain. Enter the data shown below and click OK.

Step 16
Reselect the shape created in the previous step and add a third fill. Select it from the Appearance panel and use the radial gradient shown below. Remember that the yellow zero from the gradient image stands for opacity percentage.

Step 17
Reselect the two circles created in step #10 along with the shape created in the second step (and edited in the third step) and go to Effect > Stylize > Drop Shadow. Enter the data shown below, click OK and you’re done.
Conclusion
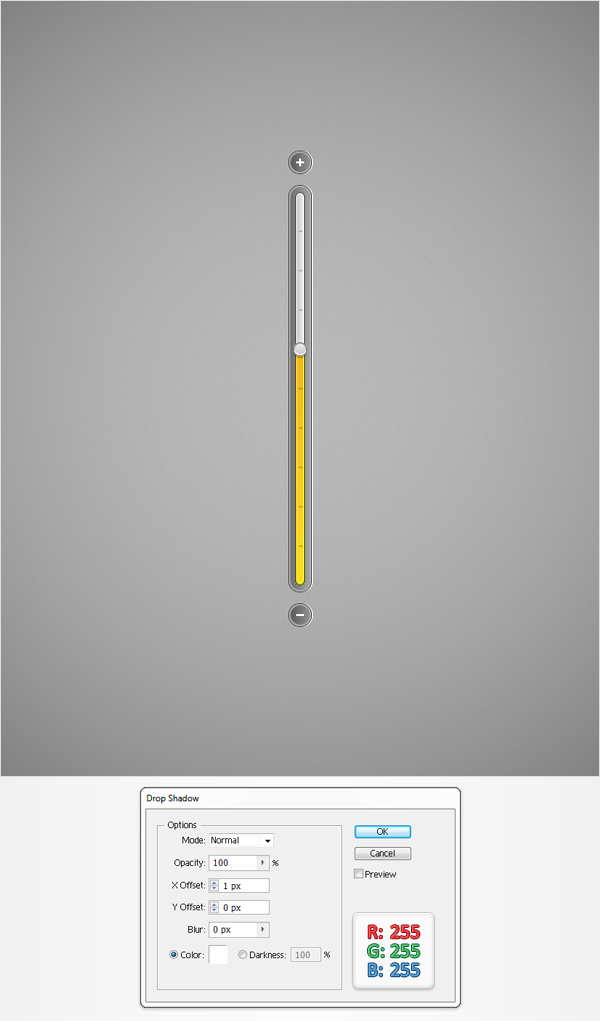
Now your work is done, this is how it should look. I hope you’ve enjoyed this tut.

{excerpt}
Read More