How jQuery Beginners can Test and Improve their Code
jQuery’s arrival has made the process writing JavaScript laughably easy. But, you’ll notice that making small changes to your code improves the readability and/or performance significantly. Here are some tips to get you on your way to optimizing your code.
Setting up the Platform
We’ll need a solid platform to conduct our tests. Here is the HTML markup for the test page in which we’ll be running all our tests:
<!DOCTYPE html>
<html lang="en-GB">

<head>
<title>Testing out performance enhancements - Siddharth/NetTuts+</title>
</head>

<body>

<div id="container">
<div class="block">
<p id="first">
  Some text here
</p>
<ul id="someList">
  <li class="item"></li>
  <li class="item selected" id="mainItem">Oh, hello there!</li>
  <li class="item"></li>
  <li class="item"></li>
</ul>
</div>
</div>

<script  src="http://ajax.googleapis.com/ajax/libs/jquery/1.4.2/jquery.min.js"></script>
<script>
  console.profile() ;

  // Our code here

  console.profileEnd();
</script>

</body>
</html>
There’s nothing special here; just a bunch of elements that we can target and test. We’re using Firebug to log the times here. profile begins the process, and profileEnd stops it, and makes a note of how much time the task took. I typically use Firebug’s main profile method, but for our devious purposes, this will be sufficient.
1. Detect an Element’s Presence First
As is often the case, you’ll be serving a single script file containing your code to all the pages in your site. This is usually code which often performs actions on nonexistent elements in the current page. Though jQuery handles problems such as these quite gracefully, this doesn’t mean that you can just ignore any problems.
As a best practice, only run code which is applicable to the currently loaded page, instead of bunching all of your code into a single document ready check, and serving it to the client.
Let’s look at the first scenario:
 console.profile() ;

 $("#somethingThatisNotHere").text("Some text").slideUp(300).addClass("editing");
 $("#mainItem");

 console.profileEnd();

 //Some more awesome, ground shattering code here ._.
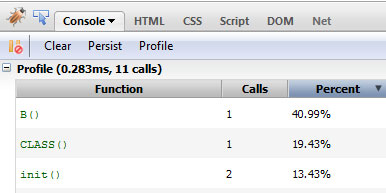
Firebug’s spits out the following result:
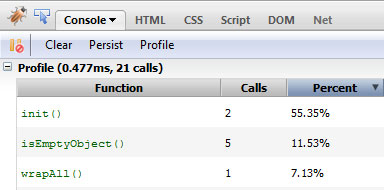
This time, let’s check whether the element we’re looking to perform actions on exists before doing so.
console.profile() ;

if ($("#somethingThatisNotHere")[0]) {
   $("#somethingThatisNotHere").text("Some text").slideUp(300).addClass("editing");
}
$("#mainItem");

console.profileEnd();

//Some more awesome, ground shattering code here ._.
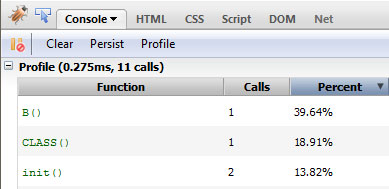
And the results:
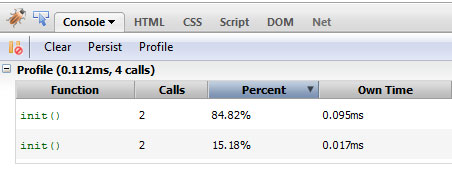
See? It’s pretty simple, to the point and gets the job done. Note that you don’t need to check whether an element exists for every single bit of your code. You’ll notice in your page that certain bigger parts will generally benefit from this method. Use your judgment here.
2. Use Selectors Effectively
Try to use an ID instead of passing a class.
This is a big topic so I’ll keep it as concise as possible. First up, when passing in selectors, try to use an ID instead of passing a class. jQuery directly uses the native getElementById method to find an element by ID while in the case of a class it has to do some internal voodoo to acquire it, at least in older browsers.
We’ll look at the different selectors you can use to target the 2nd li element. We’ll test each one of them and how they modify the performance.
The first method, the easiest, will be to plainly target it using the selected class. Let’s see what Firebug’s profiler returns.
console.profile() ;

$(".selected");

console.profileEnd();
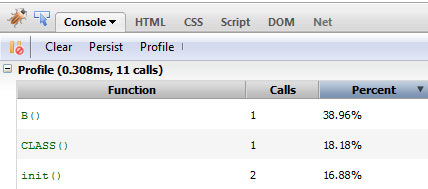
And the result: 0.308ms. Next, we prefix a tag name to narrow it down. This way, we can narrow down our search by first targeting only the selected DOM elements, with document.getElementsByTagName.
console.profile() ;

$("li.selected");

 console.profileEnd();
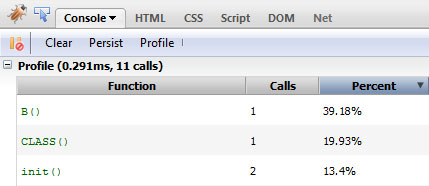
And the result: 0.291ms. Roughly 0.02 ms shaved off. This is negligible due to the fact that we’re testing in Firefox; however, it should be noted that this performance boost will be notably higher in older browsers, like Internet Explorer 6.
Next, we descend from the ID of the parent element.
console.profile() ;

$("#someList .selected");

console.profileEnd();
And the result: 0.283ms. Let’s try to be a bit more specific. We also specify the type of element in addition to the ancestor’s ID.
console.profile() ;

$("#someList li.selected");

console.profileEnd();
And the result: 0.275 ms. Another small part shaved off. Finally, let’s just target it directly using an ID to.
console.profile() ;

$("#mainItem");

console.profileEnd();
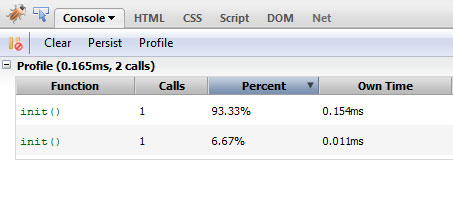
And the result: 0.165ms. Impressive! This really shows you how much faster it is to run native methods Note that while modern browsers can take advantage of things like getElementsByClassName, older browsers cannot – resulting in much slower performance. Always consider this when coding.
3. Account for Sizzle’s Parsing Model and Adding Scopes
Sizzle, the selector engine that jQuery uses – built by John Resig – parses selectors from right to left, which raises a few unexpected chains of parsing.
Consider this selector:
$("#someList .selected");
When Sizzle encounters such a selector, it first builds the entire DOM structure, discards items that don’t have the required class, and, for every element with the class, it checks whether its parent has an ID of someList.
To account for this, make sure that the right-most part of your selector is as specific as possible. For example, by specifying li.selected instead of .selected, you cut down the number of nodes it has to check. This is the reason why performance jumped in the previous section. By adding additional constraints, you effectively reduce the number of nodes it has to check.
To better fine-tune the way elements are obtained, you should look into adding a scope for each request.
var someList = $('#someList')[0];
$(".selected", someList);
By adding a scope, the way the element is searched changes completely. Now, the element providing the scope – someList in our case – is first searched for, and once it has been obtained, child elements that don’t have the requisite class are removed.
Note that it’s generally a best practice to pass a DOM element as the context of your jQuery selector. Using a context is most helpful when it is stored in some variable. Otherwise, you can streamline the process and use find() — which jQuery, itself, does under the hood.
$('#someList').find('.selected');
I’d like to say the performance increase will be clearly defined, but I can’t. I’ve run tests on a number of browsers and whether the scoped approach performance beats that of the vanilla version depends on a number of factors including whether the browser supports specific methods.
4. Avoid Query Waste
When you’re browsing through someone else’s code, you’ll often find.
// Other code

$(element).doSomething();

// More code

$(element).doSomethingElse();

// Even more code

$(element).doMoreofSomethingElse();
Please don’t do this. Ever. The developer has essentially obtained the element in question again and again instead of reusing a reference to it.
Let’s see how much time such horrendous code takes to run.
 console.profile() ;

 $("#mainItem").hide();
 $("#mainItem").val("Hello");
 $("#mainItem").html("Oh, hey there!");
 $("#mainItem").show();

 console.profileEnd();

If the code is structured like above, one after the other, you can use chaining like so:
console.profile();

$("#mainItem").hide().val("Hello").html("Oh, hey there!").show();

console.profileEnd();
By chaining, the element initially passed in is acquired and a reference is passed along to each subsequent calls cutting down on execution time. Otherwise a new jQuery object is created each time.
But if unlike above, the sections referencing the element aren’t concurrent, you’ll have to cache the element and then do all the same operations as before.
console.profile() ;

var elem = $("#mainItem");

elem.hide();

//Some code
elem.val("Hello");

//More code
elem.html("Oh, hey there!");

//Even more code
elem.show();

console.profileEnd();
As is evident from the results, caching or chaining considerably decreases the execution time.
5. Perform DOM Manipulation more Intelligently
Suggesting non-traditional DOM manipulation in my earlier article drew a little flak from a few people before being shown that the performance boost really is worth it. We’ll now test it ourselves.
For the test, we’ll create 50 li elements, and append them to the current list, and determine how much time it takes.
We’ll review the normal, inefficient method first. We’re essentially appending the element to the list every time the loop runs.
console.profile() ;

var list = $("#someList");

for (var i=0; i<50; i++)
{
   list.append('<li>Item #' + i + '</li>');
}

console.profileEnd();
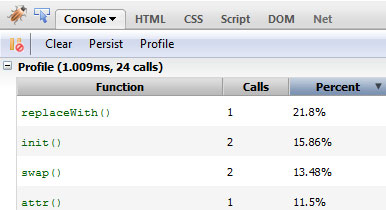
Let’s see how it did, shall we?
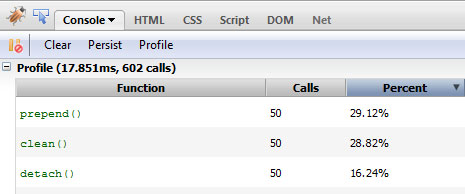
Now, we’ll follow a slightly different path. We’ll essentially append the required HTML string to a variable firs, and then only reflow the DOM one time.
console.profile() ;

var list = $("#someList");
var items = "";

for (var i=0; i<50; i++){
     items += '<li>Item #' + i + '</li>';
 }

list.append(items);

console.profileEnd();
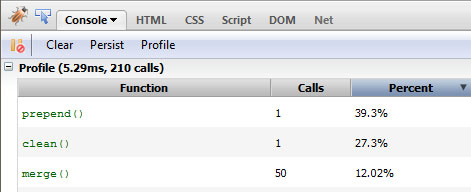
As expected, the time taken has decreased significantly.
And finally, a more optimized version. Instead of appending the content, we’ll copy over the existing contents of the list first, and then completely replace the HTML of the parent container.
console.profile() ;
var list = $("#someList");
var items = list.html();
for (var i=0; i<50; i++){
items += '<li>Item #' + i + '</li>';
}
list.html(items);
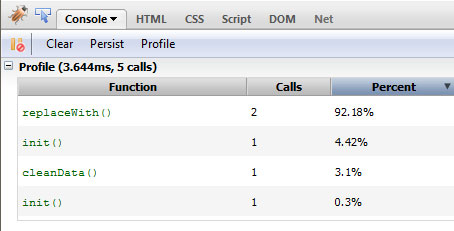
console.profileEnd();
If you’re using jQuery as a replacement for getElementById, but never utilize any of its provided methods, then you’re doing it wrong.
As expected, the time taken to run the code decreases. If you’d like to take things further, ask yourself if you really need to create a new jQuery object all for the purpose of targeting some element? If you’re using jQuery as a replacement for document.getElementById, but never utilize any of its provided methods, then you’re doing it wrong. In this case, we can get away with raw JS.
console.profile() ;

var list = document.getElementById('someList');
var items = '';

for (var i=0; i<50; i++){
     items += '<li>Item #' + i + '</li>';
 }

list.innerHTML = items;

console.profileEnd();
A Few Caveats
You’ll notice that the difference in execution time between the optimized and un optimized code is in the fraction of a millisecond range. This is because our test document is very small with an impossibly small number of nodes. Once you start working with production level sites with a few thousand nodes in it, it’ll really add up.
Also note that in most of these tests, I’m simply accessing the elements. When you start applying proper functions to them, the delta in the execution time will increase.
I also do understand that this isn’t the most scientific of methods to test performance, however, to gain a general feel for how much each of these changes affect the performance, I think this is suitably sufficient.
Ffinally, in most of your web apps, the connection speed and response time of the web server in question is going to play a bigger role in the performance of your app more than the tweaks in the code you’ll make. Nevertheless, this is still important information and will help you down the line when you’re trying to eke out as much performance as possible from your code.
That’s all Folks
And we’re done. A few points to keep in mind when you’re trying to optimize your code; this is not the all encompassing list of tweaks, of course, and the points may not necessarily apply to all situations. Either way, I’ll be watching the comments closely to read what you have to say on the topic. Any mistake you see here? Drop me a line below.
Questions? Nice things to say? Criticisms? Hit the comments section and leave me a comment. Happy coding!