How To Build a Widget to Display your Buzzing
A couple months ago, Google released a new Twitter-like service, called Buzz. We can use this service to display our latest buzzes on any site. So, in this tutorial, I’ll guide you through the process of building your own Buzz widget.
Step 1. Reading Public Updates from Buzz
At the moment, there’s no API to work with the Buzz service; Google is expected to provide one within the next several months, however, for now, the public updates are available as Atom feeds.
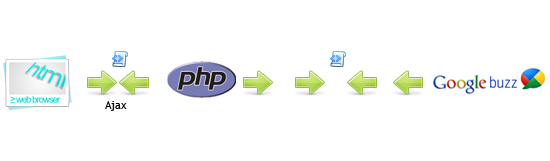
First, we need to get the data from the Buzz service. In order to do so, we’ll setup a PHP script that reads the data from the Buzz service. This script will be a kind of proxy that we’ll use to retrieve the data. By doing this, we can make an AJAX request, and get an XML document that contains desired updates.
Here’s the initial PHP code:
header('Content-type: application/xml');	 //Setting up the response content type to XML
$handle = fopen($_GET['url'], "r");		//Open the given URL

if ($handle) {
    while (!feof($handle)) {
        $buffer = fgets($handle, 4096);		//reading the data
        echo $buffer;
    }
    fclose($handle);
}
Save this file as “readfeed.php,” and remember that this is just an example. In a real world project, you should clean the url parameter, and make sure the user is not opening something important on your file system.
Step 2. Creating the Structure of our JavaScript Object
Once we can read this data, we need to build an object that holds our code in JavaScript. Create a new file and name it “buzz-widget.js”. To extend an object, we need to use the “prototype” property; if you have questions about this you should watch the tutorial where Jeffrey shows us how this works with native objects.
The structure of our object will be something like this:
var BuzzReader = function(options){	//Step 1
	//code for the constructor
};

BuzzReader.prototype = {			//Step 2
	renderTo: "",
	proxy	: "readfeed.php",
	user	: "",
	url		: "",
	items	: 10,
	onLoad	: function(){},
	onRender: function(){},

	render	: function(element){

	},

	read	: function(){

	},

	parse	: function(xml,success,response){

	},

	format		: function(date){

	},

	createDate	: function(str){

	}
};
In step one, we created the constructor function for our object. Now, we’re going to check for the required configurations, and read the updates from our proxy.
- renderTo : the element where the widget will be rendered; this property can be a jQuery selector too.
- proxy : the URL where we’ll make an AJAX request call to retrieve our data. We already created the PHP file that reads the information from the Buzz service; by default it is “readfeed.php”.
- user : the Buzz user we want to get the updates from.
- items : the number of updates we are going to display in the widget.
- onLoad : an event we’re going to trigger when the data is loaded into the widget; by default, this is an empty function.
- onRender : this event is triggered when the widget is about to be rendered in the page; empty function by default.
Step 3. The Constructor
Let’s work on the constructor function of our widget.
var BuzzReader = function(options){
	var url = "http://buzz.googleapis.com/feeds/{user}/public/posted";	//Step 1
	jQuery.extend(this,options || {});			//Step 2

	if(this.user === "") throw "The 'user' property is required";	//Step 3
	if(this.renderTo === "") throw "The 'renderTo' property is required";

	if(this.url === "")this.url = url.replace(/{user}/g,this.user);	//Step 4

	this.read();		//Step 5
};
In step one, we defined the URL of the Buzz service from which we are going to retrieve the data. We’ll replace the “{user}” string with the user configuration (see step 4).
In step two, we overrode the default properties with the given options; we used jQuery.extend to do that.
In step three, we checked for the required configurations, one of them is the “user” and the “renderTo”. If one of these is missing, we throw an exception. This will be useful for the developer who uses our plugin.
In step four, we searched for the “{user}” string in the variable “url”, and replaced it with the user whose buzzes we wish to display in our widget.
The last step is very important. Here, we start the process of reading and displaying the information.
Step 4. Reading the Information
We’ve setup the PHP script that pulls the data to our server. Now, we only need to make an Ajax request to retrieve the data with jQuery; let’s look at the following code:
read	: function(){
	this.el = jQuery(this.renderTo);		//Step 1
	this.loader = this.el.append("<div class=\"buzz-loading\"></div>");
	jQuery.ajax({				//Step 2
		url		: this.proxy,
		data	: "url="+this.url,
		context	: this,
		success	: this.parse
	});
},
In step one, we appended a new element to the container, informing the viewer that we’re currently processing information.
In step two, we made the Ajax request. The most important thing is the “context” property; this configuration will allow you to change the context of the function that is called when the server responds. Finally, we set the context to “this” which is the BuzzReader object.
Remember that the PHP script expects the “url” parameter. so don’t forget to send it; when the server responds, the method “parse” is executed.
Step 5. Parsing the XML Document
The Buzz service delivered the data in an Atom feed format, so we need to parse and extract the information we need.
This is an example of the XML document that is returned from the Buzz service:
<?xml version="1.0" encoding="utf-8"?>
  <feed xmlns="http://www.w3.org/2005/Atom"
        xmlns:thr="http://purl.org/syndication/thread/1.0"
        xmlns:media="http://search.yahoo.com/mrss"
        xmlns:activity="http://activitystrea.ms/spec/1.0/">
    <link rel="self"
          type="application/atom+xml"
          href="http://buzz.googleapis.com/feeds/117377434815709898403/public/posted"/>
    <link rel="hub" href="http://pubsubhubbub.appspot.com/"/>
    <title type="text">Google Buzz</title>
    <updated>2009-12-14T20:04:39.977Z</updated>
    <id>tag:google.com,2009:buzz-feed/public/posted/117377434815709898403</id>
    <generator>Google - Google Buzz</generator>
    <entry>
      <title type="html">Buzz by A. Googler from Mobile</title>
      <published>2009-12-14T20:04:39.000Z</published>
      <updated>2009-12-14T20:04:39.977Z</updated>
      <id>tag:google.com,2009:buzz/z12bx5v5hljywtfug23wtrrpklnhf3gd3</id>
      <link rel="alternate"
            type="text/html"
            href="http://www.google.com/buzz/117377434815709898403/DmuNZHSfZ7t/buzz-buzz"/>
      <author>
        <name>A. Googler</name>
        <uri>http://www.google.com/profiles/a.googler</uri>
      </author>
      <content type="html">Bzz! Bzz!</content>
      <activity:verb>http://activitystrea.ms/schema/1.0/post</activity:verb>
      <activity:object>
        <activity:object-type>http://activitystrea.ms/schema/1.0/note</activity:object-type>
        <id>webupdates:[email protected]</id>
        <title>Buzz by A. Googler from Mobile</title>
        <content type="html">Bzz!  Bzz!</content>
      </activity:object>
      <link rel="replies"
            type="application/atom+xml"
            href="http://buzz.googleapis.com/feeds/117377434815709898403/comments/z12bx5v5hljywtfug23wtrrpklnhf3gd3"
            thr:count="0"/>
      <thr:total>0</thr:total>
    </entry>
  </feed>
Once we know the response, we can parse the document quite easily with jQuery.
parse	: function(xml,status){
	var that = this;
	var nodes = jQuery("entry",xml);	//Step 1
	this.el.empty();
	var info = [];
	nodes.each(function(){			//Step 2
		var date = that.createDate(jQuery("published",this).text());
		info.push({
			title		: jQuery("title",this).text(),
			author		: jQuery("author > name",this).text(),
			uri			: jQuery("author > uri",this).text(),
			summary 	: jQuery("summary ").text(),
			content		: jQuery("content:first",this).text(),
			published	: that.format(date),
			updated		: jQuery("updated",this).text(),
			date		: date,
			reply		: jQuery("link[rel=replies]",this).attr("href")
		});
	});
	this.data = info;				//Step 3
	this.onLoad.call(this,info);
	this.render(this.renderTo);		//Step 4
},
We received two arguments: the first is the data, in this case a XML document; the second argument is the text status of the request.
In step one we got all the “entry” nodes; this is the place where our Buzz updates and all the information we need is located. Next, we emptied the container of our widget and created an empty array to store our data as a JavaScript object for each node.
In step two, we iterated through the “entry” nodes and extracted the “title”, “author”, “content” and so on. This is a really simple process; all we have to do is write the selector and set the root for the search, in this case the root is the node “entry.”
I’d like to point out the line where we are extracting the “reply” attribute – the selector looks something like this:
link[rel=replies]
We specified that we want the node “link”, that has an attribute “rel” equal to “replies”. This is important because there are many “link” nodes within each “entry.”
In step three, we created the “this.data” reference to the array that contains our data. After that, we executed the event “onLoad” and passed the information we extracted.
In step four, we executed the render method.
Before we continue with the “render” method, let’s review the “createData” and “format” methods. We call these methods for each entry.
In the “createDate” method, we’re only going to create a new Date object with the given string. The string has the format “2009-12-14T20:04:39.977Z” so we can create the Date object as follows:
createDate	: function(str){
	var date = new Date();
	date.setDate(str.substring(8,10));
	date.setMonth(str.substring(5,7) - 1);
	date.setFullYear(str.substring(0,4));
	date.setUTCHours(str.substring(11,13));
	date.setUTCMinutes(str.substring(14,16));
	date.setUTCSeconds(str.substring(17,19));
	return date;
}
Or we can use a simple regexp to format the string and give it to the Date constructor:
createDate	: function(str){
	//str = '2009-12-14T20:04:39.977Z'
	str = str.substring(0,19).replace(/[ZT]/," ").replace(/\-/g,"/");
	//str = '2009/12/14 20:04:39'
	return new Date(str);
}
In the format method we are going to use the date object we just created, and return the time that is between the publication date and the system local time – for example “11 minutes ago” or “3 hours ago.”
format		: function(date){
	var diff   = (((new Date()).getTime() - date.getTime()) / 1000),
		days   = Math.floor(diff / 86400),
		months = Math.floor(days / 31);

	if (isNaN(days) || days < 0)return date.toString();

	if(days == 0){
		if(diff < 60)return "Just now";
		if(diff < 120)return "1 minute ago";
		if(diff < 3600)return Math.floor( diff / 60 ) + " minutes ago";
		if(diff < 7200)return "1 hour ago";
		if(diff < 86400)return  Math.floor( diff / 3600 ) + " hours ago";
	}else if(days < 31){
		if(days == 1)return "Yesterday";
		if(days < 7)return days + " days ago";
		if(days < 31)return Math.ceil( days / 7 ) + " weeks ago";
	}else{
		if(months == 1)return "A month ago";
		if(months < 12)return Math.ceil( days / 31 ) + " months ago";
		if(months >=12)return Math.floor( days / 365 ) + " years ago";
	}
},
The previous code, though a bit tedious, is pretty straight forward. First, we obtained the difference between the current time, and the publications date in minutes, days and months. After that, we simply compared the results, and returned a string in the correct format.
Now let’s review the “render” method.
Step 6. Creating the GUI
Until now, we’ve only pulled the data from the Buzz server, and parsed the XML document. That means that we are ready to display the information on the screen.
render	: function(element){
	this.onRender.call(this,this);		//Step 1

	var html = [];				//Step 2
	html.push("<ul>");

	for(var i = 0; i < this.items || i < this.data.lenght;i++){
		html.push("<li><strong><a href=\""+this.data[i].uri+"\">"+this.data[i].author+"</a></strong><span>"+this.data[i].published+"</span>"+this.data[i].content+"</li>");
	}
	html.push("</ul>");

	this.el.append(html.join(""));	//Step 3
},
In the first step, we triggered the event “onRender,” this, again, will be useful for the programmer who uses our plugin.
In the second step, we created an array to store our dynamic HTML. After that, we created a list “ul” and then we iterated through our data, creating the “li” node for each item; you probably noticed that the “for” condition has an “or” operator; this allow us to stop the iterations when the array of data ends, or when the index “i” has reached the “items” property defined by the developer who is going to use the plugin.
In the last step, we inserted the HTML into the container using the “append” method.
Step 7. Using the Widget
In order to use our widget we need to create an instance of our class “BuzzReader”, but, before doing so, let’s define where we want to render it. Create an HTML file, and, within the body element, and add the following:
<div id="buzz">
<div>
	<div class="reader"></div>
</div>
</div>
We are going to render our widget inside the div with the class “reader”, let’s create the instance of our widget as follows:
$(function(){

	new BuzzReader({
		renderTo	: "#buzz .reader",
		user	: "nettutsblog",
		items	: 3
	});
});
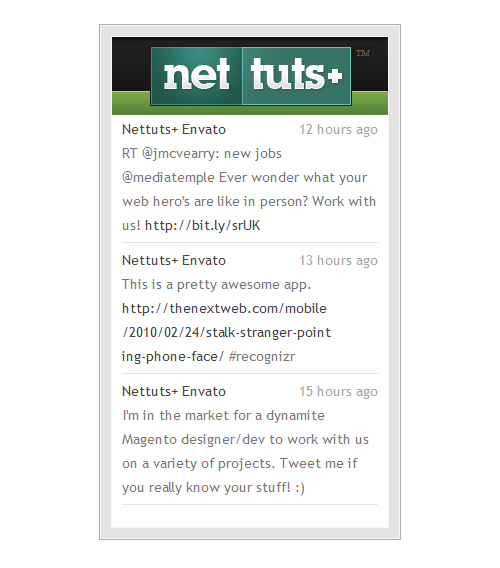
Don’t forget to import the jQuery library and the “buzz-widget.js” into your HTML file. If everything was configured and coded correctly, you should see something similar to the following image:

Step 8. Styling the Widget
Well, we can now see the updates, but it doesn’t look very pretty; we need to style it a bit.
/* step 1 */
body{font-family:"Trebuchet MS",Arial,sans-serif;line-height:24px;font-size:14px;}

/*Step 2*/
#buzz{width:300px;margin:100px auto;border:1px solid #AFAFAF;}
#buzz > div{background-color:#E4E4E4;border:1px solid #F6F6F6;padding:10px;}
#buzz .reader{height:350px;overflow:auto;border:1px solid #F6F6F6;padding:80px 10px 10px 10px;background:#fff url(title.jpg) center 0 no-repeat;}
/* Step 3 */
#buzz ul{margin:0;padding:0;}
#buzz ul li{list-style-type:none;color:#A3A3A3;border-bottom:1px solid #E4E4E4;margin-bottom:5px;padding-bottom:5px;}
#buzz ul li div{color:#777;}
#buzz ul li a{color:#444;text-decoration:none;font-weight:normal;}
#buzz ul li a:hover{text-decoration:underline;}
#buzz ul li span{float:right;}

/* Step 4*/
#buzz .buzz-loading{position:absolute;margin-left:240px;width:16px;height:16px;background:transparent url(ajax-loader.gif) center center no-repeat;}
In the first two steps, we centered the widget on the screen, and set the size, borders and colors for the container; we also added the logo as a header for the widget.
In the last two steps, we set the styles to the dynamic list, we changed the color of the fonts, and we added some margins, borders and paddings to our links.
As a result we have a much more appealing product.
Step 9. Creating the Plugin
The last step in this tutorial is to create the jQuery plugin. Let’s modify the “buzz-widget.js” file, adding the following code to the end of the file.
jQuery.fn.buzzReader = function(options){  	//Step 1
	return this.each(function(){
		var opts = options || {};		//Step 2
		opts.renderTo = this;
		new BuzzReader(opts);		//Step 3
	});
};
In the first step, we simply named our plugin.
In step two, we created the configuration object if the argument “options” is empty. Next, we defined the property “renderTo” to the actual element.
In step three, we created a new instance of our widget.
Now, we can use our plugin in our HTML, like this:
$(function(){
	$("#buzz .reader").buzzReader({
		user	: "nettutsblog",
		items	: 3
	});
});
Conclusions
I hope you’ve learned a bit about how to extract data from XML documents, and display your latest Buzzes on any website. Any questions? Thanks for reading!