Follow this quick tip and learn how to give some personality to common everyday symbols with the help of the Scribble effect. We will use the Appearance Panel, the Offset Path and Feather effects and we will play with the Scribble settings to turn symbols into fun colorful objects or even labels.
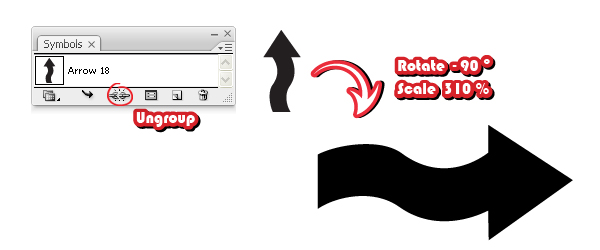
Step 1
I will use the first symbol in order to explain the method in detail and for the others I will highlight only the essential steps. From the Symbols Panel open the Symbol Libraries menu and under Arrows find Arrow 18. Drag it into your working area, press the Break Link to Symbol button and choose Ungroup from the Object menu. Also from the Object menu, under Transform select Scale and enlarge the arrow about 310% then rotate it minus 90 degrees.
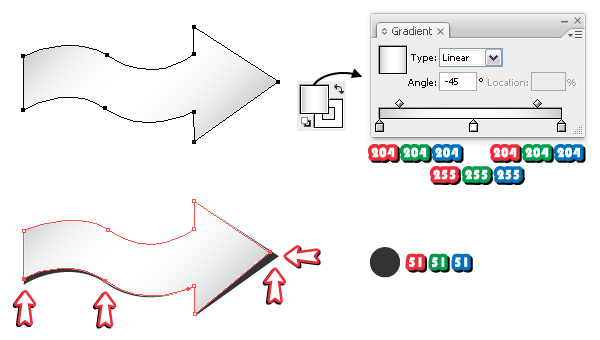
Step 2
Fill the arrow with a linear gradient shown and also give it a 1 pt white Stroke. Copy and Paste in back the arrow (Command + C then Command + B), delete the existing attributes and fill it with dark gray. Now, take the Direct Selection Tool (A) and move the anchor points indicated individually to reveal the dark shape from beneath it.
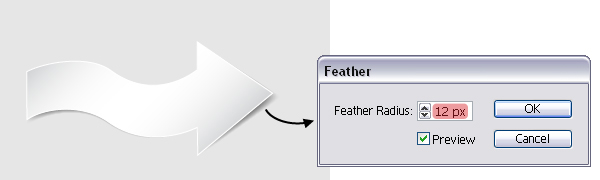
Step 3
Having the dark arrow in back selected, go to Effect menu > Stylize > Feather and apply a 12 px Radius to obtain the shadow.
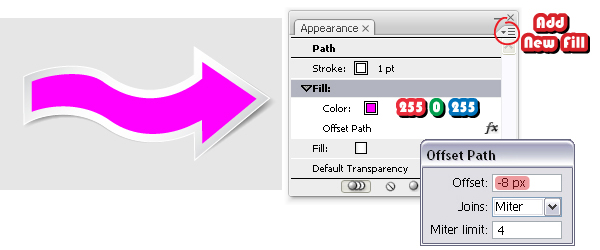
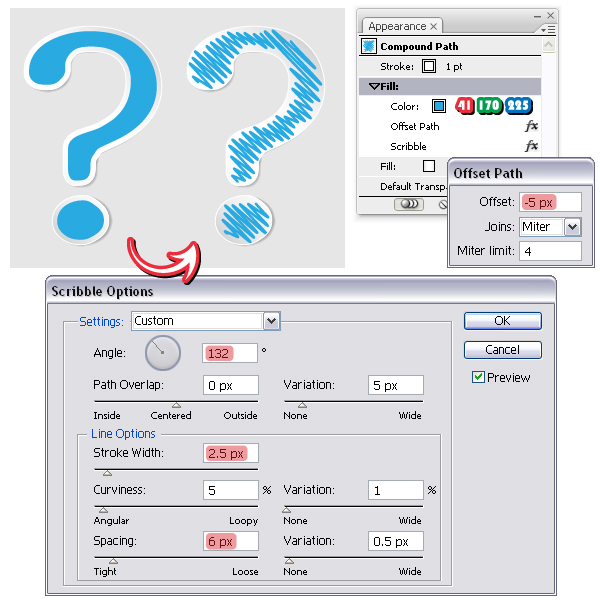
Step 4
Let’s continue with the main arrow. In the Appearance Panel, open the fly-out menu and choose Add New Fill. Pick any color you want then having this second fill selected, go to Effect menu > Path > Offset Path and apply a -8 px Offset value.
Note: The selected Offset value is not a fixed value and should be chosen depending on the size of the symbol and the Scribble settings. If you don’t apply the Offset Path effect the scribbled paths will go over the edges of the arrow and that’s not what we want in this case. This way we are keeping them inside the shape (see the image from the next step).
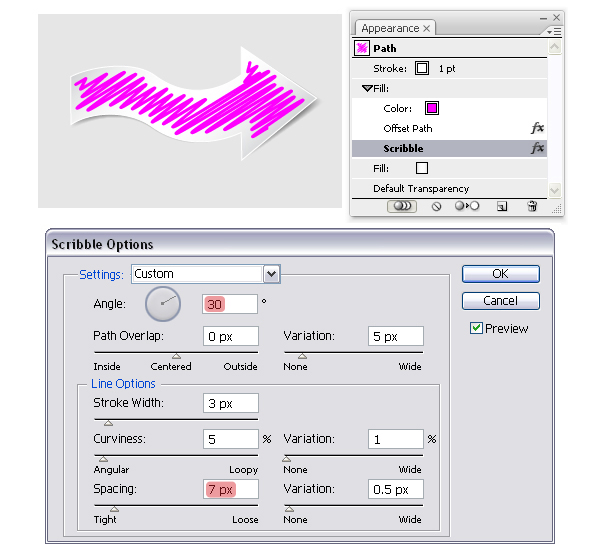
Step 5
Make sure that the second fill is selected in the Appearance Panel then go to Effect menu > Stylize and apply the Scribble effect. I kept the Angle value and towards the default settings I just increased the Spacing to 7 px, this time.
Step 6
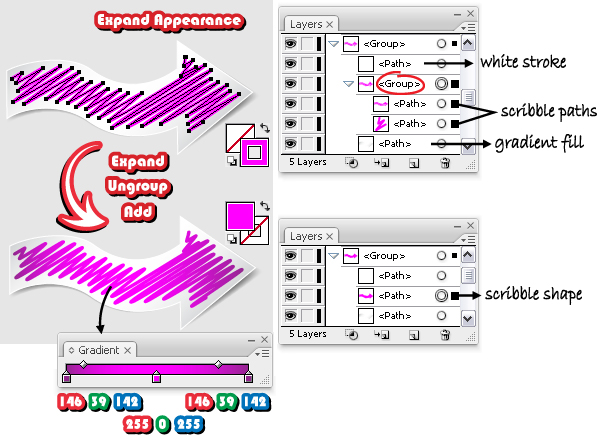
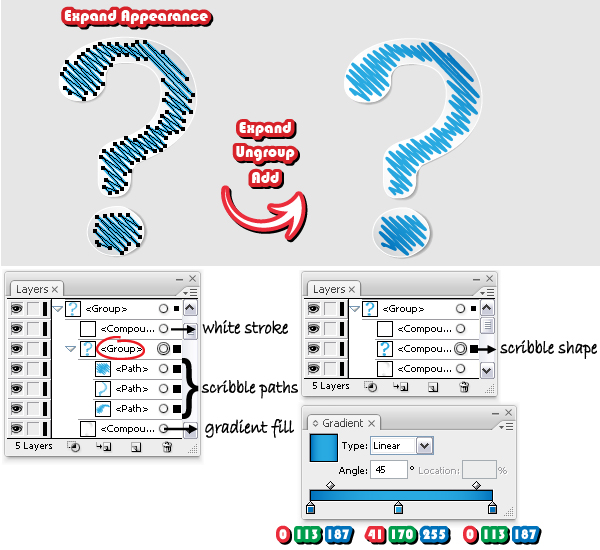
Next, go to the Object menu and choose Expand Appearance. At this point, you could stop here and use the new symbol as it is or you could fill the scribble path with a gradient as I did.
After you expand the arrow you will obtain a group. If you open the group in the Layers Panel you will notice that there are three things: a path having the white stroke applied at the beginning, a group and a path filled with the gradient that we used.
Our issue is with this group that contains two scribble paths (although it would have been nice to be just one) that actually have a 3 pt pink Stroke (the Stroke Width in the Scribble Options window). You have to expand them so select this group and from the Object menu choose Expand. As a result of this action the two pink stroked paths turn into paths filled with pink. But still, they are two and we only need one to fill it with a gradient therefore we need to unite these two shape.
To do this, first you have to Ungroup them from the Object menu (otherwise Add won’t work) then click Add to shape area > Expand from the Pathfinder Panel. You just obtained a single path that I’ve called a "scribble shape" and you can fill it with any gradient that you want. The first symbol is ready.
Step 7
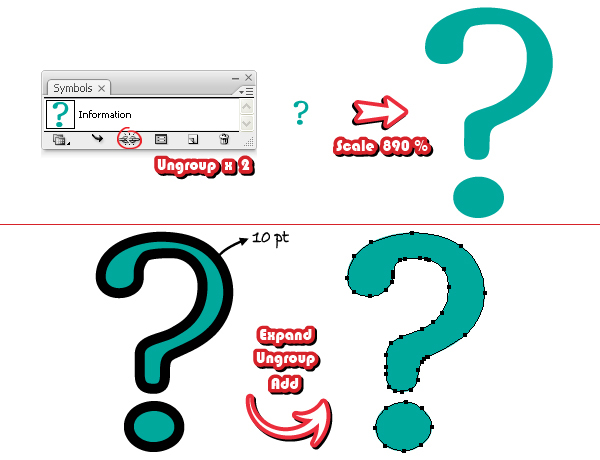
The following symbol that I’ve used can be found in the Symbol Libraries menu under Default Symbols > Web. Drag it into your working area, press the Break Link to Symbol button then Ungroup it twice. At this point, it is far too small so enlarge it 890%. Give it a 10 pt Stroke then from the Object menu choose Expand and Ungroup.
Now, select both shapes (green + black) and click Add to shape area > Expand from the Pathfinder Panel to unite them. The reason I did this is that I wanted the symbol to be thicker in order to have enough space for the scribble paths inside.
Step 8
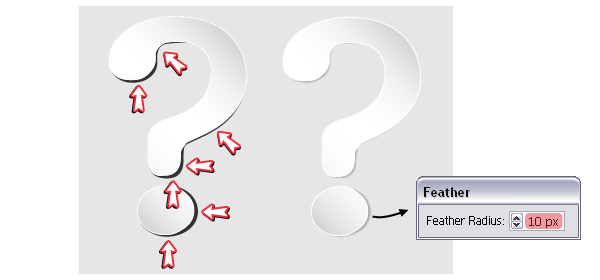
Fill the symbol with the same gradient shown at step 2 and also give it a 1 pt white Stroke. Copy and Paste in back the shape and fill it with dark gray then go to Effect menu > Stylize and apply the Feather effect to create the shadow. Just like before, use the Direct Selection Tool (A) to move some of the points individually to reveal the shadow in back.
Step 9
Add a new blue fill from the fly-out menu in the Appearance Panel then go to Effect menu > Path and apply a -5 px Offset Path. When you are done, you can apply the Scribble effect using the settings shown below. This time, I changed the Angle, the Spacing and decreased the Stroke Width value. These values are optional, I suggest you play around with them and see what result you will get.
Step 10
This step is the same as step 6. After you select Expand Appearance you will obtain again a group containing three things: a compound path having a white stroke, another one filled with a gradient and a group which, this time, contains three scribble paths. Having this group selected, choose Expand and Ungroup from the Object menu then click Add to shape area > Expand from the Pathfinder Panel. As a result of this action you will obtain a single compound path that now can be filled with any gradient. The second symbol is ready.
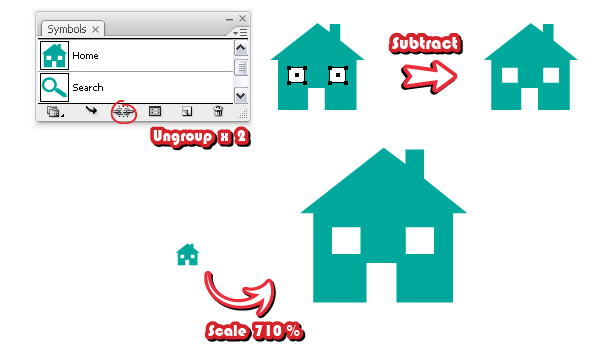
Step 11
For the third example I’ve used the Home symbol that can be found in the Symbol Libraries menu under Default Symbols > Web. Drag it into your working area, press the Break Link to Symbol button then Ungroup it twice. Now, you should have three shapes: the green home and two window paths and this is not what we want. Select all three and click Subtract from shape area > Expand from the Pathfinder Panel. Once you have obtained the home compound path, enlarge it about 710%.
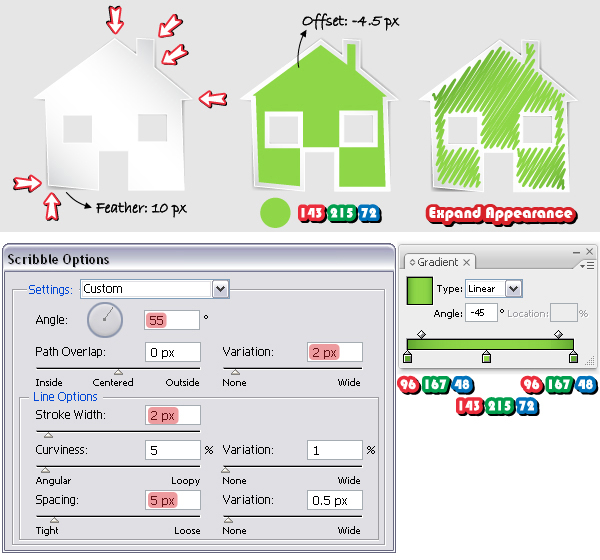
Step 12
Repeat steps 2 – 6 to complete the home scribbled symbol. All the essential information that you might need is shown in the image below.
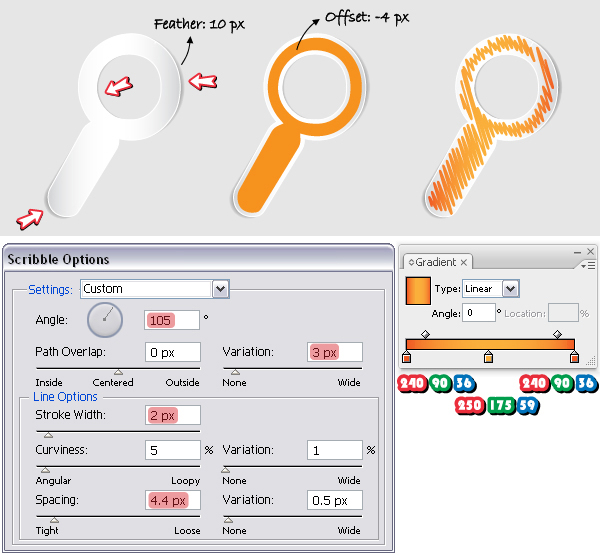
Step 13
For those of you who want to create the other symbols, in the following two images I have highlighted the settings that I’ve used for the Search symbol.
and for the Chat symbol.
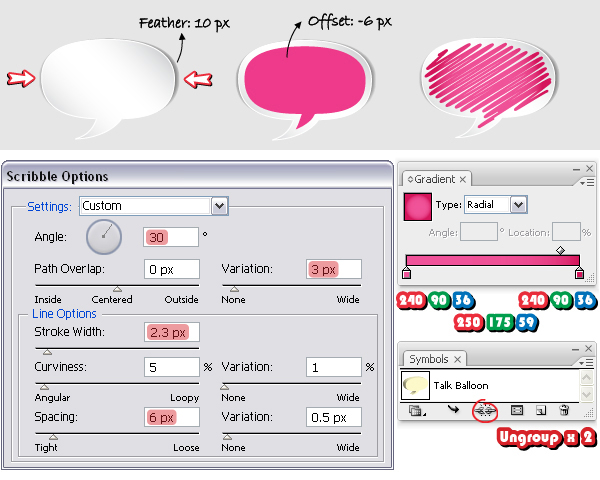
The Search symbol can be found in the Symbol Libraries menu under Default Symbols > Web and the Chat symbol under Logo Elements.
Final Image
Here is the final image with all the symbols. By trying different Scribble settings you can get different results every time so have fun applying this method to any symbol that you want.

{excerpt}
Read More