Understanding EQ is essential when producing, mixing and mastering. This post is a clear explanation and helpful overview of the topic from Mark Garrison’s book Encyclopedia of Home Recording.
Equalizers allow us to control the tonal qualities of a signal by changing the relative volume of different frequency ranges. Originally designed to compensate for frequency loss caused by inefficient cabling, equalizers are now used as a creative tool as much as a corrective one. Reasons for using an equalizer include correcting tonal problems that have occurred in the recording process, creating tonal separation between two instruments that exist in the same frequency range, and creating special tonal effects.
An equalizer affects the tone of a signal by boosting or cutting signal in different frequency ranges. This is achieved through the use of three types of filters: bell, shelf, and pass (see Fig. 39).
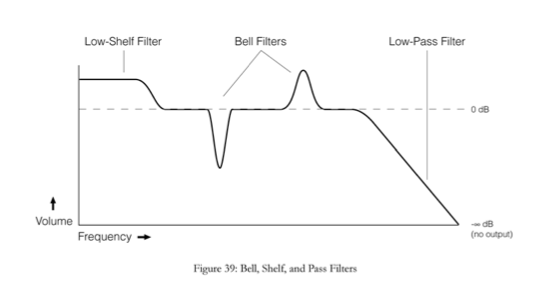
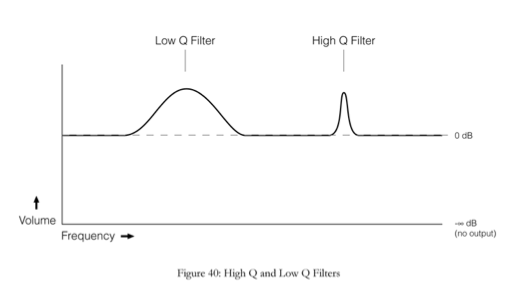
Bell filters (also called peak filters) boost or cut the chosen frequency, affecting the surrounding frequencies in a bell-shaped curve. How much on either side of the target frequency is affected by the filter is controlled by the its quality factor or “Q”. A high Q affects very little to either side of the target frequency, while a low Q affects a wide band of frequencies (see Fig. 40).
Shelf filters work at either end of the frequency spectrum. A high-shelf slopes up or down to the desired amount of boost or cut, then shelfs off to boost or cut all frequencies above by the same amount (see Fig. 39). A low-shelf does the same, only affecting all frequencies below. For example, a high-shelf set to boost 2 dB at 7 kHz will increase the volume of all frequencies above 7 kHz by 2 dB. A low-shelf set to -3 dB at 80 Hz will attenuate all frequencies below 80 Hz by 3 dB.
Pass filters can only cut signal. Like shelving filters, pass filters occur at either end of the spectrum, but rather than shelving off, the cut continues on the same slope until signal is completely removed (see Fig. 39). The target frequency is the point on the slope where the volume of the signal has been reduced by 3 dB. A high-pass filter cuts all sound below the target frequency completely, allowing only the higher frequencies to pass while a low-pass filter cuts everything higher than the target frequency, with all lower frequencies allowed to pass though unaffected. When both a high-pass and a low-pass filter are used together, it is called a band- pass filter. A band-pass filter leaves a band of frequencies, with everything above and below being cut.
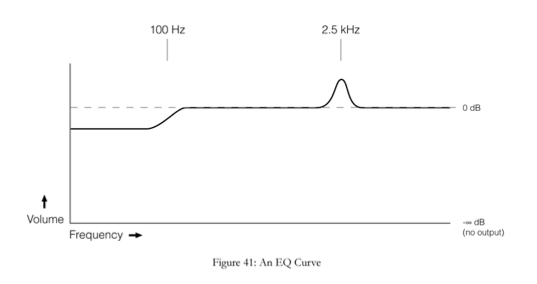
The effect of an equalizer is often represented with an “EQ curve”, a graphic depiction of what is happening to a signal (see Fig. 41). The dashed horizontal line represents the signal coming into the EQ, and the black line represents the signal coming out. When the black line is above the dashed line, the signal is being boosted, when it is below, the signal is being cut, and when the dark line is even to the dashed line, there is no cut or boost. The curve being shown in Fig. 41 shows that the signal is being cut with a shelf filter at 100 Hz and boosted with a bell filter at 2.5 kHz. All other frequencies are unaffected.
Types Of Equalizers
There are two basic types of equalizers: parametric and graphic (see Fig. 42). Parametric equalizers vary in the number of bands they have (essentially, the number of frequencies that can be affected at the same time), generally ranging from 3 to 7. The highest and lowest bands are shelf filters (unless labelled otherwise), with the bands in between being bell filters. On a parametric EQ, each band has controls to set the target frequency and the amount of boost or cut that is to be applied to that frequency. If a band uses a bell filter, it will also have a control for the filter’s Q. An equalizer that works in this manner but has less fewer (for example on a mixing board) is called a semi-parametric equalizer. Parametric equalizers are favored in recording because they can be used to hone in on precise frequencies.

Graphic equalizers use a series of set-frequency, set-Q faders to control frequency balance. They are called graphic equalizers because the positions of the faders provide a graphic representation of the equalization curve they are producing (see Fig. 43). Like parametric equalizers, graphic equalizers have a shelf filter at either end of the spectrum with bell filters in between. The number of bands a graphic EQ has varies, though 15- and 31-band are among the most common. Graphic EQs are less precise than parametric EQs, but they can be used more quickly, making them preferable for use in live sound reinforcement.
Finding Frequencies
Equalizers are usually used with the goal of boosting or cutting a specific portion of a signal, such as the crack of a snare drum, the pick hitting the strings on an acoustic guitar, or the scratch of the bow on a fiddle track. Using a parametric EQ, there is a quick and easy way to find the frequency of a specific quality you want to affect within the signal.

On one band of the equalizer, turn the Q up quite high and boost the band all the way. Then, play the sound and slowly sweep the frequency back and forth until you find the point where the tone you are looking to focus on is loudest. Make a note of the frequency and put the EQ back to zero. You now know the frequency where your target tone occurs, and you can cut or boost appropriately.
General Equalizer Tips
Don’t “fix it in the mix”. Try changing the sound by other means first, such as using a different microphone or mic placement. Heavy EQ often sounds manipulated and can lead to phasing issues.
It is usually better to cut than to boost. Boosting in EQ makes the instrument take up more space in the mix, which can contribute to muddy or unintelligible mixes. Also, the phase problems mentioned above are more common with boosting than with cutting.
An instrument only needs to sound good on its own if it is heard on its own at some point in the song. Otherwise all that matters is how it sounds in the mix.
Don’t be a low-mid junky. When an instrument has a lot happening in the low- mid range (120–250 Hz), it sounds big, but this range tends to get crowded very quickly resulting in a muddy or muffled mix. Avoid allowing too much to happen in this frequency range.
Make space. Every instrument needs its own place in the mix in order for it to be heard clearly. Try cutting a bit of volume from the less important frequency ranges of each instrument to make room for other instruments in that range.
If two instruments exist in the same basic frequency range (for example bass and kick drum) try interlocking their EQ curves. This means that any frequency boosted on one should be cut in the other and vice-versa. In the example of a bass and kick drum, if you boost the bass at 100 Hz to give it more thump, then cut from the kick drum at 100 Hz.
Cut narrow, boost wide. As a rule of thumb, equalization tends to be less obvious when a narrow band (high Q) is used to cut frequencies and a wide band (low Q) is used for boosting frequencies.
{excerpt}
Read More