Mascots can be a great asset to a company’s branding, providing a face and emotion to an otherwise stale design. This illustration began as a rejected new mascot for the redesign of thewikigame.com but he was just too adorable to ignore, so I had to share! This tutorial requires a strong grasp of the pen tool and how to create custom shapes in illustrator. Let’s dive right in and show you how to illustrate this cute little octopus mascot.
Step 1
Create a new document with an 450 x 450px artboard and a document color mode of RGB. Draw a square covering the whole artboard and apply a gradient to the square from #BEE4E8 to #45A7D8. Make sure the angle of the gradient is 90°.
Next, outline the shape of the octopus with the pen tool. A quick advice on the pen tool – try to use as few vertices as possible, usually you will only need one per a curve. Once you are done outlining and satisfied with your shape fill it with #3BA8C3. Go to Effect>Stylize>Inner Glow… (Multiply, #82E4F4, 100%, 22px, edge) and Outer Glow… (Screen, #BBEDF2, 20%, 28px) Make sure you select Inner Glow first or you will get a strange halo around your shape.
Tip: Sketch you character first then scan your sketch and trace the outline from that. You will find your illustrations will usually end up a looking a lot better when you’ve taken the time to sketch them out fully.

Step 2
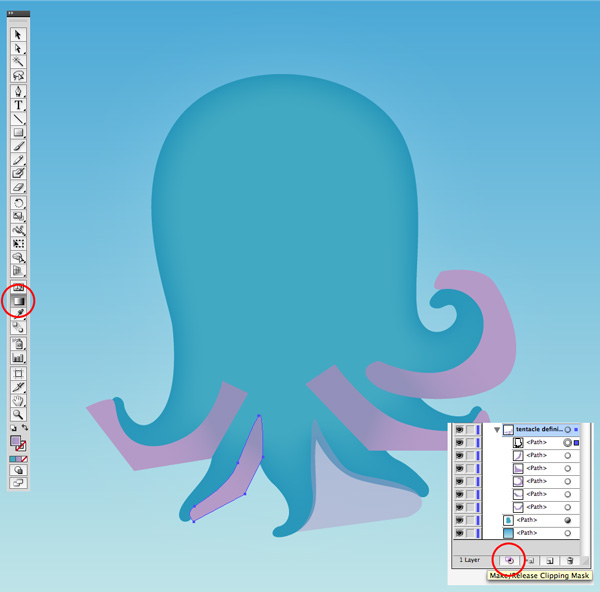
Draw the pinkish areas under his tentacles. You can draw these so they both extend outside of the body outline we drew in Step 1 and to where the pink would be hidden by other tentacles, we will mask out or cover the parts we don’t want to see later. Apply a gradient to each from #938FBB to #B599C8 and then use the gradient tool to angle the gradient from dark to light away from the body of the octopus.
Tip: when drawing shapes that cover other shapes, but require visiblity the shaped being covered (the octopus body) to use as a reference you can lower the opacity like I’ve done for the middle tentacles and then raise it back up once you’re done drawing.
Duplicate the octopus body layer and move it to the top of your layers. Select the pink tentacle layers and the top body layer and Group them (Cmd+G or Ctrl+G). Select only the top body layer then highlight the group layer in the layer palette and then select the Make/Release Clipping Path at the bottom of the layer palette. This will mask all the layers (pink tentacle undersides) in the group to the clipping path (the octopus body).
Step 3
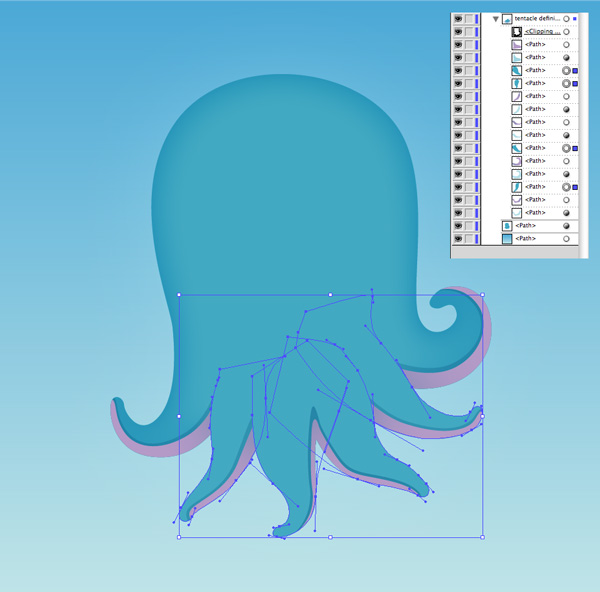
Draw an outline underneath the pink areas but still in the group we just masked in Step 2. Color them #3BA8C3 and lower the opacity to 40% and set the blend mode to Multiply.
Next you need to draw out the 4 tentacles in the foreground so we can cover up the pink areas of the tentacles behind them. Color them #3BA8C3. You will have to arrange your layers so these new tentacles cover only what they need to. The layer order of each tentacle from the top down should be pink underside area, then dark highlight then the full tentacle arms we just drew.
Tip: instead of drawing each tentacle you can duplicate the body layer, remove the vertices you don’t need then just draw in the new portion. you will also need to remove the layer styling.
Step 4
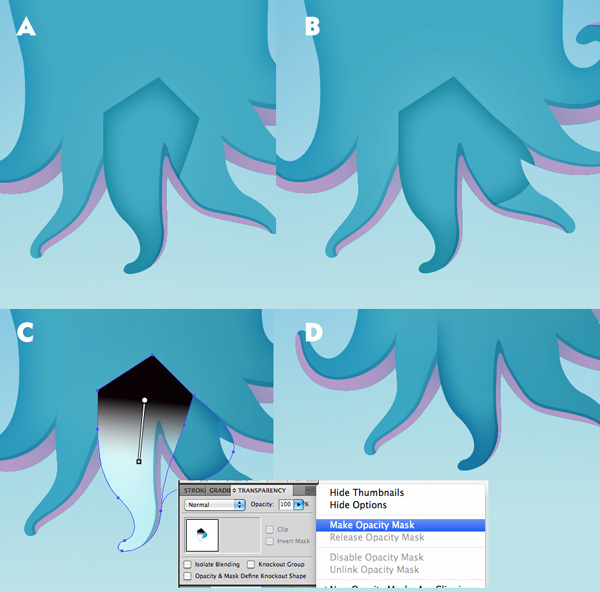
The final step for the tentacles is to add shading to give the four tentacles in the foreground more depth. Duplicate one of the tentacles you drew in Step 4 and add a Inner glow (Multiply, #50D1D8, 100%, 14px, edge) you should see what 4.A looks like. Now you need to pull the edge close to the pink farther away from the pink so we see almost none of the inner glow on that side; this will look like 4.B.
We have the shading, but now we need to mask it so the tentacles look like the are smoothly attached to the body. Again, duplicate one of the tentacles you drew in step 4 and add a black to white gradient like in 4.C. Make sure this gradient layer is directly above the shading layer we just made. Select both of the layers we made in this step and select Make Opacity Mask from the extra options window. You should now see step 4.D; repeat Step 4 for all tentacles.
Optional: the inner glows provide a nice sense of giving the body volume, but for an extra bit you can duplicate the body path, move it to the top layer, color it with a gradient that from #FFFFFF to #A3DADC, and set the layer to multiply.
Step 5
Draw out the basic shape of the eyeglass frames in #404040 Draw the closed eyes in #00444C. Next, draw the lenses and apply a gradient (#FFFFFF to #26A9E0, -30°) Lower the opacity of the lenses to 40%. Duplicate the lens paths and move the copies down below the eyeglass frames path and use the minus back button again to cut out the lens portion. Your glasses should look like Step 5.A
Now we’ll draw the shadows of the glasses. Begin by duplicating the eyeglass frames, grouping it and making it a clipping mask like we did with the body path in Step 2. Now you can draw in the shading with #333333 inside the group.

Step 6
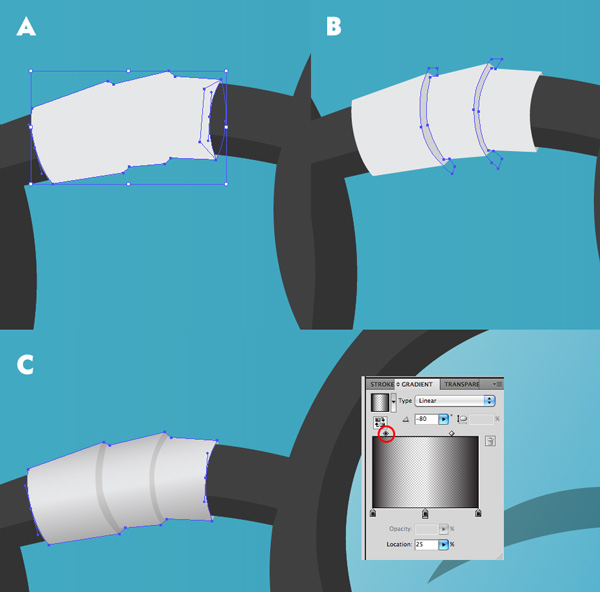
For the tape on the glasses draw the two shapes in 6.A; the top one above the eyeglasses and filled with #E5E5E5 and the second below the eyeglasses colored #BCBCBC.
Duplicate the top layer, group it and make it a clipping mask. Now you can draw in the shadows of the tape like 6.B and in color #D1D1D1
The last step is to give the tape some more depth. Duplicate the top layer again and color it with a gradient from black(100% opacity) to black(0% opacity) to black(100% opacity). Set the gradient angle to -80°. Change the location of the middle point of the first black to black gradient to 25%. Reread that last sentence and if you still aren’t sure what I’m talking about, I’ve circled what I’m referring to in red on the image. What this will do it make the highlight we are creating look a bit more natural and make the light source appear above the subject. Next change the opacity of the layer to 40% and specify the blend mode as multiply.
Step 7
Next we’ll work on the mouth which is by far the most complex part of the illustration, so bear with me.
Draw the mouth shape (7.A) color with a gradient from #00444C to #002127 and apply an inner glow (Multiply, #04507B, 60%, 8.5px, edge)
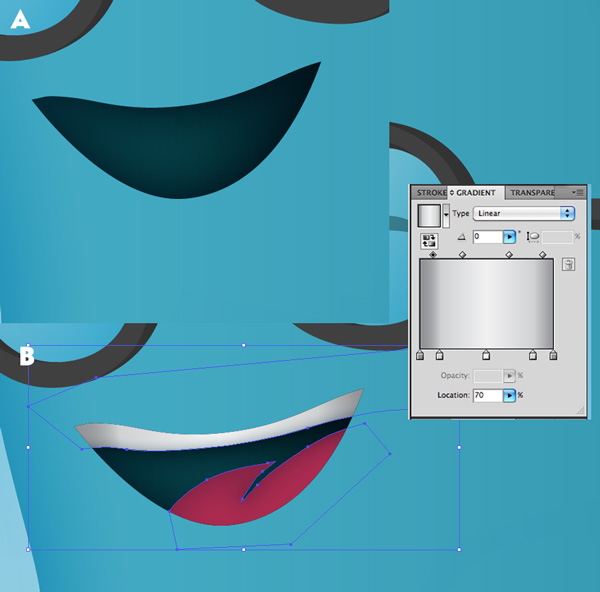
Duplicate the top layer, group it and make it a clipping mask, you should be familiar with this process by now ![]() In that group draw the tongue in #AC294E with an inner glow (Multiply, #04507B, 20%, 5.5px, edge)
In that group draw the tongue in #AC294E with an inner glow (Multiply, #04507B, 20%, 5.5px, edge)
Also in that group draw the teeth with an inner glow (Multiply, #AABEC8, 80%, 2.75px, edge) and an outer glow (Multiply, #05646E, 100%, 2.75px).
Next we need to add a rather complex gradient to the teeth to give them an accurate shine. From left to right and with their respective locations and with the midpoint locations: #999999/0%, MID-70%, #CCCCCC/15%, MID-50%, F2F2F2/50%, MID-50%, #CCCCCC/85%, MID-50%, #999999/100%.
Step 8
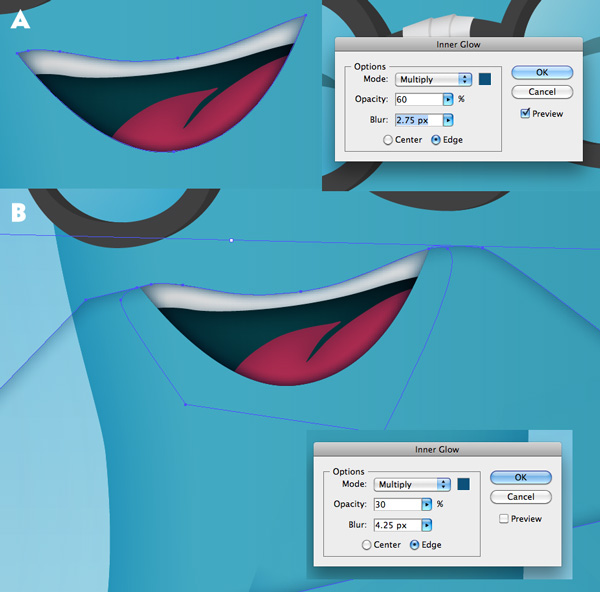
Duplicate the mouth again, move it above the teeth and tongue, color it white, set the blending mode to multiply and give it an inner glow. (Multiply, #04507B, 60%, 2.75px, edge) This will give your mouth a little more depth as you can see in 8.A.
For the upper lip shadow we’re going to use the same clipping mask/inner shadow trick we used for the tentacles. Draw the two shapes in 8.B, color the larger one white, set the blending mode to multiply and give it an inner glow. (Multiply, #04507B, 30%, 4.25px, edge) Then group them both and make the smaller shape the clipping mask. Now you have a nice taper in the lower lip shadow.
Tip: the two shapes share the same top edge with each other and the mouth layer – instead of drawing each one you can duplicate the mouth layer and modify them as necessary.
Step 9
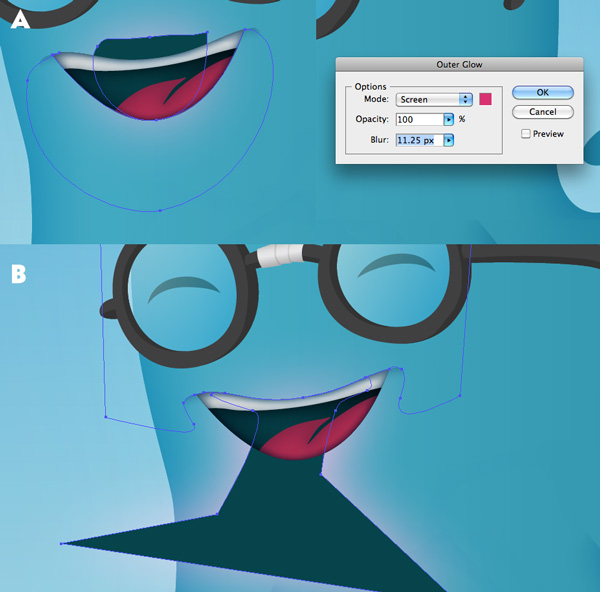
The last step for the mouth is to add some highlights above and below it. We’re going to use the same clipping mask trick we’ve been using, except with outer glows.
Create the two shapes in 9.A, apply an outer glow (Screen, #DB3072, 100%, 11.25px) to the top one. Group them and create a clipping mask with the bottom shape and you should see only the pinkish outer glow under the mouth.
Repeat this process with the shapes in 9.B to create the upper glow.
Step 10
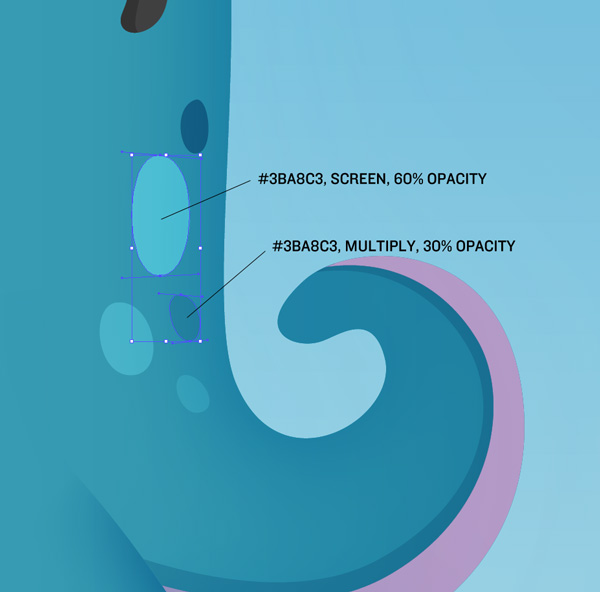
Add some spots in dark and lighter tones and at varying opacities.
Conclusion
Whew, you made it! now you should feel more comfortable working with masks and outer/inner glows. Thanks for reading, for more of my tutorials and design resources please visit chapolito.

{excerpt}
Read More