With the recent revival of Jungle, Future Jungle and Jungle breaks I thought it would be nice to put together a tutorial on how to manipulate that most seminal of drum loops – the Amen break. This tutorial will outline many of the techniques you can use to transform a simple one-bar drum loop into a frenzy of percussive production wizardry.
I have used Nuendo 3 for this but the techniques will work the same for anybody using any version of Cubase SX or Nuendo right up to the most recent versions. Here is an example of the kind of results you can expect from using these techniques:
Download audio file (Audio Example 1.mp3)
Step 1: Load in the Sample
For premium users there is a version of the Amen break included in this tutorial pack, for other users the Amen break is available for free download from many websites – just google it. For anyone interested in learning about the history of the Amen break there is a great video up on YouTube.
Open a new project and import the drum loop. The loop in the tutorial pack is at 150 bpm but the first thing we need to do is to choose a tempo for our track and stretch our loop to fit it. For this example I am going to use a healthy 170 bpm, for a classic jungle track. For Future Jungle/Jungle Breaks somewhere around 140 would be more suitable.
The loop will now stretch over our bar dividers because it lasts for longer than the duration of 1 bar so we need to time stretch it to fit our new tempo. By clicking the pointer icon in the toolbar at the top of the screen we can turn on "sizing applies timestretch" – this helpful function automatically timestretches an audio region to any size you like, so you can easily match it to your tempo by making sure the snapping is turned on.


Step 2: Slice the Sample
Now turn the pointer tool back to its default setting and set the snapping to 1/8. We can now use the scissors tool (or alt and click with the pointer tool) to slice the sample into 8 sections. To help keep things clear in this tutorial I have colored the sections differently.

Technique 1: Rearranging the Slices
The fundamental technique in manipulating drum breaks like the Amen is to rearrange the slices to get new patterns from the drum loop – below are a series of screenshots with audio examples to show how rearranging the slices can work.

Download audio file (Audio Example 2.mp3)

Download audio file (Audio Example 3.mp3)

Download audio file (Audio Example 4.mp3)
Now let’s hear the 3 new edits together with the original, combined to make a 4 bar section of drums:
Download audio file (Audio Example 5.mp3)
As you can see, we can very quickly start to construct an intricate, varied drum beat from a simple 1 bar loop. Now for some more advanced techniques…
Technique 2: Pitch Shifting
The pitch shift function in Cubase and Nuendo makes it very easy to alter the pitch of individual slices of the drum loop. Most commonly we hear this done on the snare drums. To pitch shift a slice simply right click (in later versions of the software ctrl+right click) the slice and select "process>pitch shift".

Make sure that the ‘time correction’ box is ticked and choose a value to pitch the note up or down by. You can use the preview function to see what your drum will sound like before you apply the pitch shift. In the examples below I pitched the snare down by 2, then by 4 semitones.
Download audio file (Audio Example 6.mp3)
The pitch shift function also works well on longer sections of the break, or on repeated drum hits, when using the ‘envelope pitch shift’ function, however this function only works on individual slices, so to apply it to a longer section we need to bounce them out as a new region. To do this, simply select the slices you wish to merge, right click on one and choose "audio>bounce selection" then choose ‘replace’ when it asks you:

Now we end up with a fresh region of audio which we can edit as we please.

Open the pitch shift screen as before, only this time use the tab at the top which says ‘envelope’.
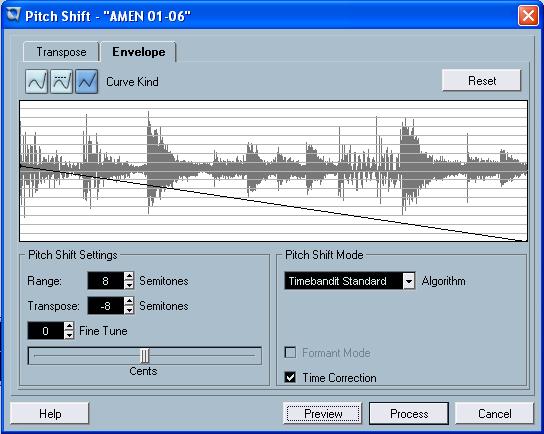
You can use the line in the window to program a smooth pitch shift up or down, or by creating new points on the line you can create more advanced curves and shapes. In this example I have just used a simple downward slope. This pitch envelope also works on individual hits, particularly cymbals, such as the amen crash which is also included in the tutorial package.
Download audio file (Audio Example 7.mp3)
Technique 3: Repetition
you can get some surprisingly effective sounds by simply repeating certain drum hits. This technique is particularly distinctive when you take it to the extreme and repeat a slice very very quickly, which can be easily programmed by setting your snapping resolution to be very fine. In this example I have used a snare again, and am repeating it faster and faster to illustrate the glitchy sounds you get once you reach a certain speed.
Download audio file (Audio Example 8.mp3)
Technique 4: Volume/Filter Curves
By applying automation to the volume of your drum track, or by putting a filter onto the track you can get some really nice builds and fades into your drum part. The curves work really well when combined with long repetitions of a particular drum – the example below is using a repeated snare hit, first with a volume curve then a filter sweep.
Download audio file (Audio Example 9.mp3)
Technique 5: Experimentation!
Listed above are just some of the ways that drum loops such as the Amen break can be manipulated, but if you really want to push the boundaries you’ll need to go out and experiment for yourself – have a play around with effects; reverbs, delays, distortion etc – try reversing hits or whole sections of the beat – see what happens if you get LFOs or other forms of modulation involved, or you could even try vocoding sections of your beat – the sky is the limit…
Finally, here is an example of a track I have made to illustrate how these techniques can sit in a full composition.
Download audio file (Audio Example 10.mp3)
{excerpt}
Read More