Greetings everyone! In this tutorial we’re gonna show you how you can create a cool retro ASCII art style logo reveal with few simple steps and default plug-ins.
Step 1
Before we’re starting the tutorial we need to create the ASCII style Aetuts+ text or your logo,picture. So to do that we have to visit this site. In this website we can create the text and you just have to select a sympathetic looking text from the generated versions down below and copy it(ctrl+c).If you’re wanna using a single jpg file then you should visit this website.You have to select a picture from your computer and after that you have to click on the generate button and the site application will convert your picture into different caracters. I made a couple pictures for you so It’s not a difficult part but here’s a little help if you get stuck.We need a picture too so I will use this great Stock Image. Okay it’s not a computer monitor but I couldn’t find any normal looking free images.We also need the sound file wich you will find in this website.Okay so we have the picture,ASCII style text,audio file so we good to go.

Step 2
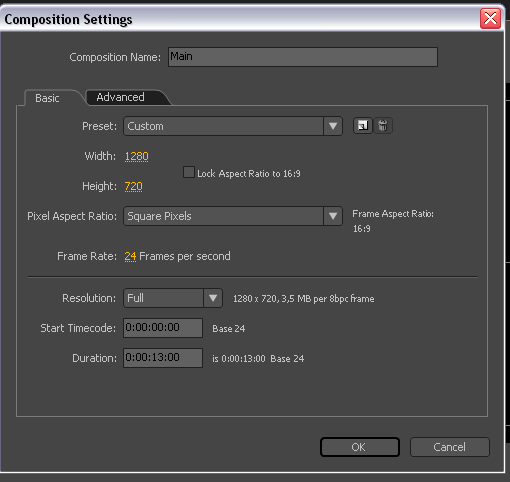
Create a new composition clicking by Menu->Composition->New Composition. Name it as Main, change the resolution to 1280×720 and set the duration to 13 seconds.
Step 3
Import the Stock image and hit the "s" key on the keyboard to reveal the scale properties and change them.I used the following scale settings:66,6 59,3.When you done then select the Pen tool and create a path around the tv screen.After that let’s reveal the mask properties(hit the "m" key twice on the keyboard) and invert the mask and feather it just a touch.As you can see here I renamed the Stock image to TV frame.(If the scale part was confusing here’s a quicker explanation: You should bring closer the tv screen because in the normal size in my opinion the screen is a little small and a little far away.)

Step 4
Because is the original photo is too bright and won’t fit in the scene that’s why we have to add a little color grading to it.

Step 5
Create a new solid clicking by Menu->Layer->New->Solid. Change the color to Black. Make it comp size (1280*720) and name it as ‘Screen BG’ and put it beneath the TV frame layer.

Step 6
Let’s add a few effects to this layer.I set the following colors under the ramp properties. I changed the start color to #AAAAAA and the end color to #353333.

Step 7
Create a new solid clicking by Menu->Layer->New->Solid. Change the color to Black. Make it comp size (1280*720) and name it as ‘Noise Color’ and change the blending mode to Soft Light and put this beneath the TV frame picture layer but above the Screen BG layer.

Step 8
Let’s add a ramp effect to this layer with the following properties. Let’s change the Start color to #487FEE and the End color to #030304.

Step 9
You should see something similar like this.

Step 10
Create a new solid clicking by Menu->Layer->New->Solid. Change the color to Black. Make it comp size (1280*720) and name it as ‘Lines’ and put this beneath the TV frame picture but above the Noise color layer and lower the opacity to 60% and change the blending mode to overlay.

Step 11
With this layer selected I add the following effects to it.

Step 12
Quick tip.The good way is to speed up your work is that if you are using the Effect&Presets window in After Effects to search the different plugins,presets..etc etc.You can turn this guy on if you are clicking by the window menu and select it from the list.That’s very handy way because you don’t have to select anymore the effect menu and the other sub menus to use a specific preset.

Step 13
Create a new solid clicking by Menu->Layer->New->Solid. Change the color to white. change the size to (700*300) and name it as ‘Scanline’ and put this between the Noise color layer and Lines layer and change the blending mode to Add and lower the opacity to 23 %..

Step 14
Let’s add Gaussian blur to smooth the hard edges.

Step 15
Let’s go to the first frame of the animation.With the scanline layer selected press the "p" key on the keyboard to reveal the position keyframes and click on the position stopwatch to create a new keyframe and position the scanline to the top of the tv screen..Now go forward few frames and bring down the scanline to the bottom of the tv screen.

Step 16
Now select those keyframes and hold down alt+click on the position stopwatch and type in the following expression: loopOut(type = "cycle", numKeyframes = 0) or just select it from the pop-up menu by clicking on the little arrow icon behind the parent icon.

Step 17
We have to visit the ASCII art creator websites which I mentioned before and we have to create a text.If you done please select all of the text and press CNTRL+C(copy) now go back to after effects, select the Horizontal type tool and press CNTRL+v to paste it. Keep in mind this effect will work only with monospace fonts so this is the link where you can find various free fonts under Mac or PC.I’m curently using Windows Xp so I can use one of my default font called: Fixedsys. I changed few thing in my character window also.

Step 18
Now let’s paste(CTRL+v) the text and add some effects to it and change the blending mode to overlay and put it above all of the layers.

Step 19
With the text layer selected let’s add a simple animation preset: Typewriter.

Step 20
It’s not a necessary step but I pre-composed the text layer. I also made a picture so you can see the final layer order down below.

Step 21
With the text composition selected let’s hit the "p" key on the keyboard to reveal the position properties. Go back to the first frame of the animation and create a keyframe after that move forward a couple of frames and move the text layer up.If you are not satisfied with the speed of the typewriter animation then open the text comp and reveal the text properties to modify the Range selector keyframes.Select the keyframes and hit f9 to convert them to easy ease.

Conclusion
So this is it! I hope you enjoyed the tutorial and learned new things and tricks.Try different ideas or customize the project file and improve your clients or your buyers.If you have a tutorial request or did you get stuck somewhere in the tutorial then you can contact with me via email—>[email protected] or you can subscribe my youtube channel:sparks89. Once again my name is Tibor Miklos and thanks a lot for your attention.
{excerpt}
Read More