This tutorial introduces a simple and quick way of using Ableton Live’s Operator synthesizer to produce glitchy and noisy drum samples, the types of which are heavily used in the glitch/idm/experimental electronic music scene by artists such as Alva Noto, Kearley, Aoki Takamasa and Daisuke Tanabe to name just a few. We’ll be covering a basic kit, including “clicks” and “pops”, static-like sounds, kick, and snare.
The purpose of this tutorial is not to cover every possible type of glitch sample that can be produced with Operator, and does not by all means imply that this is a method used by the above artists. It showcases a basic idea/technique that can be developed further through experimenting and combining other Live devices and effects.
This is an example of what we are going for.
Step 1: Preparation and Safety
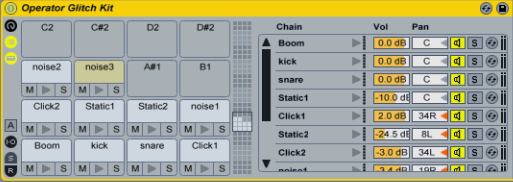
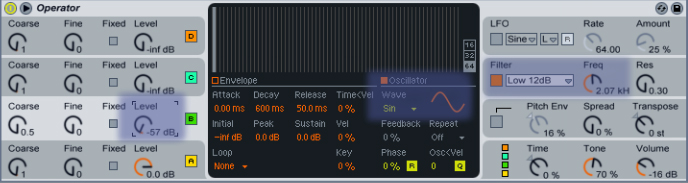
Open up a Drum Rack. This is where your Operator instances will be kept, organized and ready to be triggered via a midi device or programmed in a MIDI pattern.
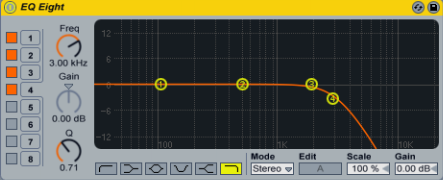
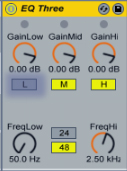
I strongly suggest that you use an EQ next to you operator instances, cutting the extreme high frequencies that would make your ears hurt or push your speakers too much, since what we’ll do later could produce very high and unwanted frequencies. Use a High Cut at around 3 khz, and tweak it carefully if you think it’s cutting off too many frequencies from your sound.
You could also use a “Spectrum” effect instance to have a clear vision of where the frequencies hit the most.
Step 2: The Basic Idea
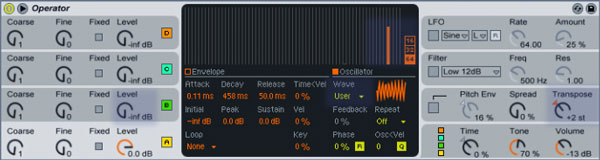
We will focus on the Operator’s “Oscillator” section, choosing “User” as our Wave option and drawing partials on the Waveform Editor. It can be a trial and error procedure, but it should give us lots of desirable noisy sounds in just a few seconds. Transposing the sound will offer interesting variations. Adding an Overdrive effect and an EQ-3 will cut down, strengthen or distort some frequencies. Finally, it’s always interesting to add a second oscillator (or more, it’s up to you!) and see what can come out of that combination.
Step 3: “Clicks” and “Beeps”
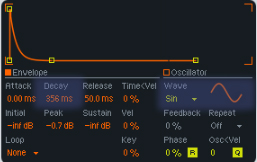
The Click sound is the most simple one. Drag and drop an Operator Instance into a Drum Rack Pad. On the Operator’s Envelope section, Lower the “Decay” to 1-10 ms.
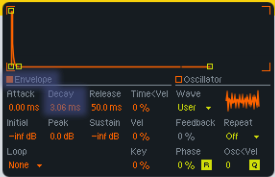
Draw some partials on the Oscillator’s Waveform Editor, and finally tweak the Transpose knob to listen to similar versions of the sound. I usually do two of those, or more, and almost hard-pan them left and right.
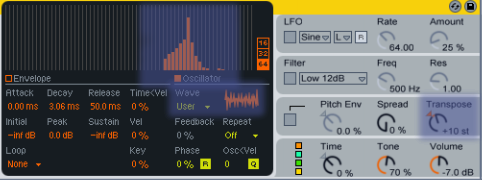
The Click sound.
To create a “Beep” sounding sample, draw a partial on the highest part of the Waveform Editor, add an “EQ Three” effect to cut the higher frequencies completely, and finally add an Overdrive effect to distort the signal.
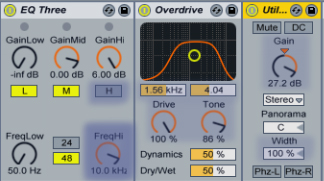
The Beep sound.
Step 4: Static and Noise
Let’s see what will happen if we take the previous sound and add a second Oscillator. Increase the “Level” of the second Oscillator and select a Wave option, for example Sw6 (Sawtooth). While increasing the level you’ll notice the sound evolving and changing. Keep the EQ-3 and Overdrive effects which you used on the “beep” sound as well.
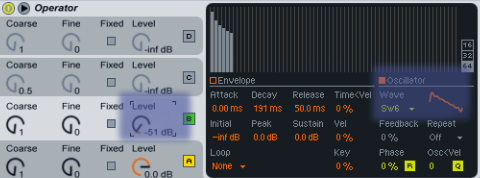
Increasing OSC B’s Level until it gives the desired sound.
Let’s repeat this process, but choose a “Sin” (Sine Wave) as our Wave Option instead.
Adding second oscillator. Choosing Sine Wave and increasing the Osc’s Level.
Increasing OSC B’s Level until it gives the desired sound.
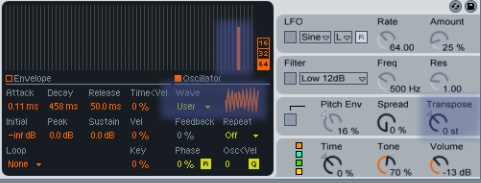
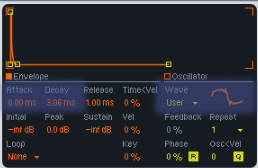
Now, what if we played around with the Envelope section on OSC B? We’ll repeat what we did for the previous sound, but this time let’s choose a different Wave for OSC B (such as Sq32) and change the Attack on the Envelope section.

Increasing OSC B’s Level until it gives the desired sound.
Step 5: Kicks and Snare.
For the Kick sound, choose a Sine wave, shorten the delay at about 300 ms (depends on how snappy or boomy you wish your kick sound to be), and use the Pitch Envelope to strengthen the attack of the sound.
A Sine wave with short delay.

The Pitch Envelope will polish and strengthen the sound of the kick.
Cutting extremely low frequencies to give room to the more punchy mid.
The snare plays a big role on the sound of your final mix, so choose carefully what suits the most. For the purposes of this tutorial, I created a snare sound using a Noise Wave, cutting the delay to 3-10 ms, and finally by adding Ableton Live’s built in Vocoder, choosing Noise as the Carrier.
Noise wave with very short delay.
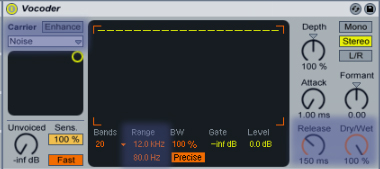
Adding Vocoder with “Noise” as the Carrier.
Conclusion
That’s it. As you can see it’s a really easy and simple technique. Feel free to download the source pack (Ableton Live 8.1.3 required) and try out the sounds while reading the tutorial. I would recommend repeating the process 10-20 times and filling a drum rack with lots of sounds to choose from according to your track.
Don’t forget to mix the samples in the drum rack by changing Volume and Pan values suitably, and try to think of a corresponding real acoustic drum part when mixing the sounds or when creating a rhythm. For example I usually think of the Click sounds as closed hi-hats, the Beep sounds as an open hi-hat, the Static noises as toms/cymbals, etc. Don’t forget, there are no rules, do whatever feels and sounds right to you!
Here’s an example I made, using the samples we just created for the rhythmic section.
Download audio file (final.mp3)
Final Example.
Don’t hesitate to leave a comment, suggestion, critique or request in the comment section below. Thanks for reading!