This is a true gem for Mac users especially when most DAWs do not allow you to use multiple audio interfaces. This can be very useful if you have multiple audio interfaces and want to use them together for more simultaneous inputs and outputs. I am sorry about this tutorial will only apply to Macs so Windows users are out of luck.
This concept works by creating an aggregate device. If you have more than one audio device, you can use them as a single device known as an “aggregate device”. With this aggregate device, you can increase your audio inputs and outputs without purchasing another multichannel audio interface. If you have a 4-channel interface and a 2-channel interface. You can combine them to use them as a single 6-channel audio interface. This is exceptionally useful as most software only allows you to select one audio interface at a time.
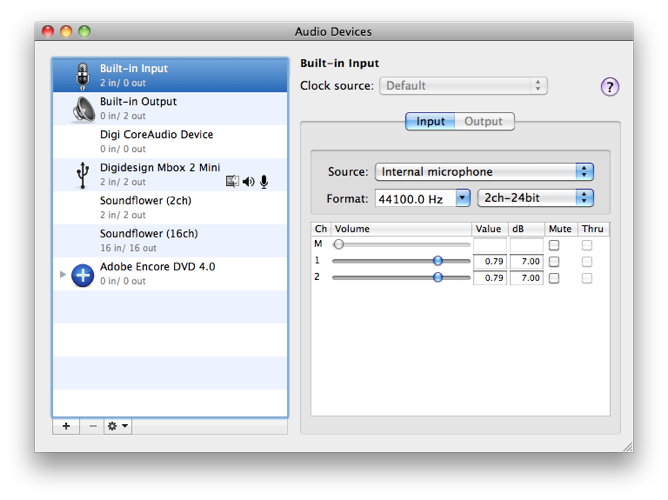
Step 1: Open Audio MIDI Setup
You can find this under Applications – Ultilities – Audio MIDI Setup. This is the application used in Mac OS X to configure your audio and MIDI devices. This is not the same as the audio preference pane under system preferences. You should see a window similar to the one shown below.
Step 2: Create An Aggregate Device
Create a new aggregate device by clicking on the “plus” symbol at the bottom left corner of the window. This creates a new device where you can map the devices that you would like to use together. You will see a new device created as “Aggregate Device” which you can rename to something which makes sense to you.
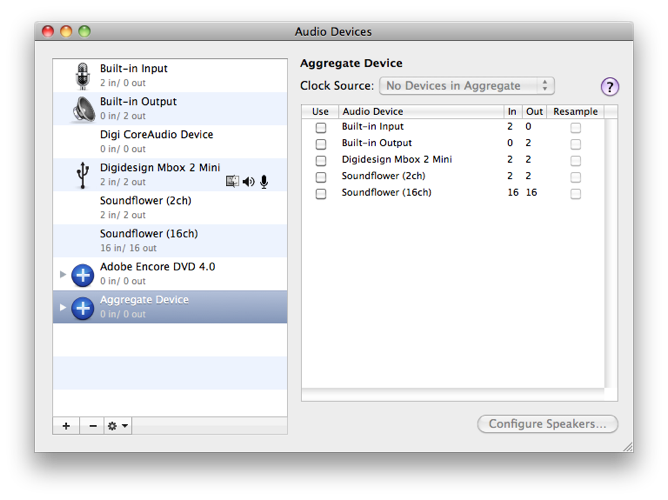
Step 3: Select The Audio Devices
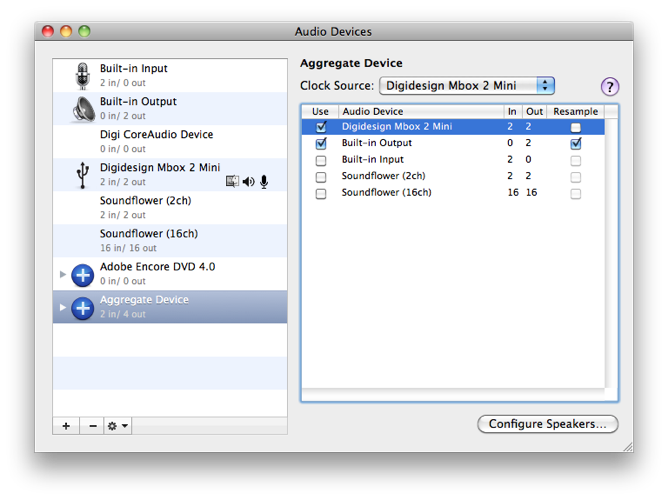
Select the aggregate device and you will see all your available audio devices that you can use to form the aggregate device on the right. Just check the checkbox that says “use” to add the device. Once you have selected the devices you wish to use, you will need to choose a device which is the clock source or the master. Select it from the drop down menu. If your devices support word clock, connect them together to provide sync. If the devices do not support word clock, tick the checkbox labelled “resample” for the respective devices except your clock source. In my example below, I have selected my Mbox Mini and my built-in output. Since my Mbox would be a more reliable clock source, I have selected it as the clock source and ticked the resample box for my built-in output.
Step 4: Select The Aggregate Device In Your Software
Now that your device has been set up, you will see the new audio device as an option under the list of your audio devices. Go ahead and start up your DAW and open up your audio preferences. You should see your new device with the combined inputs and outputs available for your use. Congratulations! You now have more inputs and outputs at your disposal.
The Difference With Getting Another Audio Interface
Although this methods gets you more simultaneous inputs and outputs, you will need remember that these are different audio interfaces. Different audio interfaces use different convertors, different quality components and most importantly sound different. You can’t hook up 3 different audio interfaces with 2 outputs each and use that for a 5.1 surround system. This will not get your accurate and consistent results as each output is colored differently. Avoid using the inputs and outputs across different audio interfaces for any session that would require “matched” outputs such as surround mixing, stereo pairs, surround recording, etc. Keep these groups of inputs or outputs on the same audio interface.
Tip For Ableton Live Users
If you have only one external audio interface, you can create an aggregate device with the built-in audio interface on your Mac. A nice trick would be to use the built-in output on the MacBook Pro as a preview out for Ableton Live. You can have your external audio interface for the main mix and the built-in interface for the audition path which can be used for auditioning clips, soloing tracks, etc.