This is a fun little project for beginner Illustrator users who are just finding their way with the Pen Tool and feel much more comfortable using shapes and lines. This Candy Cane tag is made using an Ellipse, the Pathfinder Tools, and a custom made brush. You will learn how to make some cute looking Gift Tags with a retro texture finish and how to use InDesign as a tool for PDF output so you can print your tags at either your local print shop or offset printing service. This tut takes about an hour, so let’s get started!
Final Image Preview

Step 1
As with any project, start by opening up Illustrator and set your document to the size you want your gift tag to be, a few centimeters is fine. If you’re worried about the size, sketch out the approximate shape on a piece of paper and once you’ve drawn something you like, measure it for reference.
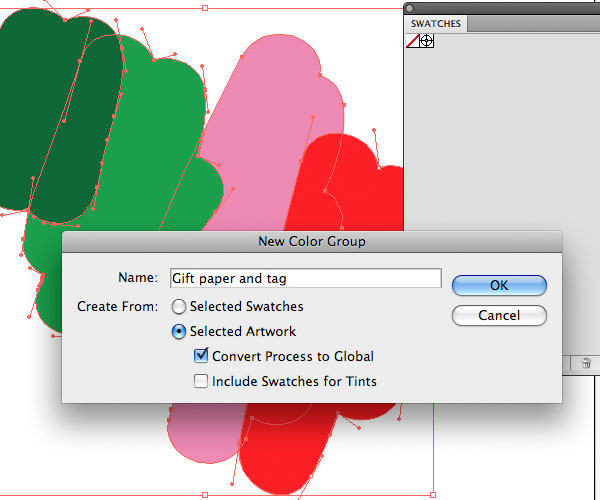
Once you have your document, use the Blob Brush to set out a few colors you would like to use. Once you have the colors you want, select them all and click on the Add New Color Group icon at the bottom of the color palette (it’s a folder icon with a plus sign on it) and save your selection.
I’ve saved my colors as "Global Swatches" so that I can change them later in the project if I need to. You can chance a Global Swatch by either Double Clicking on the swatch icon and moving the sliders or by holding Option and dragging another swatch on top of the one you want to replace.
Step 2
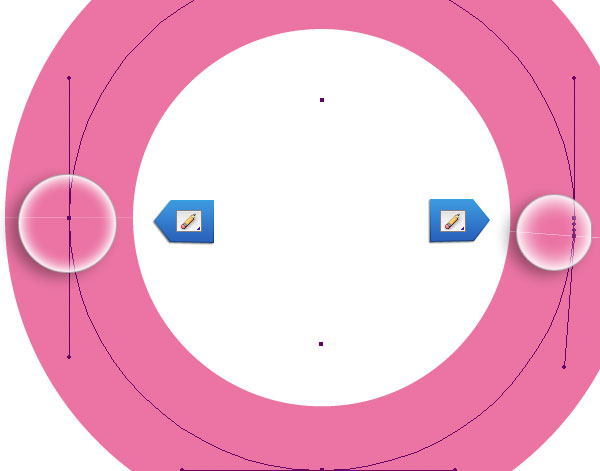
Using the Ellipse Tool (L), draw a circle. This will become the Candy Cane. Once the circle is the same width as you want your tag to be, take the Path Eraser Tool (located within the Pencil Tool tab) and cut the circle in half, use the second image below for reference.

Step 3
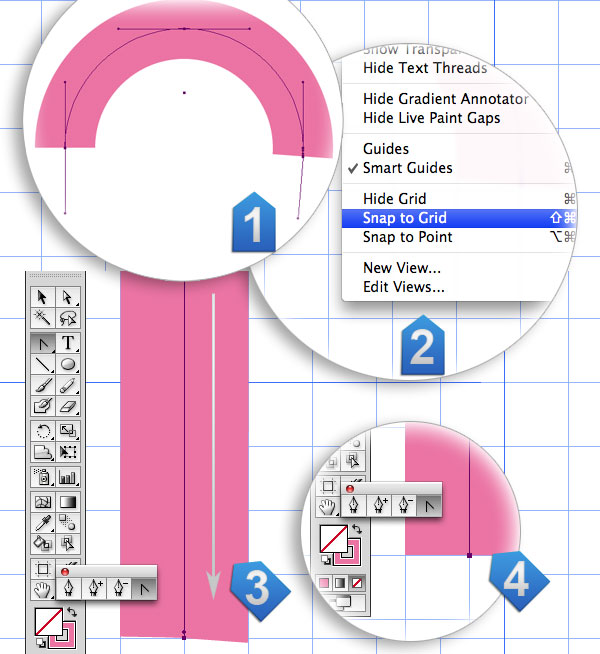
Using the Direct Selection Tool (A), select the bottom section of the circle and delete it.Turn on your grid (View > Show Grid) go to View > Snap to Grid and move your shape to line up with a vertical grid line. The grid isn’t completely necessary, but I like to use it when I’m aiming to make a completely straight line and I like the Snap to Grid Feature.
Select the node at the end of the right hand side of the semi-circle and drag it down to make the handle of the Candy Cane. If the bottom line looks a bit uneven (see step 3 in the image below) use the Convert Anchor Point Tool (Shift + C) and click on the node to straighten it. Repeat the same steps to make the hook of the Candy Cane (see the second image below for reference).
Repeat the same steps with the hook end of the Candy Cane. Now you can turn off Snap to Grid, as some editing features won’t work properly if it’s turned on.

Step 4
You should now have a shape that looks a bit like a Candy Cane. In this step we’re going to add a bit style to the shape so that it looks more realistic.
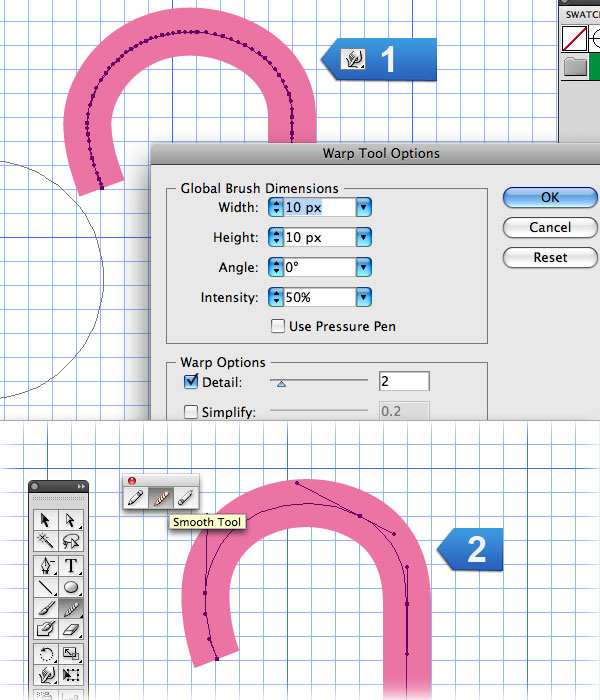
First, double click the Warp Tool icon and set the Brush Dimensions so that it’s fairly large, but not so large that it will warp your entire shape. I’ve used 10px as my tag is fairly small, you may need to play with the setting here. Before you close the dialogue box, un-check the Simplify button, this way the shape will warp with enough nodes to make a nice curve. Click OK and lightly brush the hook end of the Candy Cane with the Warp Tool until you have a shape you’re happy with. Remember, you can use Command + Z to quickly undo any mistakes you make as you brush.
Once you have a shape you’re happy with, select the Smooth Tool (located within the Pencil Tool tab) and draw around the nodes you’ve just made with the Warp Tool, this will simplify the shape without losing the nice bends. This tool takes a bit of getting used to, but it’s one of my favorites.
Step 5
Now it’s time to add some lines to the Candy Cane. If you look at a real Candy Cane you will notice that the lines run around the shape of the cane and warp a bit at the ends. I’m hoping to achieve something similar with this illustration so I’m going to make a custom brush rather than a fill.
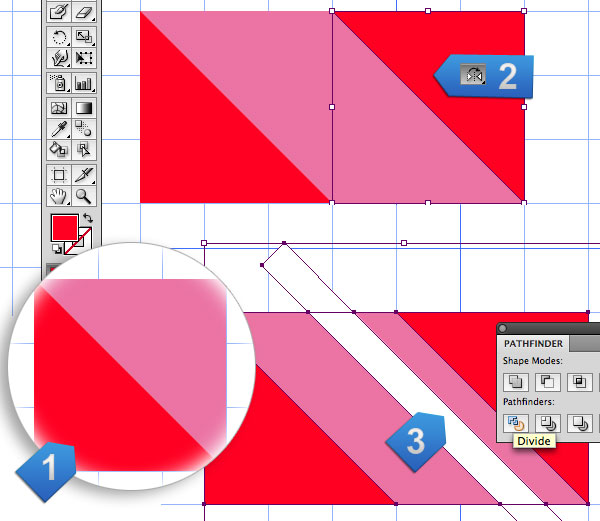
First, make a Square the same width as the Candy Cane you wish to draw, then with the Smart Guides turned on (Command + U), take the Pen Tool (P) and while holding down Shift, make a triangle shape over half of the box and make it a different color Now select the shape and copy it (Command + C then Command + F) take the copy and rotate it -180° so that it looks like the shape in the image below (point 2).
Select the two inner shapes (in this case, pink) and click on the Unite button in the Pathfinder Palette Then make a rectangle/line using the Rectangle Tool, and rotate it to line up with the inner shape and select all the lines and click Divide from the Pathfinder Palette. With the Direct Selection Tool, click on the shapes that fall outside of the rectangle and delete them. You should now have a rectangle with some lines on it. This will be the Pattern Brush.
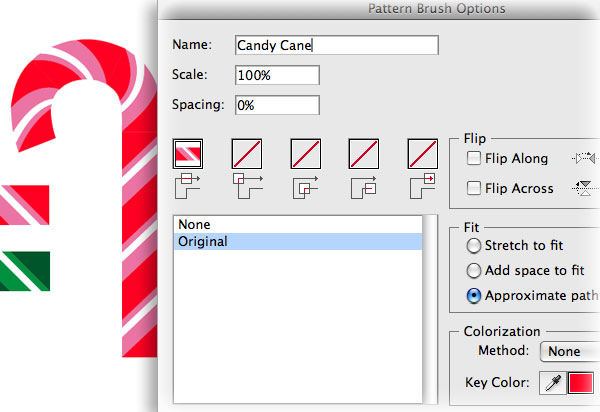
To make this shape into a Pattern Brush, select it and drag it into the Brush Palette (Window > Brush Palette). You will then see a dialogue asking which style of brush you want to make. Select New Pattern Brush (located at the bottom of the list) and click OK. You will then see a dialogue with some settings. First, name your Brush, this is good if you want to use it later. Then, select Fit to Approximate Path and click OK. You will now see your Pattern Brush on the Brush Palette.
You can see how my brush looks on the Candy Cane in the image below. You may also notice that I’ve made a secondary color scheme in the same style. This is a good time to make as many color variations as you like.
Step 6
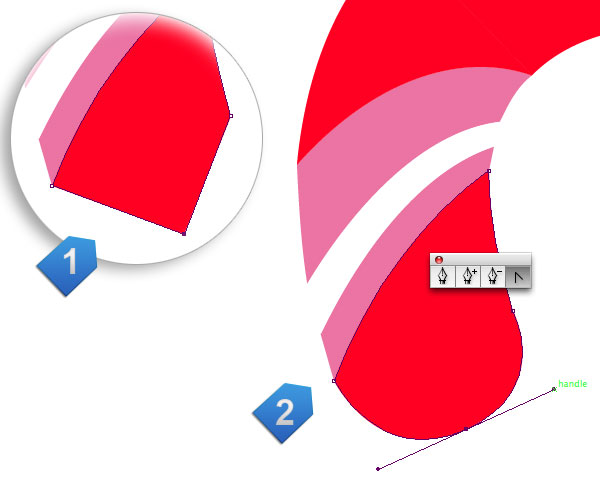
The end of the cane is a bit blunt and we’re after a nice rounded one, so once you’re happy with the Pattern Brush, select your line and go to Object > Expand Appearance, this will flatten out your brush and convert the Candy Cane into editable shapes. You should make a copy of the line before you expand it into a shape incase you make a mistake and want to do some further editing later.
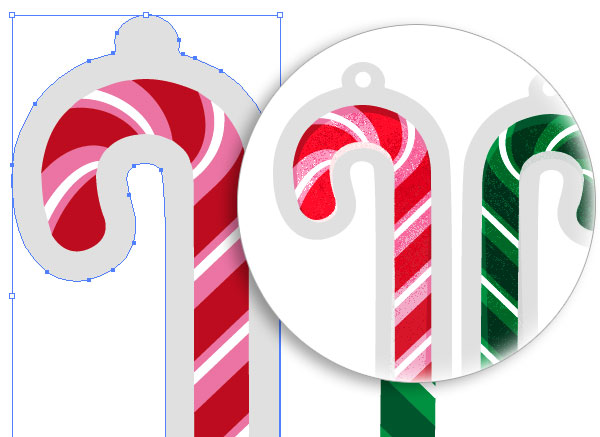
Once the line is Expanded, select it and with the Pen Tool, add a node to the end. Using the Direct Selection Tool, drag the node out into a pointy tip. Finally, using the Convert Anchor Point Tool, select the node and drag the handles out to the side so that it makes a nice rounded tip.
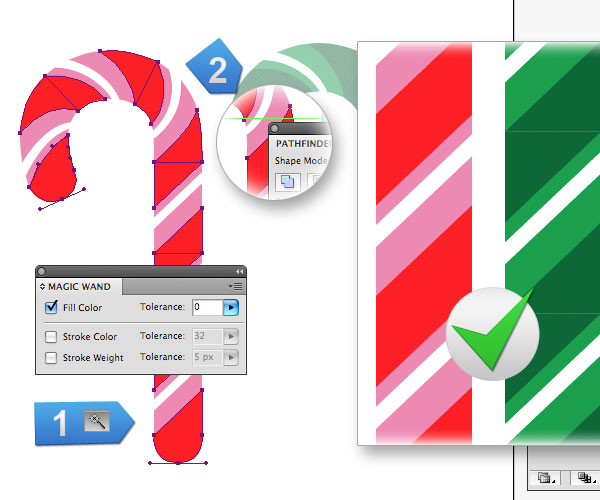
Because the Candy Cane is made from an expanded brush, you may notice some gaps in the shape, take a look at the Green Cane in the image below to see an example. You can fix this by Double Clicking into the Group of your shape (this will isolate it from other shapes you may have made) and with the Magic Wand Tool (Y) set to Tolerance 0 (You can set this by double clicking on the Magic Wand icon) select each color from your design and Unite them in the Pathfinder Palette.
Double Click on your artboard to exit the group and repeat the same steps with any additional design you may be working on.
Step 7
In this step we will make the cutting line for the tag. First copy the Candy Cane (Command + C then Command + F). Fill the copy with a single color, I’ve used gray, then click Unite from the Pathfinder Palette.
Once the shape is united, outline it with a thick outline in the same color and click Object > Expand. Draw a circle at the top with the Ellipse Tool (make sure it’s big enough to make a hole in) then select the fill, the circle and the expanded outline and click Unite. Select the outline shape and move it behind the Candy Cane (Command + Shift + Left Square Bracket). Finally, add a smaller circle to the top part of the outline, select the outline shape and the circle and click on Divide from the Pathfinder Palette., select the circle with the Direct Selection Tool and delete it. If the shape looks bumpy you can smooth over the outlines with the Smooth Tool.
Your tag is almost complete! You can add some decorations or text if you feel like it, I’ve gone ahead and added some retro textures. You can learn more about adding Textures by following the tutorial " Keep the File Size Down and Spice-up our Vectors with Bitmap Textures" by Jesse Hora.
Step 8
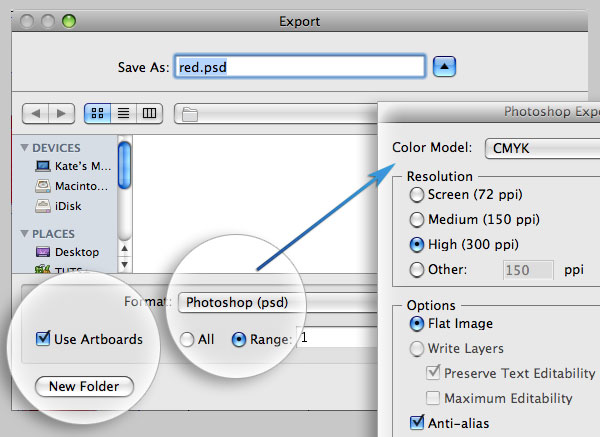
Now it’s time to export the Candy Cane. Move the Tag Outline you have made to the side of the Artboard and go to File > Export, and export the image as a 300 ppi, CMYK PSD file. Make sure you have Use Artboards ticked so that you don’t export everything outside of the Artboard.
Step 9
You don’t have to use InDesign if you’re happy to print your own tags, just save a PDF from Illustrator and take it to your local digital print shop, or send the file to your home printer. I find that this step is useful if you want to send your tag to the printer for offset printing and die-cutting (a die-cut is the name given to a cut out shape applied to a print).
If you want to make an InDesign file for printing, open your saved file in Photoshop to tweak any contrast and color settings, then make an A4 sized document in InDesign and go to File > Place, and import the Photoshop document. Make a new layer above your Artwork Layer and call it "Die_cut". Go to your Illustrator File, copy the outline of the tag (make sure its set to stroke only) and paste it into the Die-cut layer of the InDesign Document (Command + V) and move it into position around the Candy Cane image.
Then select the outline and double click on its color swatch in the Swatches Panel, name the swatch “die-cut” and set it to be a spot color (this lets the printer know it’s a special element). Many printers specify that you use a bright red as a die-cut color, but you should always check with your printer before setting these elements.

Step 10
Select the Candy Cane image and the outline, make a copy (Command + C then Command + V) and Rotate it (move it into position like the image below), then select the copy and the original and make copies across the width of the page by holding down Option + Shift. Once you’ve done this select all the candy canes and make another row below (again, Option + Shift).
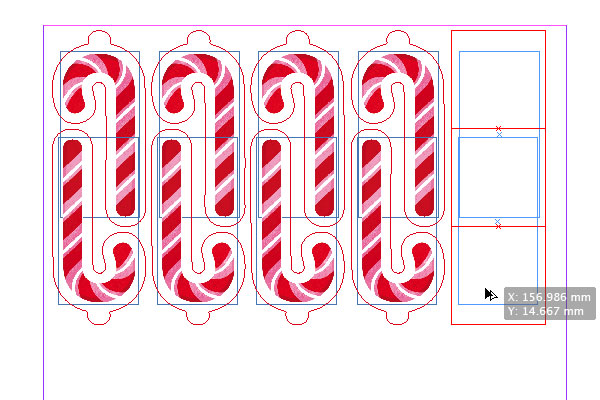
You should now have a page ready to export as a Print Ready PDF to send to the printers. If you’re printing the page yourself then you can use whatever color you like for the outline, 50% gray is good as it doesn’t stand out when you make a mistake with the cutting but is dark enough to see where to cut in the first place.
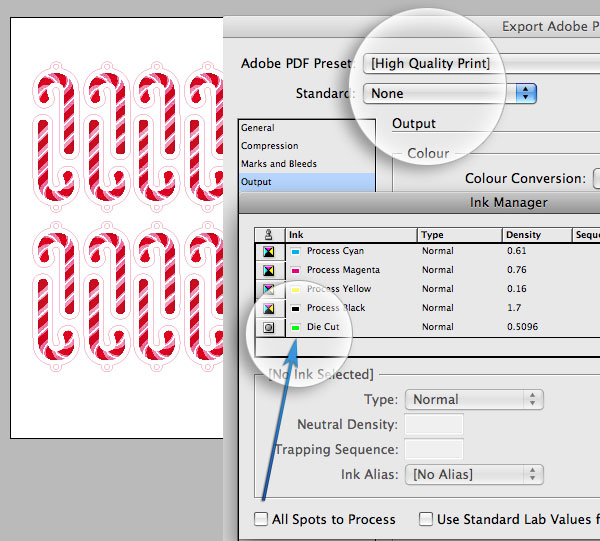
To export a PDF, go to File > Export and choose Adobe PDF from the drop down menu. Having worked for a PDF company, I’ve had some people tell me to use the Print Dialogue to save a PDF as it’s a better quality than the Export to PDF function in InDesign, either way is fine by me, but I prefer to use the Export Dialogue.
Once you’ve opened up the PDF Settings, select High Quality Print and then double check that the Die Cut color is set to be a Spot Color (This will help the printer know that the line is supposed to be a cut and not a printed element), you can do this by going to Output > Ink Manager. The Die Cut color should not have the "All Spots to Process" box ticked.
Save the PDF, and you’re done!
Conclusion
And that’s how easy it is to make a gift tag that’s ready for print. Remember, if you want to make a commercial offset print, you should always call you printer first to double check their file guidelines. Some printers are different to others and require various templates and color profiles to be used. If you’re printing these tags for yourself, go nuts and have fun!