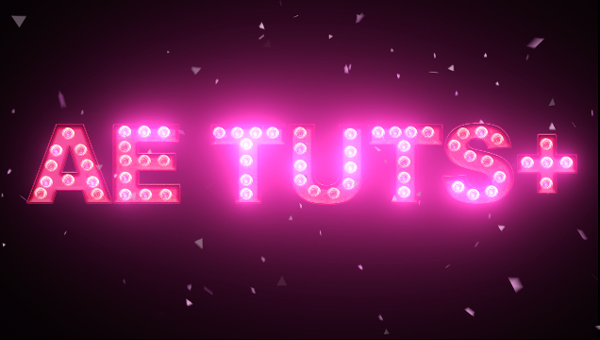
Hey Guys! Are you feeling lucky?! In this tutorial we’re gonna show you how you can create a realistic, cool looking casino style text effect…. good luck! ![]()
Tutorial
Step 1
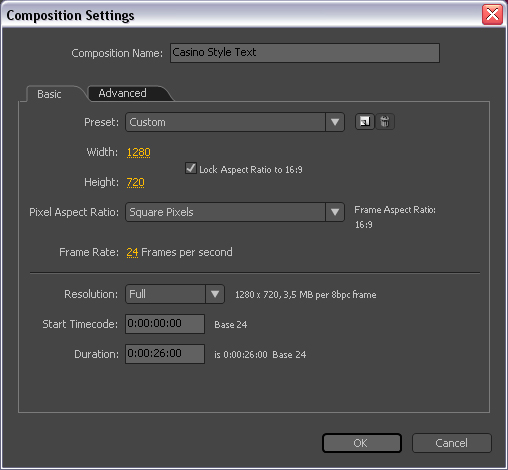
I create composition by clicking Menu-> Composition->New Composition. Make it 1280*720 square pixels 26 seconds long, name it as ‘Casino Style Text’.
Step 2
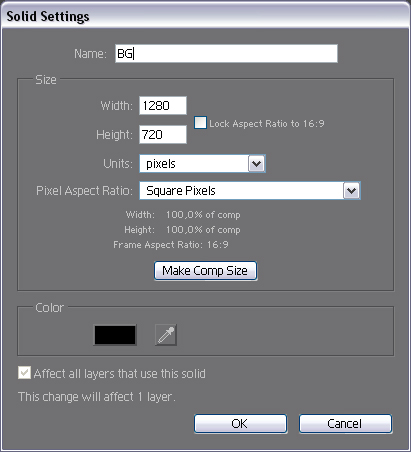
Create a new solid clicking by Menu->Layer->New->Solid. Change the color to Black. Make it comp size (1280*720) and name it as ‘BG’.
Step 3
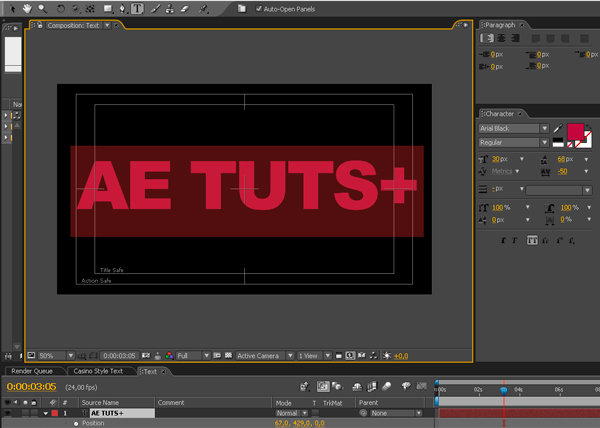
Now select the Horizontal Type Tool(ctrl + t), and choose the font. I used a default font (Arial Black), and type in ‘AE TUTS+’ or whatever you like. Change the color to #A70F3E (Actually the color of the text is not so important now, because we will change it later).
Step 4
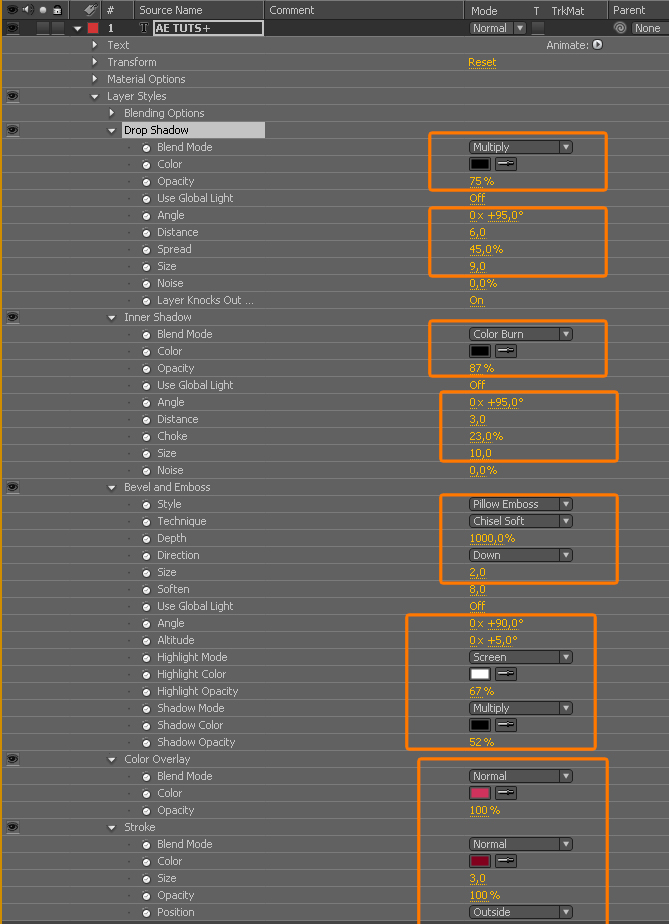
Select Menu ->Layer->Layer Styles and add the following styles (Drop Shadow, Inner Shadow, Bevel And Emboss, Color Overlay and Stroke) and set the following settings. Feel free to change the properties for the different result and use an other front as well.Set the Color overlay color to #B2355B and the stroke color to #6F0022.
Step 5
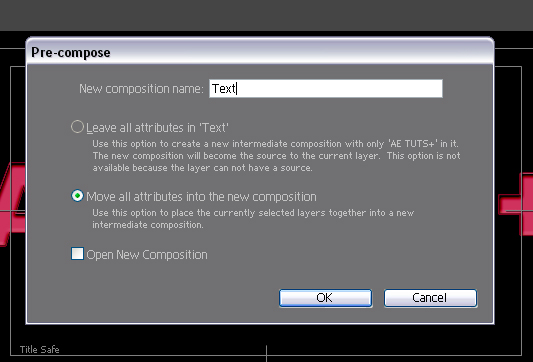
Select the text and choose Menu-> Layer->Pre-Compose and name it as ‘Text’ and choose move all attributes into the new composition.
Step 6
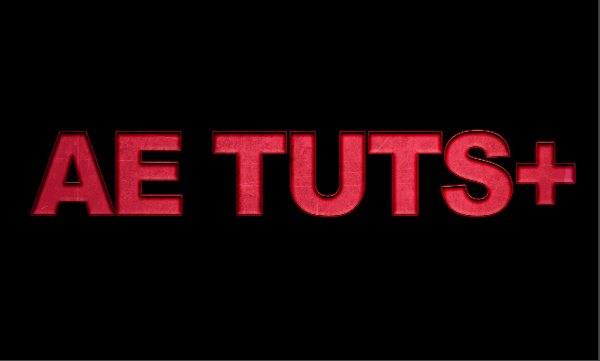
Add this texture above the text composition, and change the blending mode to overlay, and lower the opacity to 52%.

Step 7
If you did everything correctly, you should see this:
Step 8
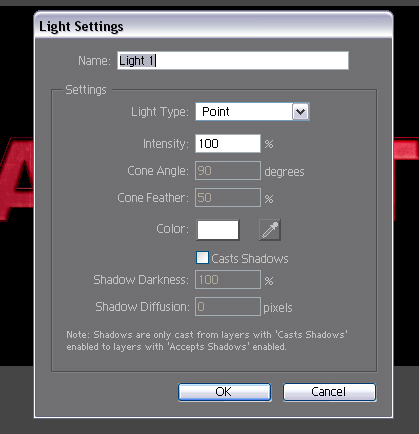
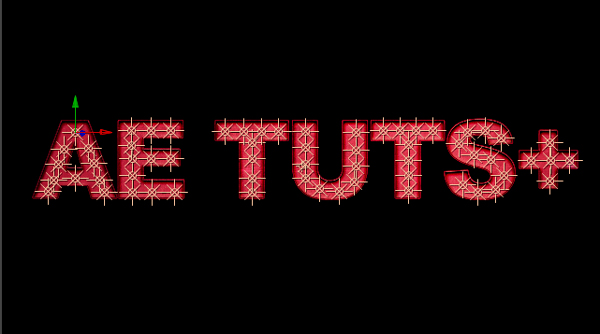
Here comes the boring part.Go to Menu->Layer->New->Light and add a new light to your scene.
Step 9
Let’s duplicate the lights, and try to follow the shape of the letters until you will get something like this.Use the arrow keys on the keyboard to move the lights more accurate to the correct position. Try to don’t cover the edge of the letters, and be careful with the number of the lights, because if you put too much than it will looks very fake.If you done you can hide the light icons by pressing Ctrl+Shift+h.
Step 10
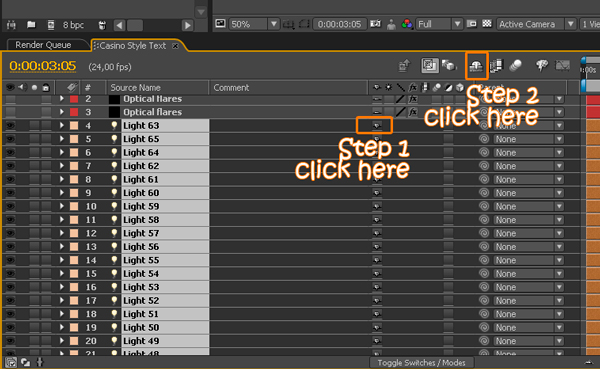
We have a bunch of lights now so let’s shy them. To do that you have to select the first light, and hold down the Shift key on the keyboard and select the last light. After that click once the little square icon next to the layer’s name(right side). If you don’t see them, than press the f4 key on the keyboard or click on the Toggle Switches/Modes button.
Step 11
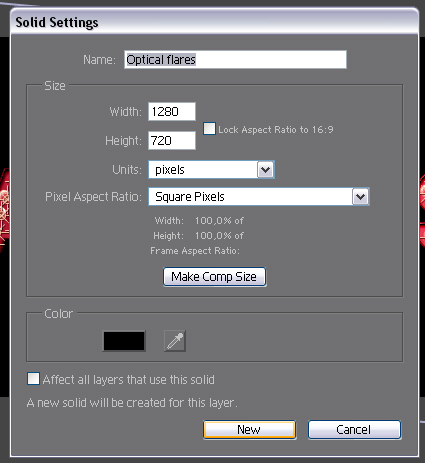
Create a new solid Menu->New->Solid and name it as ‘Optical Flares’ make it comp size and choose a color(Black) and change the blending mode to screen.
Step 12
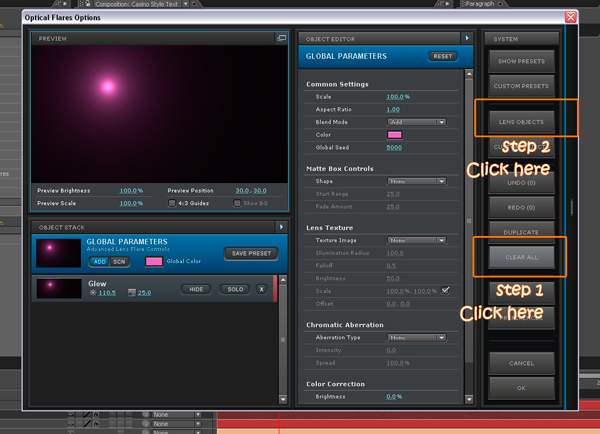
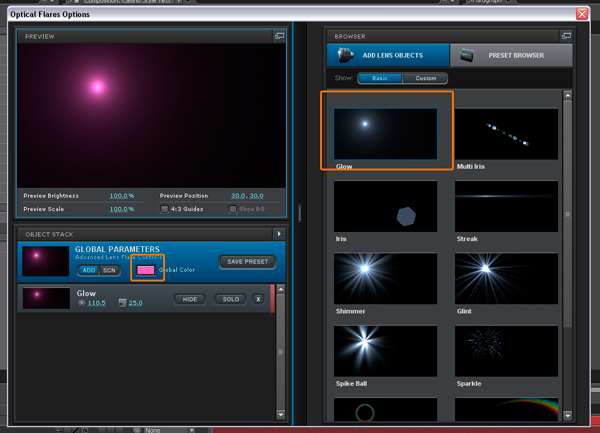
Go to Menu->Effect->Video Copilot->Optical Flares and first of all click on the clear all button and after that click on the lens object button.
Step 13
Select the glow element and change the Global color to #D863BE
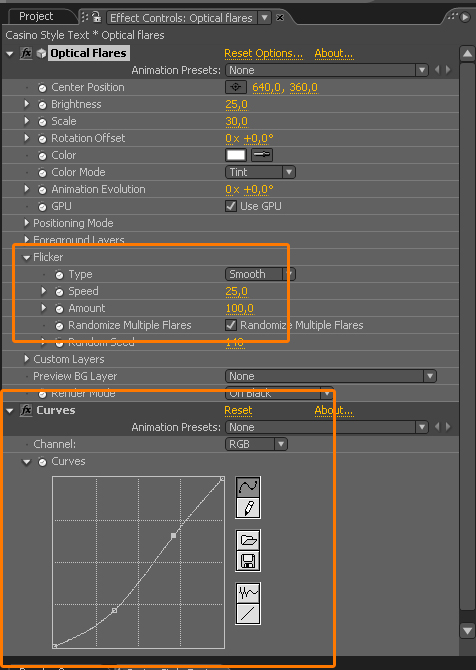
Step 14
Select the Flicker properties and enable randomize multiple Flares and increase the speed and the amount properties as well plus add a curves effect (Menu->Effect->Color Correction->Curves) to change the contrast just a touch.
Step 15
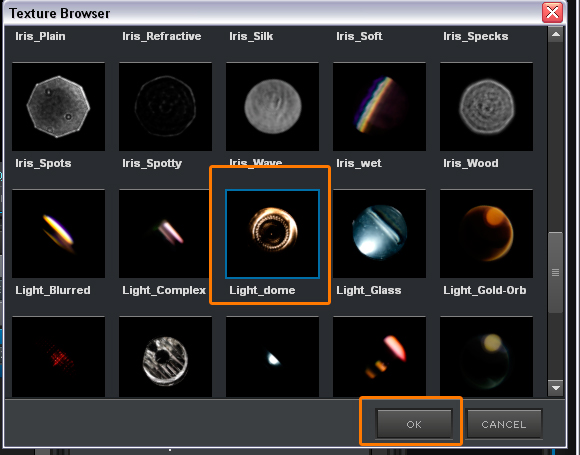
Duplicate the Optical Flares layer and rename it to Led and bring it below the Optical Flares layer.Click on the Clear all button again and select Iris from the lens object menu. Inside the Iris properties change the shape type to texture and click on the texture image button to select a different shape.

Step 16
Select the Light_dome object or try a different object from the list if you want. By the way this is a fast and elegant way, because we don’t need to place the elements to the correct position this will perfectly align with the flares.If you don’t have Optical Flares, than you have to do this process manually.
Step 17
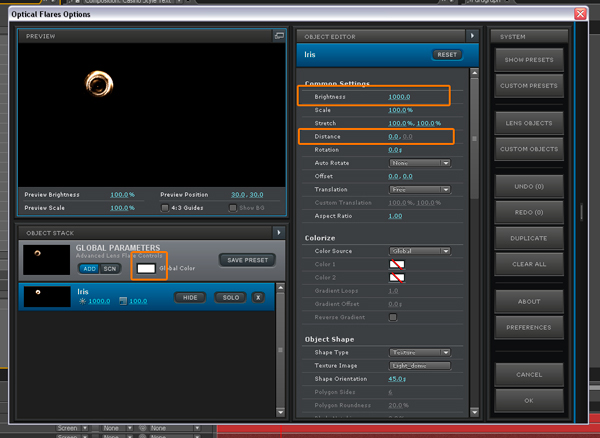
Let’s set the Distance to 0, increase the brightness to 1000, and change the color to White.Because we set the distance to zero the lights and the led are perfectly aligned now.
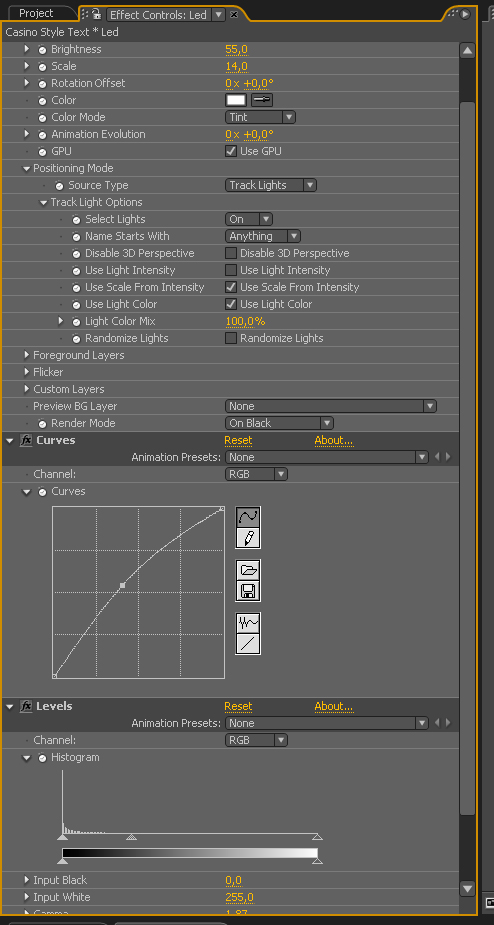
Step 18
Let’s add some final adjustment in our Led layer.
Step 19
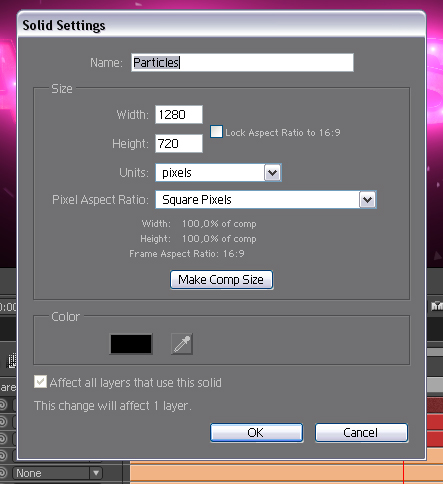
Create a new solid clicking by Menu->Layer->New->Solid. Change the color to Black. Make it comp size (1280*720) and name it as ‘Particles’.
Step 20
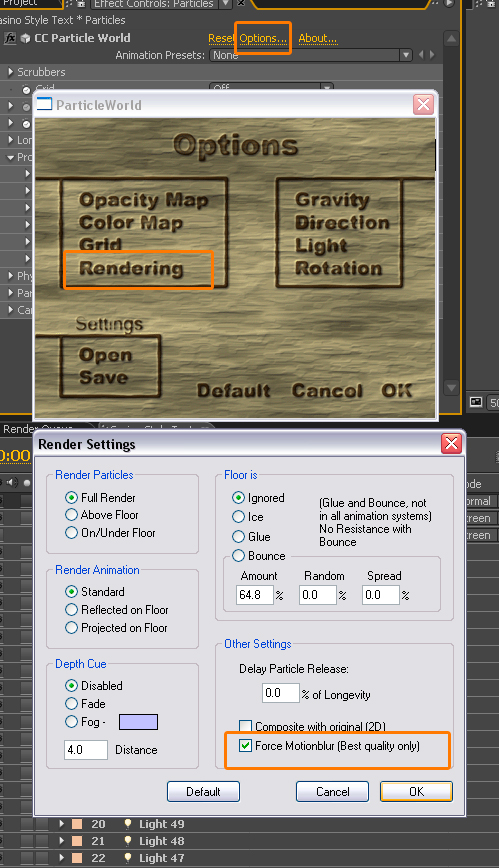
Go to Menu->Effect->Simulation->CC Particle World. Click on the options and choose the rendering properties and click inside the Force motion blur properties check box to enable it.
Step 21
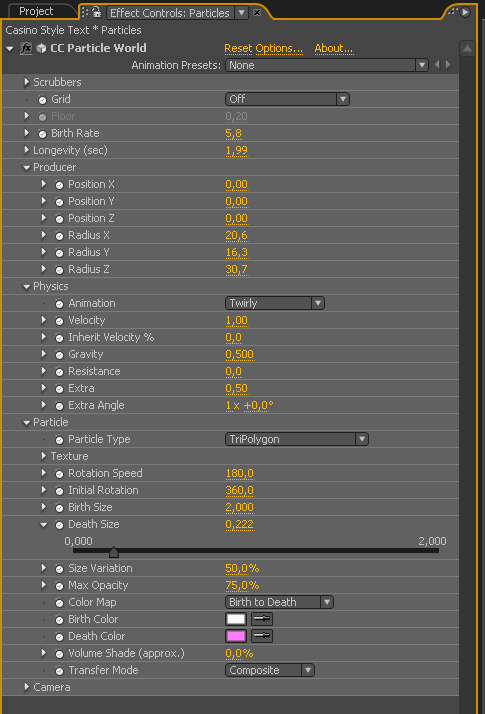
Change the particle world properties.Set the birth color to #FAFAF8 and the death color to #F17AFF
Step 22
If you haven’t purchased Optical Flares yet than you can try to create the flares in an alternative mode. You can find the Led transparent PNG file inside the project file, so you can use it as a led body and I think it will makes the whole effect better if you don’t have Optical Flares. The next thing is the flares which you can create in an alternative way if you check out this tutorial. My advice is that you add maybe a glow effect and a wiggle expression to the glow intensity, than you can get a cool pulsing effect, and if you offset the layers than you can achieve a random flame effect, but the OF version is much more time saver and elegant way I think.
Step 23
My final tip is that you use some smoke element, than you can create more dramatic look. Action Essentials 2 is a great choice but you can check out this awesome tutorial http://ae.tutsplus.com/tutorials/vfx/realistic-fog-without-3rd-party-plug-ins/
So be smart and creative, try different colors, particles, textures and create your own amazing casino style text animation.
Final Image