As you know, Psdtuts runs a premium program for just $9 a month, or about 30 cents per day. Our premium program gives you access to hundreds of source files and bonus tutorials across our entire network of sites, which includes Psdtuts, Vectortuts, Activetuts, Nettuts, Phototuts, Aetuts, and more! We often receive requests from our readers asking exactly what a premium tutorial looks like.
Today, we are giving everyone access to a premium tutorial written by senior author, Mark Mayers that demonstrates the process of exploring new styles of illustration by re-mixing existing elements with new ones. This method of working is a great way to quickly develop your own style and inject some individuality into your artwork. It’s also a fun way to learn and refine new techniques. So what are you waiting for? Let’s get started! And if you like what you see, sign up for our premium program today!
Resources
You’ll find a stack of goodies in the "source" folder. You’ll also need the following stock photography to complete this tutorial.
- Colored Grunge Textures
- The medium version of Model One
- The medium version of Model Two
- Bird by Doc
- Mountains
- Asteroid
- Astronaut
Preparation
Before you start it’s best to establish which style you want to develop. I don’t really stick to a specific one because over the years I’ve developed a diverse range of styles. For this tutorial I wanted to explore the possibilities of combining hand-drawn elements and model photography with a touch of retro kitsch thrown in for good measure.
The next step was to gather together existing elements that I could recycle with new images. If you’ve worked through my Premium tutorials, some of these elements will be familiar. Next, I got to work with pen and paper and created a page of doodles, which was then scanned at 300 dpi. Feel free to use a tablet for this part, but personally I prefer working away from the computer in the traditional way.
If you’re stuck for doodle ideas, check out the work these artists for some inspiration: Jamie Tao, Raphaël Vicenzi and Mike Harrison.

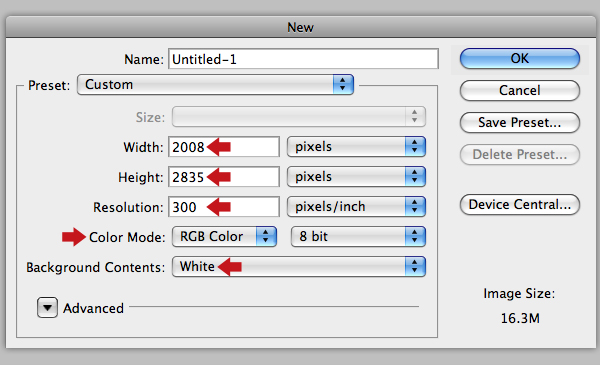
Step 1
Create a new RGB canvas 2008 px X 2835 px with the Resolution set at 300 pixels per inch and select White under the Background Contents drop-down menu.
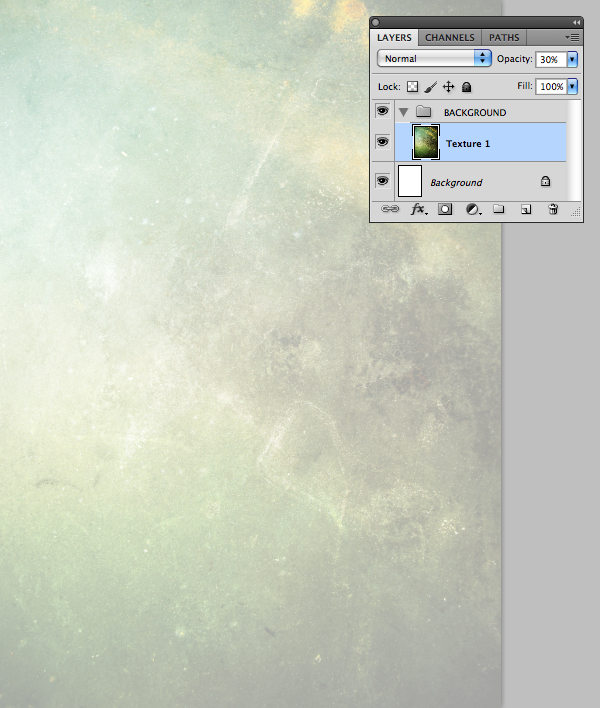
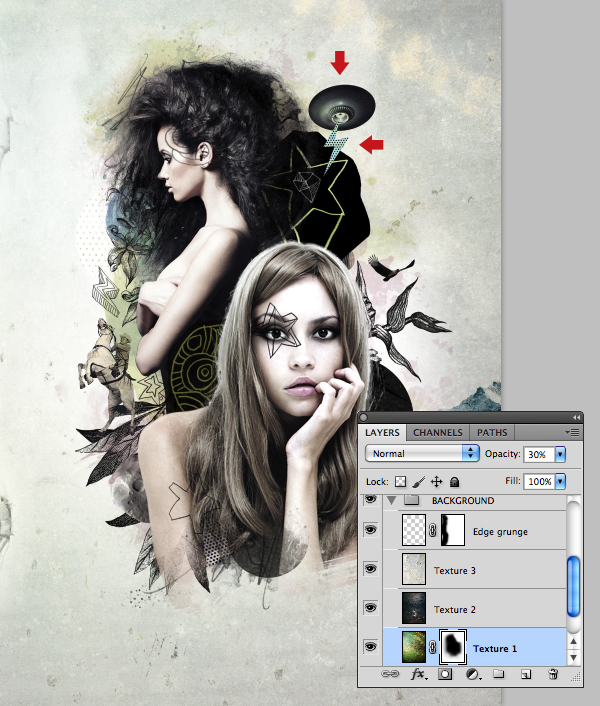
To start off we’ll use various textures to create a subtle distress background. First, add a group folder called "BACKGROUND", then open "1.jpg" from these colored grunge textures and go to Image > Image Rotation > 90 CCW. Place this within the folder, then hit Command/Ctrl + T and resize to cover the canvas. Name the layer "Texture 1" and reduce its Opacity to 30%.
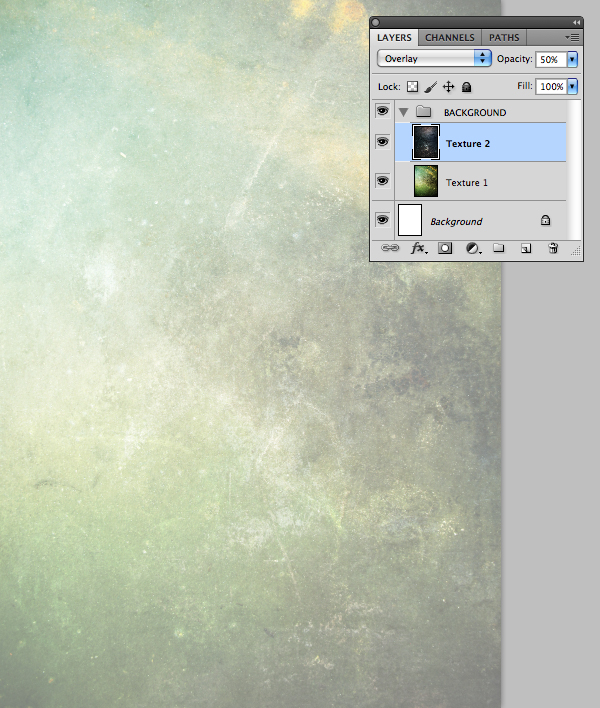
Now add "8.jpg" as a new layer within the same folder, resize and name it "Texture 2". Change the Blend Mode to Overlay and lower its Opacity to 50%.
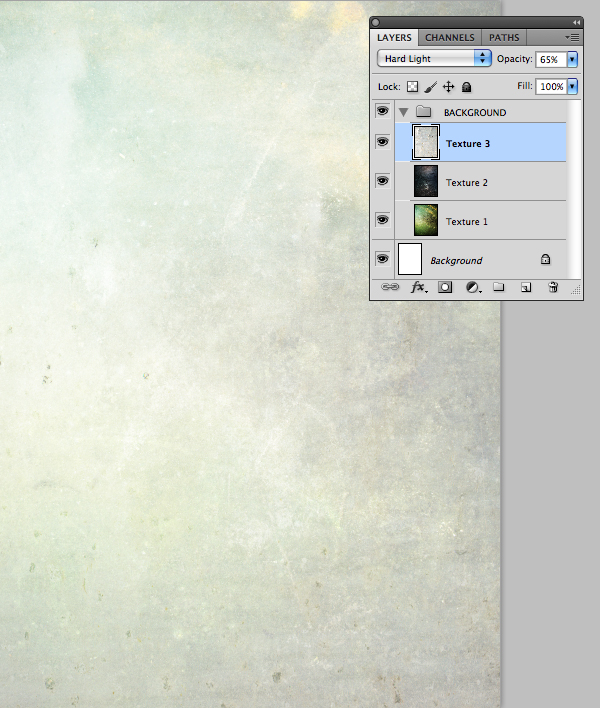
Place "Metal_plate.jpg" from the "source" folder as a new layer within the same folder. Resize and label it "Texture 3". Now set the Blend Mode to Hard Light and reduce its Opacity to 65%.
Next, add "Staples.jpg", again from the "source" folder. Change the Blend Mode to Luminosity, then resize and name it "Edge grunge". Add a layer mask, then use a large, soft-edged brush (B) to hide the hard edge as indicated.

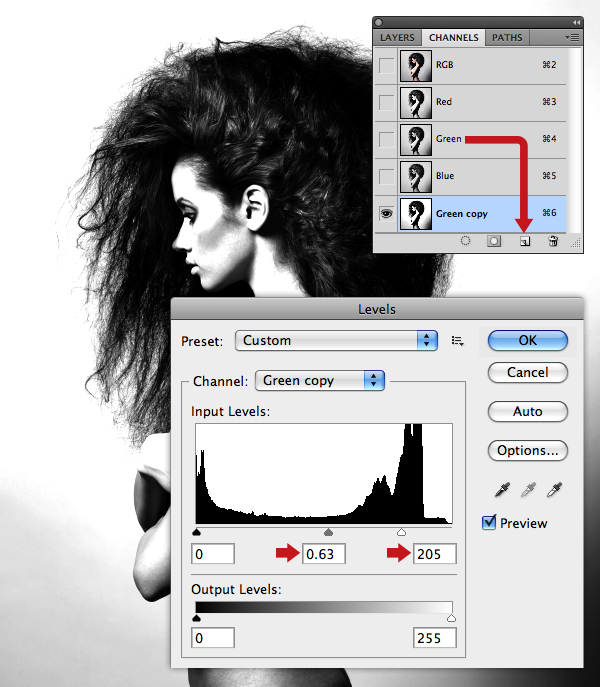
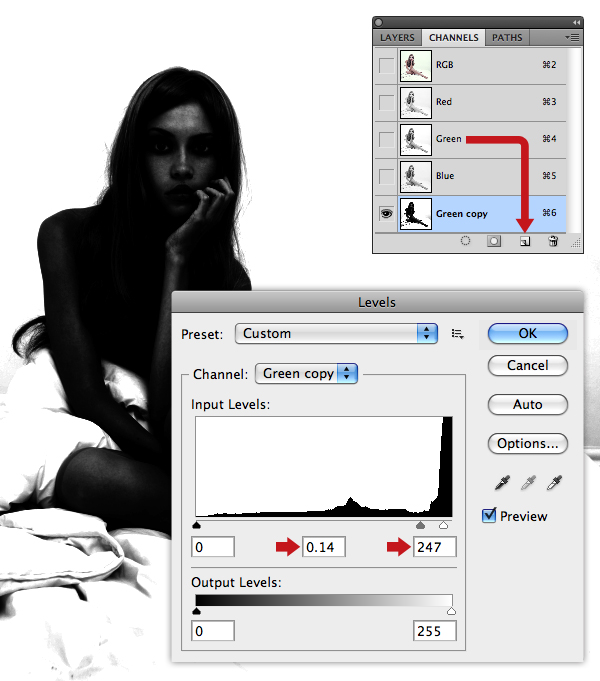
Step 2
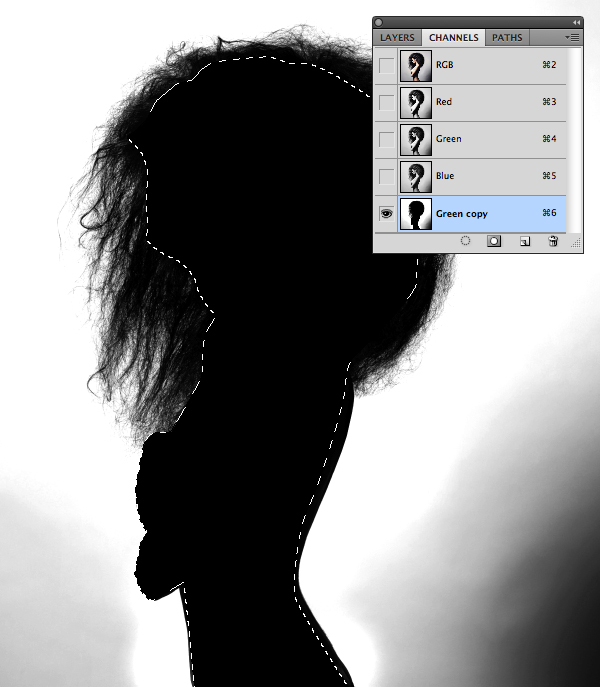
We now need to extract our first model. Switch to your Channels tab and cycle through each channel in turn to determine which holds the most contrast – in this case it’s the Green. Drag its thumbnail over the Create new channel icon at the foot of the palette to duplicate it. Now hit Command/Ctrl + L to access the Levels dialogue box and set the Input sliders as shown. Don’t sweat over the remaining background detail – we’ll deal with this next.
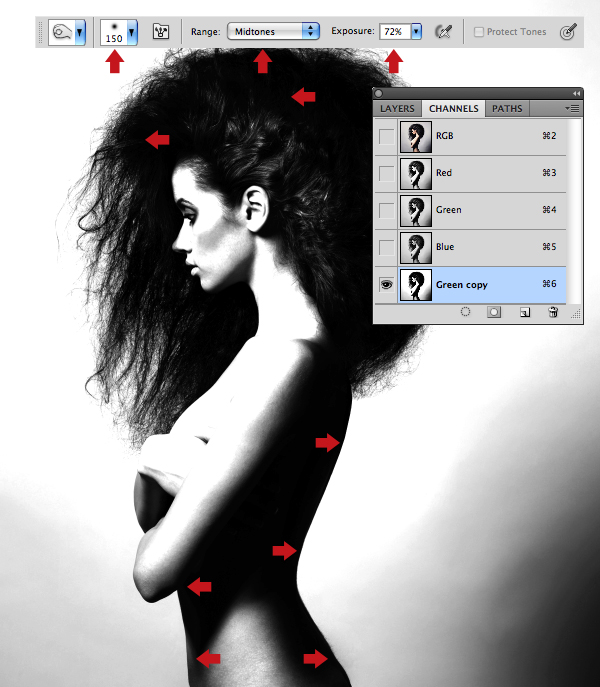
To clean up the channel mask, set the Burn Tool (O) to: Exposure: 72% / Range: Midtones and use a 150 px brush to darken the inner edges of the model as shown.
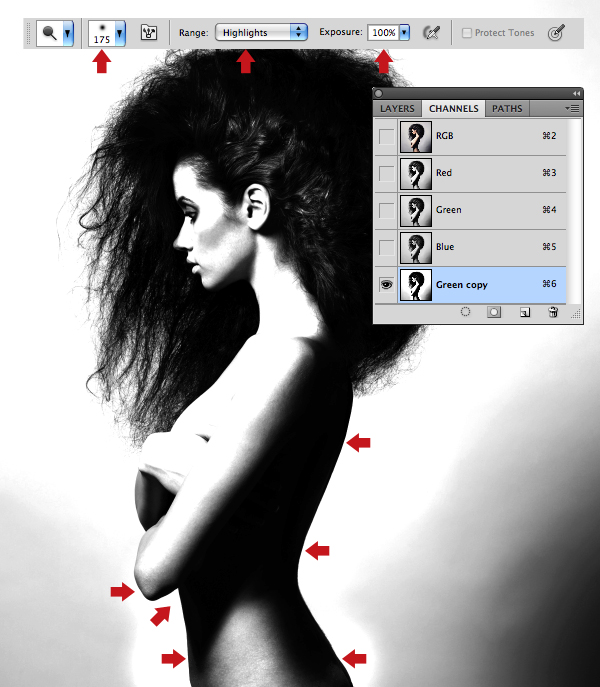
Now set the Dodge Tool (O) to: Exposure: 100% / Range: Highlights and use a slightly larger brush to bleach out the background grey in the areas indicated.
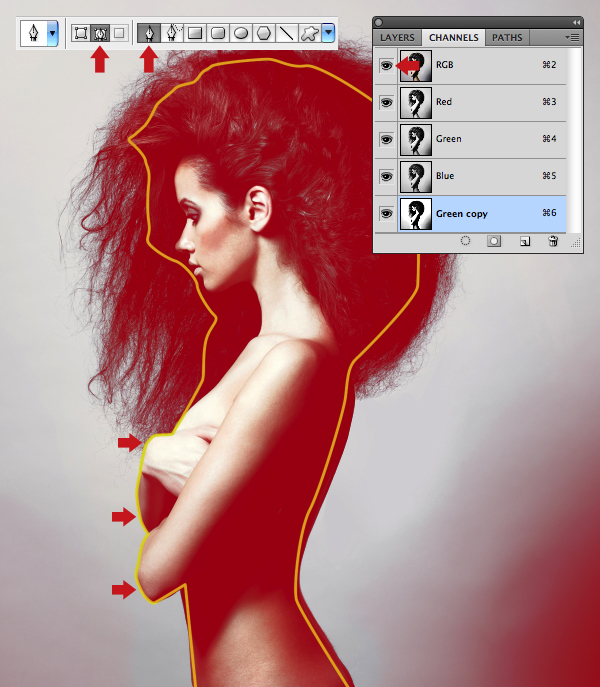
Set the Pen Tool (P) to Paths in the options bar, then draw a closed path to encompass the model as indicated in yellow. Plot your points fairly loosely over good contrast areas, but zoom in and toggle the visibility of the top RGB composite channel and take some time over less well defined areas such as her arms as indicated.
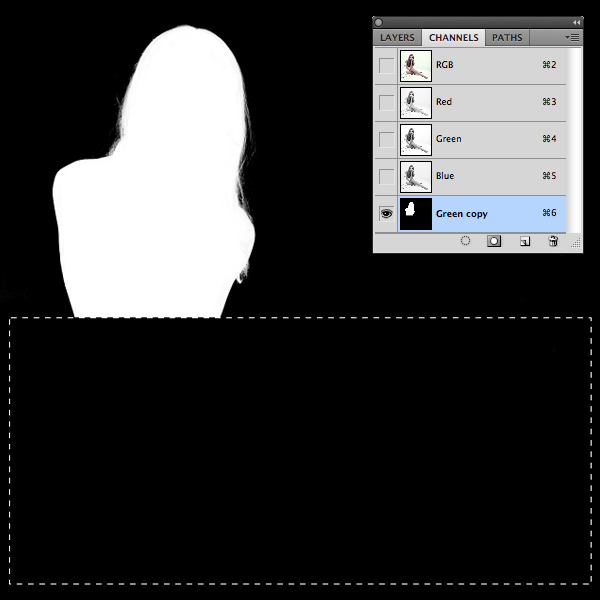
Switch to the Paths tab and Command/Ctrl-click your path thumbnail to load it as a selection. Return to the Channel tab and ensure your duplicate is the target channel. Next, press D to restore your Foreground/Background colors to the default black/white, then hit Option + Delete to fill the selection with black.
Next, use a large, hard-edged white brush to remove any remaining background grey. By default, white areas act as channel selections, so hit Command/Ctrl + I to Invert the channel to a negative.
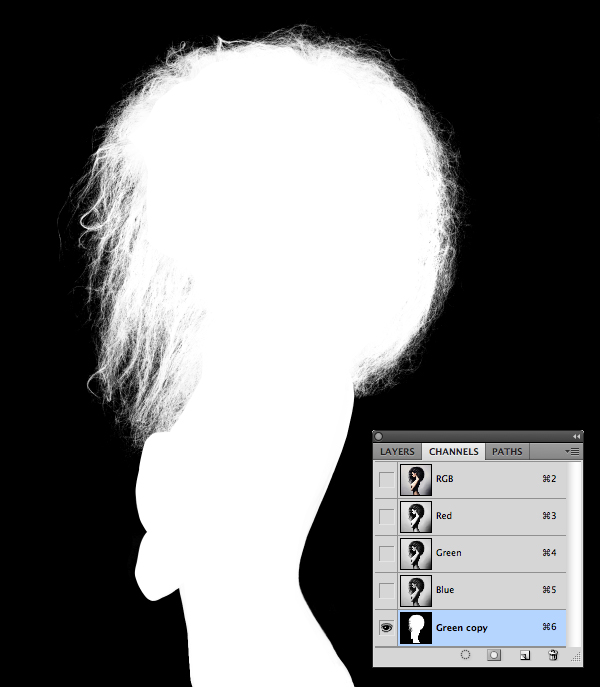
Command/Ctrl-click your duplicate channel to generate a selection, target the RGB composite channel, then jump to the Layers tab. Activate any selection tool, then hit the Refine Edge button in the options bar.
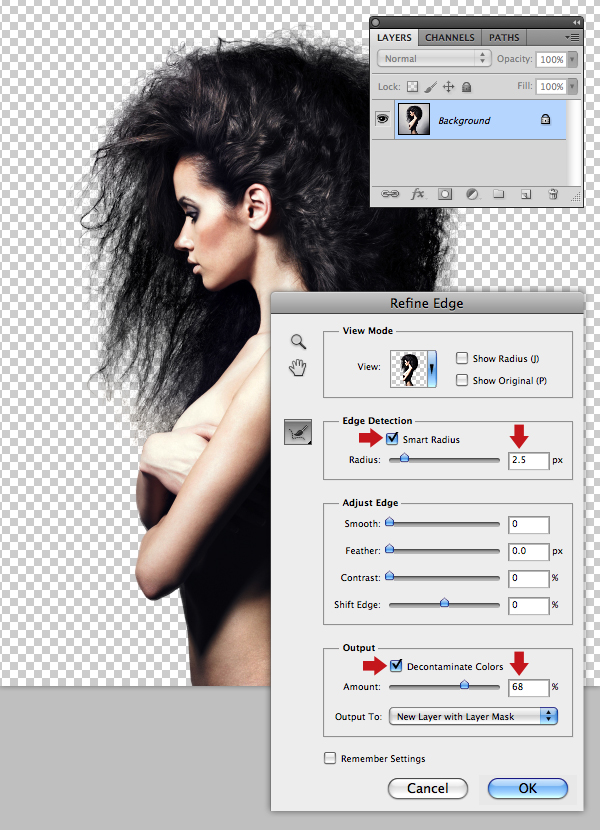
In the next window choose On Layers (L) from the View drop-down menu, then check the Smart Radius button and set the Radius field to 2.5 px. Now activate the Decontaminate Colors option and set the Amount value to 68% and hit OK.
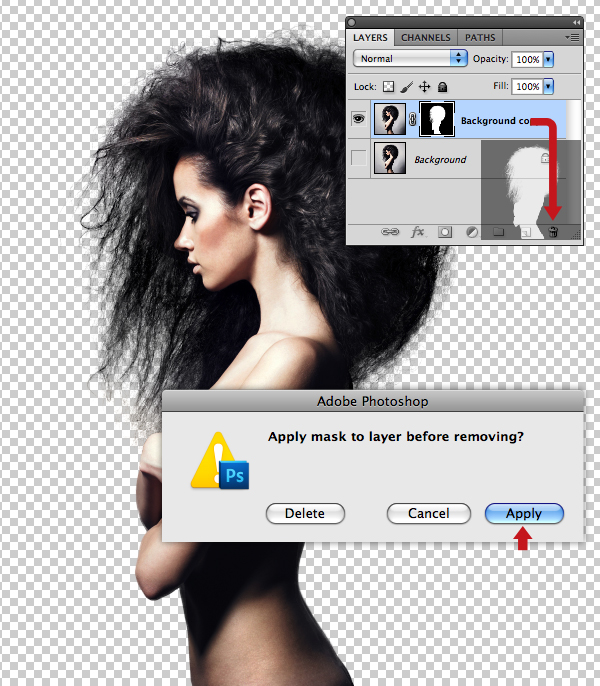
When the Refine Edge command has finished you’ll notice an additional masked layer has appeared and the visibility of the original layer switched off. You can now drag the mask into the trash icon at the foot of the palette and click the Apply button on the following dialogue box.
Drag the isolated model onto your working file and label it "Figure 1". Now place it within a new group folder called "FIGURES", then resize and position as shown.
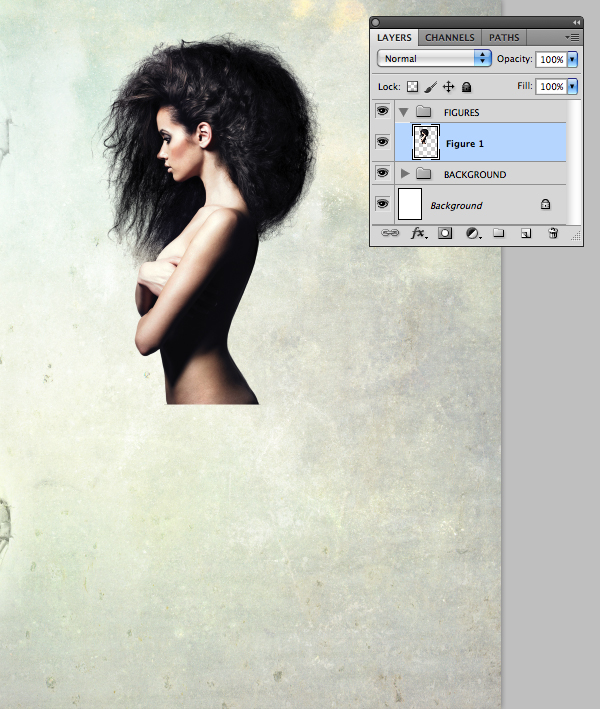
Step 3
You can now apply the same isolation techniques on the second model.
We only need this model’s head and chest, so once have a clean inverted mask, fill a rectangular selection (M) with black to eliminate the unwanted area.
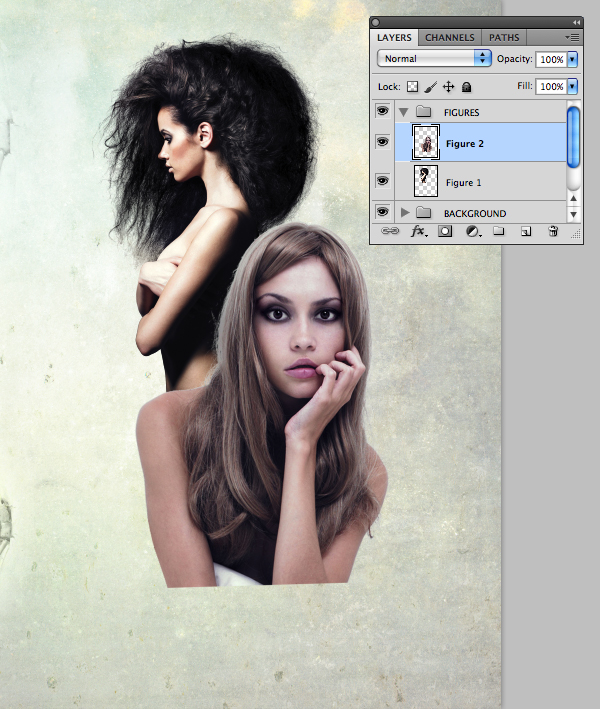
After you’ve successfully extracted the model, place it as a new layer called "Figure 2" within the same folder, then enlarge to overlap the first model.
Step 4
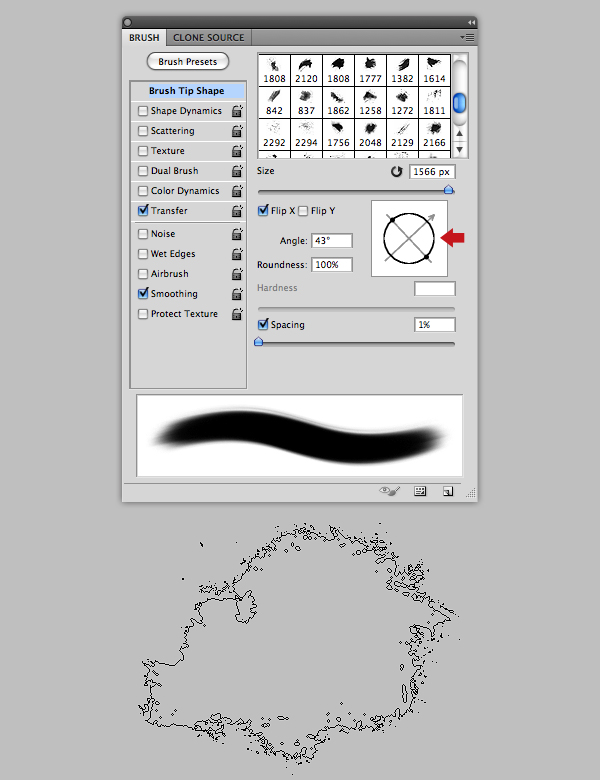
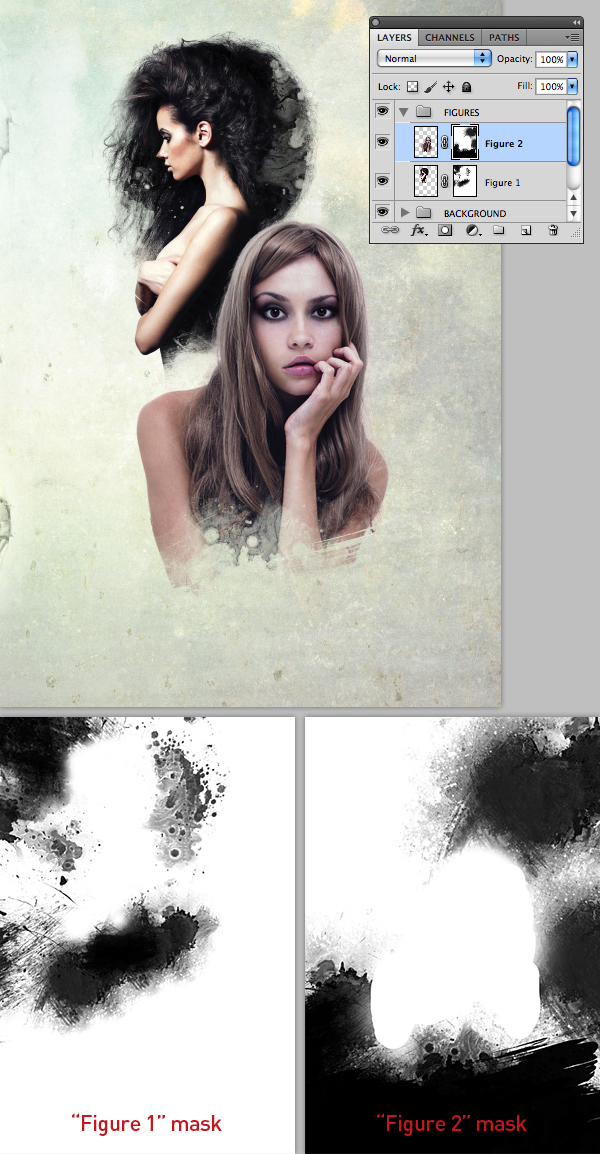
Load the "grunge_brushes.abr" from the "source" folder. To familiarize yourself with them, open a new canvas and have a play; as these brushes are image-based, you’ll find they work best used in a stamping fashion, also open the Brush panel from the options bar and experiment by rotating and flipping them to avoid repetition.
Now switch back you your project file and mask both "Figure 1" and "Figure 2" layers with an assortment of brushes – my masks are shown in isolation at the bottom of the screengrab.
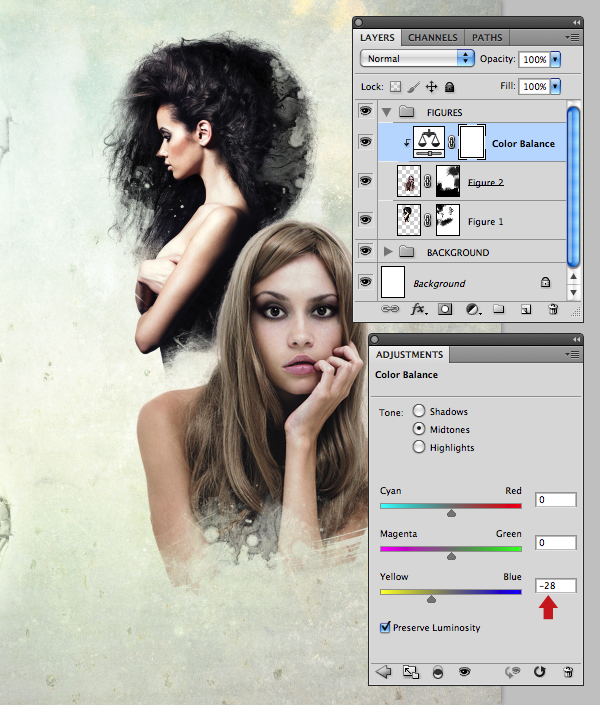
We now need to apply some non-destructive edits so both models match. Target the "Figure 2" layer and choose Color Balance from the Adjustments panel and reduce the Blue by -28.
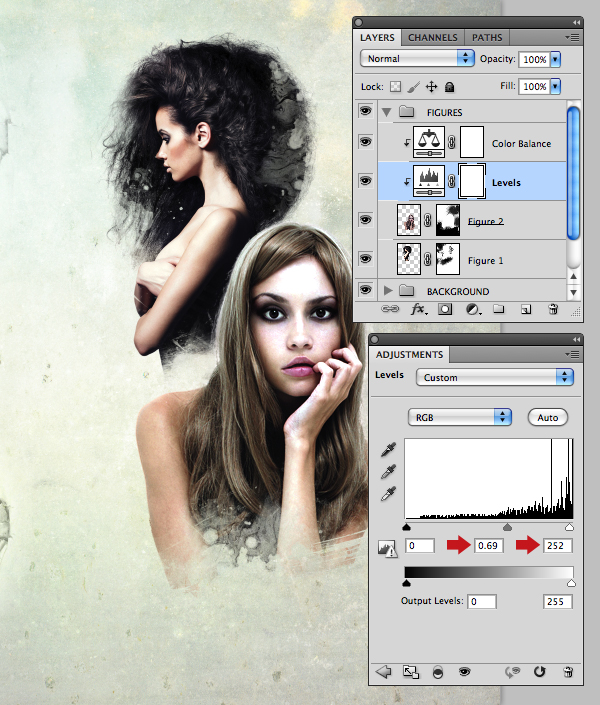
Next, target the same later again and add a Levels adjustment and copy these settings.
Step 5
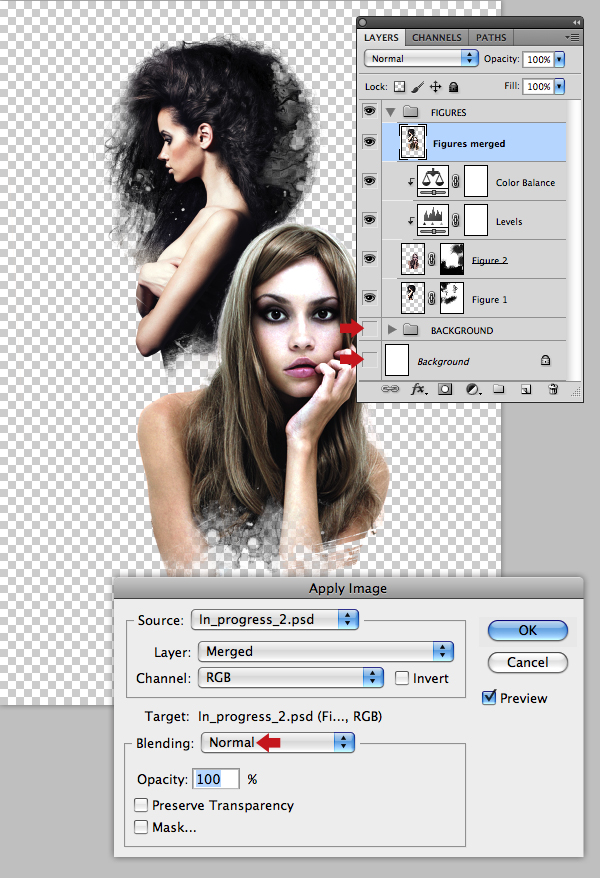
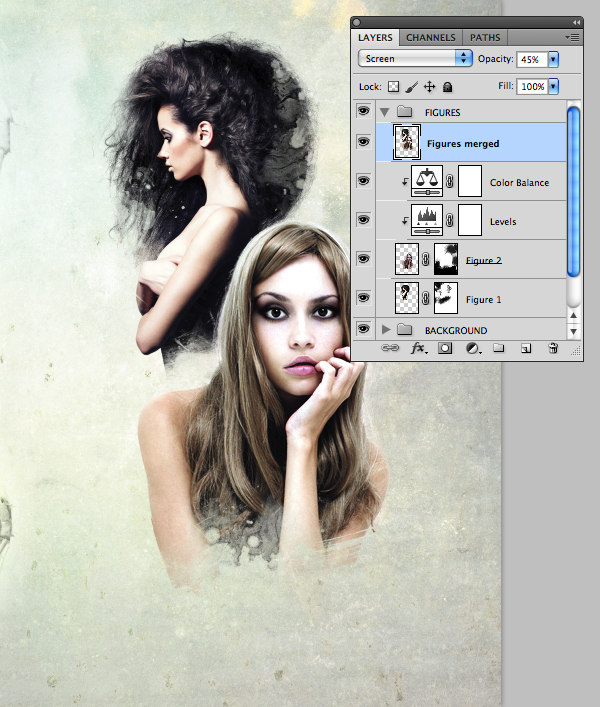
Disable the visibility of the "Background" layer and the "BACKGROUND" folder. Place an empty layer called "Figures merged" at the top within the "FIGURES" folder. Now go to Image > Apply Image, check the Blending option is set to Normal and hit OK. Your new layer now contains a composite of all visible layers.
Now change the layer’s Blend Mode to Screen and drop the Opacity to 45%. You can now enable the visibility of all layers. The model’s should have a slightly lighter appearance.
Step 6
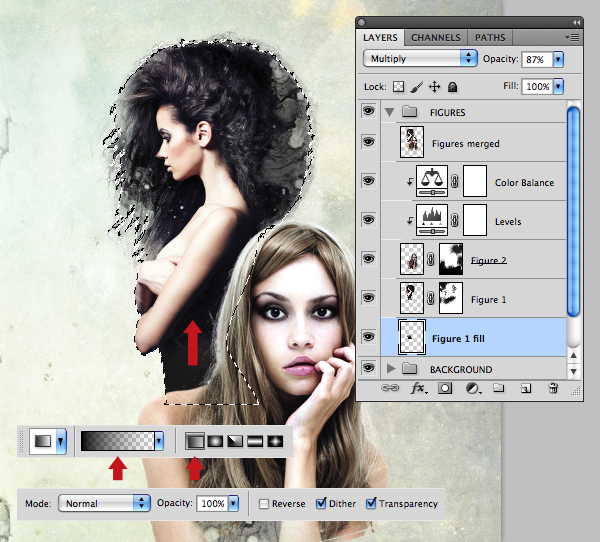
We now need to darken the torso of our first model. Add a layer at the bottom of the stack within the same folder and name it "Figure 1 fill". Command/Ctrl-click the "Figure 1" layer thumbnail to generate a selection. Ensure the new layer is the target layer and your Foreground color is set to black. Now hold Shift and drag a Linear Gradient from the bottom up using the Foreground to Transparent preset. Finally, change the Blend Mode to Multiply and lower the Opacity to 87%.
Step 7
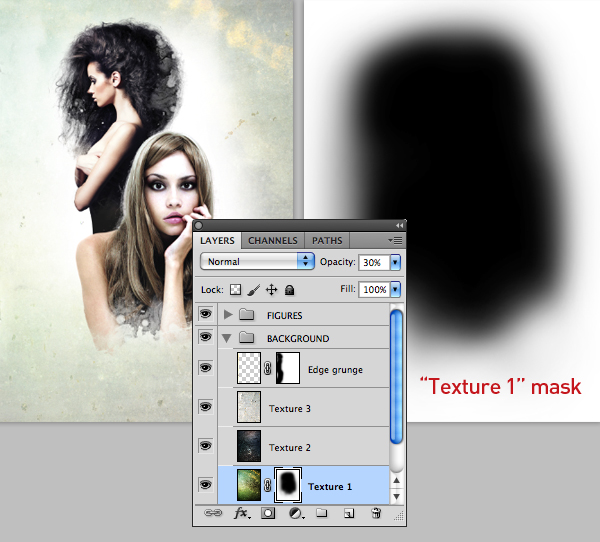
Revisit your "Texture 1" layer and add a mask. Now use a large, soft-edged brush to hide the central area. My mask is shown in isolation to the right of the screengrab.
Step 8
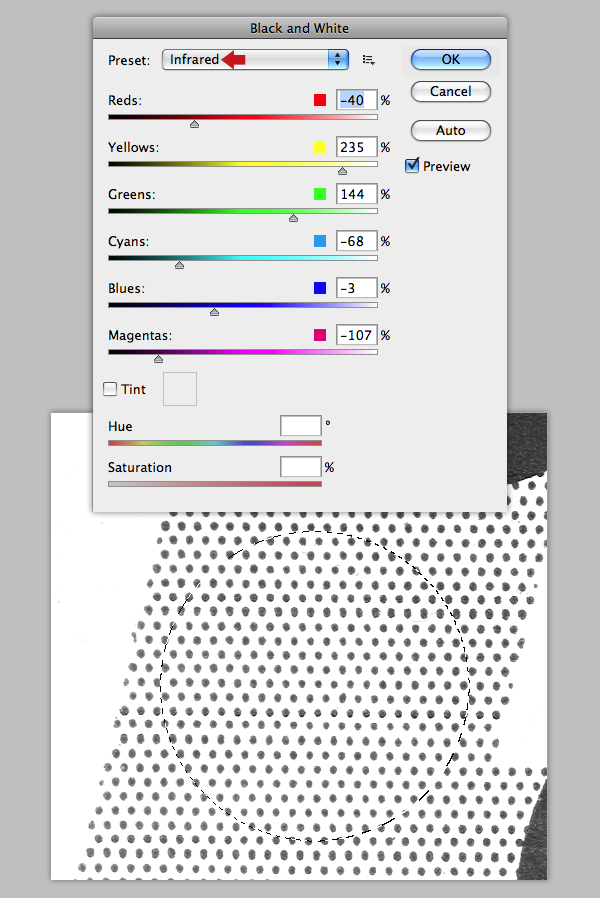
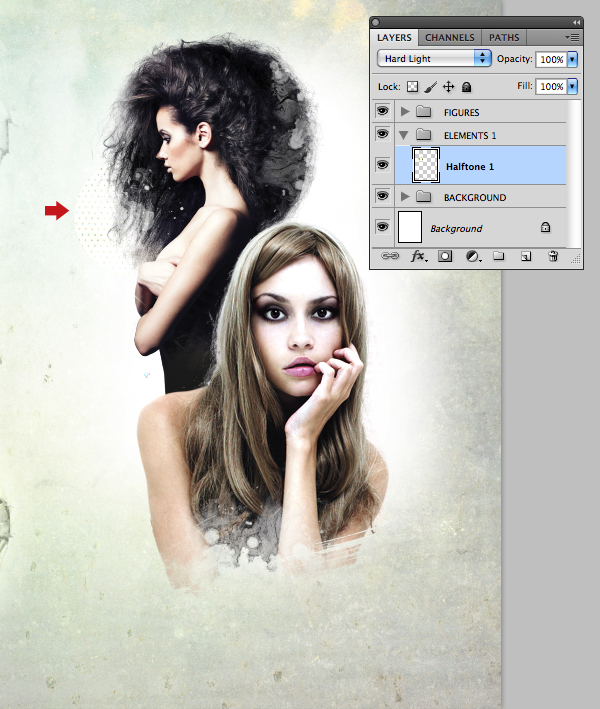
Open "Dots_1.jpg" from the "source" folder and press Option + Shift + Command/Ctrl + B to apply an Infrared Black and White adjustment directly to the layer. Now use the Elliptical Marquee Tool (M) to Shift-drag a selection of dots and copy to the clipboard.
Add a new folder called "ELEMENTS 1" below the "FIGURES" and Paste the selection as a new layer within the folder and name it "Halftone 1". Position / resize as indicated, then change its Blend Mode to Hard Light for a subtle effect.
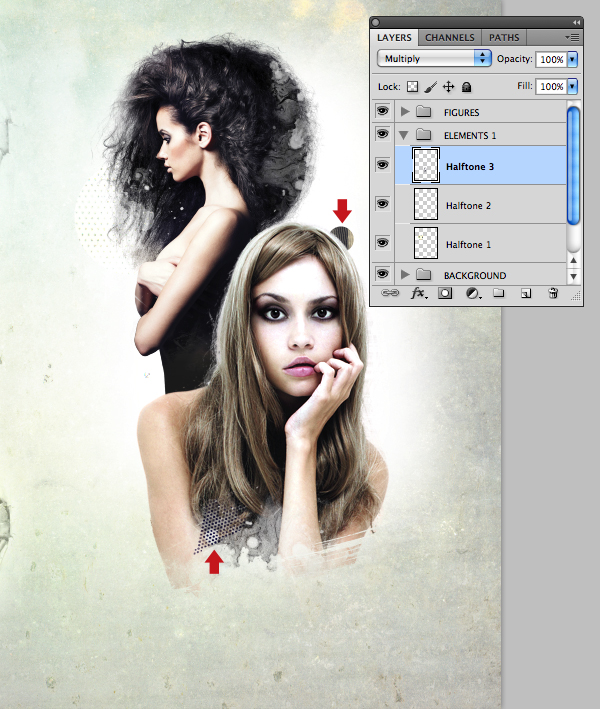
Use the same technique on "Dots_2.jpg", label it "Halftone 2" and change the Blend Mode to Multiply. Next, apply an Infrared Black and White adjustment to "Dots_3.jpg", then use the Polygonal Lasso Tool (L) to copy an irregular selection and copy > paste as a new layer. Label this one "Halftone 3" and set the Blending to Multiply again.
Step 9
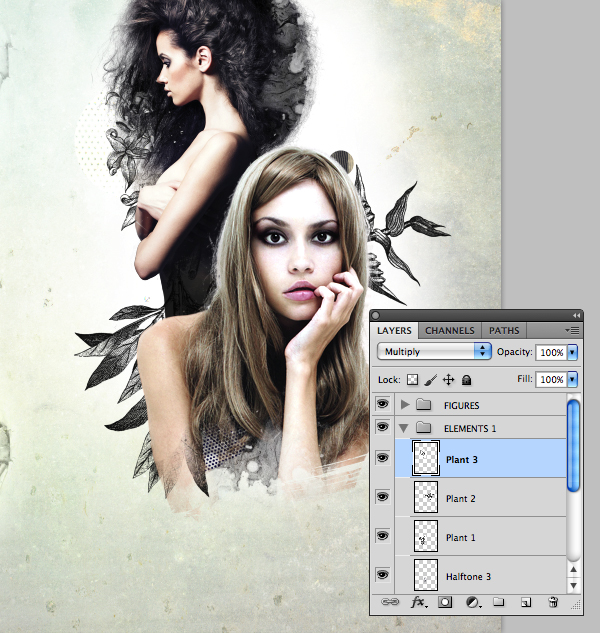
Place "Lineart_1.jpg", through to "Lineart_3.jpg" as new layers within the "ELEMENTS 1" folder and position as shown. Change their Blend Modes to Multiply and name them "Plant 1", "Plant 2" and "Plant 3".
Step 10
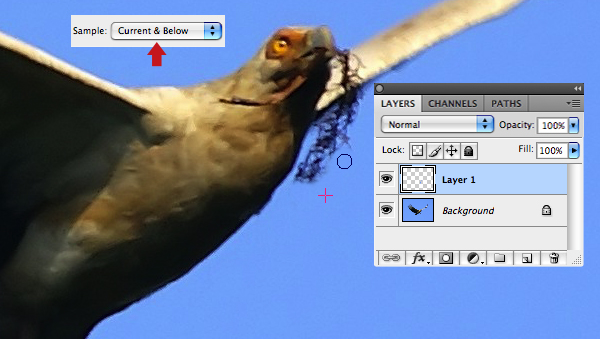
Open the bird image, then add a new layer to carry out some retouching. Grab the Clone Stamp Tool (S) and set it to Current & Below. Now use a small, soft-edged brush to get rid of the object in the bird’s mouth.
When you’ve finished, press Command/Ctrl + E to Merge your retouch layer, then choose Select > Color Range and set the Fuzziness slider to around 96.
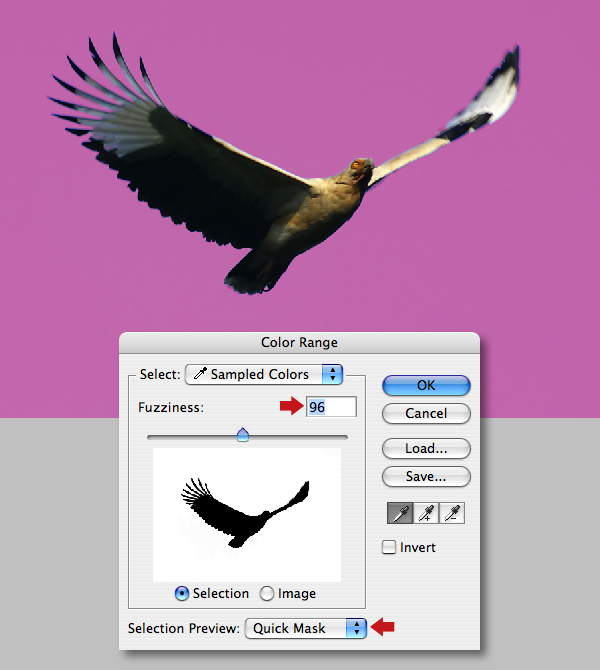
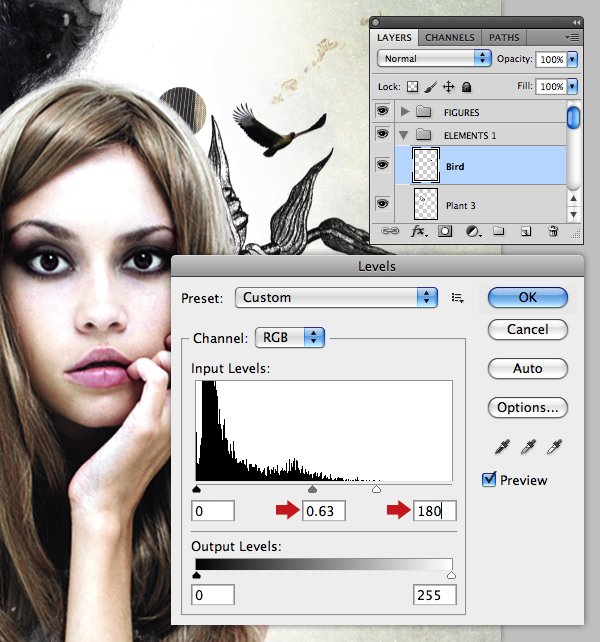
Apply a Refine Edge command, then add as a new layer above "Plant 3". Resize, then apply a Levels adjustment directly to the layer as shown and label it "Bird".
Step 11
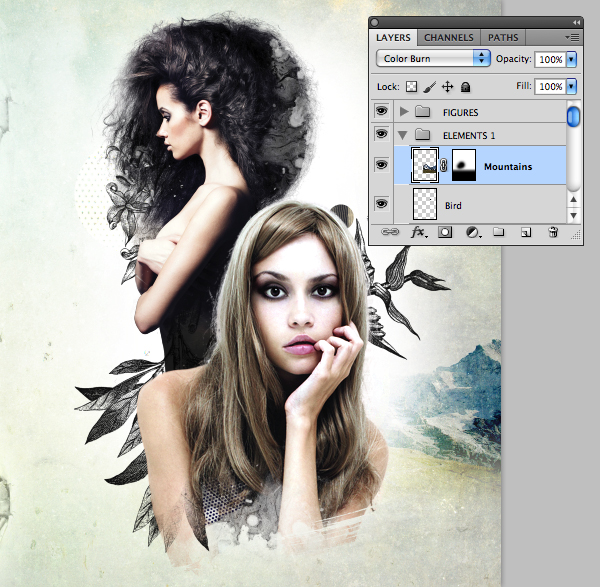
Open the mountains and draw a closed path to exclude the sky. Create a path-based selection and copy > paste as a new layer within the same folder, name it "Mountains" and position middle-right. Now change the Blend Mode to Color Burn and mask as shown.
Step 12
Isolate the asteroid with a path, make a selection and add as another layer within the same folder. Resize / position as indicated and label it "Rock".
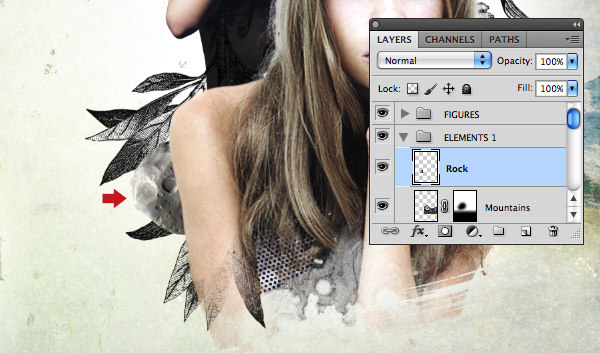
Step 13
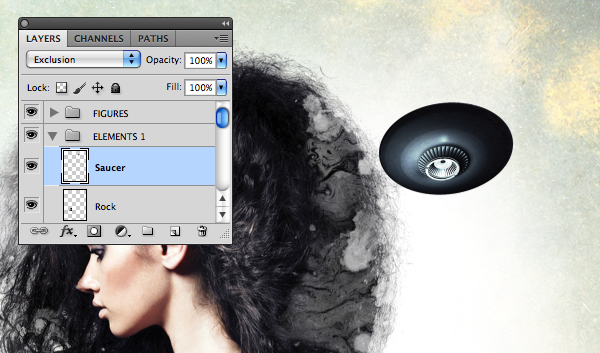
Drag "UFO.psd" from the "source" folder as another layer and position as shown. Set the Blend Mode to Exclusion and name it "Saucer".
Step 14
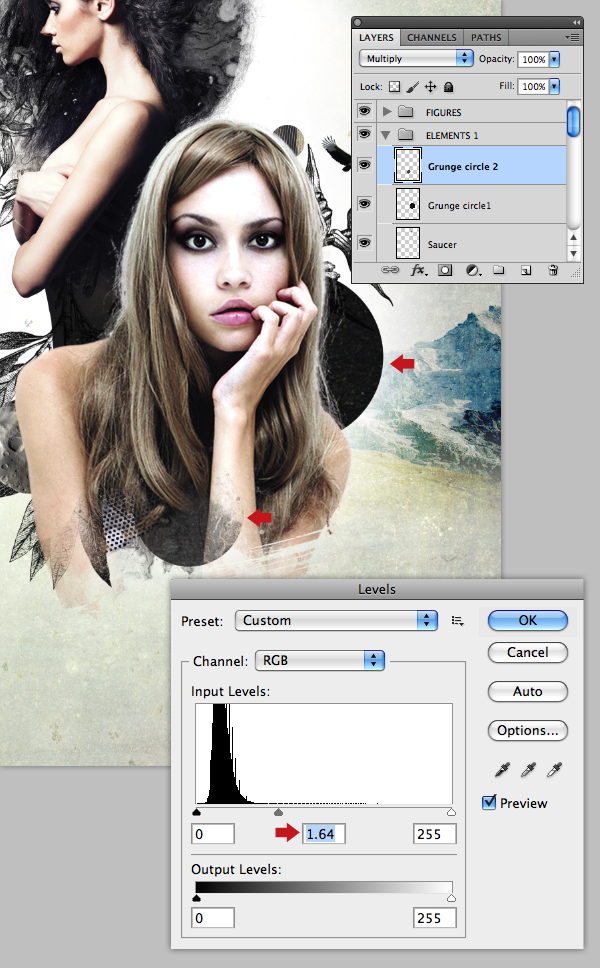
Next, add "Circle_texture.psd" (again from the "source" folder) as a new layer in Multiply Mode and name it "Grunge circle 1". Duplicate this layer and rename it "Grunge circle 2", then apply a Levels adjustment to lighten it. Position and resize both these layers as indicated.
Step 15
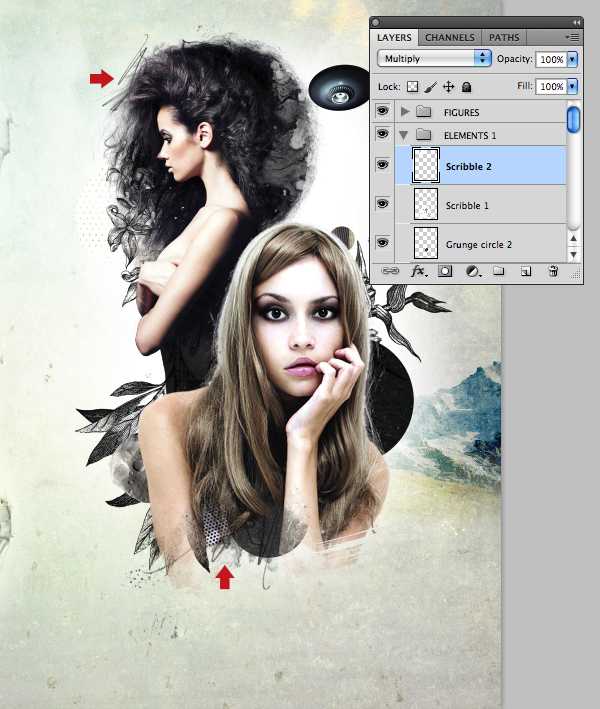
Place "Pencil.jpg" within the same folder, again in Multiply Mode. Duplicate, reposition and label them "Scribble 1" and "Scribble 2".
Step 16
Open "a.jpg" from the "source" folder and use the Lasso Tool (L) create a rough selection as shown and copy.
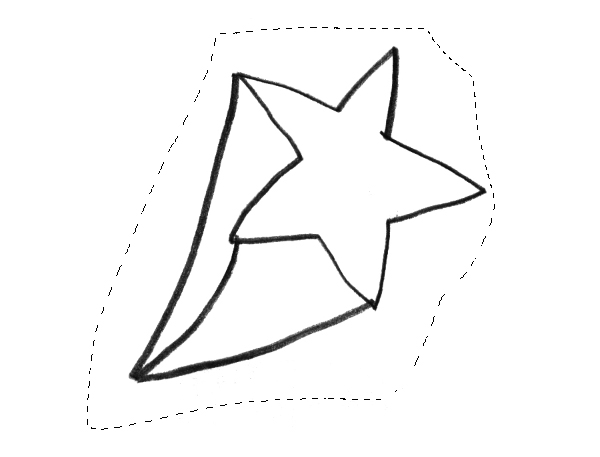
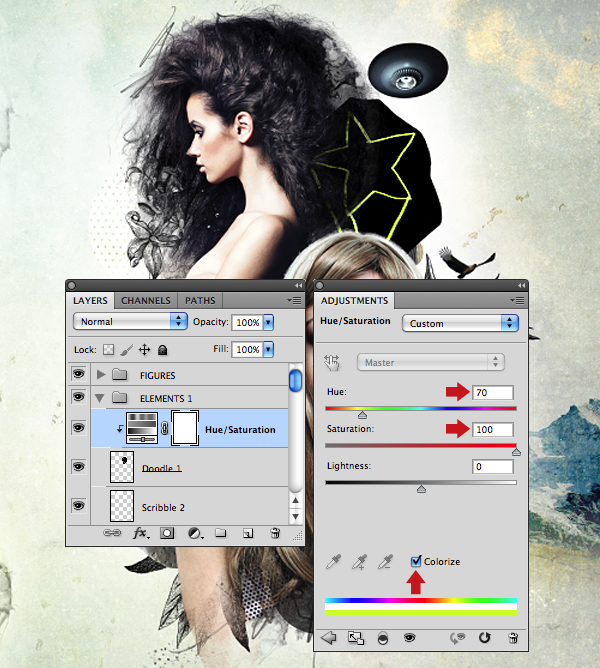
Paste the selection as an uppermost layer within the same folder, then hit Command/Ctrl + I to Invert it, position as shown and name it "Doodle 1". Next, clip a Hue/Saturation adjustment layer to add some color to the white area.
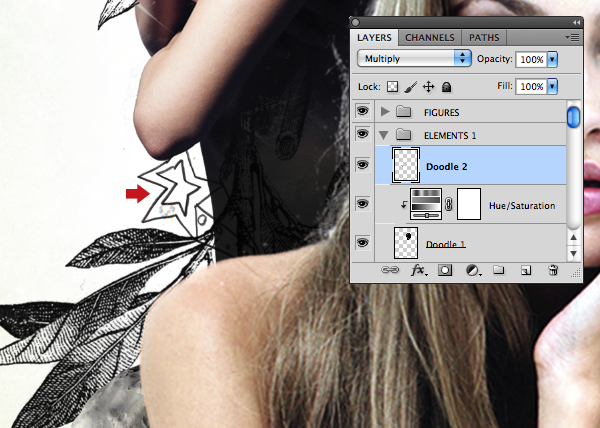
Add "b.jpg" as a another layer and label it "Doodle 2", but change the Blend Mode to Multiply.
Step 17
Open the astronaut and plot a closed path ignoring the strap on the left hand as shown in magenta.
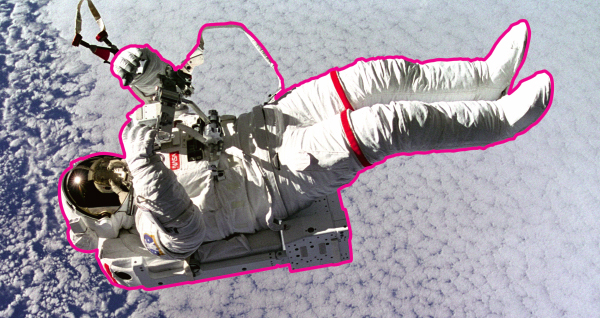
Now set the Pen to Subtract from path area to create the inner sub-path (again shown in magenta). When you’re done generate a path-based selection and copy.
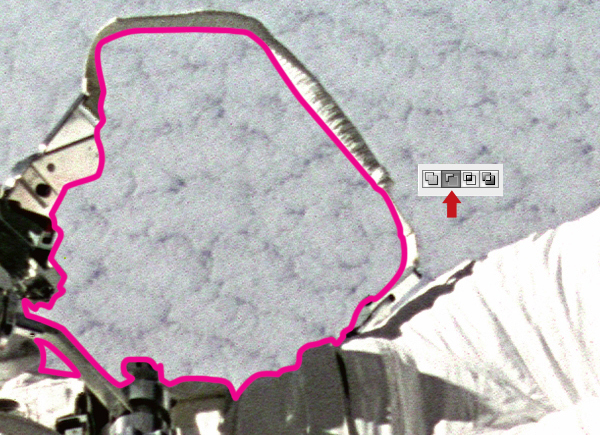
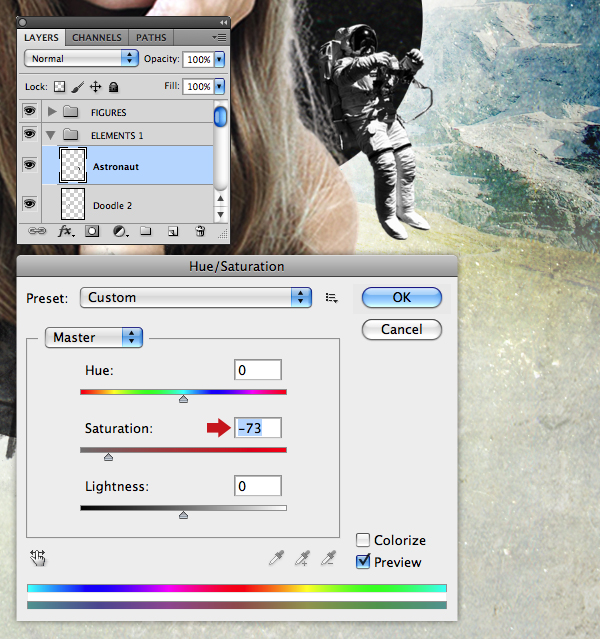
Paste as a new layer into the same folder, label it "Astronaut" and Transform/position as shown. Next, reduce the color with a Hue/Saturation adjustment layer.
Step 18
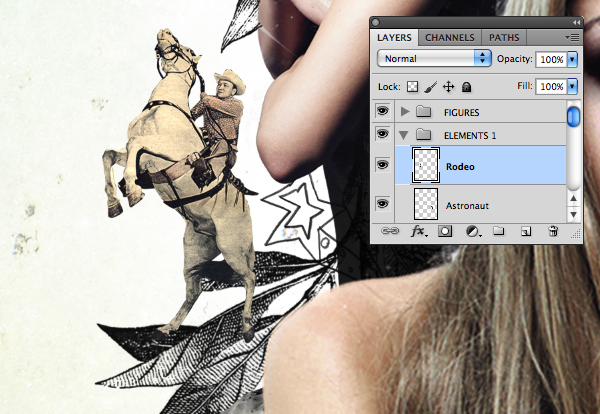
Place "Cowboy.psd" (from the "source" folder) as an upper layer within the same folder, position over the foreground model’s shoulder and name it "Rodeo".
Step 19
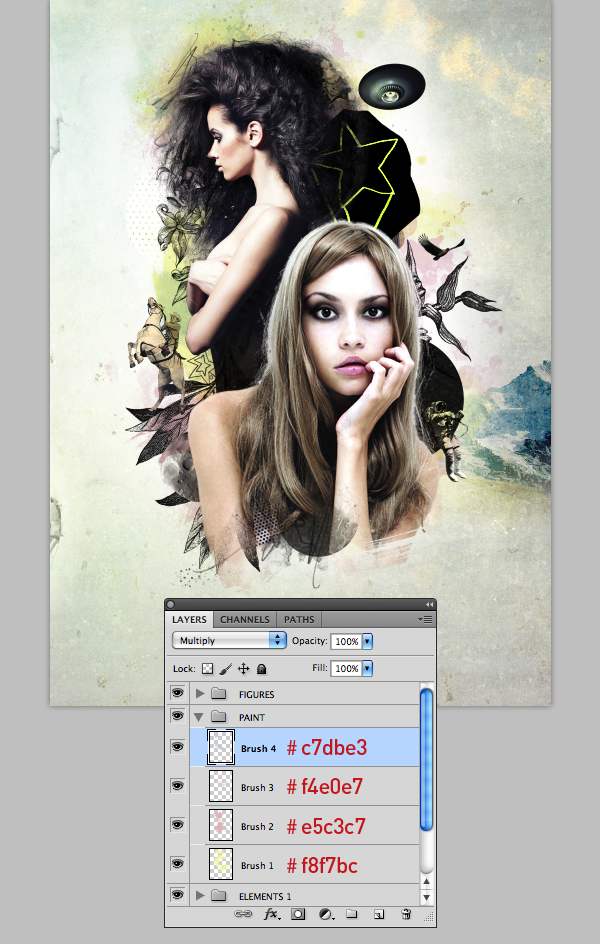
In this step we’ll add some subtle paint washes. Add a new folder called "PAINT" above "ELEMENTS 1". Add a layer within the new folder called "Brush 1" and set its Blend Mode to Multiply. Use the Color Picker to select # f8f7bc and use a selection of grunge brushes to paint behind the central composition. Repeat this on separate layers (again in Multiply Mode) using different pastel shades as annotated.
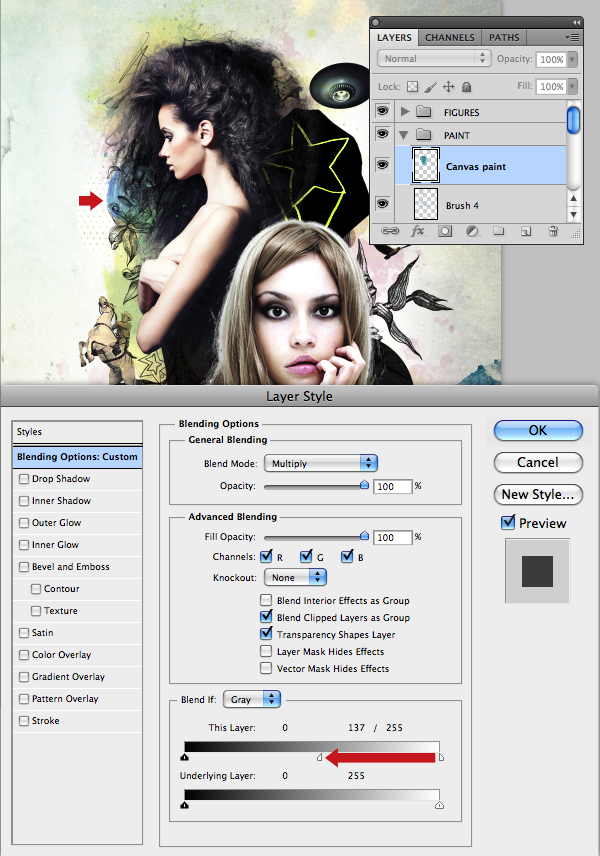
Add "Paint.jpg" (from the "source" folder) and change the Blend Mode to Multiply. Position as indicated and name it "Canvas paint". Now double-click its layer thumbnail to access the Blending Options window and Option-click the top-right Blend If slider to split it. This technique eliminates any hard-edged white areas.
Step 20
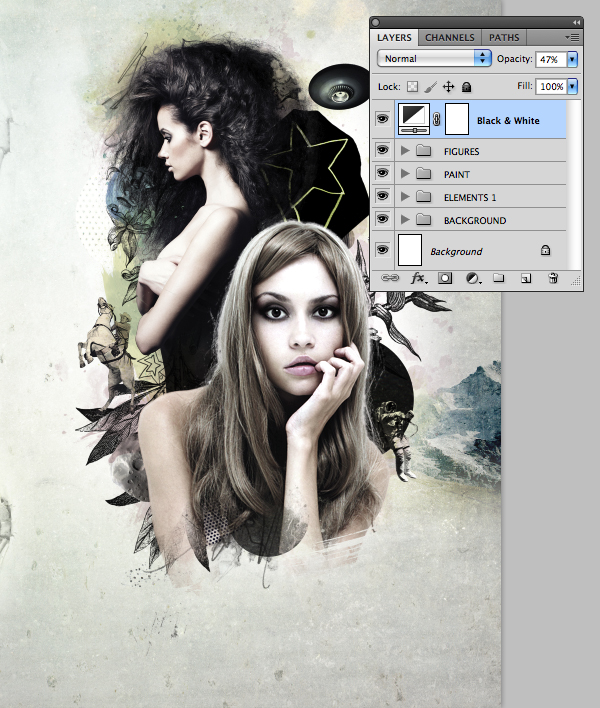
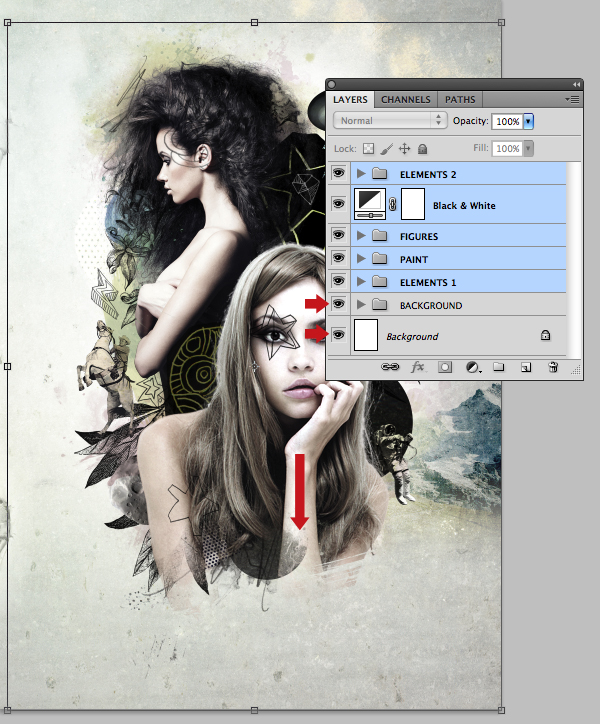
Next, we’ll desaturate the entire composition a little. Collapse all your folders, then add an uppermost Black & White adjustment layer set to the default preset to affect all underlying content. Now drop its Opacity to 47%.
Step 21
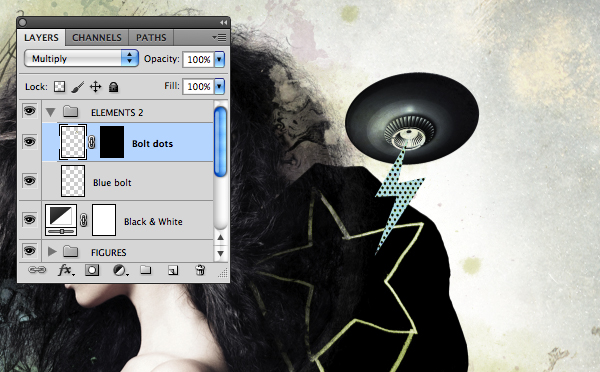
Add a new folder called "ELEMENTS 2" at the top of the stack and place a layer within it called "Blue bolt". Use the Polygonal Lasso Tool (L) to draw a lighting bolt from below the flying saucer and fill with # b9e1eb.
Now select an area from "Dots_3.jpg" and copy. Generate a layer-based selection from your "Blue bolt" and choose Edit > Paste Special > Paste Into to create a new masked layer. Label this "Bolt dots" and change its Blend Mode to Multiply.
Step 22
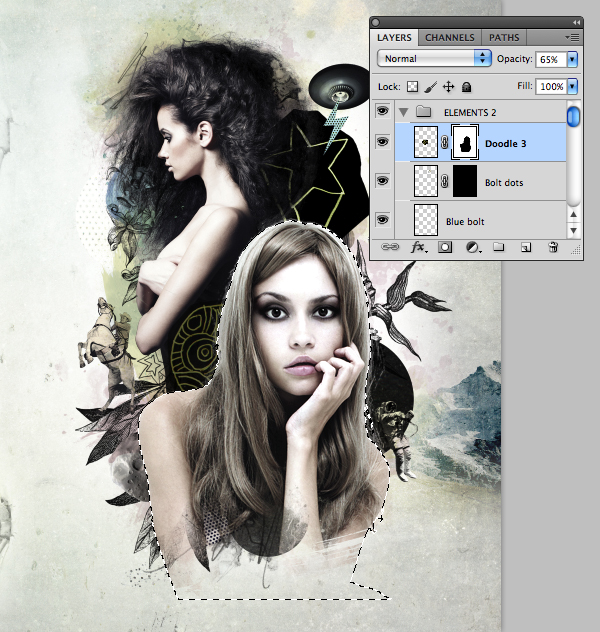
Draw a rough selection around "c.jpg" and copy > paste as a new layer at the top within the same folder. Name this layer "Doodle 3" and Invert. Position as shown, then reduce its Opacity to 65%. Now generate a layer-based selection from "Figure 2" and choose Layer > Layer Mask > Hide Selection.
Step 23
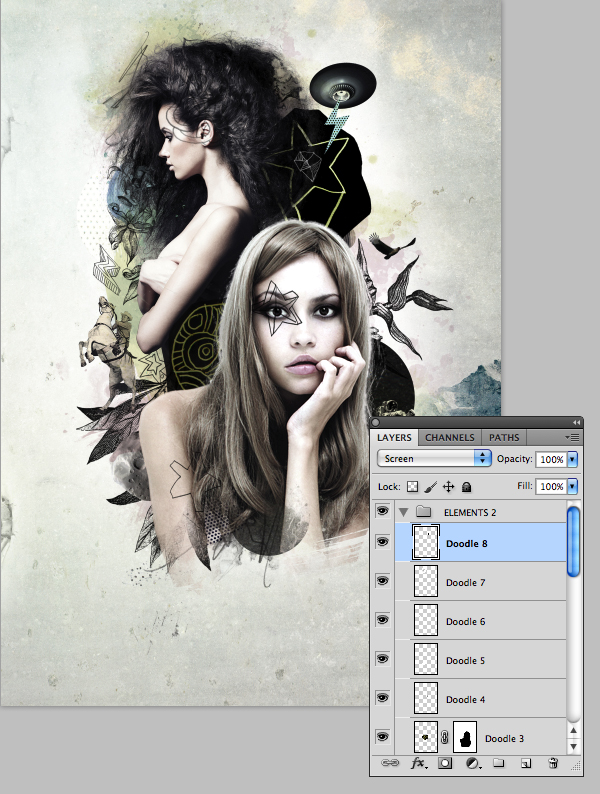
Add the remaining doodles ("d.jpg", through to "h.jpg") as new layers within the same folder in Multiply Mode and label them accordingly. Now Invert some and change their Blend Modes to Screen for some variation.
Step 24
At this point you can may need to reposition the main composition; to do this Shift-click all your folder/layer thumbnails, apart from the "BACKGROUND" folder and "Background" layer, press Shift and drag down.
To wrap up, you may need to reinstate some of the mask on your "Texture 1" layer.
Conclusion and Scope
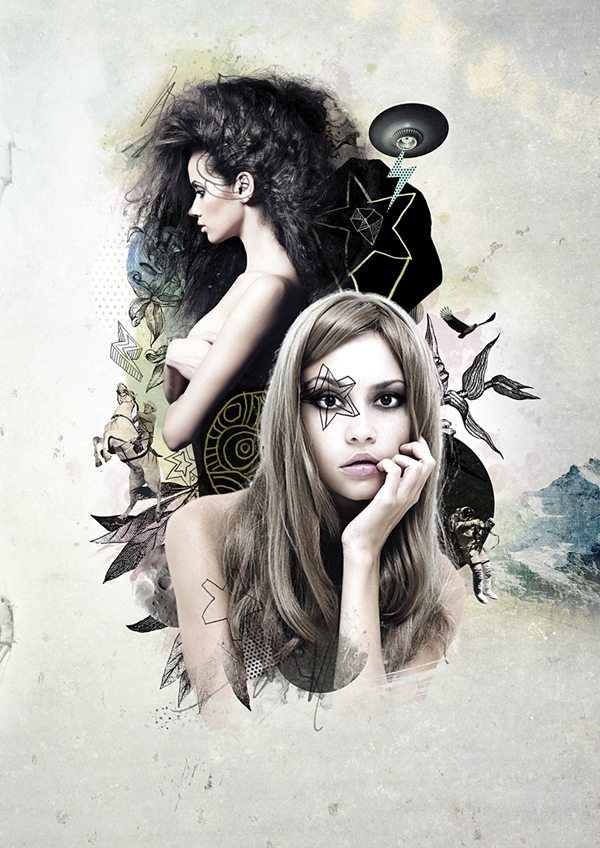
I hope this tutorial has inspired you to develop your own styles of illustration. The key to this method of working is to recycle existing elements and mash it up with fresh images, but to also have some fun in the process!
Join Today!
Did you enjoy this tutorial? See others just like it and Join Our Premium Program Today! Click here to learn more!