If the user has to scroll often to get to access the data, providing a search bar to search the table view helps in making the process faster. To learn more on searching, click on “Read more”…
Introduction
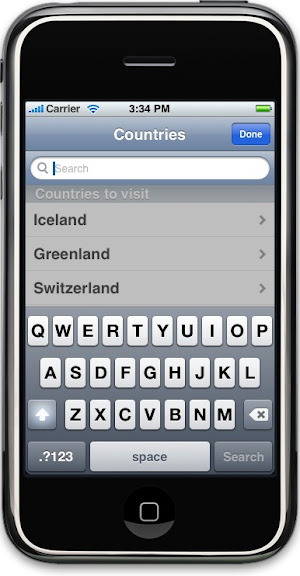
In this tutorial, you will learn how to search the contents of the table view. This is the fourth tutorial in the UITableView tutorial series and borrows its code from the previous one. This is how the final app looks like
 Adding the search bar
Let’s get started by adding the search bar to our existing sectioned table view app. Open Interface Builder by double clicking “RootViewController.nib” file. Drag and drop a UISearchBar object in the nib file. In XCode, open RootViewController.h file declare a variable of type UISearchBar called “searchBar” and declare it with the keyword “IBoutlet” so it is visible in IB. Connect the variable to the UISearchBar object and set the delegate of UISearchBar to File’s Owner. This way the “RootViewController” gets notified of all the events generated on the search bar. This is how the header file looks like, where I have added some more variables and method which will help us in searching.
//RootViewController.h
@interface RootViewController : UITableViewController {
NSMutableArray *listOfItems;
  NSMutableArray *copyListOfItems;
IBOutlet UISearchBar *searchBar;
BOOL searching;
BOOL letUserSelectRow;
}
- (void) searchTableView;
- (void) doneSearching_Clicked:(id)sender;
@end
The search bar is added to the header of the table view in “viewDidLoad” method and this how the code looks like
//RootViewController.m
- (void)viewDidLoad {
[super viewDidLoad];
//Initialize the array.
listOfItems = [[NSMutableArray alloc] init];
NSArray *countriesToLiveInArray = [NSArray arrayWithObjects:@"Iceland", @"Greenland", @"Switzerland", @"Norway", @"New Zealand", @"Greece", @"Rome", @"Ireland", nil];
NSDictionary *countriesToLiveInDict = [NSDictionary dictionaryWithObject:countriesToLiveInArray forKey:@"Countries"];
NSArray *countriesLivedInArray = [NSArray arrayWithObjects:@"India", @"U.S.A", nil];
NSDictionary *countriesLivedInDict = [NSDictionary dictionaryWithObject:countriesLivedInArray forKey:@"Countries"];
[listOfItems addObject:countriesToLiveInDict];
[listOfItems addObject:countriesLivedInDict];
//Initialize the copy array.
copyListOfItems = [[NSMutableArray alloc] init];
//Set the title
self.navigationItem.title = @"Countries";
//Add the search bar
self.tableView.tableHeaderView = searchBar;
searchBar.autocorrectionType = UITextAutocorrectionTypeNo;
searching = NO;
letUserSelectRow = YES;
}
Here we also set some boolean variables which will help us in searching. More about this later in the tutorial. The search bar is added to the “tableHeaderView” property of the table view. I also have another mutable array called “copyListOfItems”, which is used to store the search results. It used as the data source of the table view when searching. Run your application to see the search bar added to the top of the table view. The search bar is also released in the dealloc method (source code not provided here).
How the search will work
Before we proceed with any code, lets review some things we will do. When the user begins searching by clicking the search text box, we will do the following:
- Set the “searching” variable to YES.
- Set the “letUserSelectRow” variable to NO, since we do not want the user to select a row when the search box is empty.
- Disable scrolling of the table view. This is done to avoid an error that is raised, when the user scrolls the table view after the search bar is clicked.
- Display a done button on the right bar.
- Start searching as the user starts typing, this time allowing the user to select a row.
- Use a different data source to bind the table, which display’s the search reults.
- Search results are displayed in a single list and they are not grouped.
- Hide the keyboard and finish searching, when the user clicks on done.
Handling events
The first event that gets raised, is when the user touches the search bar to bring up the keyboard. The method searchBarTextDidBeginEditing is called and this is where we set the table view in search mode. The code looks like this
//RootViewController.m
- (void) searchBarTextDidBeginEditing:(UISearchBar *)theSearchBar {
searching = YES;
letUserSelectRow = NO;
self.tableView.scrollEnabled = NO;
//Add the done button.
self.navigationItem.rightBarButtonItem = [[[UIBarButtonItem alloc]
           initWithBarButtonSystemItem:UIBarButtonSystemItemDone
           target:self action:@selector(doneSearching_Clicked:)] autorelease];
}
Set the “searching” variable to YES, so we know the table view is in search mode. The variable “letUserSelectRow” is set to NO, so we can prohibit the user from selecting a row. Scrolling of the table view is also disabled which will help us when we add a overlay above the view. This is done in tableView:willSelectRowAtIndexPath method and this is how the code looks like
//RootViewController.m
- (NSIndexPath *)tableView :(UITableView *)theTableView willSelectRowAtIndexPath:(NSIndexPath *)indexPath {
if(letUserSelectRow)
return indexPath;
else
return nil;
}
The above code prevents the user from selecting a row if the variable “letUserSelectRow” is set to true.
The method “doneSearching_Clicked” is called when the user clicks the done method. The code for this method is shown later in this tutorial.
Searching the table view
The method searchBar:textDidChange is called when the user starts typing in the search field. This is how the search code looks like
//RootViewController.m
- (void)searchBar:(UISearchBar *)theSearchBar textDidChange:(NSString *)searchText {
//Remove all objects first.
[copyListOfItems removeAllObjects];
if([searchText length] > 0) {
searching = YES;
letUserSelectRow = YES;
self.tableView.scrollEnabled = YES;
[self searchTableView];
}
else {
searching = NO;
letUserSelectRow = NO;
self.tableView.scrollEnabled = NO;
}
[self.tableView reloadData];
}
There is a lot of stuff going on in the code above, so let’s look at it line by line
- We first empty the array, which is used as the data source to the table view when searching.
- If the search bar has some text then we continue searching, by calling “searchTableView” method. This time we let the user select a row to see its detail view.
- The method “searchTableView” is responsible to search the table view based on the search text and populate the search results in the array “copyListOfItems”.
- If the search bar is empty then, disable scrolling, set the searching variable to NO, and prohibit the user from selecting a row.
- At last we refresh the table view.
Before we jump to understand how the table view is able to display the search results, let’s review what happens when the user clicks the search button and the “searchTableView” method.
The method “searchBarSearchButtonClicked” is called and this is how the code looks like, where we simply call “searchTableView” method.
//RootViewController.m
- (void) searchBarSearchButtonClicked:(UISearchBar *)theSearchBar {
[self searchTableView];
}
- (void) searchTableView {
NSString *searchText = searchBar.text;
NSMutableArray *searchArray = [[NSMutableArray alloc] init];
for (NSDictionary *dictionary in listOfItems)
{
NSArray *array = [dictionary objectForKey:@"Countries"];
[searchArray addObjectsFromArray:array];
}
for (NSString *sTemp in searchArray)
{
NSRange titleResultsRange = [sTemp rangeOfString:searchText options:NSCaseInsensitiveSearch];
if (titleResultsRange.length > 0)
[copyListOfItems addObject:sTemp];
}
[searchArray release];
searchArray = nil;
}
Let’s review what goes on in “searchTableView” method. We first create a temporary search array, which we will fill it all the objects from the original data source. We loop through the dictionary objects, and add all the array objects to “searchArray”. We then loop through all the items in “searchArray” and compare it with the search text. We add the string object to the “copyListOfItems” if we find the search text in one of the countries.
Finish Searching
The following method “doneSearching_Clicked” is called when the user clicks the done button and this is how the code looks like
//RootViewController.m
- (void) doneSearching_Clicked:(id)sender {
searchBar.text = @"";
[searchBar resignFirstResponder];
letUserSelectRow = YES;
searching = NO;
self.navigationItem.rightBarButtonItem = nil;
self.tableView.scrollEnabled = YES;
[self.tableView reloadData];
}
We hide the keyboard, let the user select a row, set “searching” to false and hide the right bar button item.
Displaying search results
The search results are stored in “copyListOfItems” array and the table view is refreshed by calling reloadData. We also set the variable “searching” to YES when the user is searching, so we know to display the search results. To display results results we have to change few methods. The code changes for the following methods “numberOfSectionsInTableView“, “tableView:numberOfRowsInSection“, “tableView:titleForHeaderInSection“, “tableView:cellForRowAtIndexPath“, and “tableView:didSelectRowAtIndexPath“. We have to display data from “copyListOfItems” is the variable “searching” is set to YES else we display data as before. Let’s look at the code of all these methods
//RootViewController.m
- (NSInteger)numberOfSectionsInTableView:(UITableView *)tableView {
if (searching)
return 1;
else
return [listOfItems count];
}
// Customize the number of rows in the table view.
- (NSInteger)tableView:(UITableView *)tableView numberOfRowsInSection:(NSInteger)section {
if (searching)
return [copyListOfItems count];
else {
//Number of rows it should expect should be based on the section
NSDictionary *dictionary = [listOfItems objectAtIndex:section];
NSArray *array = [dictionary objectForKey:@"Countries"];
return [array count];
}
}
- (NSString *)tableView:(UITableView *)tableView titleForHeaderInSection:(NSInteger)section {
if(searching)
return @"";
if(section == 0)
return @"Countries to visit";
else
return @"Countries visited";
}
// Customize the appearance of table view cells.
- (UITableViewCell *)tableView:(UITableView *)tableView cellForRowAtIndexPath:(NSIndexPath *)indexPath {
static NSString *CellIdentifier = @"Cell";
UITableViewCell *cell = [tableView dequeueReusableCellWithIdentifier:CellIdentifier];
if (cell == nil) {
  cell = [[[UITableViewCell alloc] initWithFrame:CGRectZero reuseIdentifier:CellIdentifier] autorelease];
}
// Set up the cell...
if(searching)
cell.text = [copyListOfItems objectAtIndex:indexPath.row];
else {
//First get the dictionary object
NSDictionary *dictionary = [listOfItems objectAtIndex:indexPath.section];
NSArray *array = [dictionary objectForKey:@"Countries"];
NSString *cellValue = [array objectAtIndex:indexPath.row];
cell.text = cellValue;
}
return cell;
}
- (void)tableView:(UITableView *)tableView didSelectRowAtIndexPath:(NSIndexPath *)indexPath {
//Get the selected country
NSString *selectedCountry = nil;
if(searching)
selectedCountry = [copyListOfItems objectAtIndex:indexPath.row];
else {
NSDictionary *dictionary = [listOfItems objectAtIndex:indexPath.section];
NSArray *array = [dictionary objectForKey:@"Countries"];
selectedCountry = [array objectAtIndex:indexPath.row];
}
//Initialize the detail view controller and display it.
DetailViewController *dvController = [[DetailViewController alloc] initWithNibName:@"DetailView" bundle:[NSBundle mainBundle]];
dvController.selectedCountry = selectedCountry;
[self.navigationController pushViewController:dvController animated:YES];
[dvController release];
dvController = nil;
}
In “numberOfSectionsInTableView” we return 1 if we are searching because the search results are not displayed in sections. In tableView:numberOfRowsInSection we return the count of the search results array, if we are searching. We return the text “Search Results” when searching in tableView:titleForHeaderInSection method. We get the data from the search results array when displaying text in tableView:cellForRowAtIndexPath method. The same logic is used to get the selected country in tableView:didSelectRowAtIndexPath method.
Adding an overlay
If you do a search in the contacts application, the table view gets a gray overlay above the table view and the search is canceled if the user touches the table view. We can do this same, by adding an overlay view above the table view.
Let’s adding another view under resource and name it “OverlayView”. Create a view controller called “OverlayViewController” in XCode. Open the nib file in IB and set the class of File’s Owner to “OverlayViewController” and create all the appropriate connections. Make sure that the view is able to respond to touches.
Now let’s add the overlay above the table view. We do this in “searchBarTextDidBeginEditing” and this is how the code looks like
//RootViewController.m
- (void) searchBarTextDidBeginEditing:(UISearchBar *)theSearchBar {
//Add the overlay view.
if(ovController == nil)
ovController = [[OverlayViewController alloc] initWithNibName:@"OverlayView" bundle:[NSBundle mainBundle]];
CGFloat yaxis = self.navigationController.navigationBar.frame.size.height;
CGFloat width = self.view.frame.size.width;
CGFloat height = self.view.frame.size.height;
//Parameters x = origion on x-axis, y = origon on y-axis.
CGRect frame = CGRectMake(0, yaxis, width, height);
ovController.view.frame = frame;
ovController.view.backgroundColor = [UIColor grayColor];
ovController.view.alpha = 0.5;
ovController.rvController = self;
[self.tableView insertSubview:ovController.view aboveSubview:self.parentViewController.view];
searching = YES;
letUserSelectRow = NO;
self.tableView.scrollEnabled = NO;
//Add the done button.
self.navigationItem.rightBarButtonItem = [[[UIBarButtonItem alloc]
           initWithBarButtonSystemItem:UIBarButtonSystemItemDone
           target:self action:@selector(doneSearching_Clicked:)] autorelease];
}
We have changed the header file “RootViewController.h” to add a variable “ovController” of type “OverLayViewController” and the header file is added to the top of RootViewController.m file.
Start by initializing the overlay view controller with the nib name “OverlayView”. We perform some calculations to find out where the search bar ends, as we want the overlay view to show up below the search bar. We set the frame of the view which will redraw the view on the screen. We set the background color and its transparency. The next line of code says that the self is assigned to the “rvController” property. The view is inserted above the table view, using insertSubView method.
We have declared a variable called “rvController” of type “RootViewController” in “OverlayViewController”. The reason it is done because, we want a reference to the root view controller from the overlay controller. This is how the header file and implementation file of the “OverlayController” looks like
//OverlayViewController.h
@class RootViewController;
@interface OverlayViewController : UIViewController {
RootViewController *rvController;
}
@property (nonatomic, retain) RootViewController *rvController;
@end
//OverlayViewController.m
#import "OverlayViewController.h"
#import "RootViewController.h"
@implementation OverlayViewController
@synthesize rvController;
- (void)touchesBegan:(NSSet *)touches withEvent:(UIEvent *)event {
 [rvController doneSearching_Clicked:nil];
}
- (void)didReceiveMemoryWarning {
[super didReceiveMemoryWarning]; // Releases the view if it doesn't have a superview
// Release anything that's not essential, such as cached data
}
- (void)dealloc {
[rvController release];
[super dealloc];
}
Let’s look at the method touchesBegan:withEvent which is called when the user touches the overlay view. A call is made to the “doneSearching_Clicked” method defined in “RootViewController”. This is possible because we have a reference to the root view controller.
Now that that a overlay shows up when the user clicks the search bar, it should be hidden when the user starts searching. The method searchBar:textDidChange method now changes accordingly
//RootViewController.m
- (void)searchBar:(UISearchBar *)theSearchBar textDidChange:(NSString *)searchText {
//Remove all objects first.
[copyListOfItems removeAllObjects];
if([searchText length] > 0) {
[ovController.view removeFromSuperview];
searching = YES;
letUserSelectRow = YES;
self.tableView.scrollEnabled = YES;
[self searchTableView];
}
else {
[self.tableView insertSubview:ovController.view aboveSubview:self.parentViewController.view];
searching = NO;
letUserSelectRow = NO;
self.tableView.scrollEnabled = NO;
}
[self.tableView reloadData];
}
We remove the view if the user starts searching and add it back if the search bar is empty. The overlay view is removed and released when the user clicks the done button. This is how the code for “doneSearching_Clicked” is changed
//RootViewController.m
- (void) doneSearching_Clicked:(id)sender {
searchBar.text = @"";
[searchBar resignFirstResponder];
letUserSelectRow = YES;
searching = NO;
self.navigationItem.rightBarButtonItem = nil;
self.tableView.scrollEnabled = YES;
[ovController.view removeFromSuperview];
[ovController release];
ovController = nil;
[self.tableView reloadData];
}
The overlay is removed, released and set to nil. Run the app to see the search work.
Conclusion
Providing a search feature to the table view is a good option, if the user has to scroll a lot to select a row. I hope you had fun reading this tutorial as much as I had writing it. Don’t forget to leave a comment.
Happy Programming,
iPhone SDK Articles
Attachments
Suggested Readings
- UITableView – Creating a simple table view
- UITableView – Sectioned table view
- UITableView – Indexed table view
- UITableView – Adding subviews to a cell’s content view