The Graphic Styles Panel in Illustrator CS4 is more powerful than it’s ever been. Quickly add, create and save appearance attributes to make your work stylin’.
Freelance Projects, Design and Programming Tutorials
The Graphic Styles Panel in Illustrator CS4 is more powerful than it’s ever been. Quickly add, create and save appearance attributes to make your work stylin’.
In this Quick Tip we’re going to set up a quick preset using expressions that will allow us to copy and paste color schemes from Adobe Kuler right into After Effects for easy reference. Also check out this tut for another option.
File size 97.6MB
You have been CHALLENGED! AEtuts+ and Zaxwerks wanna give you the opportunity to both learn and create. For the whole month of May you will be able to use ProAnimator free of charge and teach yourself how to use it. Additionally, you can take what you learn and show off your skills by entering our animation contest. See the details below about specifications and prizes!
File size 15.2MB
File size 20.3MB
Along with our own tutorials: “Workflow In Zaxwerks ProAnimator” Part 1 and Part 2, You can also download these quick tuts to help you get started:
Please read the following carefully *before* submitting your content.
The winners will be chosen by votes. Once we receive the final entries, we’ll post them all up gallery-style then you and ALL of your friends will be able to vote. Your goal should be Creativity.


Sometimes you just can’t spend a ton of time on a project, especially if you have cheap clients, tight deadlines, or you have to take the kids to soccer practice. Thank God there are After Effect template sites to save our behinds! If you need a quick project file to switch out images, customize a few colors, and call it good these are a few of the options on the interwebs for you to do just that!

Of course we are going to start with our sister site on the Envato network! VideoHive has very reasonably prices materials, a ton of different categories, and bit of a social network to go with it. You can earn badges, participate in the forums, rate, leave comments, all kinds of different stuff. It is a very comprehensive site, as well as having stock footage and flattened motion graphic videos as well without having to deal with project files.

RevoStock has been around for a long time, a lot longer than a lot of the others in this list, and they hve a huge library of templates. They range from $10 to upwards of $50, but the quality, length and professionalism increases with that as well. Whether it be a simple presentation or a corporate commercial, there is something for everyone.

Launched just two days ago, Red Giant People is the big brother of now perished Trapcode People. It is a network that provides free presets and project files, as well as premiere packages from some of the leading names in the graphics world, focusing only on Red Giant products.

Digital Juice seems to have a little bit of everything when it comes to the post world. All of their toolkits like the Motion Designer’s Toolkit or Editor’s Toolkit, all have some awesome graphics that you can use as stock, but you can also modify those graphics from the provided After Effects project files included in the packages!

There are around 15 templates on this site, all very high quality, lots of elements, great colors, and all in full HD. Prices range from $15 to $90 for the really high quality ones, so take a look around!

Gyrofi Szilard runs BlueFX, and it is a really well presented site. He has a walkthrough video for new customers, a nice selection of very cool looking templates, and along with those templates, you can watch the tutorials or check out his blog for more information.

Not only does RuffKut Media off templates for sale, but they also have a section devoted to their own tutorials, as well as aggregating some tutorials from around the web for your convenience.

These got the premiere domain name for this market of business… AEPROJECTS.com. They haven’t updated the store in a while, but they have around ten projects available with some training and presets thrown into the mix.

I know I would get reamed if I didn’t feature VC in this roundup, you savages. If you just know Andrew for his free project files from the tutorials, he also has project files included with every single one of his projects to demonstrate the uses of them. So check out all the products and go nuts with the included files.

Pretty simple name, pretty sweet project files. They got projects that take place on football and soccer fields, openers, title sequences and even packages available to save money when you but them in bulk!

MaxAfter.com is one of my favorite tutorial sites, and to go along with his blog and tutorials, he has a pretty big store full of very interesting and unique looking project files available for sale. Some are lower priced, some are higher, but all are awesome quality.

As I like to call it… “Planet of the AEPS” haha… has all kinds of different categories to choose from, individual files, or even large packages to download instead of a ton of singles.

With a very easy to navigate site, you can browse through all the products on one page, watch the accompanying preview videos on Youtube, and choose from a variety of different formats to download from.

The sister site to We Make Motion, this site deals in just wedding After Effects Templates, virtually the only site of its kind. This makes it a little easier for you to find what you need, and if you don’t feel like customizing it yourself, you can hire them out to do it themselves.

These guys also have a very cool looking site, with some spectacular looking preview videos and projects to download. They are a little on the higher side, but if it is exactly what you need, it is probably worth the price. I mean, how long would it take you to do this on your own?

Now, this site looks straight out of the GeoCities era, but their projects ain’t too bad. You have to download the MPEG-1’s to view them but they sell their stuff in packages instead of as single files.

Even though their Apple Motion template library is larger than the After Effects one, they still have quite a large selection of templates to choose from. All their products are in HD 1080p, and there is stock video, animated elements and even some freebies as well!

These guys specialize in DVD Menu Packages as well as After Effects project files, working in mainly Adobe Encore for the DVD Menu side of things. They have a selection of over a hundred different projects, but not all of them deal with AE. They also have dedicated areas for different projects like SD, HD, 720p menus, and so on.

This is a smaller site, but they have some good stuff for sale, as well as some bundled packages so you can buy them in bulk and save some money.

Adobe has a database themselves that others can upload their free templates or link to the templates they have on other sites, like the ones above. It’s a nice site to keep an eye on, you might find some cool stuff for free, or a template on another site that you might have missed along the way.
If you enjoyed this post, please give it a vote on Digg or a stumble to say thanks!
In this tutorial you’ll learn how to use the Zaxwerks ProAnimator After Effects plug in to open an existing Zaxwerks project inside After Effects and use the Layer Maps feature to add animated texture maps and filter effects to a 3D model. To view Part 1 Click Here.
Want access to the full Project Files and assets for every tutorial on Aetuts+, including this one? Join Ae Premium for just $9/month. You can view the final effect preview video below.
File size 203MB
3D movies, 3D televisions, 3D on the desktop. Everything cool these days is in 3D! For an animator, there is no faster way to create professional 3D animation than with the Zaxwerks ProAnimator. Everyone’s heard of it, and in this 32 minute tutorial Rob Birnholz will teach the basics of how it works. This is not a sales pitch, but an actual workflow. For the basics, After Effects is not required, but the tutorial steps are same for both the standalone ProAnimator application and the AE plug-in version. A trial version of ProAnimator can be downloaded from www.zaxwerks.com.
Want access to the full Project Files and assets for every tutorial on Aetuts+, including this one? Join Ae Premium for just $9/month. You can view the final effect preview video below.
File size 267MB
In this Quick Tip we’re going to look at the difference you can make to your footage by converting it to 32BPC with a little help from “Glow”. For even more information on this subject, check out this Quick Tip: Understanding Bit Depth.
File size 65.3MB
In this tutorial we are going to make a distortion effect, similar to the intro titles in ‘Gamer’. We start of by creating a stylized text in Photoshop, and making some cool distortions with Photoshop filters. After that we go into After Effects to animate the photoshop layers into a sequence, and stylize the sequence to make it look even cooler.
Want access to the full AE project files and assets for every tutorial on Aetuts+, including this one? Join Ae Premium for just $9/month. You can view the final effect preview video below.
File size 225MB
Whether we like it or not, non-linear editors (NLE’s) are a part of our daily lives. A lot of you might be stuck on one app (like me) but it is always good to explore what other possibilities out there. I am not trying to sway you or anything, but you never know if the grass may be greener on the other side.

So, if you are using After Effects, chances are you know what Premiere Pro is and the big news that got announced about it a couple weeks ago. If you HAVE been living under a rock or in a cave… well the news is Premiere Pro CS5 is a 64 bit application in the new CS5 line of products. Along with being 64 bit they now have a pretty awesome feature called the Adobe Mercury Playback Engine which lets you accelerate your previews and overall workflow if you have certain GPU accelerated graphics cards. Overall, Premiere is a very strong application in the Adobe line, and with news of CS5 is going to give a lot of the other apps a run for their money.

Avid is one of the more popular apps when it comes to professionalism. When I say that, I don’t mean that the other apps in this list aren’t professional (although some aren’t), but Avid is considered by many industry professionals one of the best solutions for film editing, and news editing solutions. Avid has been around forever, one of the earliest non linear editing systems, now it is on the front lines when it comes to a streamlined environment when you need to route video in and out of different edit bays, into switchers, betamax decks, different displays or whatnot.

Everyone knows Final Cut Pro, and how it has become the de facto editing system on Macintosh. Final Cut comes with Final Cut Studio which includes, Color, Motion, Soundtrack, and DVD Studio Pro, which gives you a fantastic arsenal of tools for all your post production needs. Final Cut is another one of the three top apps (included are Avid and Premiere) in the world that are most widely used, and if you are looking to work professionally, would be a great asset to learn and have in your freelancing toolbox.

Vegas is another one of those consumer/prosumer apps that I have always been kind of on the fence about. I mean, it has everything you really need in an NLE app, 64 bit support, support of RED and other new media formats, ability to capture HDV tape, and a lot of the other features of the other big names, but for some reason it just doesn’t stand up to the other big dogs. Probably because Apple, Adobe and Avid have dominated the market for a long time, and Vegas holds it’s ground to this day, it just has yet actually broken through the barrier as a professional piece of software.

Edius has been around a while, but has never gained mainstream status, despite its robust intuitive interface, and ability to run AVCHD and the new, highly popular Canon EOS movie formats. Grass Valley (Canopus) are the company behind Edius, and actually at NAB they had one of the largest booths in the South Hall (if you were there). They have a lot of products, and this NLE didn’t seem too high on the list, but it nevertheless gets the job done if that is what you are choosing to use.

Oh, iMovie, how I despise thee. Being a trained professional editor, applications like iMovie, just seem pointless. But, for those that are just looking to make some cheesy fun movies with their friends, this is a great app. There are some very simple transitions that you can stick in, and it makes it really easy to load footage off of a tape based camera or files from the computer, but if you are looking to edit something that you have a paying client for, highly consider the above choices.

This is an app that I pretty much consider worthless aside from the user that wants to make quick shorts of their family. Windows Movie Maker wasn’t designed for much more than that. Basic transitions, a blah interface, and some reasonable compression makes this app good for that one niche market, the person that really doesn’t care if the edits are awesome, or the titles look generic. There is a reason why this and iMovie come bundled with their propreitary operating systems.

Premiere Elements is a dumbed down version of Premiere, geared towards the consumer base of customers, since a lot of those people won’t use extensive effects or multi-cam editing… or the other features that are included with the full version of Premiere. Think of Premiere Pro as the professional version and Elements as the consumer version. Elements just has the core features to create enough edits to get by and make a basic movie without having to worry about the perfections and fine tunes that you would with Premiere Pro.

Wax is a free app, with a very blah interface, but also works as a plugin into Motion and Premiere. It doesn’t really hold its ground and an NLE, but free apps are just that, free. This app has some interesting features like the ability to load 3D models, a particle engine, and the ability to extrude text in 3D, but it is still very limited into what it can do as an NLE.

Another free editor with not too much punch. We would like to think of free NLEs like Blender is to 3D, but that is just not what we are getting. With this piece of software you get some basic effects, keying techniques and stuff like that, basically, if you are just looking to put clips together with rough cuts or cross dissolves this might work for you, other than that, probably not.

This isn’t really an NLE, but since we are on the subject of free apps, I figured it was probably worth mentioning. Jahshaka is a film and video compositing app that uses OpenGL and OpenML to give you close to realtime interactivity in your projects. Jahshaka was recently acquired by Cinefex and is in the process of reinvented to work better with today’s workflows.

Avid DV is actually no longer offered, but there is an alternative with a 14 day trial… Pinnacle Studio Ultimate. Pinnacle has been another one of the consumer products that has never really been used professionally. Pinnacle is another one of those great applications for home movies or cheap skate videos with your friends, nothing professional.
Now if you lot have some contrbutions of some of the apps that I have missed, I am sure there are many more, and all of you will have some very strong opinions on them, I encourage you to post your ideas, apps, rebuttals, thoughts and whatever else may come to mind after reading this. I like to hear what the readers say, and seeing it come straight from your mouths (or fingers for that matter) is more than I could hope for. So leave a comment and express your thoughts!
If you enjoyed this post, please give it a vote on Digg or a stumble to say thanks!
Learn how to composite a multi-purpose short scene using still pictures and .vpe files. We will be using the 3d resources in AE to make the pictures blend together. In addition, a new technique to achieve a different neon text effect and more compositing tips. Lets hit the road!
Want access to the full AE project files and assets for every tutorial on Aetuts+, including this one? Join Ae Premium for just $9/month. You can view the final effect preview video below.
File size 310MB
Assets:
Original footage and pictures by Openfootage.net, Gamillos and Zboula.
It’s time for another Exclusive Freebie; this time AerisT offers a flavor of summer to Activetuts+ readers. Add your own custom beach party logo to this 3D interactive beach ball! The file uses the open-source Papervision3D engine and loads images via XML.
Check out the beach ball with an example logo:

If you take a look at the demo, you can click and drag the ball to rotate it. You can replace the logo with any image you like! It’s controlled by an external XML file, so you don’t even need to have the Flash authoring environment.

Recently, a client of mine, who was in the process of designing a website for a kid’s baseball team, asked me to help him spice up the site with some Flash elements. I proposed the idea of incorporating a 3D interactive baseball showcasing the team’s logo. At the time, I did not have the slightest idea how I would accomplish the task, but it was an interesting idea so I decided to pursue it.
After stumbling around with various implementation concepts to create a 3D sphere effect and browsing through ActiveDen’s stock Flash offerings without much success, I finally landed on using the open-source Papervision3D engine. Although I was new to PV3D, my early tests gave me some really promising results and I quickly realized that it was the correct technology for the task at hand.
I dug in to PV3D and after a lot of experimentation and some excellent advice from other authors on ActiveDen, I was able to create a 3D sphere to which a detailed texture could be applied, was interactive with the mouse, and featured a custom logo driven by an XML text file. It was the perfect solution for my 3D interactive baseball (and this beach ball).
The next challenge was to create a realistic bitmap texture that could be applied to the 3D sphere. This turned out to be a bit tricky due to the way PV3D wraps textures around sphere primitives. In designing my texture, I had to take into consideration the fact that the top and bottom edges of the bitmap would be compressed when mapped to the sphere. Visual elements in my bitmap texture that were near the top or bottom edge of the bitmap needed to be stretched wide in order to compensate. (For example, on the beach ball, the top and bottom red circles are actually red rectangles that stretch all the way across the bitmap texture’s width – see figure. When wrapped onto the sphere, they appear as circles.)
As a result of PV3D’s texture wrapping method, I spent some time perfecting textures in a graphic design program.

As you can see from this 3D beach ball, the result of my efforts turned out quite nicely. This beach ball is a stripped-down version of the ActionScript 3.0 code I used for the original baseball. The beach ball is contained entirely within its own movieclip – so it is easy to drag-and-drop into a Flash project. All of the ActionScript code for the beach ball is contained on the beach ball’s own timeline, so there are no external class files to manage. I’ll admit that external class files are a great way to code, but in this case, I preferred the simplicity of keeping everything in one place.
The beach ball is a great way to announce an upcoming beach-themed event or summer trip. Add your own custom logo easily by modifying the included XML text file and link to another site by specifying a URL link on double click. Your viewers will appreciate having something they can interact with.
So what’s next? Perhaps in the future I’ll consider building a game using one of these 3D balls. (Let me know if you have any great game concepts.)
If you like this beach ball, go and check out my 3D Sports Balls on ActiveDen and see the baseball that started it all!
In my last tut: Create New Features for Flash with JSFL we created new commands for Flash. Now we’re going to take things further by creating entirely new panels within the Flash authoring environment.

To try the Buttonizer panel, download the Source zip file and extract the Buttonizer.swf file to the folder listed in Step 3. Restart Flash and you’ll find it in Window > Other Panels.
A Flash panel is just a regular SWF that you tell Flash to run in a panel rather than a separate window. All you need to do is create a new FLA. The name of the FLA will be displayed as the title of the panel; I’m calling mine Buttonizer.fla. We’ll use AS3 for this tutorial.
A plain white panel’s pretty useless, of course, so let’s fill it out. Resize the stage to 250px wide by 170px high (not that it matters – I’ve picked these numbers because I know they’re big enough for what I have planned later) and change the background color to #EDEDED (this matches the backgrounds of the panels on my system, anyway).
Open the Components panel (Window > Components) and drag a Button from the User Interface folder onto the stage.

Compile a SWF from this FLA. To get Flash to use this as a panel, all you have to do is drag the SWF into the correct folder, then restart Flash.
The folder is called WindowSWF and its location varies depending on your operating system:
The username folder will match the name you use to log in with, language will change depending on what you picked when you installed Flash (for English speakers it’ll probably be en-us or just en), and if you’re using a newer version of Flash than CS3, that folder will change too.
(Frankly, it’s probably easiest to search your computer to find all folders named WindowSWF. One will be correct.)
Drag your SWF over to the WindowSWF folder then restart Flash. Don’t worry, you won’t have to restart Flash every time you make a change. Once you’ve opened it again, check out the Window > Other Panels sub-menu and you should see Buttonizer as an option. Click it:

Awesome.
With the panel open, move the button in the FLA, then re-compile the SWF. The panel doesn’t change.
Move the SWF to the WindowSWF folder. The panel still doesn’t change.
Close the panel and re-open it from the menu. It changes.
We can speed this up by having the panel’s SWF publish directly to the WindowSWF folder. Click File > Publish Settings, then click the folder icon next to the box that says Buttonizer.swf, browse to your WindowSWF folder and hit Save.
Uncheck the HTML checkbox, too; you don’t need it.
Now move the button again, recompile the SWF (you can hit Shift-F12 to do this without making Flash Player appear), close the panel, re-open it, and it will have updated.
As the panel is a functioning SWF, we’re not restricted to changing how it looks; we can add code, too.
Create a new AS file called Buttonizer.as, and set it up as the document class of your FLA. Here’s the basic code:
package
{
	import flash.display.MovieClip;
	public class Buttonizer extends MovieClip
	{
		public function Buttonizer()
		{

		}
	}
}
(If you’re not familiar with using a document class, check out this quick introduction.)
To prove code can work, we’ll change the text on the button. In the FLA, give the button an instance name of theButton (imaginative), then in your constructor function, add this line of code:
theButton.label = "Buttonize";
Hit Shift-F12, close and re-open the panel, and you’ll see the text has changed.

If not, then check you’ve linked the FLA to the document class and named the button.
Let’s get a function in there to handle the button being pushed:
package
{
	import flash.display.MovieClip;
	import flash.events.MouseEvent;

	public class Buttonizer extends MovieClip
	{
		public function Buttonizer()
		{
			theButton.label = "Buttonize";
			theButton.addEventListener( MouseEvent.CLICK, onClickTheButton );
		}

		private function onClickTheButton( a_event:MouseEvent ):void
		{
			trace( "Button clicked" );
		}
	}
}
Nothing complicated there. I’ve used a trace() to make sure it’s all hooked up correctly. Reload the panel and make sure it works.
Oh… it doesn’t?
That’s right; the AS3 trace() function doesn’t trace results to the Output panel when run from within another panel. I hate working without trace(), so we’ll have to get around this somehow.
In my JSFL tutorial, I showed you the JavaScript fl.trace() function. It traces text to the Output panel, but is run within the Flash authoring environment itself, rather than from a Flash Player window. That’s great – it means we can run it from within our panel!
But we can’t just type fl.trace( “Button clicked” ); within our AS3 code, because it’s not an AS3 function. We have to tell Flash to run this as JSFL, and to do that we use the adobe.utils.MMExecute() function, which is AS3:
package
{
	import adobe.utils.MMExecute;		//don't forget this!
	import flash.display.MovieClip;
	import flash.events.MouseEvent;

	public class Buttonizer extends MovieClip
	{
		public function Buttonizer()
		{
			theButton.label = "Buttonize";
			theButton.addEventListener( MouseEvent.CLICK, onClickTheButton );
		}

		private function onClickTheButton( a_event:MouseEvent ):void
		{
			MMExecute( "fl.trace( 'Button clicked' );" );	//quotes in quotes get confusing
		}
	}
}
MMExecute() takes a string and runs it as a JSFL call. It’s completely ignored by the Flash Player window.
If you test this out now, clicking the button will trace to the Output panel. Excellent.
It would be inconvenient to take a longer script and push it through an MMExecute() call. Instead, we can save the JSFL to a script file and tell Flash to run that.
If you followed my JSFL tutorial, you’ll have a Buttonize.jsfl file already; if not, copy the following code to a new JSFL file:
if ( fl.getDocumentDOM().selection.length == 1 )
{
	if ( fl.getDocumentDOM().selection[0].elementType == "text" )
	{
		var textLeft = fl.getDocumentDOM().selection[0].x;
		var textTop = fl.getDocumentDOM().selection[0].y;
		var textRight = fl.getDocumentDOM().selection[0].x + fl.getDocumentDOM().selection[0].width;
		var textBottom = fl.getDocumentDOM().selection[0].y + fl.getDocumentDOM().selection[0].height;
		var textText = fl.getDocumentDOM().selection[0].getTextString();

		fl.getDocumentDOM().convertToSymbol('button', textText, 'top left');
		var lib = fl.getDocumentDOM().library;
		if (lib.getItemProperty('linkageImportForRS') == true) {
		lib.setItemProperty('linkageImportForRS', false);
		}
		else {
		lib.setItemProperty('linkageExportForAS', false);
		lib.setItemProperty('linkageExportForRS', false);
		}
		lib.setItemProperty('scalingGrid',  false);

		fl.getDocumentDOM().enterEditMode('inPlace');
		fl.getDocumentDOM().getTimeline().convertToKeyframes();
		fl.getDocumentDOM().getTimeline().convertToKeyframes();
		fl.getDocumentDOM().getTimeline().convertToKeyframes();
		fl.getDocumentDOM().addNewRectangle({left:textLeft, top:textTop, right:textRight, bottom:textBottom}, 0);
	}
}
Save it as Buttonize.jsfl anywhere on your hard drive. Now you can run that script by calling (in AS3):
MMExecute( "fl.runScript( '(path-to-your-script)' + '/Buttonize.jsfl' )" );
To keep things simple, move your JSFL file into your WindowSWF directory. You can now replace ‘(path-to-your-script)’ with fl.configURI + ‘WindowSWF/’. Let’s try it out:
package
{
	import adobe.utils.MMExecute;
	import flash.display.MovieClip;
	import flash.events.MouseEvent;

	public class Buttonizer extends MovieClip
	{
		public function Buttonizer()
		{
			theButton.label = "Buttonize";
			theButton.addEventListener( MouseEvent.CLICK, onClickTheButton );
		}

		private function onClickTheButton( a_event:MouseEvent ):void
		{
			MMExecute( "fl.runScript( fl.configURI + 'WindowSWF/' + '/Buttonize.jsfl' )" );
		}
	}
}
Start a new FLA, create some text, select it, and hit the Buttonize button. It should turn into a button, just like the script does normally.
Back in the Buttonizer FLA, drag a ColorPicker and a Label from the User Interface components to the stage. We’ll use the color picker to change the color of the text in the button’s Down state. Arrange the components appropriately:

Give the color picker an instance name of downColorPicker.
We’ll need to pass the color from the ColorPicker to the Buttonize script, but first, we’ll turn the script into a function so that it can accept arguments.
Modify it like so:
function makeButtonFromText( downColor )
{
	if ( fl.getDocumentDOM().selection.length == 1 )
	{
		if ( fl.getDocumentDOM().selection[0].elementType == "text" )
		{
			var textLeft = fl.getDocumentDOM().selection[0].x;
			var textTop = fl.getDocumentDOM().selection[0].y;
			var textRight = fl.getDocumentDOM().selection[0].x + fl.getDocumentDOM().selection[0].width;
			var textBottom = fl.getDocumentDOM().selection[0].y + fl.getDocumentDOM().selection[0].height;
			var textText = fl.getDocumentDOM().selection[0].getTextString();

			fl.getDocumentDOM().convertToSymbol('button', textText, 'top left');
			var lib = fl.getDocumentDOM().library;
			if (lib.getItemProperty('linkageImportForRS') == true) {
			lib.setItemProperty('linkageImportForRS', false);
			}
			else {
			lib.setItemProperty('linkageExportForAS', false);
			lib.setItemProperty('linkageExportForRS', false);
			}
			lib.setItemProperty('scalingGrid',  false);

			fl.getDocumentDOM().enterEditMode('inPlace');
			fl.getDocumentDOM().getTimeline().convertToKeyframes();
			fl.getDocumentDOM().getTimeline().convertToKeyframes();
			fl.getDocumentDOM().getTimeline().convertToKeyframes();
			fl.getDocumentDOM().addNewRectangle({left:textLeft, top:textTop, right:textRight, bottom:textBottom}, 0);
		}
	}
}
Now we should alter the MMExecute() call, to refer to that specific function in the script. All that’s required is to pass the function name as a second parameter:
MMExecute( "fl.runScript( fl.configURI + 'WindowSWF/' + '/Buttonize.jsfl', 'makeButtonFromText' )" );
For every argument we want to pass to the JSFL function, we just add another parameter to the MMExecute() call. So, to pass the selected color:
MMExecute( "fl.runScript( fl.configURI + 'WindowSWF/' + '/Buttonize.jsfl', 'makeButtonFromText', " + downColorPicker.selectedColor.toString() + " )" );
We have to break out of the double quotes to include that argument, since we obtain it via AS3, not via JSFL. It’s messy, and more than a little confusing, I know.
Let’s add a simple trace to the JSFL function to make sure this is working:
function makeButtonFromText( downColor )
{
	fl.trace( "color: " + downColor );
	if ( fl.getDocumentDOM().selection.length == 1 )
	{
(Since it’s above the selection condition, you can see the trace without having to actually buttonize some text.)
I tried it with black and then white, and here’s what appeared in the Output panel:
color: 0
color: 16777215
Looks like it’s working to me.
To find out what JSFL to use to change the text color, use the trick from the JSFL tut; hit “Select All”, then change the fill color and take a look at the code in the History panel:
fl.getDocumentDOM().selectAll();
fl.getDocumentDOM().setFillColor('#009999');
Uh-oh. Are we going to have to convert the uint color we got from the ColorPicker into an HTML string? Fortunately, no; the document.setFillColor() help page tells us that we can use either format.
So, all we need to do is insert that new script in the correct place. Since the “Down” frame is the third one, we should insert it after the second convertToKeyframes() call:
fl.getDocumentDOM().enterEditMode('inPlace');
fl.getDocumentDOM().getTimeline().convertToKeyframes();

fl.getDocumentDOM().getTimeline().convertToKeyframes();
fl.getDocumentDOM().selectAll();				//new line
fl.getDocumentDOM().setFillColor( downColor );	//new line

fl.getDocumentDOM().getTimeline().convertToKeyframes();
fl.getDocumentDOM().addNewRectangle({left:textLeft, top:textTop, right:textRight, bottom:textBottom}, 0);
This works:
Add a new ColorPicker (overColorPicker) and Label to let the user change the color of the “Over” text:

Change the signature of the JSFL function to accept this other color:
function makeButtonFromText( overColor, downColor )
While we’re editing the JSFL function, we might as well add the script to change the color of the “Over” state:
fl.getDocumentDOM().enterEditMode('inPlace');
fl.getDocumentDOM().getTimeline().convertToKeyframes();
fl.getDocumentDOM().selectAll();
fl.getDocumentDOM().setFillColor( overColor );
Now let’s change the call to MMExecute() in the AS3 so that it passes along the “Over” color:
MMExecute( "fl.runScript( fl.configURI + 'WindowSWF/' + '/Buttonize.jsfl', 'makeButtonFromText', " + overColorPicker.selectedColor.toString() + ", " + downColorPicker.selectedColor.toString() + " )" );
…Ugh. That’s too messy, and it’s going to get worse. How can we fix this?
Steven Sacks and Steven Hargrove came up with a neat little function to make this call easier. I’ve adapted it here:
private function runButtonizeScript( ... args ):String
{
	if ( args.length > 0 )
	{
		return MMExecute( "fl.runScript( fl.configURI + 'WindowSWF/' + '/Buttonize.jsfl', 'makeButtonFromText', " + args.join(", ") + " );" );
	}
	else
	{
		return MMExecute( "fl.runScript( fl.configURI + 'WindowSWF/' + '/Buttonize.jsfl', 'makeButtonFromText' )" );
	}
}
So now we can call:
private function onClickTheButton( a_event:MouseEvent ):void
{
	runButtonizeScript( overColorPicker.selectedColor.toString(), downColorPicker.selectedColor.toString() );
}
Much neater!
Add new components:

Change signature of JSFL function:
function makeButtonFromText( upColor, overColor, downColor )
Make JSFL change color of text:
fl.getDocumentDOM().enterEditMode('inPlace');
fl.getDocumentDOM().selectAll();
fl.getDocumentDOM().setFillColor( upColor );
Pass “Up” color to JSFL from AS3:
private function onClickTheButton( a_event:MouseEvent ):void
{
	runButtonizeScript( upColorPicker.selectedColor.toString(), overColorPicker.selectedColor.toString(), downColorPicker.selectedColor.toString() );
}
Test it:

Brilliant. Just one thing left.
Chances are, the user is going to want to stick with the color they picked for the text for at least one of the three states. But we start all three ColorPickers with black as the selected color.
So, now we need to get the existing fill color from the text object, and use JSFL to pass it through to the panel, then use AS3 to change the color of the ColorPickers. It’s the opposite of what we’ve been doing, really.
Where in our AS3 code should we set the color of our pickers, though? I see three choices:
So, add a new Button to the Buttonizer, labeled “Set Defaults”. Give it an instance name of setDefaults.
Back in Buttonizer.as:
public function Buttonizer()
{
	theButton.label = "Buttonize";
	theButton.addEventListener( MouseEvent.CLICK, onClickTheButton );
	setDefaults.addEventListener( MouseEvent.CLICK, onClickSetDefaults );
}

private function onClickSetDefaults( a_event:MouseEvent ):void
{

}
Just to make sure this will work when we have the correct data:
private function onClickSetDefaults( a_event:MouseEvent ):void
{
	var defaultColor:int = 0x000000;	//black
	upColorPicker.selectedColor = defaultColor;
	overColorPicker.selectedColor = defaultColor;
	downColorPicker.selectedColor = defaultColor;
}
Make sure that it works by setting some random colors, then clicking the Set Defaults button. It should reset them all to black.
The MMExecute() function returns the return value of any function run through it. (If several functions are run, it returns the return value of the last one.)
To get the color of the selected text, we can use the JSFL document.getCustomFill( ’selection’ ) function. This returns a Fill object, whose color property is what we need. So, we can get the color like so:
MMExecute( "document.getCustomFill( 'selection' ).color" );
This is actually not quite what we want, as it returns the color in CSS String format: “#AA43E2″, for example. I’ve written a little extra code to convert this to the uint format that we need:
private function onClickSetDefaults( a_event:MouseEvent ):void
{
	var cssFormatDefaultColor:String = MMExecute( "document.getCustomFill( 'selection' ).color" );
	cssFormatDefaultColor = cssFormatDefaultColor.replace( "#", "0x" );
	var defaultColor = uint( cssFormatDefaultColor );
	upColorPicker.selectedColor = defaultColor;
	overColorPicker.selectedColor = defaultColor;
	downColorPicker.selectedColor = defaultColor;
}
Try this out:


Awesome ![]()
Take a look back at what you’ve learned. You can now create your own panels inside Flash, run JSFL commands and scripts, pass data from a panel to the stage, and even get data from the stage to use in the panel. Congrats!
Let’s take a look at Adobe’s new Media Encoder which comes bundled with Flash CS5. A couple of interesting changes have been made to it and you really should be aware of them, so let’s get started..
Don’t like ads? Download the screencast.
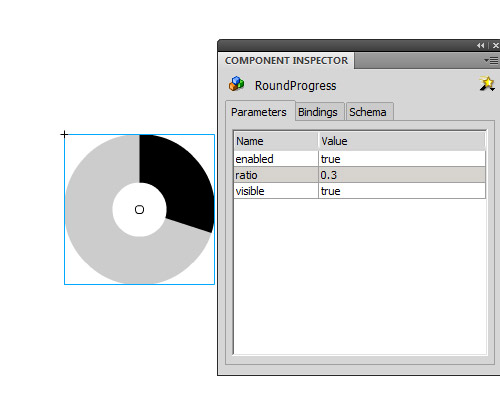
During this tutorial I will explain how to create a FLA-based User Interface (UI) component. Like the components that come with Flash, it will be visible on the stage, the preview then automatically updating as you change its parameters. This specific example is a circular progress bar.
Here’s how our component will look. Click the example to see it working with random values:
But we’re not focusing on the SWF result in this tutorial. To see the component itself and change its skin, download the zip file, extract it, and run RoundProgress.mxp to install it. (You may need to download the Adobe Extension Manager first.)
UIComponent is the base class of all Flash components. All User Interface components which are already in Flash (like the ColorPicker, the Checkbox and so on) extend the UIComponent (or extend some class that extends the UIComponent); the reason being that the UIComponent makes it easier for developers to allow their components to be “skinned”.
When used, the UIComponent class recreates the object, removes everything on the stage and adds the skins. This is important for personalization of the component; the user can just double-click the component and edit it visually, with Flash. You just create a component avatar on Frame 1 and the skins on Frame 2, and the UIComponent class does the rest.
You can do all this manually, but it is much better using UIComponent – you’ll see why.
I have explained what the UIComponent is and what it does, but you have to configure the classpath for the UIComponent as it is not configured by default. So, a few steps must be followed:
Let’s start by creating a new Flash AS3 file. Save it as RoundProgress.fla, wherever you want (example: C:\RoundProgress\)

We will assume the package org.display for our component, so in the same folder that you’ve saved RoundProgress.fla, create a folder with a subfolder, /org/display (example: c:\roundprogress\org\display\)
This is where we will save our component ActionScript file. This is just used to create the component or edit it; you won’t give the final user the .as file.
When we create a component for Flash the library organization is very important (perhaps even more so than usual). When you drag the component to the stage of a project its library assets will be automatically added to the project’s library, so keep it organized.
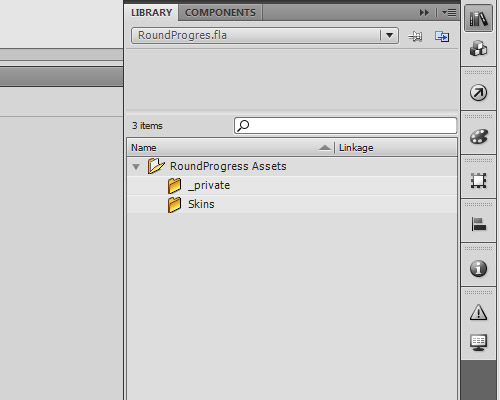
Create a folder in the library called RoundProgress Assets.
Inside this folder create two other folders, Skins and _private.
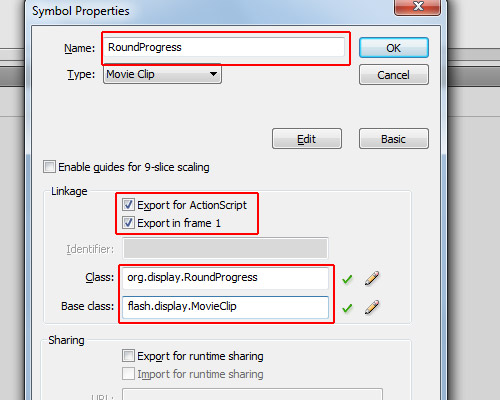
Click Insert > New Symbol. For the name: RoundProgress; type: Movie Clip; linkage: check the options "Export for ActionScript" and "Export in frame 1"; for the class: org.display.RoundProgress; base class: flash.display.MovieClip (though it will be changed when we create the .as file for this object).
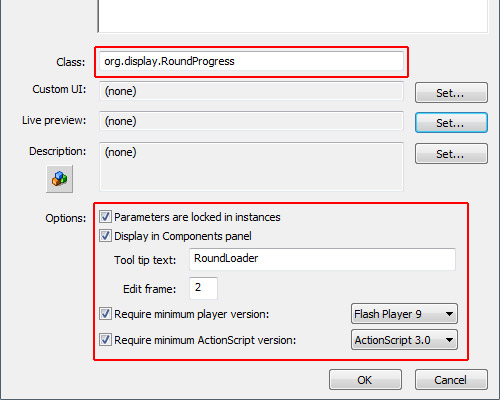
Let’s treat the RoundProgress object as Component. To do this, open the library, right-click on the RoundProgress object and click "Component Definition".
In the window that opens, in the class field insert: org.display.RoundProgress (we will create this class later); in the options panel, check all the options, and for Edit Frame type "2" (it’s actually irrelevant). The most important field here is "Display in Components panel": this option allows the component to be shown show in the components panel when you publish it (we will see this later).
So far we have in our library the “RoundProgress” object as a Component and the folder “RoundProgress Assets” with subfolders “Skins” and “_private.”
As we will use the UIComponent, we will need three layers and two frames on each layer. We need two frames because UIComponent uses the dimensions of the first frame to define the size of the component, and uses the second frame for Skin Editing.
In the library, double-click the RoundProgress component to open it as a movie clip.
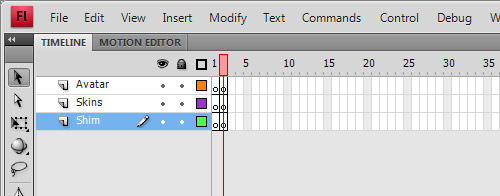
In the timeline, add two new layers, rename the top layer to “Avatar”, the middle layer to “Skins” and the bottom layer to “Shim.”
Also create a new blank keyframe for each layer (select Frame 2 and press F7). It should now look like the image:
No, not the movie, the Avatar is an object which the UIComponent takes as the size of the object, then removes. Let’s create a square with a white background and black outline (hairline).
Select the square and convert it to a movie clip (Modify > Convert to Symbol), with type: Movie Clip, and name: RoundProgressAvatar. It’s important that the registration point is set to the top left; the name is completely irrelevant.
Go to the library again and drag the RoundProgressAvatar to the folder “_private” inside “RoundProgress Assets.”
Then, double-click on the RoundProgress component again to edit it, select Frame 1 and the Avatar layer, and drag an instance of RoundProgressAvatar on to the stage (so it will be at Frame 1, on the Avatar layer of the RoundProgress component). Set its position to x:0 and y:0.
The background will be one of the skins we will create, it will be the background of our RoundProgress component.
Create a new movie clip (Insert > New Symbol):
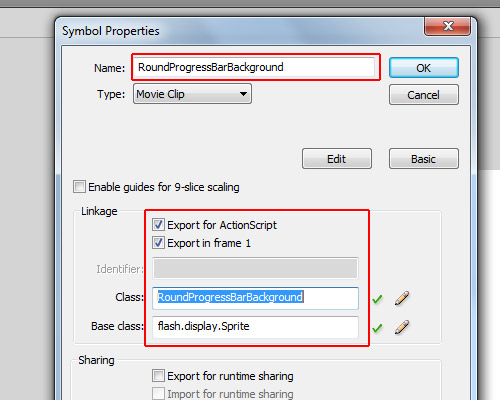
For the name we will use “RoundProgressBarBackground”; check “Export for ActionScript” and “Export in frame 1″; for the class we will use “RoundProgressBarBackground” just like the name; and for the base class, since we won’t use animation we will use “flash.display.Sprite” (but if you use flash.display.MovieClip it will work too).
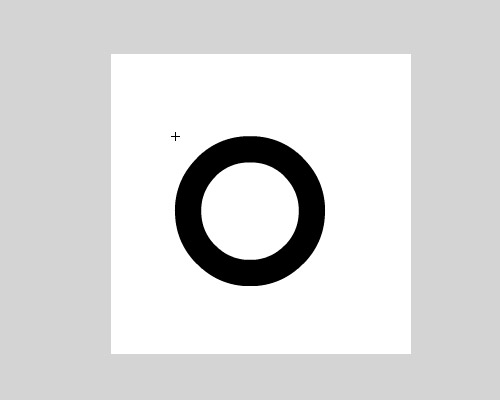
Assuming in the last step you left the RoundProgressBarBackground object open (if not, double-click on it in the library to open it again), let’s draw a ring. First, draw a circle with a diameter of 150px.
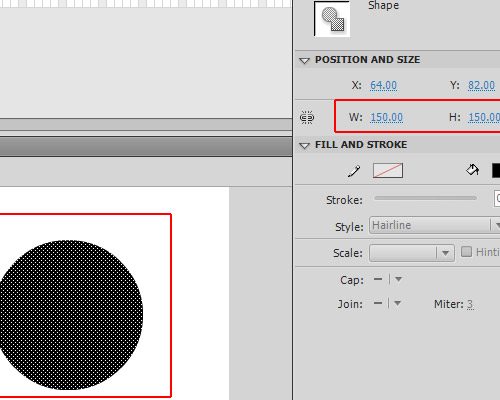
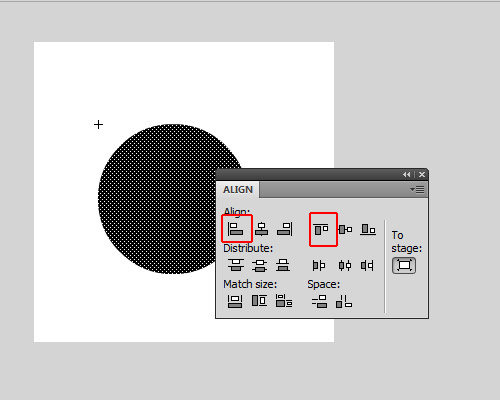
Align it to top and left (Window > Align); its position will be x:0 and y:0.
If you copy and paste-in-place (using Ctrl+Shift+V) you will create a copy of the circle, but don’t deselect it, just change its size to make it a little bit smaller than the other circle. Then change its color, all without deselecting the copy of the circle. After this you can deselect it, so you will get a circle inside another, then you can select the smaller circle (which will have another color) and delete it, so you will be left with a ring.
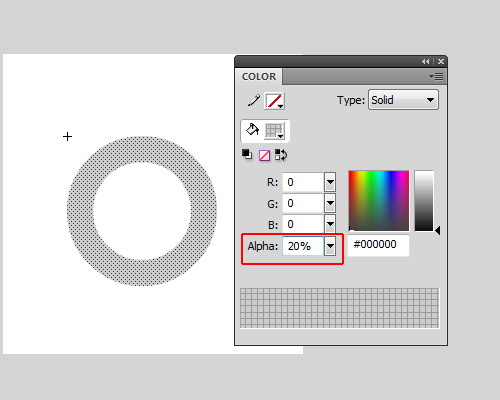
Change its color alpha to 20%.
Now you can exit the Edit mode of RoundProgressBarBackground object.
Open the library and drag the RoundProgressBarBackground we have created to the folder RoundProgress Assets/Skins.
The face is a copy of the background, but with the color alpha set to 100%; it must have exactly the same width and same height of the Background…
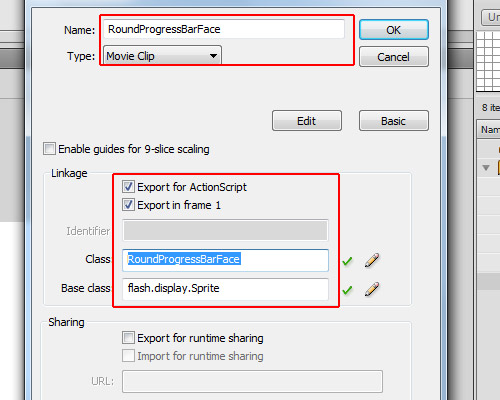
Open the library, right-click RoundProgressBarBackground and click "Duplicate". This will create another object just like the RoundProgressBarBackground; for the name of this use RoundProgressBarFace, for the type: MovieClip, check the options "Export for ActionScript" and "Export on frame 1", for the class use "RoundProgressBarFace", and since we don’t have animations set the base class to “flash.display.Sprite.”
Enter edit mode (in the library double-click the object) and set its color alpha to 100%.
If it is not in there yet, drag the RoundProgressBarFace object to the folder RoundProgress Assets/Skins.
So far we have in our library the RoundProgress component, the RoundProgressAvatar in the _private folder and the RoundProgressBarBackdround and RoundProgressBarFace in the Skins folder.
OK, the design is ready, now we will start the dirty job, the code… First create a new Actionscript File
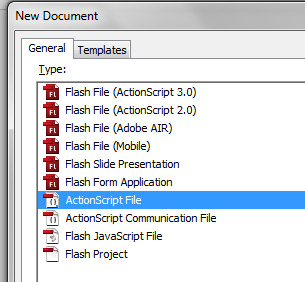
Save it as RoundProgress.as in the org/display folder which was created in the beginning of the tutorial, and let’s start coding it.
Let’s create the package and import the necessary classes.
package org.display{

	import fl.core.UIComponent;
	import flash.display.Sprite;

}
As we want to use the package org.display we saved our RoundProgress.as inside the org/display folder, so the package is org.display.
We import the class fl.core.UIComponent, which we will extend. This will be the base of our component and the Sprite class will be the mask.
Now we’ll create the Class, extending the UIComponent Class.
package org.display{

	import fl.core.UIComponent;
	import flash.display.Sprite;

    public class RoundProgress extends UIComponent{
    }

}
Next up, we create the variables used in RoundProgress
package org.display{

	import fl.core.UIComponent;
	import flash.display.Sprite;

    public class RoundProgress extends UIComponent{

    	private const RAD:Number=Math.PI/180;
		private var _face:Sprite;
		private var _background:Sprite;
		private var _mask:Sprite;
		private var _ratio:Number=0;

    }

}
The _face and the _background will be the skin for the face and background; we will use Sprites for these. The _mask will be an empty Sprite, the const RAD is just a conversion factor from degrees to radians, and the _ratio is the current progress value, which ranges from 0 to 1.
The protected configUI() function is from the UIComponent class; it is called when the object is created – almost like the constructor function, but it removes everything from the stage, so you have to recreate everything.
Since we are overriding the function configUI(), we need to call it in our class. If not, our script will run but nothing will be removed from the stage, so our Avatar will be there when we use the component. We call the superclass’s configUI() method by using super.configUI():
package org.display{

	import fl.core.UIComponent;
	import flash.display.Sprite;

    public class RoundProgress extends UIComponent{

    	private const RAD:Number=Math.PI/180;
		private var _face:Sprite;
		private var _background:Sprite;
		private var _mask:Sprite;
		private var _ratio:Number=0;

       	override protected function configUI():void{
        	//Call the superclass configUI function
			super.configUI();

            //Create a definition for the background
			var bgDef:Object=this.loaderInfo.applicationDomain.getDefinition("RoundProgressBarBackground");

            //Create a definition for the face
			var fcDef:Object=this.loaderInfo.applicationDomain.getDefinition("RoundProgressBarFace");

            //Create the background object, cast it as Sprite and add it in our RoundProgress object
			_background=addChild(new bgDef) as Sprite;

            //Create the face object, cast it as Sprite and add it in our RoundProgress object
			_face=addChild(new fcDef) as Sprite;

            //Create the mask object, cast it as Sprite and add it in our RoundProgress object, also setting the _face.mask as this object
			_face.mask=_mask=addChild(new Sprite()) as Sprite;
		}
    }
}
Note that since the addChild() function returns a DisplayObject we can instantiate an object when we create it and cast it as whatever we want (in this case I cast it as Sprite). In one single line I created the object, cast it as Sprite and added in our object.
The method draw() is also from UIComponent; it’s called when an property is changed in our FLA file and updates the live preview of the component. This allows the user see how the component will change on the stage, rather than having to compile a SWF. We’re going to override it so that when we change a value the draw method will be called.
package org.display{

	import fl.core.UIComponent;
	import flash.display.Sprite;

    public class RoundProgress extends UIComponent{

    	private const RAD:Number=Math.PI/180;
		private var _face:Sprite;
		private var _background:Sprite;
		private var _mask:Sprite;
		private var _ratio:Number=0;

       	override protected function configUI():void{
			super.configUI();
			var bgDef:Object=this.loaderInfo.applicationDomain.getDefinition("RoundProgressBarBackground");
			var fcDef:Object=this.loaderInfo.applicationDomain.getDefinition("RoundProgressBarFace");
			_background=addChild(new bgDef) as Sprite;
			_face=addChild(new fcDef) as Sprite;
			_face.mask=_mask=addChild(new Sprite()) as Sprite;
		}

        override protected function draw():void{
        	//it is always important to set the background and the face objects with the same width of the component
            //It doesnt resize automatically
			_background.width=_face.width=width;
			_background.height=_face.height=height;

            //Calculate the angle based on the ratio
            //The .1 is because if the graphics doesnt draw a little bit more it will stay a line of fail
			var angle:Number=(360.1*_ratio)-90;

            //store a little bit more than the radius of the face
			var h:Number=_face.height*.6;

            //If we resize our component but the width and height stay different, gets the width too
			var w:Number=_face.width*.6;

            //this is for offset mask, as we want to draw from the center of the face, we need to get this offset
			var dx:Number=_face.width/2;
			var dy:Number=_face.height/2;

            //Start drawing from center and create a line until the top of the object
			_mask.graphics.clear();
			_mask.graphics.beginFill(0x00FF00);
			_mask.graphics.moveTo(dx,dy);
			_mask.graphics.lineTo(dx,dy-h);

            //Create a segment of circle, this will be the mask of the _face object
            //These lines are what makes the magic, starting at -90 degrees and running around by the amount of degrees specified
			for(var i:int=-90;i<angle;i++){

            	//Math.cos will return the cos of the angle, multiplyed by the w (width radius)
                //As Math.cos needs to use radian as parameter we convert the angle i to radians by multiplying it by our constant RAD
				var px:Number=Math.cos(i*RAD)*w;

                //Math.sin will return the sin of the angle, multiplyed by the h (height radius)
                //As Math.sin needs to use radian as parameter we convert the angle i to radians by multiplying it by our constant RAD
				var py:Number=Math.sin(i*RAD)*h;

                //Here is the offset, it is based on the radius of the face
				px+=dx;
				py+=dy;

                //then we create a line to the position px and py
				_mask.graphics.lineTo(px,py);
			}
            //After the code is executed, we need the graphics return to the center of the _face object
            //So we line it to the first position, which is the offset
			_mask.graphics.lineTo(dx,dy);
			_mask.graphics.endFill();

            //it is always important to use super.draw() to update widths and heights
			super.draw();
		}
    }
}
Don’t worry too much about this code. As I said before, it’s not the focus of the tutorial.
Well, here we create the ratio property. This is like a variable, but it’s a function: we use the [Inspectable] tag immediately before the function’s definition so this property can be changed using the "Component Inspector" when we use it in Flash.
Let’s get to grips with [Inspectable]. We have some parameters that we can use on it, like defaultValue, name and some others. If using defaultValue then Flash will use it as the default value in the component inspector (where we can change the parameters); the name parameter defines how it will appear in the component inspector, but is not necessary. If you want to set another name for this for example you can use [Inspectable(name="MyCustomName",defaultValue=0)]. You can also set the Type (Number, String), but as it is set in our ratio property this is not needed.
package org.display{

	import fl.core.UIComponent;
	import flash.display.Sprite;

    public class RoundProgress extends UIComponent{

    	private const RAD:Number=Math.PI/180;
		private var _face:Sprite;
		private var _background:Sprite;
		private var _mask:Sprite;
		private var _ratio:Number=0;

       	override protected function configUI():void{
			super.configUI();
			var bgDef:Object=this.loaderInfo.applicationDomain.getDefinition("RoundProgressBarBackground");
			var fcDef:Object=this.loaderInfo.applicationDomain.getDefinition("RoundProgressBarFace");
			_background=addChild(new bgDef) as Sprite;
			_face=addChild(new fcDef) as Sprite;
			_face.mask=_mask=addChild(new Sprite()) as Sprite;
		}

        override protected function draw():void{
			_background.width=_face.width=width;
			_background.height=_face.height=height;
			if(!_mask) return;
			var angle:Number=(360.1*_ratio)-90;
			var h:Number=_face.height*.6;
			var w:Number=_face.width*.6;
			var dx:Number=_face.width/2;
			var dy:Number=_face.height/2;
			_mask.graphics.clear();
			_mask.graphics.beginFill(0x00FF00);
			_mask.graphics.moveTo(dx,dy);
			_mask.graphics.lineTo(dx,dy-h);
			for(var i:int=-90;i<angle;i++){
				var px:Number=Math.cos(i*RAD)*w;
				var py:Number=Math.sin(i*RAD)*h;
				px+=dx;
				py+=dy;
				_mask.graphics.lineTo(px,py);
			}
			_mask.graphics.lineTo(dx,dy);
			_mask.graphics.endFill();
			super.draw();
		}

        [Inspectable(defaultValue=0)]		//allows the ratio property to be set in the Component Inspector
		public function get ratio():Number{
        	//Return the ratio value (0 to 1)
        	return _ratio;
        }
		public function set ratio(value:Number):void{
        	//If the value is out of the range it throws an error
			if(value>1 || value<0) throw new Error("Value is out of range (0-1)");

           	//set the variable _ratio
			_ratio=value;

            //Update the component for the new _ratio value
			draw();
		}
    }
}
Let’s add a function to set the progress, you can use a current value and a max value.
package org.display{

	import fl.core.UIComponent;
	import flash.display.Sprite;

    public class RoundProgress extends UIComponent{

    	private const RAD:Number=Math.PI/180;
		private var _face:Sprite;
		private var _background:Sprite;
		private var _mask:Sprite;
		private var _ratio:Number=0;

       	override protected function configUI():void{
			super.configUI();
			var bgDef:Object=this.loaderInfo.applicationDomain.getDefinition("RoundProgressBarBackground");
			var fcDef:Object=this.loaderInfo.applicationDomain.getDefinition("RoundProgressBarFace");
			_background=addChild(new bgDef) as Sprite;
			_face=addChild(new fcDef) as Sprite;
			_face.mask=_mask=addChild(new Sprite()) as Sprite;
		}

        override protected function draw():void{
			_background.width=_face.width=width;
			_background.height=_face.height=height;
			if(!_mask) return;
			var angle:Number=(360.1*_ratio)-90;
			var h:Number=_face.height*.6;
			var w:Number=_face.width*.6;
			var dx:Number=_face.width/2;
			var dy:Number=_face.height/2;
			_mask.graphics.clear();
			_mask.graphics.beginFill(0x00FF00);
			_mask.graphics.moveTo(dx,dy);
			_mask.graphics.lineTo(dx,dy-h);
			for(var i:int=-90;i<angle;i++){
				var px:Number=Math.cos(i*RAD)*w;
				var py:Number=Math.sin(i*RAD)*h;
				px+=dx;
				py+=dy;
				_mask.graphics.lineTo(px,py);
			}
			_mask.graphics.lineTo(dx,dy);
			_mask.graphics.endFill();
			super.draw();
		}

        [Inspectable(defaultValue=0)]
		public function get ratio():Number{
        	return _ratio;
        }
		public function set ratio(value:Number):void{
			if(value>1 || value<0) throw new Error("Value is out of range (0-1)");
			_ratio=value;
			draw();
		}

        public function setProgress($bytesLoaded:Number,$bytesTotal:Number):void{
        	//The ratio is just the current value divided by the maximum value
			ratio=$bytesLoaded/$bytesTotal;
		}
    }
}
The percent property is like the ratio property, but instead of values between 0 and 1 you will use 0 to 100. It is a percentage calculation, it also returns a float value between 0 and 100:
package org.display{

	import fl.core.UIComponent;
	import flash.display.Sprite;

    public class RoundProgress extends UIComponent{

    	private const RAD:Number=Math.PI/180;
		private var _face:Sprite;
		private var _background:Sprite;
		private var _mask:Sprite;
		private var _ratio:Number=0;

       	override protected function configUI():void{
			super.configUI();
			var bgDef:Object=this.loaderInfo.applicationDomain.getDefinition("RoundProgressBarBackground");
			var fcDef:Object=this.loaderInfo.applicationDomain.getDefinition("RoundProgressBarFace");
			_background=addChild(new bgDef) as Sprite;
			_face=addChild(new fcDef) as Sprite;
			_face.mask=_mask=addChild(new Sprite()) as Sprite;
		}

        override protected function draw():void{
			_background.width=_face.width=width;
			_background.height=_face.height=height;
			if(!_mask) return;
			var angle:Number=(360.1*_ratio)-90;
			var h:Number=_face.height*.6;
			var w:Number=_face.width*.6;
			var dx:Number=_face.width/2;
			var dy:Number=_face.height/2;
			_mask.graphics.clear();
			_mask.graphics.beginFill(0x00FF00);
			_mask.graphics.moveTo(dx,dy);
			_mask.graphics.lineTo(dx,dy-h);
			for(var i:int=-90;i<angle;i++){
				var px:Number=Math.cos(i*RAD)*w;
				var py:Number=Math.sin(i*RAD)*h;
				px+=dx;
				py+=dy;
				_mask.graphics.lineTo(px,py);
			}
			_mask.graphics.lineTo(dx,dy);
			_mask.graphics.endFill();
			super.draw();
		}

        [Inspectable(defaultValue=0)]
		public function get ratio():Number{
        	return _ratio;
        }
		public function set ratio(value:Number):void{
			if(value>1 || value<0) throw new Error("Value is out of range (0-1)");
			_ratio=value;
			draw();
		}

        public function setProgress($bytesLoaded:Number,$bytesTotal:Number):void{
			ratio=$bytesLoaded/$bytesTotal;
		}

        public function set percent(value:Number):void{
			if(value>100 || value<0) throw new Error("Value is out of range(0-100)");
            //Just some math...
			ratio=value/100;
		}
		public function get percent():Number{
			return ratio*100;
		}
    }
}
Save your document (remember, in /org/display/RoundProgress.as if you haven’t saved it yet).
Nope, it isn’t finished yet. If we drag our component to the stage now, it will appear as the white square with the black outline, but if we test our movie it will show the component. This is because we haven’t created a “live preview” – the live preview can visualize a SWF of the component, and as we set the properties it will adjust and update visually too. If we don’t have a live preview only the avatar will be shown.
Let’s create our live preview; there are two ways I know of to create the live preview, so I’ll explain the one that works perfectly for me.
In the library of RoundProgress.fla, right-click over the RoundProgress component, click "Export SWC" and export in the same folder of the RoundProgress.fla file. The .swc file is a zipped file, so you can open it with WinRAR or something similar. Alternatively, you can rename the extension to “.zip” and open it that way.
Open the .swc as above and you will see some files. One of them is the library.swf; extract the library.swf to the same folder as the .fla file.
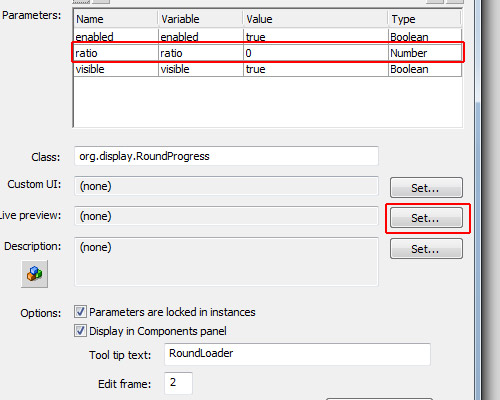
Go back to the Flash authoring environment. In the RoundProgress.fla file, open the library, right-click on the RoundProgress component and click the option "Component Definition".
In the Component Definition, note that in Parameters we have now the parameter ratio, which is the variable “ratio” and the value “0″ – this is the [Inspectable] we have defined with defaultValue=0 (the other parameters comes from the UIComponent class). It might not be configured yet; if not you need to open the Component Definition panel and click OK to update this, whenever you make changes in the .as file.
Now click the button "Set…" in the Live Preview section.
In this window that opens, select the option "Live preview with .swf embedded in .fla file", and click Browse:
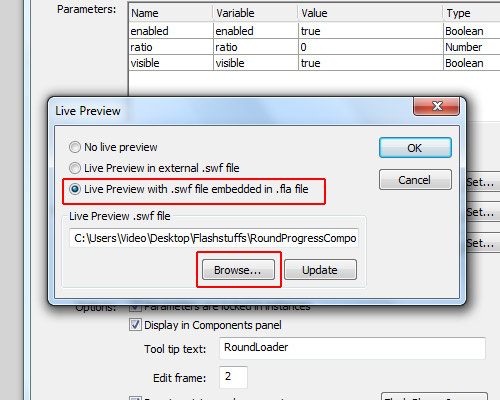
…then select the library.swf which we extracted from the .swc file.
If you drag the RoundProgress component on to the stage you should now be able to see the “live preview”. Try changing the value of “ratio” in the Component Inspector.
So far, we have created the component and it is already working with a live preview, but if you want to distribute your component as an .mxp file, you will have to send the .as file in the .mxp file. Maybe you don’t want people having access to your source .as file, or, if you have a lot of .as files, maybe you would find it boring to create the .mxi file (explanation later). The best thing you can do is to embed the .as file inside the .fla file in a compiled clip, which we call the ComponentShim.
Note that if you drag any User Interface component to the stage there will be a ComponentShim object. For example, look in the library in Component Assets/_private – which is a compiled clip, but we won’t use this one, we will create our own.
Another good reason for using a shim compiled clip is that it is already compiled, so when you compile your .swf it will just be added, not recompiled, giving a faster compilation.
Let’s start by creating another .fla file and saving it with the name “RoundProgressShim.fla” in the same folder as “RoundProgress.fla.”
In the RoundProgressShim.fla document, open the library.
For each component which has external .as files you may create a new object in the RoundProgressShim.fla. As we have only one component with one .as file, we will create the shim for this component only.
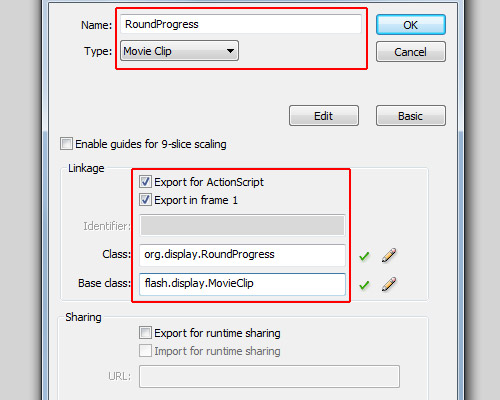
Create a new Symbol in the library, it must be of type Movie Clip and for its name choose the same name as our component (in this case RoundProgress). Check the options "Export for ActionScript" and "Export in frame 1"; for the class we will use the name of the component, so use “org.display.RoundProgress.”
OK, this is our reference for the org.display.RoundProgress object (we need one reference for each component).
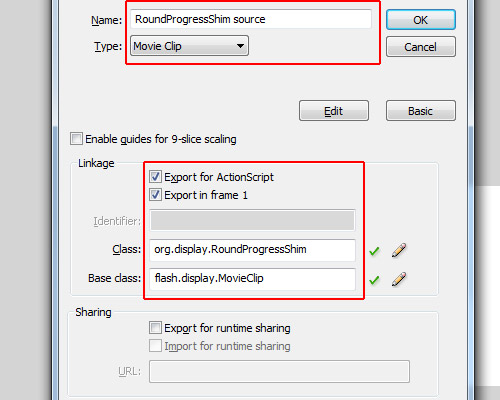
Now we create the shim source. Open the library again in RoundProgressShim.fla, and create a new Symbol named “RoundProgressShim source”. Check the options "Export for ActionScript" and "Export in frame 1"; for its class use org.display.RoundProgressShim (this is irrelevant); for its base class use flash.display.Sprite. Note that the name and the class don’t exist, really, but this will be our compiled clip, so to avoid conflicts it can’t have the same name or the same class as our component…
Now in the library, right-click on “RoundProgressShim source” and select "Convert to Compiled Clip"; now we will have one more object in the library called "RoundProgressShim source SWF". Rename it to "RoundProgressShim".
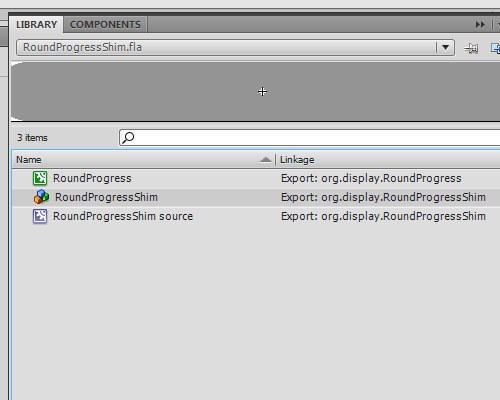
OK, our custom ComponentShim is created, just save the RoundProgressShim.fla in the same folder as the RoundProgress.fla, and close RoundProgressShim.fla.
Back in our RoundProgress.fla document, click File > Import and click "Open external library" (Ctrl+Shift+O), find and select the RoundProgressShim.fla and open it as library.
Put the two libraries side by side, the library of RoundProgress.fla and the library of RoundProgressShim.fla.
Now drag the RoundProgressShim object from the RoundProgressShim.fla library to the RoundProgress Assets/_private folder in the RoundProgress.fla library.
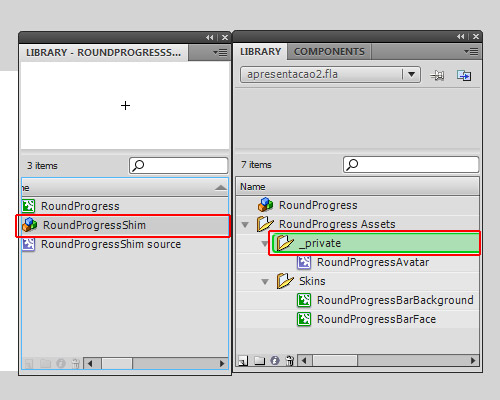
…and now you can close the RoundProgressShim.fla library.
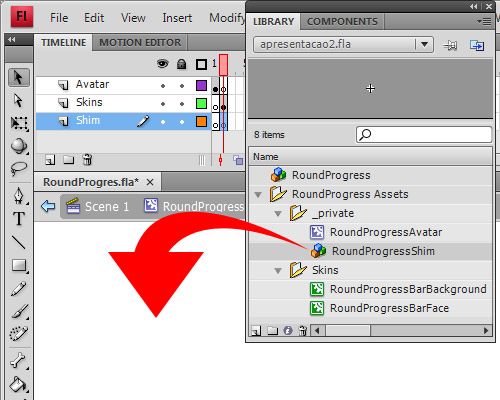
Go into edit mode of the RoundProgress component again (double click on RoundProgress object in the library), select the layer Shim, and go to Frame 2.
Now just drag the RoundProgressShim from RoundProgress Assets/_private in the library to the stage.
OK, now our component is ready to use. Save it and let’s learn how to package it into an .mxp file, ready to distribute.
Create a new XML file outside Flash, you can use Dreamweaver for this, or even notepad. I’ll use Dreamweaver.
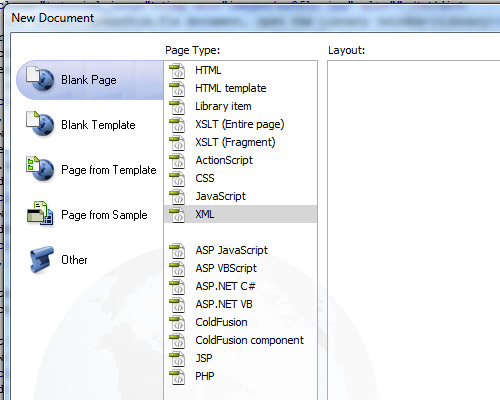
Save it as “RoundProgress.mxi” in the same folder as RoundProgress.as. It is very important you define the type (.mxi), or else you’ll save just as a .xml file which is no good to us.
Copy the XML I’ve created for this tutorial and paste into your RoundProgress.mxi:
<macromedia-extension name="RoundProgress Bar" version="1.0" type="Library">
	<author name="Andre Cavallari" />
	<products>
		<product name="Flash" version="9" primary="true" />
	</products>
	<description>
		<![CDATA[A Circle Progress Bar]]>
	</description>
	<ui-access>
		<![CDATA[window - Components (ctrl+f7)]]>
	</ui-access>
	<files>
		<file name="RoundProgress.fla" destination="$flash/Components" />
	</files>
</macromedia-extension>
Let’s break down the XML file: the first line is where we assign the name of our component (this is for the Adobe Extension Manager only, not for Flash) the version and the type (which is Library; for other types check the Adobe Extension Manager manual).
The author tag is to define the author of the package. Again, this is only for the extension manager.
The product tag defines which product your component is for. In our case it’s for Flash CS3 or CS4, so for name we use “Flash”, version being “9″ (CS3).
The description tag is for a description in Adobe Extension Manager. It can’t be null, but you may write anything there. The CDATA tag tells us that we can have HTML code inside so it won’t try to read as xml.
Inside the ui-access tag you can define how to use your component, how to access it in the Flash authoring tool.
The files tag contains the list of the files that will be copied to Flash’s configuration folder. In our case we will copy just the RoundProgress.fla, as we created the RoundProgressShim, we won’t need to copy the org/display/RoundProgress.as too. If you have more files to copy you may specify them inside the files tag (hence why having lots of AS files could make this step boring!)
The .mxi file simply gives instructions on how the Adobe Extension Manager should create the .mxp file. The .mxp file is like a zipped file, but if you try to open it in any zip application or rename it, it will return an error. This is because its compression algorithm is different to the zip algorithm. However, the Adobe Extension Manager can read the contents of the mxp file and the instructions of the mxi file, and will use this information to install your component.
When you install the MXP file with Adobe Extension Manager, the MXI file is also copied for later removal of the component; it will be in the configuration folder of Flash inside the Extension folder.
If it’s all OK you can now find the .mxi file you just created and double-click on it to open with Adobe Extension Manager.
When the extension manager opens, it will ask where you want to save your extension package. Let’s select the same folder as the RoundProgress.fla, though it can be anywhere since the RoundProgress.fla is inside the MXP file now.
It will then generate and save your MXP file.
It is important that you do this with Flash if your Adobe Flash language isn’t the same as the computer language (this is a bug in CS4 extension manager: let’s say that your computer is in Portuguese language, but Flash was installed in English language; if you just double-click an .mxp file and add it, the extension manager will understand that the language that it must install in is in Portuguese, not English, so in the configuration folder of Flash, instead of using the /en folder it will create a new folder /pt and copy the files there instead. If you open Flash, click Help and select the option "Manage extensions" it will open the extension manager in the same language as Flash, so anything you add here will be in the correct place.)
Open the Extension Manager via Flash (Help > Manage extensions).
In the Extension Manager click "install" at the top of the application.
Find the .mxp file, and agree with anything you need to. OK, it is installed; you can now close the Extension Manager. You’ll also need to close and re-open Flash for these changes to take effect.
Create a new Actionscript 3.0 file and save it anywhere, for example in c:\test\RoundProgressTest.fla
Set its stage size to 170×170px then go to Window > Components.
Note that our component is in the list now, as it is in the RoundProgress.fla it will appear in the RoundProgress folder with the name of the component inside. If we wanted it in the User Interface folder we would need to save the .fla as “User Interface.fla”, but this isn’t good practice since a file can overwrite others.
Now drag the RoundProgress component on to the stage. You can see that the live preview will work now, it will show our component with the skins, etc.
Set the component’s position to x:10 and y:10, just to center the component in the stage. Open the component inspector ("Window -> Component Inspector"), and with our component selected on stage look at the parameters tab. There you can see the parameters of our component, so change the ratio value to 0.3 and you will see the live preview update.
You can double-click it to edit its skins and you can put a text label down next to each skin to identify them (the UIComponent will remove everything). Also, you can open the library and in RoundProgress Assets/Skins you can double click each skin to edit them – but remember: the circle’s size must not be changed when editing the skin, if you want it bigger or smaller resize the component on the stage.
Important: If you set the ratio value in an ActionScript file, let the parameter in the Component go to its default value (0 in our case).
The parameters we can set and get are ratio and percent: the ratio range is from 0 to 1, and the percent range is from 0 to 100. Both do the same thing but the ranges are different. Also, we have the method setProgress(), with 2 parameters: the first is the current value and the second is the maximun value.
Now you’ve learned how to create a Flash component, you can start creating your own components, selling then on ActiveDen, or creating some freebies for us here. I hope you like it and if you have any questions just ask in the comments.
One last thing: if you want to use a Tween in the example at the top, you can: let’s assume the instance name of our component is progressbar, and our tween engine is TweenLite; you can set the ratio to 0 in the component inspector then tween it to any value bigger than 0 and smaller than 1. For example:
TweenLite.to(progressBar,.5,{ratio:.75});
Every Flash or Flex developer who has had to access remote resources has come across a crossdomain.xml policy file at some point. This article takes a look at what these policy files are, how they work and how you can create one for yourself.
Let’s take a look at an example of what we’re talking about:
What’s so special about this? Well, the SWF is loading the smiley picture from http://mytestgae.appspot.com/images/smiley.jpg, not from the Activetuts+ domain. Without a cross domain policy file, trying to load the image would trigger a SecurityError.
The security model known as the "same origin" policy, implemented by most modern web browsers, prevents some types of content from being accessed or modified if the file exists on another domain. It’s not a hard and fast rule; HTML pages will happily display images and HTML from pages on other domains. But for JavaScript the same origin policy prevents a document or script loaded from one origin from getting or setting properties of a document from another.
Flash includes a similar security policy which generally prevents a Flash application from accessing data that is hosted on a remote domain. However there are many circumstances where it is not only useful but expected that resources will be accessed remotely. An online photo album would find itself limited if external applications could not download its images. It would also be silly if a web service didn’t allow outside applications to interact with it.
For this reason it’s possible to create an XML file, called crossdomain.xml, that specifies how data on a domain can be accessed by a Flash application hosted on a remote domain. For the most part these policy files are quite simple, but there are a few details that it is useful to be aware of.
If you are hosting content that you want to be accessed by external Flash applications, you will need to create a crossdomain.xml file. Let’s start by taking a look at a basic example.
Here is a very simple crossdomain.xml file. When this file is hosted on the root of your domain it permits external Flash applications access to all the resources on your domain.
<?xml version="1.0"?>
<cross-domain-policy>
<allow-access-from domain="*" />
</cross-domain-policy>
The policy file contains a single <cross-domain-policy> tag. Inside this you can have zero or more <allow-access-from> tags. Each <allow-access-from> tag can be used to define a domain or IP address from which a Flash application can access the local resources. The attribute domain="*" specifies that all domains have access. This is thanks to the asterisk wildcard, which is used here to match all domains and IP addresses.
For most situations this "allow all" policy file is sufficient. It grants Flash applications access to all pubic resources, while any security you have in place (like password protected pages) will still prevent Flash applications from accessing sensitive data.
(Note that you cannot put a crossdomain.xml file on your domain that will allow SWFs also on your domain to access remote files on another domain!)
If you do not want to allow global access to your public resources, the domain attribute in the <allow-access-from> tag can be used to grant access to specific domains.
You can specify a domain in its entirety. The example below will give access to Flash applications hosted in the www.example.com domain.
<allow-access-from domain="www.example.com" />
You can use the asterisk wildcard to match those domains that end with the given suffix. Here we grant access to Flash applications on the domains example.com, www.example.com, whatever.example.com etc.
<allow-access-from domain="*.example.com" />
You can specify access by IP address just as you can grant access to Flash applications hosted on specified domains. The same tag and attributes are used, except in this case you use an IP address:
<allow-access-from domain="123.456.789.123" />
By default a Flash application hosted on an HTTPS server can only access resources on remote HTTPS servers. But given the overhead that HTTPS can add to a server you may not want to use it. In this case setting the secure attribute to false will allow a Flash application on an HTTPS server to access data from an HTTP server.
<allow-access-from domain="*" secure="false"/>
So what if you don’t want remote Flash applications accessing your data? You can either create a crossdomain.xml file that does not include any <allow-access-from> tags:
<?xml version="1.0"?>
<cross-domain-policy>
</cross-domain-policy>
Or you can simply not have a crossdomain.xml file at all.
A cross domain policy file will control access to the directory it resides in, and all the subdirectories beneath it. This is how placing a "allow all" policy file at your domain root allows access to your entire domain. But there may be situations where you want to only allow access to a certain subdirectory.
With the latest versions of the Flash Player this requires two XML files. First you need to place a crossdomain.xml file in the root of your domain that allows Flash to process additional cross domain policy files within the subdirectories. This is done with the <site-control> tag. In the example below we set the permitted-cross-domain-policies attribute to all, which means that the cross domain policy files that may exist in the subdirectories will be processed. This behavior is a change in Flash Player 9 Update 3 and up. Previously policy files in subdirectories were processed by default without having to set the permitted-cross-domain-policies attribute.
Note that we have not added any <allow-access-from> tags, which means in the absence of an additional crossdomain.xml files in the subdirectories, remote Flash applications will not have access to the resources on this server.
You can find out more about the meta policy options in this article.
<?xml version="1.0"?>
<cross-domain-policy>
<site-control permitted-cross-domain-policies="all"/>
</cross-domain-policy>
Next, you place a crossdomain.xml file in the subdirectory you wish to control.
To see an example of this in action check out this file. This policy file, in the root of the http://mytestgae.appspot.com/ domain, uses the <site-control> tag to delegate control to any crossdomain.xml files that may exist in the subdirectories. Then this policy file in the /images/ subdirectory grants full access to the directory and any subdirectory beneath it. So a remote Flash application could access the smiley face image in the images directory like so:
<?xml version="1.0" encoding="utf-8"?>
<mx:Application
	xmlns:mx="http://www.adobe.com/2006/mxml"
	layout="absolute"
	width="550"
	height="400"
	applicationComplete="onAppComplete()">
	<mx:Image id="image" scaleContent="true" horizontalCenter="0" verticalCenter="0"/>
	<mx:Script>
		<![CDATA[
			private function onAppComplete():void
			{
				Security.loadPolicyFile("http://mytestgae.appspot.com/images/crossdomain.xml");

				var loaderContext:LoaderContext = new LoaderContext();
				loaderContext.checkPolicyFile = true;

				var loader:Loader = new Loader();
				loader.contentLoaderInfo.addEventListener(
					Event.COMPLETE,
					function(event:Event):void
					{
						image.source = event.currentTarget.content;
					}
				);
				loader.load(new URLRequest(encodeURI("http://mytestgae.appspot.com/images/smiley.jpg")), loaderContext);
			}
		]]>
	</mx:Script>
</mx:Application>
However, access to the smiley face image in the /images-restricted/ directory is not permitted because there is no crossdomain.xml file in the images-restricted directory to override the (lack of) access granted by the crossdomain.xml file in the root of the domain. Running the code below will result in an exception being thrown:
<?xml version="1.0" encoding="utf-8"?>
<mx:Application
	xmlns:mx="http://www.adobe.com/2006/mxml"
	layout="absolute"
	width="550"
	height="400"
	applicationComplete="onAppComplete()">
	<mx:Image id="image" scaleContent="true" horizontalCenter="0" verticalCenter="0"/>
	<mx:Script>
		<![CDATA[
			private function onAppComplete():void
			{
				var loaderContext:LoaderContext = new LoaderContext();
				loaderContext.checkPolicyFile = true;

				var loader:Loader = new Loader();
				loader.contentLoaderInfo.addEventListener(
					Event.COMPLETE,
					function(event:Event):void
					{
						image.source = event.currentTarget.content;
					}
				);
				loader.load(new URLRequest(encodeURI("http://mytestgae.appspot.com/images-restricted/smiley.jpg")), loaderContext);
			}
		]]>
	</mx:Script>
</mx:Application>

The exception reads:
SecurityError: Error #2123: Security sandbox violation: LoaderInfo.content: file:///D|/CrossDomain.swf cannot access http://mytestgae.appspot.com/images-restricted/smiley.jpg. No policy files granted access.
at flash.display::LoaderInfo/get content()
at MethodInfo-635()
So from the above information it looks like cross domain policy files can be used to effectively restrict access to Flash applications not hosted on your own domain. While that is true, you should not rely on a cross domain policy file to restrict access to sensitive information. While Flash may respect a crossdomain.xml policy file, other platforms like PHP won’t. Do a search for PHP Flash Proxy to see what I mean. By using a proxy it’s possible to get access to any publicly available data regardless of the existence of cross domain policy files. And you don’t even have to pay for a PHP server – as I will demonstrate in a future article, Google App Engine can be used as a proxy with no up front costs.
The bottom line is that cross domain policy files provide a way to selectively grant access to local resources by remote Flash applications, but only if everyone plays by the rules. If you want to ensure that your private data stays private, there is no substitute for a firewall.
Dealing with cross domain policy files doesn’t need to be complicated. Once you understand the basics of how they work it is quite easy to grant or restrict access to your data by remote Flash applications. Just be aware that they are not as secure as they might initially seem.
I hope you liked this Quick Tip, thanks for reading!