**I am looking for a graphics designer who is skilled and knowledgeable in designing templates based on the Smarty Web Template Engine.** I need a creative, experienced graphic designer to custom make a Smarty web template for a website that I have… (Budget: $30-250, Jobs: Dreamweaver, Graphic Design, Photoshop Design, Templates, Website Design)
WordPress design [private project] by FeeriaStyle
Adult Backlink Building on German sides by visitx
Ticket Creator by jblanke
I need a windows based program that allows me to design and print tickets. I need to be able to add text, pictures, barcodes, etc. The barcodes need to be pseudo-random, meaning each barcode on each ticket must be unique to that ticket only, and the barcode data must be chosen at random… (Budget: $250-750, Jobs: Apache, C Programming, C# Programming, C++ Programming, PHP)
Making of the “leaKing” in 3Ds Max
In this intermediate level tutorial, we follow CG artist Cristian Pop through the process of creating an abstract paint leaking scene using 3Ds Max 2010 and Pwrapper, a great plug-in from 3D Aliens. After completing the 3D work, Cristian switches to 2D to perform some final color corrections in Photoshop.
Step 1
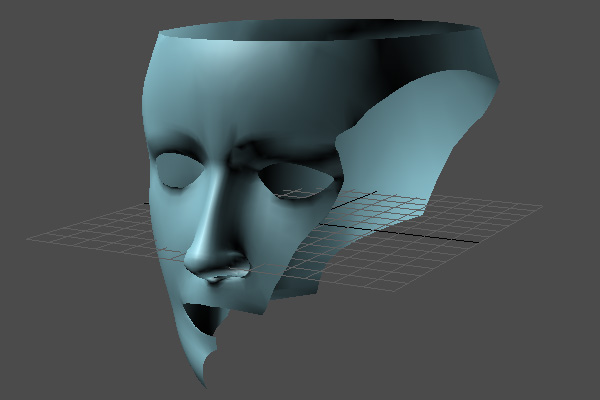
After unzipping “RefFiles.zip”, open the “leaKING.max” file. To make things easier, I have already created the King’s head for you.

Step 2
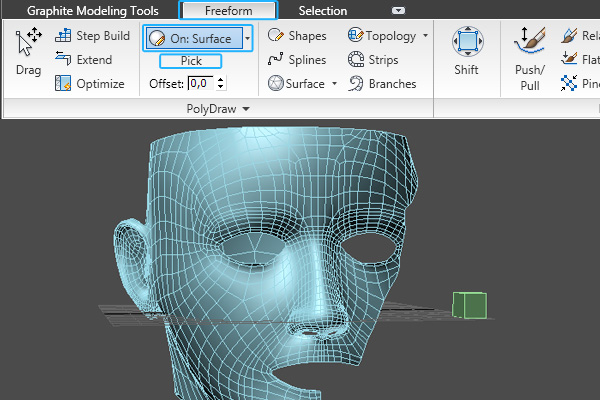
The first thing we’re going to do is model the hair, so create a box in the viewport and convert it to “Editable poly”. Then open the “Graphite Modeling Tools” and, in the “Freeform” section, choose “On: Surface”. Click the “Pick” button and then select our head object.

Step 3
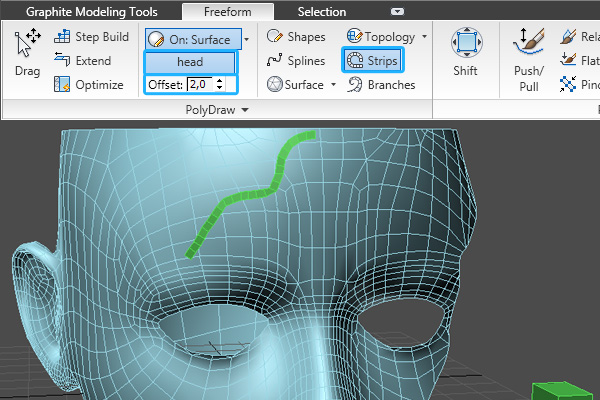
Set the “Offset” value to ’2′, and, using the “Strips Tool”, start drawing the hair onto the head as shown.

Step 4
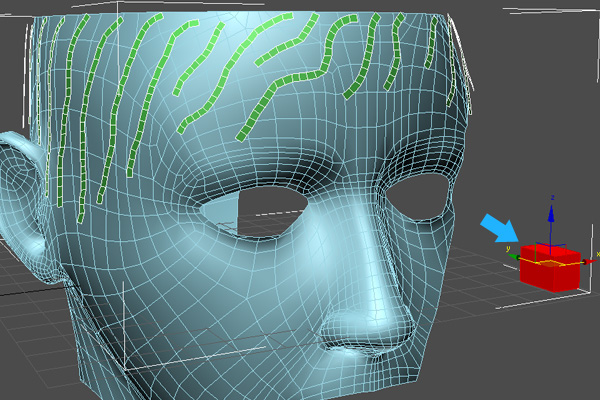
Once you’ve finished, select the original box element and delete it.
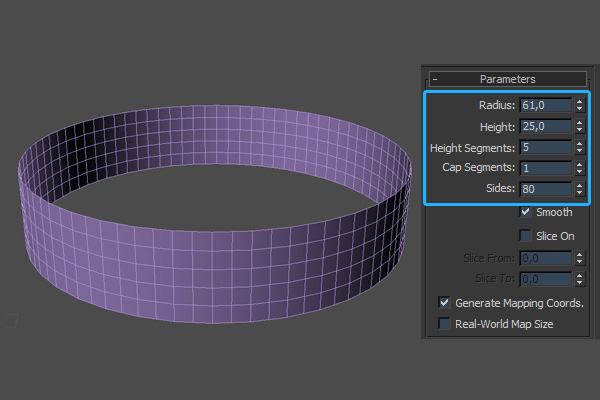
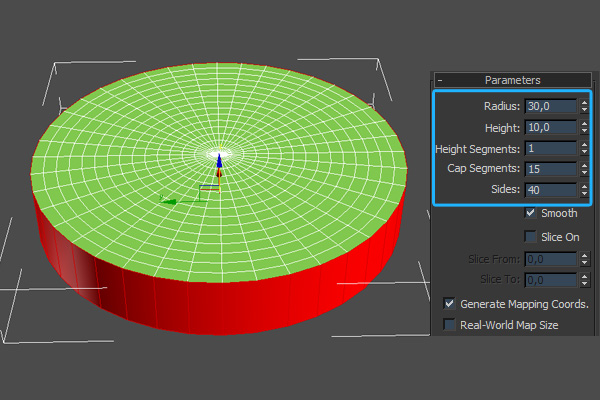
Step 5
We’re now going to move on to the king’s crown. First create a cylinder with the following parameters, then convert it to an “Editable poly” and delete the top and bottom faces.
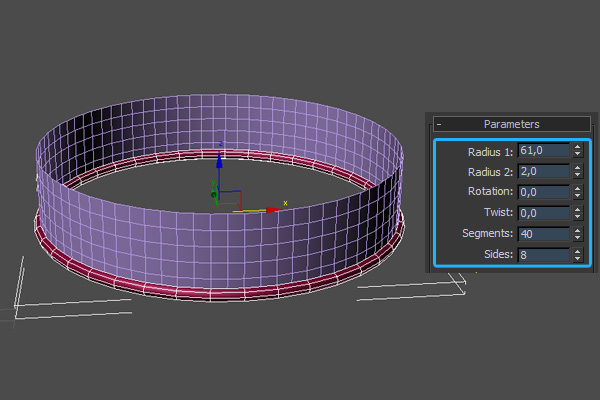
Step 6
Now create a torus with the following parameters and align it to the cylinder as shown.
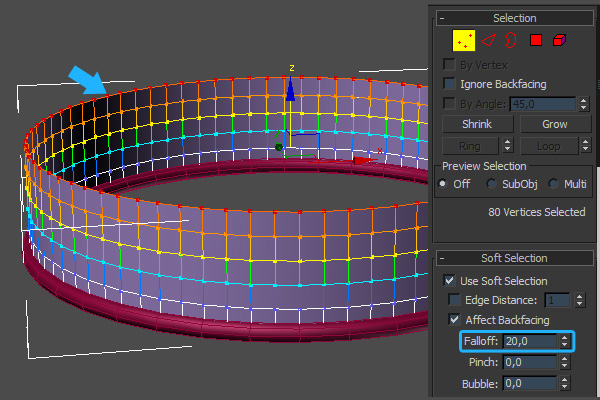
Step 7
Select the cylinder’s top vertices. In the “Soft Selection” rollout, enable “Use Soft Selection” and set the “Falloff” to 20.
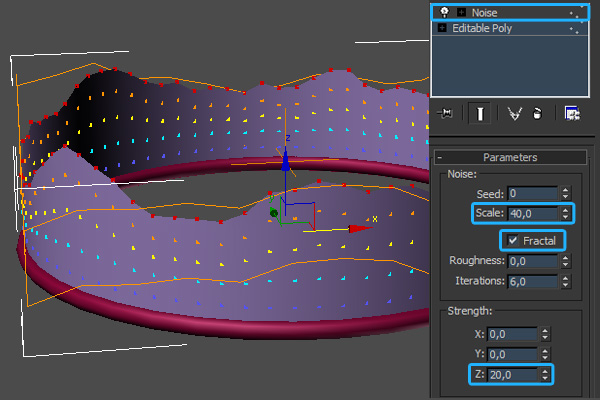
Step 8
Making sure the vertices are selected, add a “Noise” modifier. Set the “Scale” to 40, the “Z Strength” value to 20 and turn on “Fractal”.

Step 9
Now switch to the top viewport. Select both the cylinder and the torus and scale them up on the ‘Y’ axis.
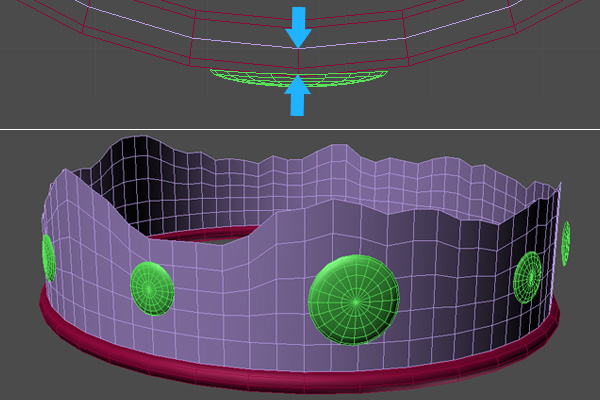
Step 10
With the main body of the crown complete, feel free to add some decorations! It’s important however that you leave some space between the crown body and any decorations you create, as shown in the image below.
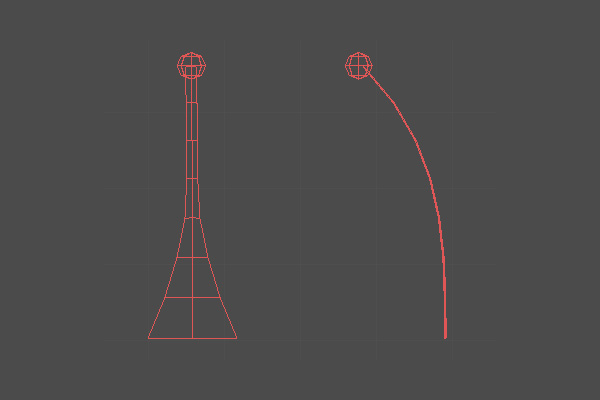
Step 11
Using Max’s basic poly tools, create the following element. This will be used to create the multiple “paint splashes” that sit on top of the crown.
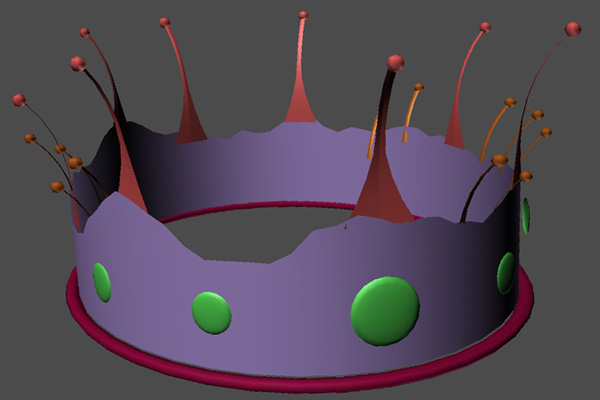
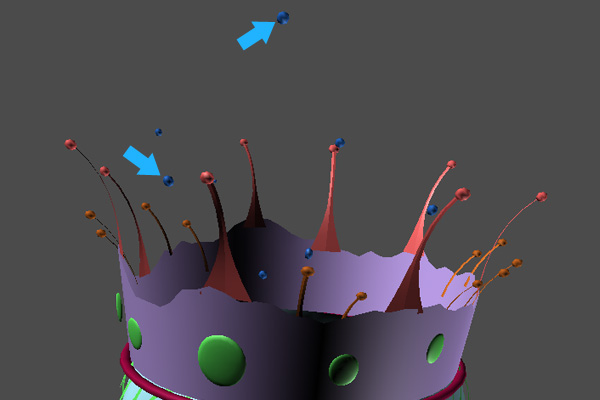
Step 12
We now need to place our splash element randomly around the top of the crown as shown.
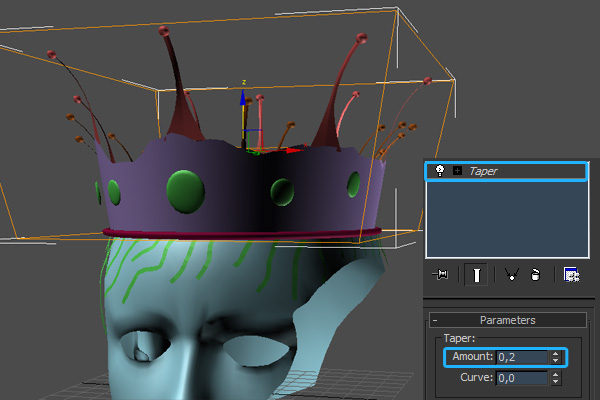
Step 13
With our splashes in place, we can now group all of the objects that form the crown. Here I’ve added a “Taper” modifier to the group (with the “Amount” set to 0.2) to further refine the shape. When you’re happy with the result, position the crown on the king’s head.
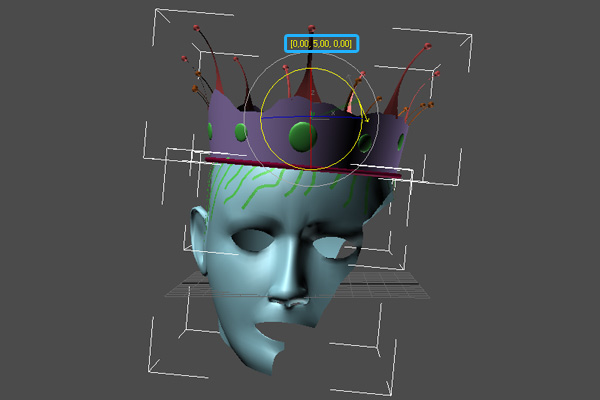
Step 14
Select both the crown group and the head mesh. Now press the ‘A’ key on your keyboard to turn on “Angle Snaps”, and rotate all objects 5 degrees on the ‘Y’ axis.
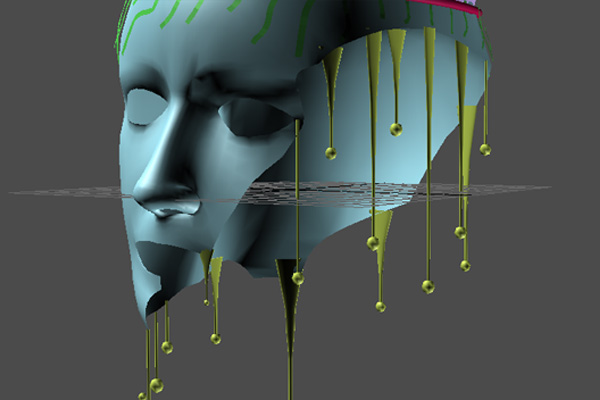
Step 15
Now, just as we did earlier with the “splash elements”, create some “paint leaking elements” and randomly place them around the model. You can see my results in the following image.

Step 16
I’ve also added in some random drops above the crown.
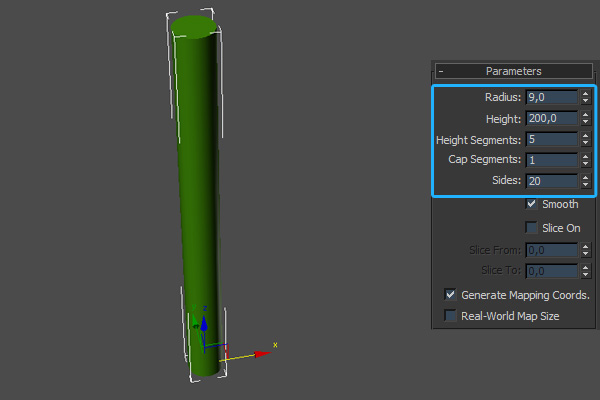
Step 17
With that done, create a “Cylinder” with the following parameters and convert it to “Editable poly”. This will be the source of the leaking paint that is going to form the king.
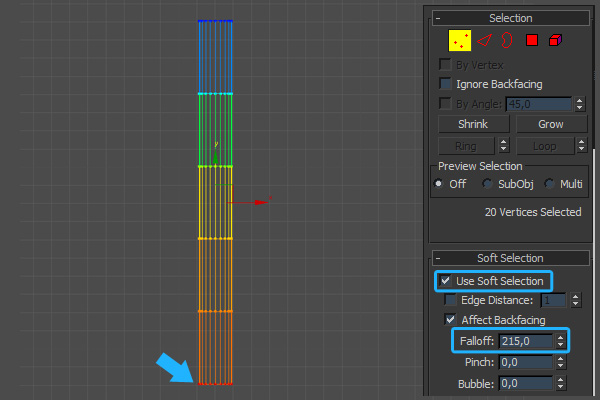
Step 18
Select the bottom vertices, enable “Use Soft Selection” and set the “Falloff” to 215.

Step 19
In the Front Viewport, making sure the vertices are still selected, scale down the cylinder on the ‘Z’ axis.
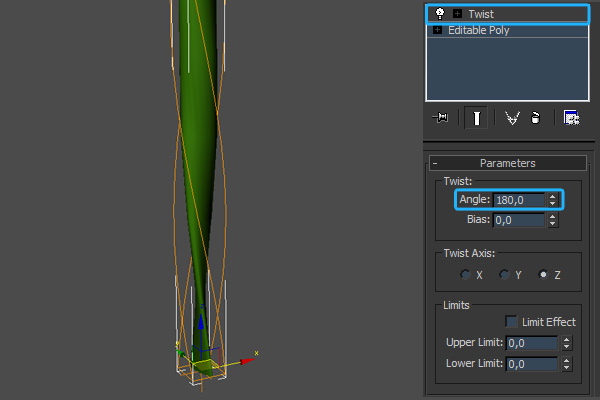
Step 20
Now, add a “Twist” modifier to the whole object, and set the “Angle” to 180 to achieve the following result.
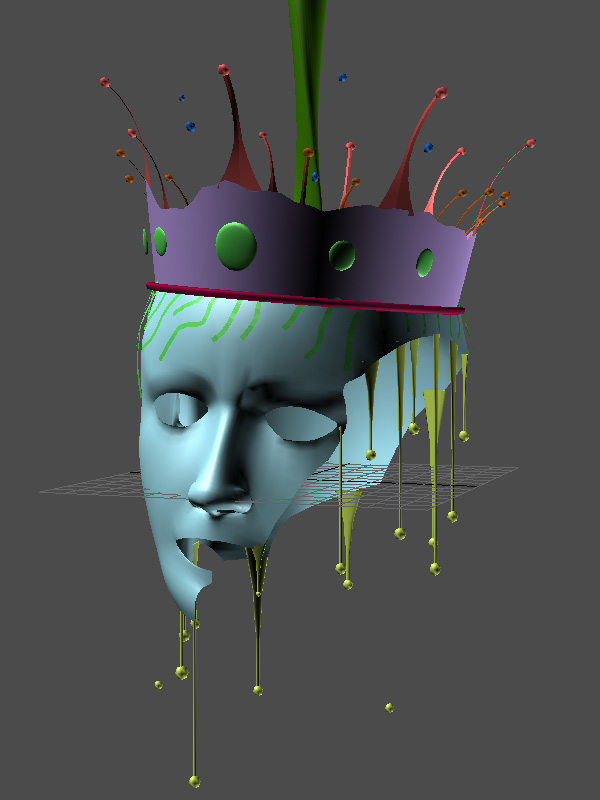
Step 21
With our stream of paint complete, we can now place it above the king’s head, as shown. Select all the objects in our scene, group them, and then change the group name to “King”.

Step 22
We now need to create the drips that have fallen to the ground. Create a “Cylinder” with the following parameters, convert it to an “Editable poly” and then delete the bottom and the side faces.

Step 23
Select the edge vertices and enable “Use Soft Selection”, setting the “Falloff” to 20.
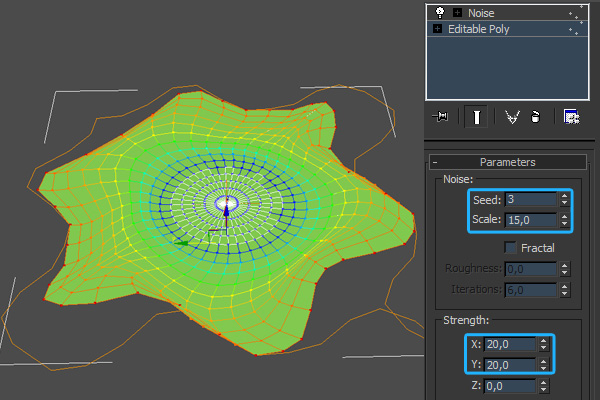
Step 24
Making sure the vertices are still selected, add a “Noise” modifier. Set the “Scale” to 15 and both the “X Strength” and “Y Strength” to 20.

Step 25
With the main shape created, we can now collapse the noise modifier. Select the middle vertex and enable “Use Soft Selection”, setting the “Falloff” to 25.
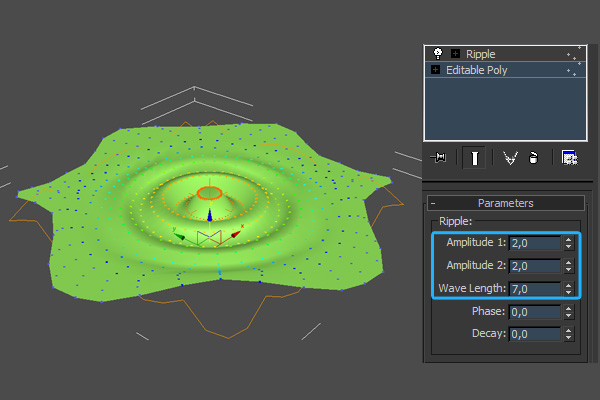
Step 26
Again, making sure the vertices are selected, add a “Ripple” modifier. Set the “Amplitude 1″ and “Amplitude 2″ values to 2, and the “Wave Length” to 7 to achieve the effect shown.
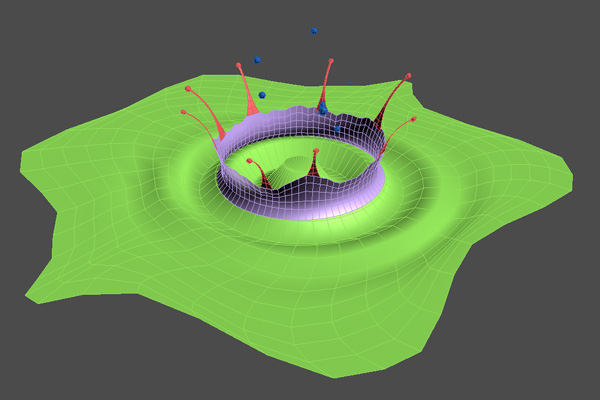
Step 27
We’re now going to create a larger splash shooting up from the floor, however instead of creating it from scratch we’re going to clone the crown group, scale it down and use that! So select the crown group and clone it, delete some of the unnecessary splash elements, and place the group on the drip as shown below.

Step 28
Using the techniques described above, continue to add some smaller drips on the ground. Once you’re happy, group the newly created splash objects and rename the group to “Ground Drips”.
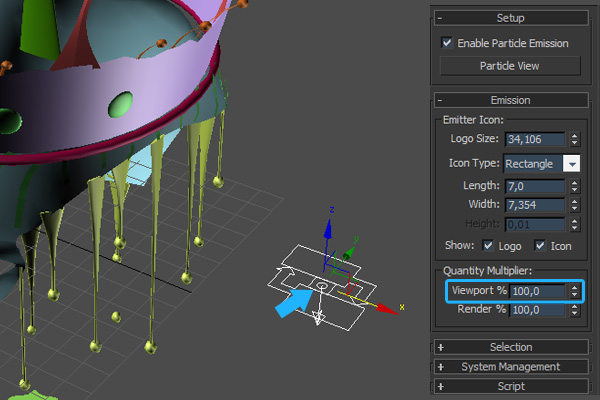
Step 29
We now need to cover all of our objects with particles, as the “Pwrapper” object we’ll be using needs a particle source from which to generate it’s mesh. So, create a standard “Particle Flow Source” near the head and set the “Viewport Quantity Multiplier” to 100%.
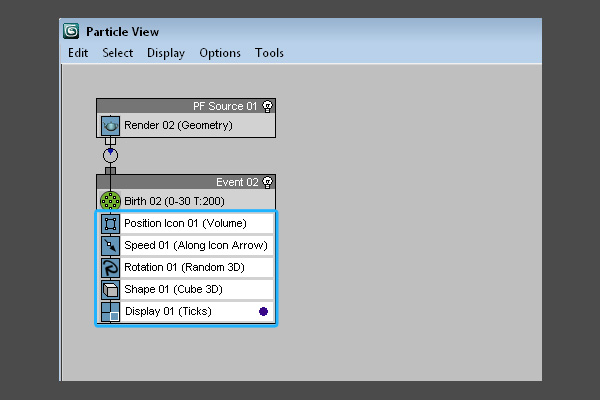
Step 30
In the “Particle View” window, select the following operators and delete them.

Step 31
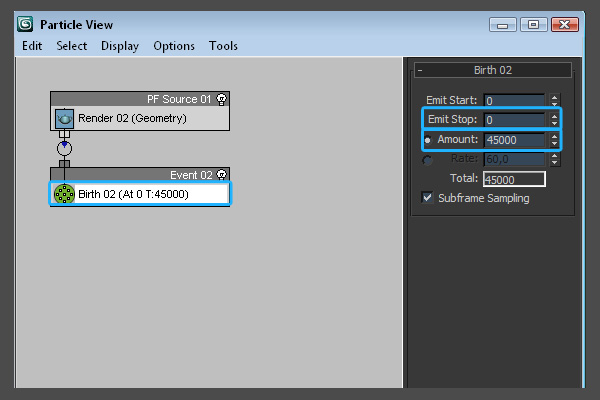
In the “Birth” operator rollout, set the “Emit Stop” to 0. This will ensure that all of the particles will be generated on the very first frame. Now set the “Amount” value somewhere between 20000 and 45000; higher value will increase mesh-generation time. This particle system will be used to generate the first of two “Pwrapper” objects.

Step 32
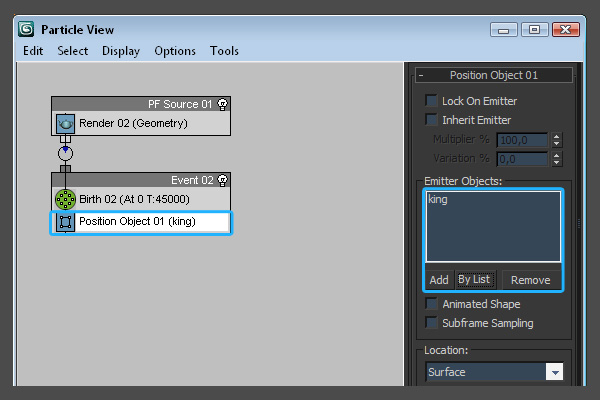
Add a “Position Object” operator to “Event02″, and add the “King” group into the “Emitter Objects” dialog.

Step 33
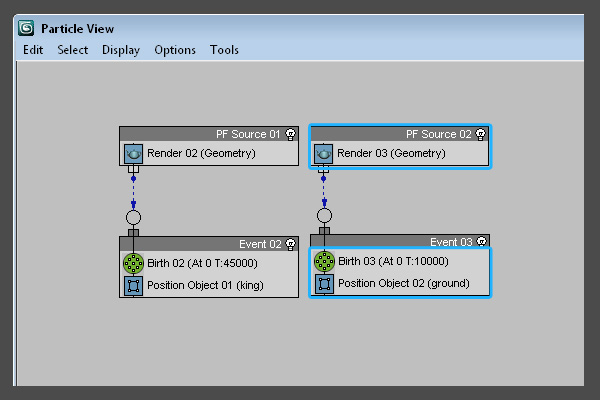
Because the second “Pwrapper” object will be different from the first, we now need to create a second “Particle Flow” system. So, create a second “Particle Flow Source” and set the “Viewport Quantity Multiplier” to 100% as before. Now open the “Birth” operator rollout, and set the “Emit Stop” to 0 and the “Amount” to 10000. Finally add the “Ground Drips” group in the “Position Object” operator.
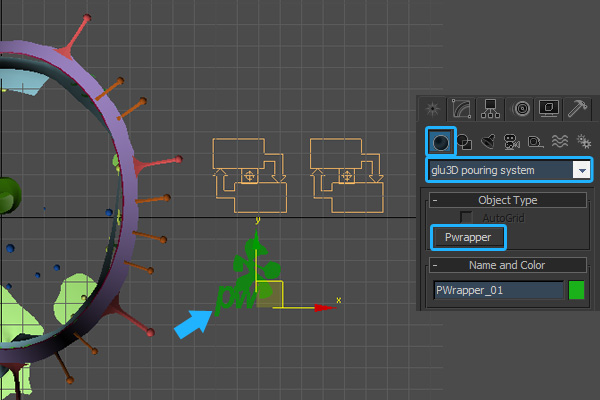
Step 34
In the “Create” panel, select “glu3D pouring system” from the drop down list and click the “Pwrapper” button to create a Pwrapper object in the viewport.
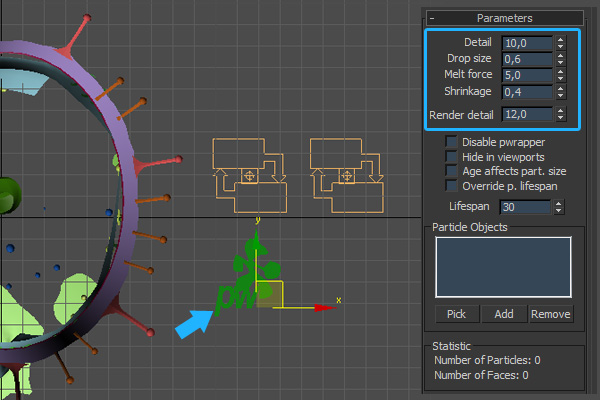
Step 35
In the “Modify” panel, set the “Parameters” values as shown here.
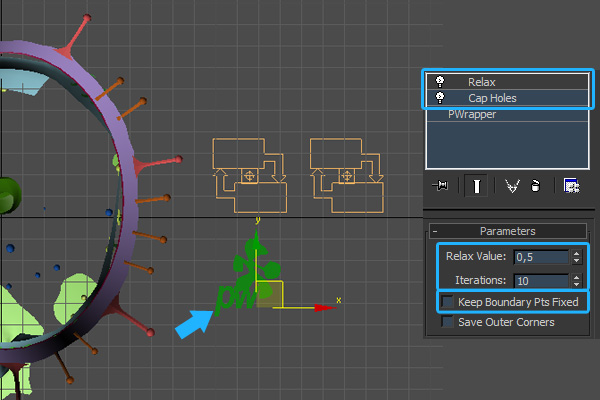
Step 36
Add in a “Cap holes” modifier and then add a “Relax” modifier, setting the “Iterations” value to 10 and disabling “Keep Boundary Pts Fixed”.
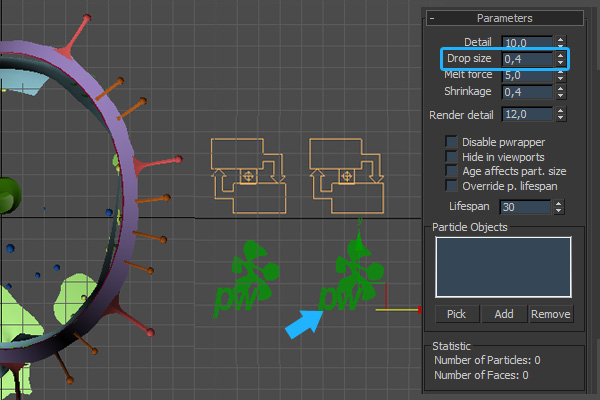
Step 37
Clone the “Pwrapper” object as a copy, and set the “Drop Size” on the copy to ’0.4′.
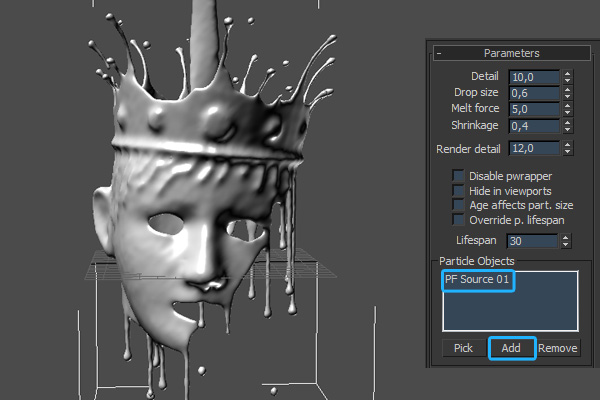
Step 38
It’s now time to create our first mesh! Select the first “Pwrapper” object, and add the first “PF Source” as shown. As soon as it’s added, the “Pwrapper” object starts generating the blobmesh that forms the king.
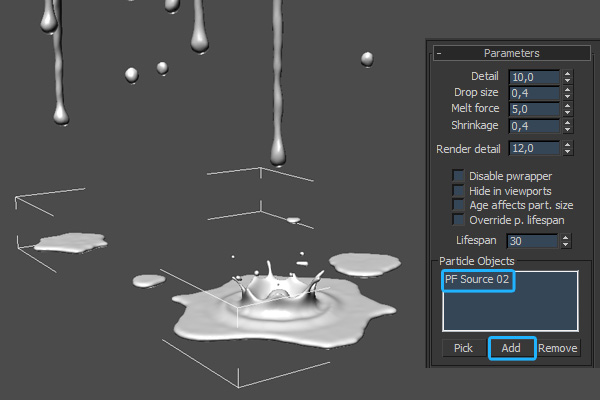
Step 39
With that done, it’s time to create the second mesh. So, just as above, select the second “Pwrapper” object, add the second “PF Source” and watch as the drips are created.
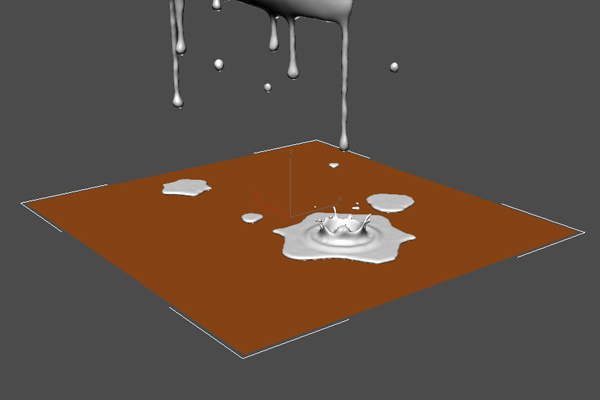
Step 40
Create a plane underneath the drips as shown.
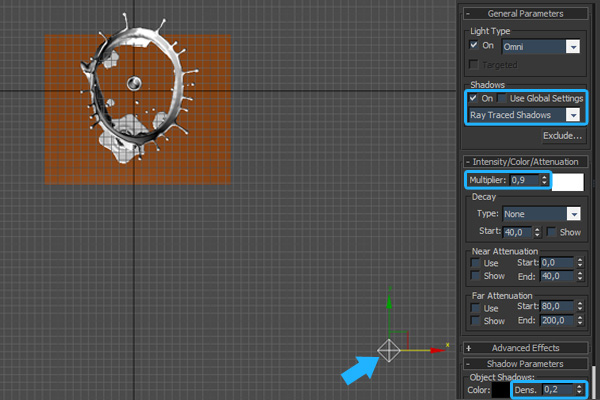
Step 41
Now on to lighting. First create an “Omni” light in the top viewport and, as this will be our master light, turn “Ray Traced Shadows” on and set the shadow density to a smaller value, as shown.

Step 42
Here I’ve created a second “Omni” light, which I’m using to further illuminate the left side of the leaKING. I’ve made sure to disable shadows and turn down the intensity.

Step 43
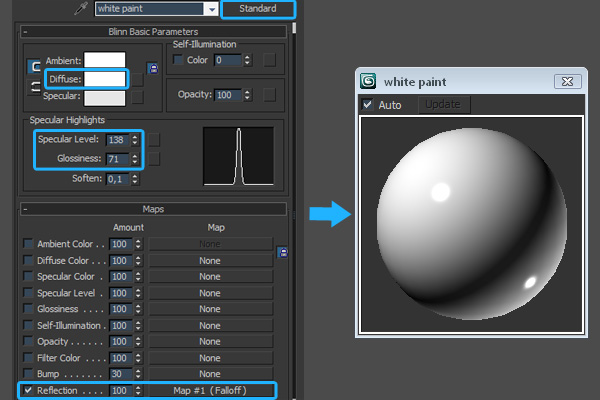
Now let’s create the materials. Open the “Material Editor”, create a “Standard” material and rename it to ‘white paint’. Change the “Diffuse” color to ‘white’, set the “Specular Level” to approximately 138 and the “Glossiness” to approximately 71. Under the “Maps” rollout, add a “Falloff” map in the “Reflection” slot.

Step 44
Click on the “Falloff” map to access it’s properties. In the first slot add the included ‘env.hdr’ file and then change the color from the second slot to ‘black’. After that, change the “Falloff type” to “Towards/Away”. Assign our new paint material to both of the “Pwrapper” objects.

Step 45
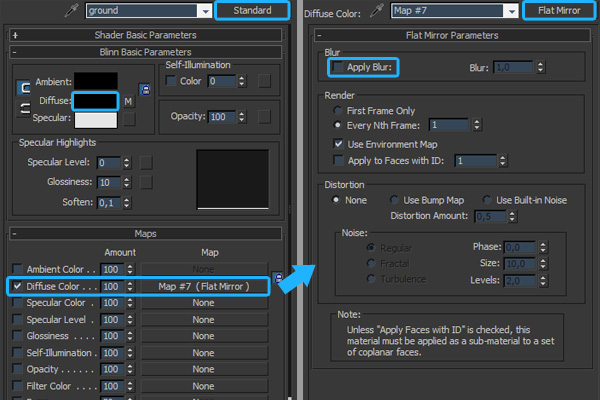
Now we need a material for the floor plane, so create a new “Standard” material, change the “Diffuse” color to ‘black’ and add a “Flat Mirror” map to the “Diffuse” slot. Click the “Flat Mirror” map to access it’s properties, and ensure that blurry reflections are disabled.

Step 46
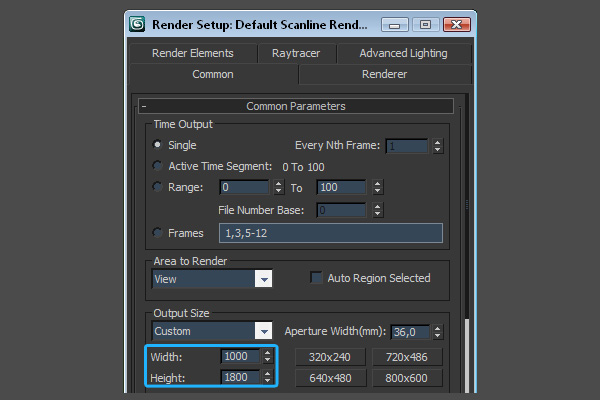
With all of the materials in place, we can now position the camera and adjust the render settings as required. For my scene I chose to render at 1000x1800px.

Step 47
Now that everything is setup as needed, render the scene using 3Ds max’s standard renderer, and save the image as a “jpeg” file.

Step 48
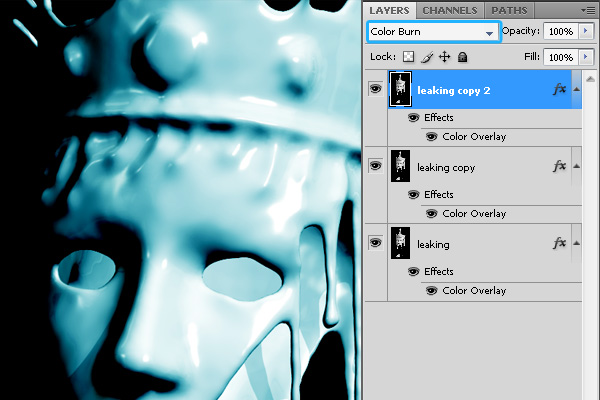
With all of the 3D work complete, we’re now going to add a few final color corrections in Photoshop. Open your render, right-click the “Background” layer and choose “Layer From Background”. In the “New Layer” dialog box, enter the name “leaking” and hit “OK”. Now double-click the layer to bring up the “Layer Style” dialog. Enable the “Color Overlay” effect and change the color to a light blue (in my case I’ve used 00d8ff,) then set the “Blend mode” to ‘Overlay’ and decrease the “Opacity” to 25%.

Step 49
Duplicate the “leaking” layer twice, using the “Ctrl+J” hotkey. Set the blending mode for the second duplicate (the very top layer) to “Color Burn”.
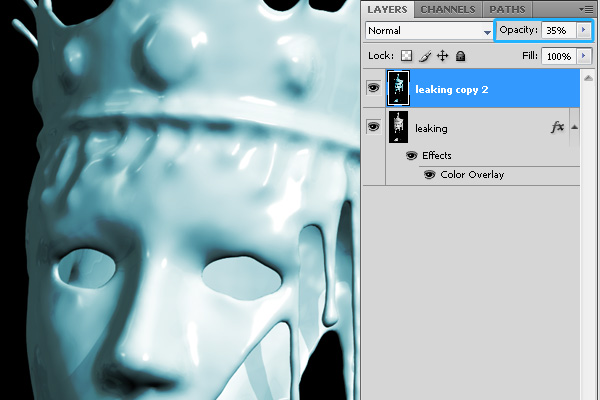
Step 50
Select the two copied layers and merge them using the “Ctrl+E” hotkey. Decrease the “Opacity” of this new merged layer to 35%, and with this done, right-click either of the layers and choose “Merge Visible”.
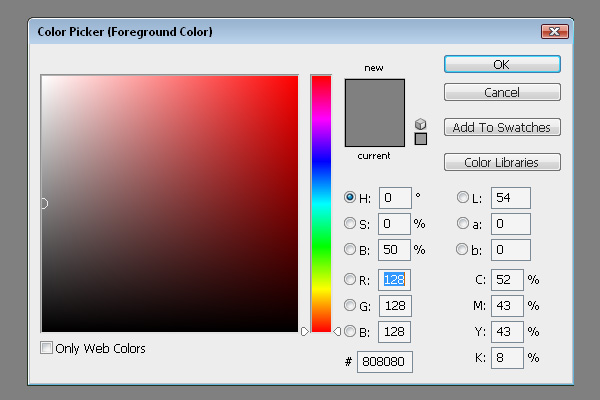
Step 51
We’re now going to add a subtle photographic grain to the image. First create a new layer and fill it with grey as shown.
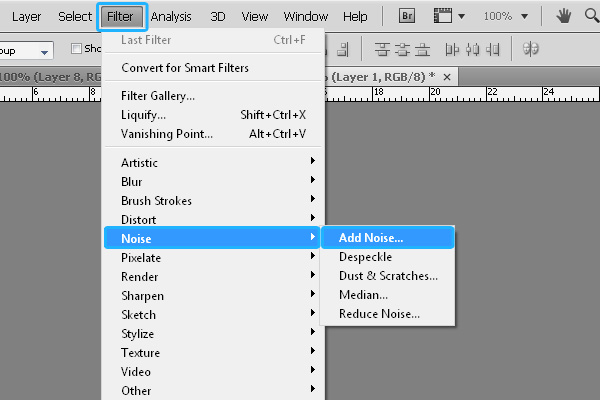
Step 52
With the layer selected, go to Filter > Noise > Add Noise…
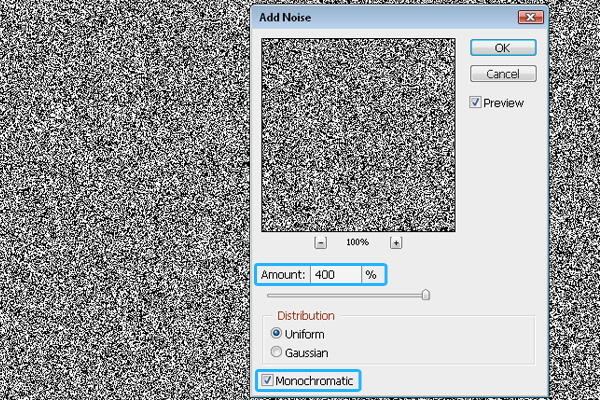
Step 53
In the “Add Noise” dialog box, set the “Noise Amount” to 400% and change the “Noise Type” to “Monochromatic”. With that done, hit “OK”.

Step 54
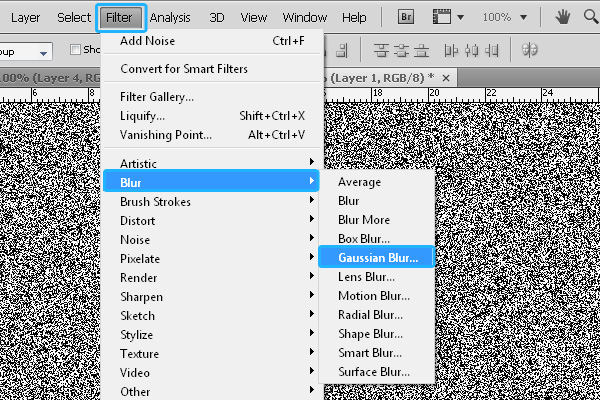
Now go to Filter > Blur > Gaussian Blur…

Step 55
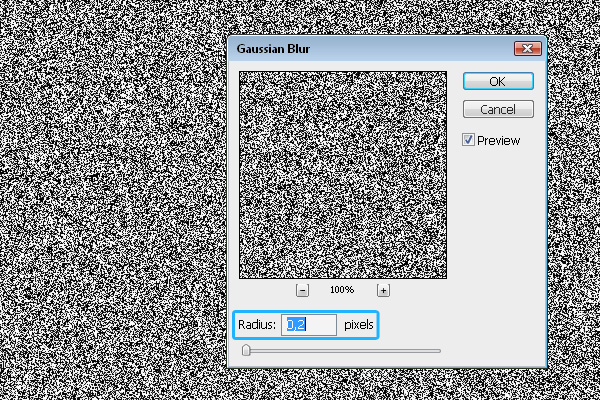
In the “Gaussian Blur” dialog box, set the “Blur Radius” to 0.2 pixels and press “OK”.

Step 56
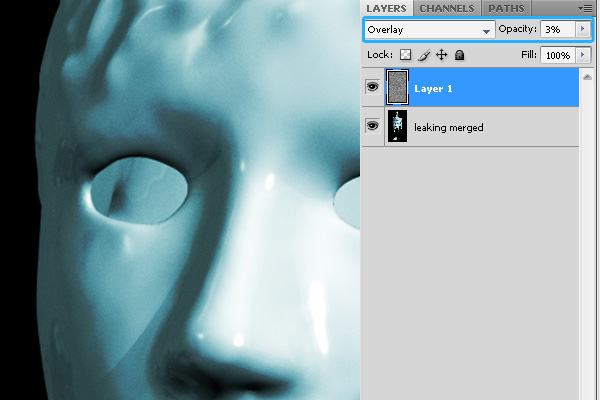
Set the blending mode of our noise layer to “Overlay” and the “Opacity” to 3% – we hardly want to be able to see it at all. With that done, the intensity of our photographic grain can now be adjusted by using the opacity slider.

Step 57
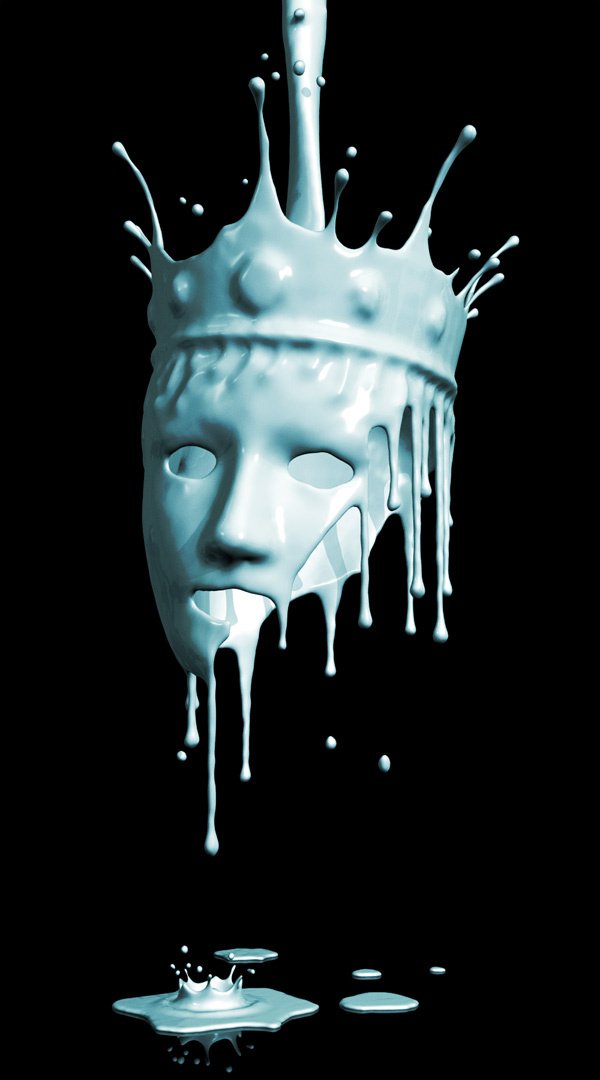
And with that, we’re done! Congratulations, you’ve made the king proud! My final result is shown below.

Don’t miss more CG tutorials and guides, published daily – subscribe to Cgtuts+ by RSS.
6 Tips for More Effective Email
We’ve covered tips for managing email overload, but the reality is that many of us are partially responsible for our own email insanity. If we sent fewer email messages and made sure that the ones we do send are clear and effective, then we’d have fewer incoming messages to read, filter, delete, forward, and so on. Here’s how to write more effective emails.
Use a descriptive subject line
One of my pet peeves is when someone sends an email titled “hey” or “greetings” or worse, without any subject line at all. How will I know if your email is time-sensitive or if it might impact the project I’m currently working on? I don’t. Including relevant details in your subject line saves time and often save you from having to answer questions from confused recipients. For instance, titling an email “Staff Retreat Scheduled for June 5, 10am-6pm” is more effective than “Staff Retreat” or something silly like “It’s that time again!!” In some cases, you can relay the entire message in your subject line and save the recipient from opening the message at all. In that case, it’s courteous to include EOM (for end of message) in the subject line so they’ll know not to open the email.
Add the recipient last
How many times have you accidentally hit send before you finished typing or attached the document you meant to send? I’m guessing it happens more often then you’d like to admit. If you add the email’s recipient(s) last, you’ll never have to send a follow-up message saying “gosh, I’m sorry, here’s the rest of that email.” When I’m composing a response to someone’s message, and I want to take my time crafting a response, I’ll sometimes alter their email address slightly (perhaps adding a “.” at the end) so that if I accidently press send, Gmail will prompt me to fix the address.
Keep it simple
Nobody likes a long, meandering email message, especially if they’re reading it on a smartphone. If you find yourself going off-topic, then hit the delete button and remove anything that detracts from your primary message. Also use short paragraphs or bullet points, since they’re easily scannable and force you to stay on topic. If you were typing on an iPhone or Blackberry, you wouldn’t write a lot of fluff or exposition, so pretend you’re using a mobile device (minus the abbreviations and potential typos – you don’t want to look sloppy or lazy). When in doubt, remember that increased simplicity often equals increased productivity.
Make recommendations
You know that classic snippet of dialogue with the old married couple where one says, “What would you like to do today, honey?” And the other says, “I don’t know – what you like do today?” Sending emails like that only prolongs the decision-making process. Depending on the situation (for instance, if it’s a job interview, you’ll let the recruiter or HR person take the lead), you can suggest meeting times and places to get the ball rolling. For instance, “our team needs to meet so we can update each other on X project – please let me know if you’re available next Tuesday at 1oam” is more effective than “when are you guys around?” If the suggested time doesn’t work for people, ask them to propose other times when they are available.
Avoid snappy comebacks
Unlike phone calls or meetings, email doesn’t give you cues like tone of voice or body language, so it’s easy to misconstrue someone’s message and assume that they’re blaming you for something or that someone is mad. Never engage in flame wars, though. It’s too easy to type an angry retort or a juicy bit of gossip and accidently hit reply all when your message was intended for one specific person. I know people who have lost their jobs over ill-advised email messages landing in the wrong inbox.
Avoid spammy words/phrases.
This isn’t such a big issue when you’re emailing someone you already have an email relationship with, but when you’re contacting a potential client or submitting your resume and cover letter for a job opening, you’ll want to avoid words and phrases that could be mistaken for spam. Otherwise, your carefully crafted email could wind up in the recipient’s spam folder. The list is constantly changing as spammers get increasingly sophisticated, but Microsoft Outlook published a pretty thorough guide earlier this year.
What about you? What email strategies have you found to be effective?
Website Review & Testing by lyj898
Directory Listing Joomla Php
Fully Functional Hyip Script
Cs-cart Email Invoice Changes
We are need someone experience with CS-Cart to make a few minor changes to the CS-Cart Invoice that is emailed in the confirmation emails.
The invoice needs to be formated to be centered in the middle of the email that the customer receives along with the header text that is enter in the CS-Cart Order Statuses.
Invoice layout is idenditcal to a modified CS-Cart invoice that we are already using, just centered in the email confirmations that the csutomers receive.
Single-page WordPress Site
Hi there. I have designed my company website but need an affordable coder to turn it into a clean, standards compliant WordPress site.
I will provide the full layered PSD, and just need someone who understands WordPress and Jquery. The site is a simple single page site, mostly just a gallery page. The only other page is an ‘about us’ page which again is a simple text and image content area.
The main part of the site is a gallery which needs to have a jquery sorting script integrated. I want the same thumbnail sorting as this site : tobiasahlin[dot]com and then a simple lightbox like colourbox to be used to display the images. Also I have custom fonts needed in headings, so something like sIFR will be needed to be integrated as well.
Please, only WordPress developers who are proficient with javascript/jquery need contact me.
Thanks so much.
understanding server load in CPanel

Understanding Server load – How does it impact Server Performance
Well, yes, basically the server load is a number. This number is usually under the x.xx format and can have values starting from 0.00. It expresses how may processes are waiting in the queue to access the processor(s). Of course, this is calculated for a certain period of time and of course, the smaller the number, the better. A high number is often associated with a decrease in the performance of the server.
You can usually find the server load value in the control panel associated with your web hosting account under “Server Status”. There you’ll find listed a server load value. If you refresh the page, you’ll notice that the value changes almost every time. That’s because it’s an instantly calculated value. However, one can notice over a period of time which are the usual values of the server load.
Knowing what the value of the server load is not very important though. Knowing how to interpret the value is what counts. Unfortunately, there’s a lot of debate on how to actually interpret it, even among web hosting company owners.
One thing is sure however: all of them consider a server load of 0.xx as safe. As long as most of the time the server load is under 1.00, you should not notice any problems like your website being slow (unless there are some networking related problems somewhere between your computer and the server).
The uncertainties come when the server load has values over 1.00. Most web hosting company owners apply the following rule: if the server has a single CPU (central processing unit), a server load higher than 1.00 is not good; if the server has two CPUs, a server load over 2.00 is not good and so on.
You have to understand that these are average server loads. All web servers get busy from time to time, either because of an user’s abuse of resources, or because the server makes some backups etc. Usually the tasks requiring lots of resources are programmed by the host to be run during weekends when the traffic is lower so they won’t affect the users much.
Things however are not as black and white as you might think by now. With the powerful processors of today even single processor servers might cope quite well with a server load of 2.00.
Also, remember the definition: the server load represents the number of processes waiting to access the CPU. But not all processes are the same! If the processes are low priority, when a new server request (page request) appears, it can still be handled almost instantly. That request will not be postponed at all, it will be dealt with immediately, while the lower priority processes will wait.
As usual, and as many people directly implicated in the hosting business say, it all comes down to real-life behavior. Are the pages loading fast? Does a process such as searching through a database take a reasonable time? Then you don’t really have a problem, whatever the server load is.
Not to mention that the server load is just one factor out of many others (memory usage, CPU usage, size of swap file) and it’s often influenced by them. I’ll give you an example. If the server has insufficient internal memory it will use a swap file. This means it will work intensely with the hard drive, which will increase CPU usage and in turn result in a higher server load which will make the server respond slowly to requests.
In such a case the solution is simple: more internal memory (RAM). That would lead to a lower swap file, lower CPU usage, lower server load, faster response speed. So the server was almost OK, all it needed was more internal memory.
So, the ultimate test is the way that the server behaves. If the server is fast, a number, even if it’s called “server load”, really doesn’t mean much. But then again, I love when I see it constantly at around 0.20. ![]()
Personally, if the server load is around 4.00 24/7 and we’re talking about a server with a single processor, I would suspect something is wrong: overselling or overloading. In that case, just to make sure I would never face serious problems, I would ask my host to do something about the server load or move my website to a server with a lower server load. If the response I get does not please me, I will consider looking for a new host.
I like to play it safe and that’s what I recommend you to do too: Play it safe
