Friday Photo Critique #38

Friday Photo Critique is our weekly community project, where we publish a photograph submitted by one of our wonderful readers, then ask you all to offer constructive feedback on the image. It’s a great way to learn more about photography, express your viewpoint, and have your own image critiqued!


Quick Ground Rules

  1. Play nice! We’ve deliberately chosen photographs that aren’t perfect, so please be constructive with any criticism.
  2. Feel free to offer any type of advice – composition, lighting, post-processing etc.
  3. You can also link to photographs that you feel offer a great example of this type of image shot exceptionally well.

Without further ado, here is this week’s candidate for Friday Photo Critique!


The Photograph

Photo Critique

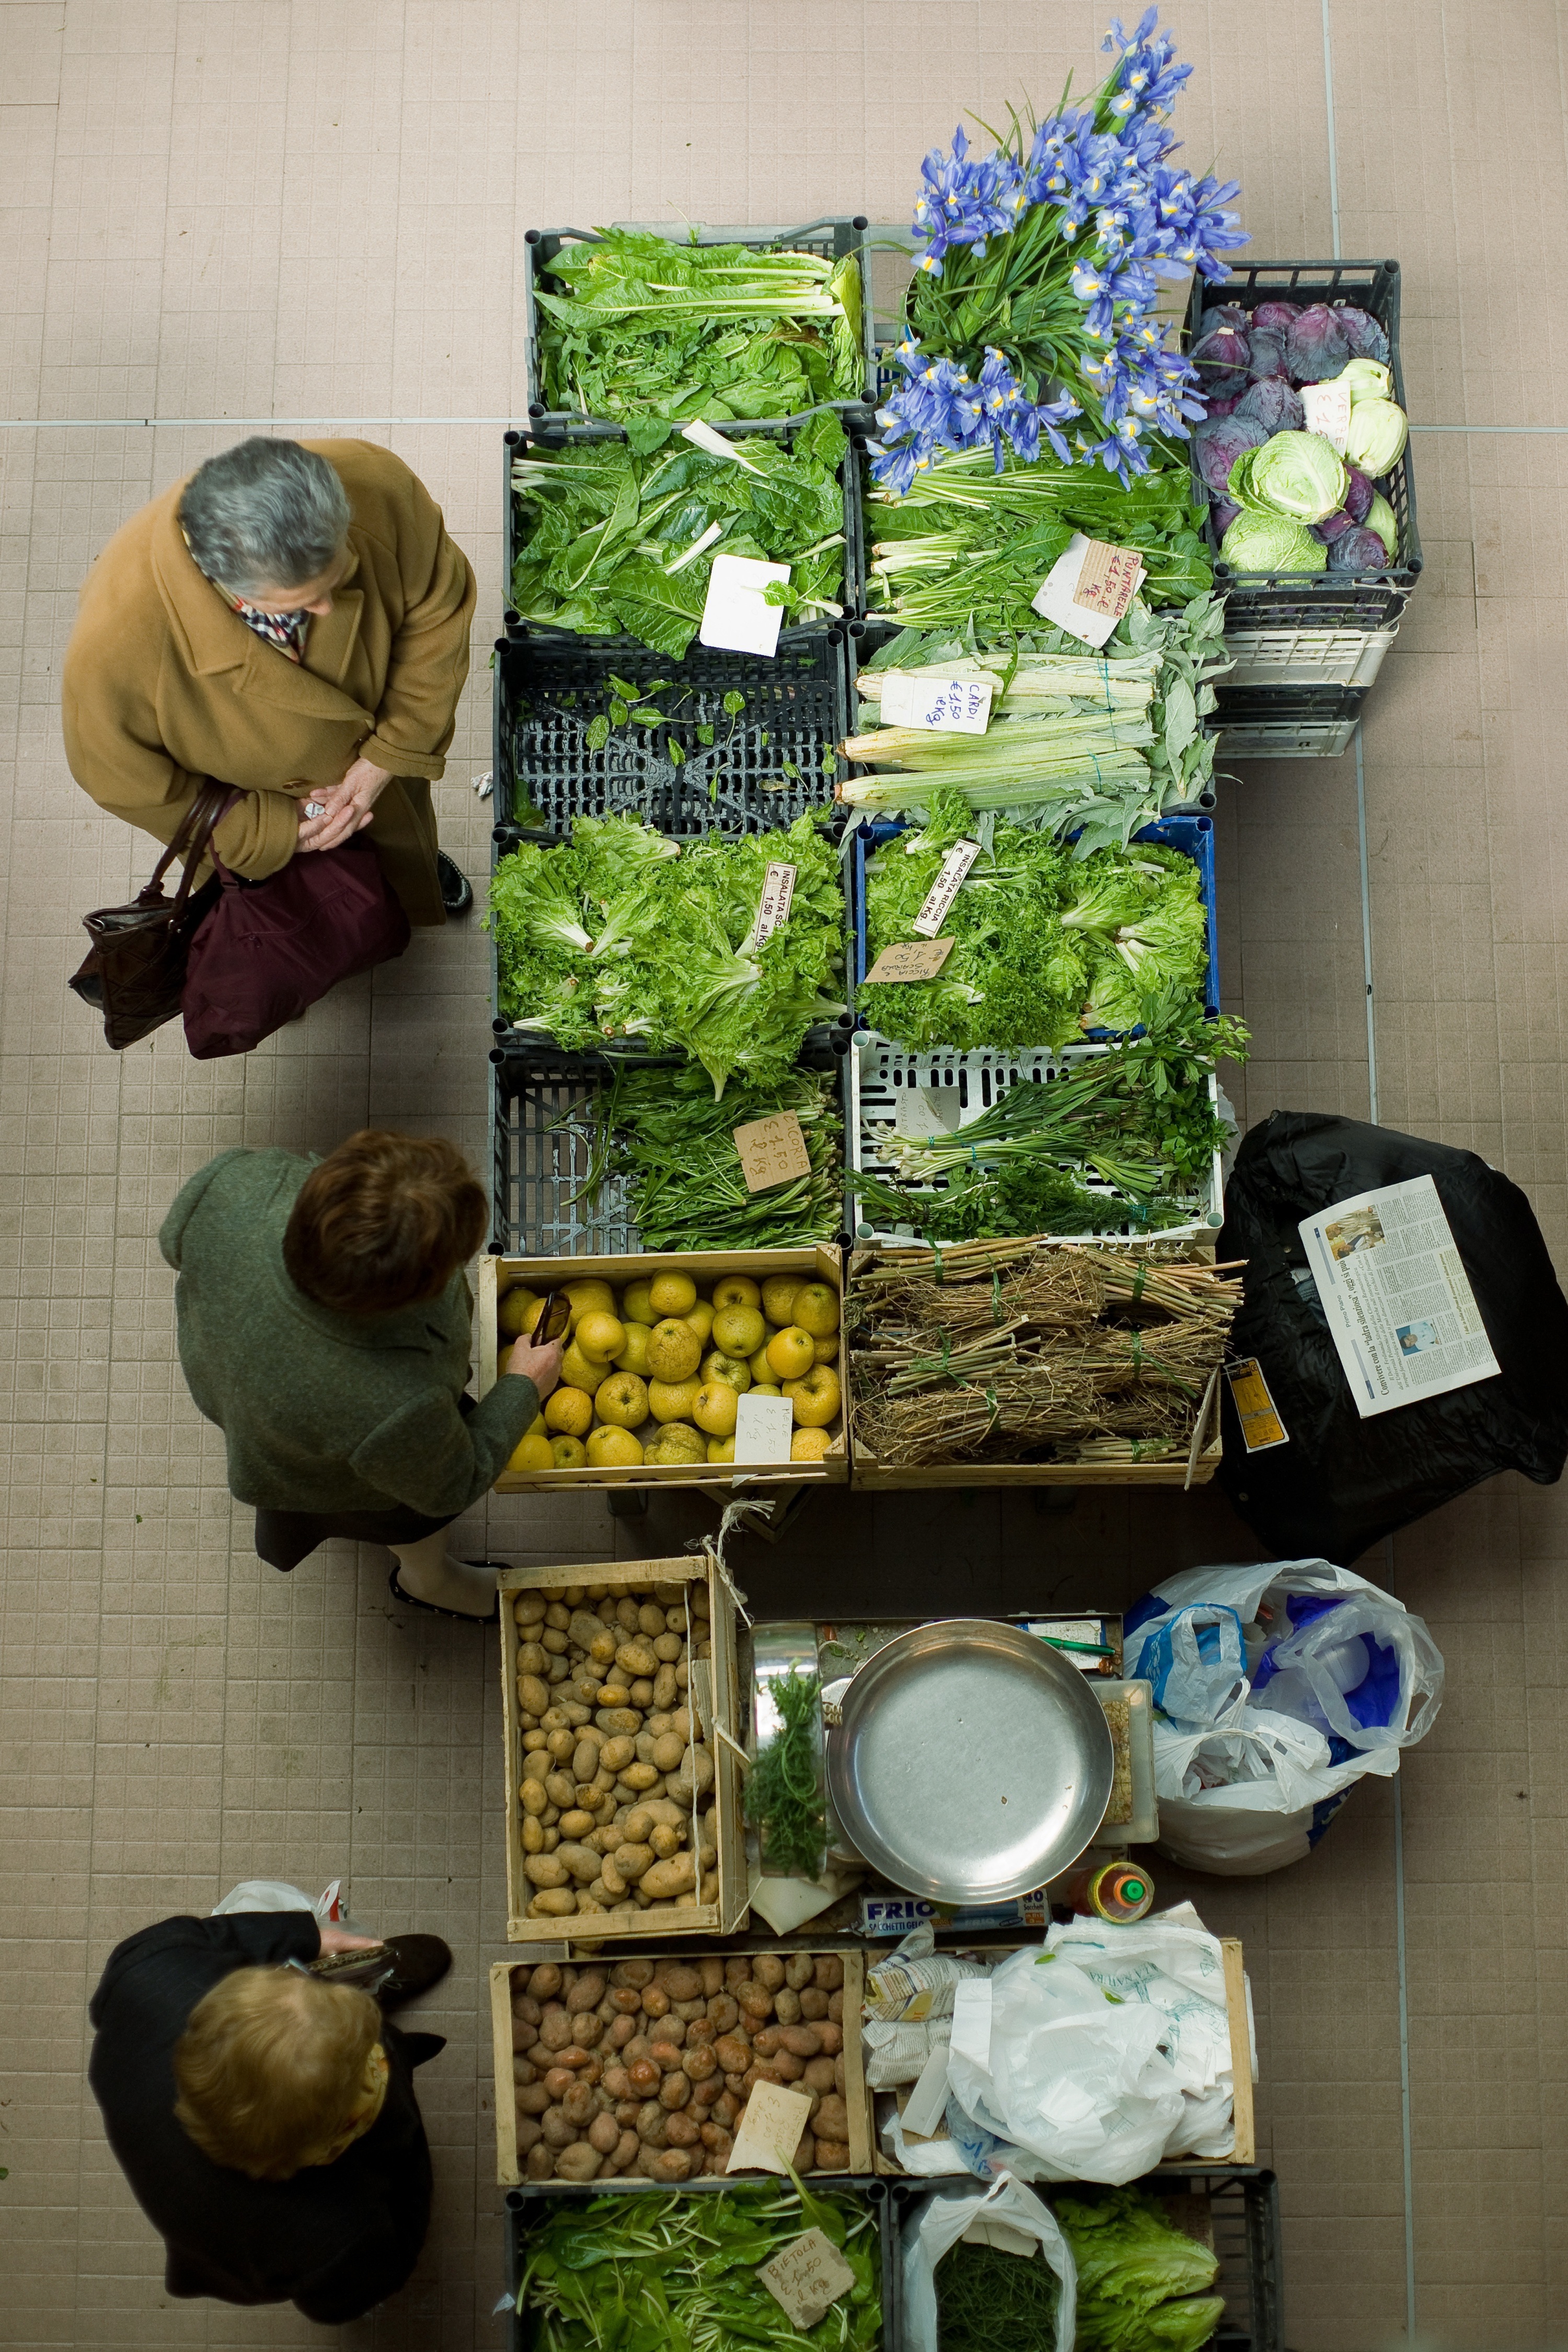
Photographer: Alessandro Rocchi

Please let us know what you think in the comments – how would you have approached the scene or taken the photo differently? A massive thank you to everyone who commented last week.

The most constructive and helpful comments will be featured on the site. Interested in submitting your own photo? You can do so here!

Perfect Exposure Every Time: A Guide to Metering in the Viewfinder

You’d be surprised how much information is available through your camera’s viewfinder. In today’s tutorial, we’re looking again at one of the most important elements of photography – exposure – and how you can expose a perfect photo using just the information shown in your camera viewfinder!


Perfect Exposure

When I first began learning photography, mastering exposure settings seemed to be one of the trickiest things to grasp. To get a decent exposure, my workflow usually consisted of snapping a picture, viewing the result, fiddling with the settings nearly at random, and then trying again only to repeat the cycle over and over while hoping to stumble onto a decent result. As a beginner, this can be immensely frustrating. It wasn’t until I had a strong grasp of how the exposure settings affected the end result that I really began taking nice photographs fairly easily.

Armed with this knowledge, I could at least figure out how to interpret my test picture and adjust the camera settings accordingly a few times until I was happy with the result. Then one day someone showed me a simple trick that changed everything. Since I lacked any sort of formal training I had completely missed the fact that my camera would actually tell me how far off my exposure was and guide me to the “sweet spot” without ever pulling my eye from the viewfinder!

This brief tutorial is for complete beginners who, like me when I first started, have no clue how to make your fancy camera take a picture that isn’t either too dark or too bright. As such, I’ll keep everything really basic and as non-technical as possible. It’s also important to note that while the principals outlined here apply to all digital SLRs, the functionality discussed below applies specifically to Canons and may require some interpretation to be applied to cameras from other manufacturers.


Exposure: The Basic Idea

Our recent Beginner’s Guide to Exposure explained in great detail everything you need to know about exposure. For those of you who haven’t read this, I’ll very briefly explain what you need to know for the purposes of this tutorial.

Exposure loosely refers to the amount of light that is let into the sensor on your camera. The more light you let in, the brighter the resulting picture. Conversely, the less light you let in, the darker the picture.

How much light is let in is a function of your shutter speed and aperture. The shutter speed is commonly expressed in fractions of a second. For example, if you see a setting that says 1/125, 1/50, etc. this is your shutter speed. Shutter speed is exactly what it sounds like: the amount of time the shutter opens to let light in.

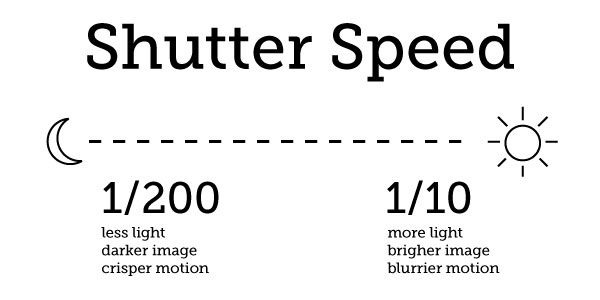
Since the number is a fraction, the smaller the denominator (the number on the bottom), the longer the exposure. For example, 1/200th of a second is a much shorter amount of time than 1/10th of a second. Consequently, a shutter speed of 1/200th of a second will let in much less light and produce a much darker image than a shutter speed of 1/10th of a second. Also note that the longer the exposure, the blurrier any action in the photo will become.

lighting chart

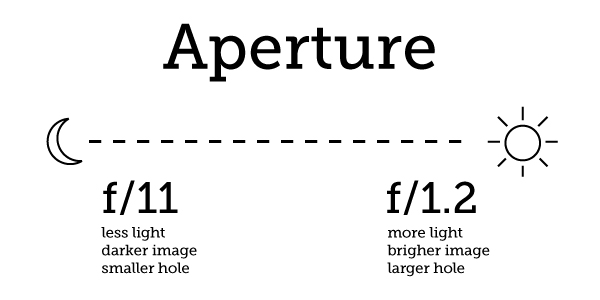
The aperture setting controls how much light is let in by varying the size of the opening through which the light must enter and is expressed in terms of focal length (f/x). The smaller the number associated with the denominator of the focal length, the greater the size of the hole, which means more light entering the camera and consequently a brighter picture.

lighting chart

Also remember that the lower the denominator is on the focal length, the shallower the depth of field. This means that the area of the picture that is in focus is fairly large at f/11 and higher, and fairly small at f/3 and lower.

Don’t Forget ISO!

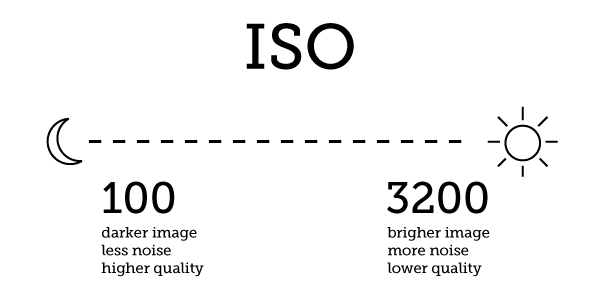
Your ISO setting will also affect the brightness of the picture in conjunction with the quality. Without getting into the complexities of your camera’s electronic sensor, suffice to say that the higher the ISO, the brighter the resulting picture. Unfortunately, as ISO increases so does color noise, which really brings down the quality of the photo.

lighting chart


Metering in the Camera

Hopefully that’s all pretty straightforward. If you’re confused by all the explanation, the three images above tell you everything you need to know. If you need your image to be brighter, decrease the denominator in both the aperture and shutter speed and increase the ISO. If you need your image to be darker, increase the denominator in both the aperture and shutter speed and decrease the ISO (you’ll quickly learn to feel out all three together).

As you know, when you’re shooting in full auto, your camera attempts to make all these judgement calls for you. However, as a photographer, you should be comfortable shooting on full manual as you’ll have much more control over the results when you can fine tune the settings.

The nice thing about all this is that even in manual mode, your camera is giving you hints as to what it thinks your exposure should be. Try pointing your camera at a subject and pressing the shoot button half way. You should hear a beep from the autofocus as the camera attempts to interpret what you want to focus on.

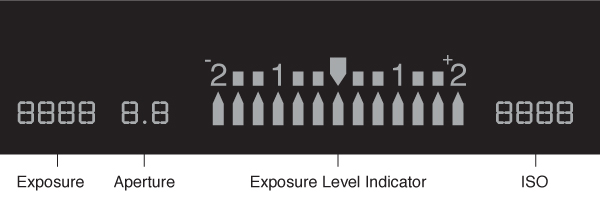
This beep signifies more than the autofocus however, as much more is going on automatically behind the scenes. To see what I mean, look into your viewfinder. You should see lots of numbers and settings that will vary from camera to camera, but they should at least resemble the simplified graphic below.

viewfinder

As you can see, all of the settings we discussed above are represented right here in the viewfinder. When you perform that half-press on the shoot button and hear the beep, these indicators will light up and show you the settings you’ve selected as well as how the camera interprets the available light.

viewfinder

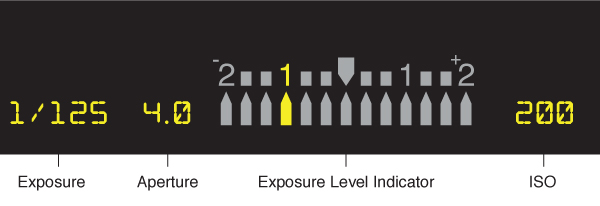
Here the camera is telling us that we’ve set our shutter speed to 1/125, our focal length to 4.0 and our ISO to 200. The real magic however is happening with the Exposure Level Indicator (ELI). This is telling us that we aren’t letting enough light into the camera. We know this because the little light on the bottom is lit up to the left of center. If it were lit up to the right of center, we would know that we are letting too much light in. The goal then is to get this little guy lined up right down the middle.

viewfinder

Theoretically, this should help you achieve a picture that is neither too bright, nor too dark. Admittedly, some exposure bias is sometimes necessary but this method should work just fine a great deal of the time. To put this into practice, let’s imagine a shooting scenario.


Getting the Perfect Shot

Let’s say you’re indoors shooting a birthday party during the day. As is often the case, the light is decent, but not great. Using the information above, you know that since there’s not a lot of light available, you’ll probably want to bump your ISO up to 800. Sure you’d love to shoot down at 100 but it simply won’t be possible given the conditions.

You also know that the poor lighting means you’ll want your aperture wide open. Let’s say your lens will only go down to f/4, so that’s where you’ll set the aperture. You’re fine with the shallower depth of field because it produces that nice blurry background and crisp subject that you see often in professional photography.

Since you’re shooting moving people, you want your shutter speed to be fast enough to have crisp photos devoid of blur where someone was moving. Consequently, you’ll start with a shutter speed of 1/200.

Next, you look into your viewfinder, focus on your subject, and see the following:

viewfinder

You can instantly tell, even before you take a single picture, that the image is going to be too dark. Your aperture is as open as you can get it and you don’t want to sacrifice any more quality, so your only option is to decrease the speed of your shutter to allow more light in.

The brilliant part is that you can accomplish this without even removing your eye from the viewfinder. With the camera up to your eye, there should be a little wheel next to your right index finger. Turn this wheel to adjust your shutter speed. Oddly enough, turning the wheel left will make the ELI go right and turing the wheel right will make it go left (it might be the opposite on a Nikon). You can actually change all of the settings above without leaving the viewfinder, consult your camera’s manual for how to do this on your specific model.

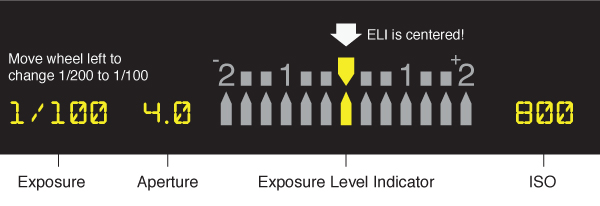
So to fix the problem shown in the picture above, simply move the wheel left until the indicator is centered.

viewfinder

A shutter speed of 1/100 should be quick enough to shoot handheld without too much blurring. Keep in mind that if you go any longer, you’ll want to shoot stiller subjects and/or implement a tripod to keep things steady.

If you’re shooting handheld and centering the ELI means dropping your shutter speed too low (say 1/50), try upping your ISO or lowering your focal length (if your lens will allow). Note that if you’re using a flash, you can shoot at much slower shutter speeds as the flash captures the motion in place.


Using AV and Auto Modes

If you’re really lost on where to set all of your settings to start things off, try switching to auto mode and metering there. This should get you in the right neighborhood to start playing with your own settings in manual mode.

Sometimes you’ll find yourself shooting a scene that is changing so quickly that using manual mode becomes cumbersome and annoying. I recently shot an outside hockey game at night where this was the case. The lighting in different areas of the rink varied dramatically, the players were of course constantly moving and I was experimenting with different zoom levels. Consequently, shooting in full manual would’ve required a lot more settings adjustments and a lot less shooting than I would’ve liked.

In these circumstances, it’s a good idea to shoot in AV. This mode allows you to set your own ISO and aperture so you have control over your depth of field and color noise. However, it automatically takes care of your shutter speed for you. If you look into the viewfinder in this mode, you’ll see that you camera dynamically adjusts the settings so that the ELI is in the center no matter where you’re shooting.

When shooting in AV, you still have to keep an eye on your shutter speed to make sure your camera isn’t putting it too slow. Again, any time it starts dipping too much below 1/100, try adjusting your other settings to allow more light in. Even if your pictures are looking decent on the small screen, you’ll be disappointed to see how blurry they are when you import them into your computer and view them at full size.

Try to resist shooting in either AV or auto mode when you don’t have to. The more practice you get in on full manual, the more you’ll become comfortable with every setting on your camera. This will enable you to confidently approach setting your own exposure in nearly every situation and will help you become a much better photographer.


Conclusion

To sum up, if your pictures are too bright, try increasing your shutter speed, upping your aperture (higher number, smaller hole), and/or reducing your ISO. Conversely, if your pictures are too dark, decrease your shutter speed, reduce the aperture, and/or increase your ISO.

Watch the Exposure Level Indicator in your camera’s viewfinder closely and try to adjust your settings so that it lines up perfectly in the center. If for some reason this produces a picture that is still too dark or too bright, apply exposure bias accordingly.

Finally, if you have trouble shooting in manual, start off in auto to get a feel for the proper settings or switch to AV so the camera will automatically control only your shutter speed while you take care of the rest.

How to Integrate an Options Page into your WordPress Theme


Creating themes to give away or sell is great, but not everyone who uses your theme will have a solid understanding of HTML/CSS. Providing your theme with an options page makes it easier for non-technical users to make theme changes without getting their hands dirty with code. I’ll show you how to make one from scratch!


What We’re Going to Achieve

Before we begin, what are we actually striving for? What are we going to make customizable about our theme? Well, this tutorial will focus mostly on the programmatic side, but in order to change something about the layout, we’ll need to have a few design ideas up our sleeves, as well. Here’s what we have:

  • Change a theme’s color scheme
  • Add 2x advertising spots
  • Optional sidebar
  • Optional recent tweets panel
  • Optional search box

There are plenty of editable elements we could add to a theme, but after today’s tutorial which illustrates how to implement the five features listed above, you should have a good feel for how to create your own options page.


1. Creating the Required Files

We’re going to concentrate entirely on the options page first before we start making the theme change. First, we need a place to put all of our code that’s going to manage the options page. All this code is going to resides in a file called functions.php, which will go inside of our themes folder. So, if our theme is called ‘example,’ then the path to our functions file would be wp-content/themes/example/functions.php.

We don’t need to tell WordPress to include our functions.php file, it’s automatically called during the WordPress execution cycle.


2. Creating the Options Page

So first we need to actually create the blank options page – the canvas for our work. To do so, we must inform WordPress about the new options page that we wish to create. We accomplish this task by using actions. Actions are called at a specific time in WordPress’ execution; so, for example, when the menu in the dashboard is being created, the action admin_menu is called. We can tie functions to these actions; so we can execute our functions at specific times. Here’s the basic functions we need to create our options page.

<?php
// Options Page Functions

function themeoptions_admin_menu()
{
	// here's where we add our theme options page link to the dashboard sidebar
	add_theme_page("Theme Options", "Theme Options", 'edit_themes', basename(__FILE__), 'themeoptions_page');
}

function themeoptions_page()
{
	// here is the main function that will generate our options page
}

add_action('admin_menu', 'themeoptions_admin_menu');

?>

Our first function, themeoptions_admin_menu is simply there to add a link to our page in the admin sidebar, it also tells WordPress what function to call to display the page which, in our case, is themeoptions_page().

The parameters for the add_theme_page() function are as follows:

  • Page Title – Theme Options
  • Menu Title – Theme Options
  • Capability – edit_themes
  • Handle – The current file
  • Function – themeoptions_page()

If you have the theme activated, then, in the Themes drop down menu, you should see your new link to an options page which is currently blank. We now have the canvas for our options page, and we can begin implementing the forms, fields and back end of our options functionality.


3. Adding Options and Fields

Ok, so that page is looking a bit lonely; let’s add the form and fields that the user will interact with to make changes to the theme. It’s important to note you can style this page however you wish, even adding tabbed dialogs if you want; but for our tutorial, we’re going to make use of the default classes used by WordPress. This way it saves us the time of reinventing the wheel, and makes our options page blend in with the rest of the dashboard.

The code for our page should reside in our themeoptions_page() function, so we’re going to add our code in like this;

	function themeoptions_page()
	{
		// here's the main function that will generate our options page
		?>
		<div class="wrap">
			<div id="icon-themes" class="icon32"><br /></div>
			<h2>Theme Options</h2>

			<form method="POST" action="">
				<input type="hidden" name="update_themeoptions" value="true" />

				<p><input type="submit" name="search" value="Update Options" class="button" /></p>
			</form>

		</div>
		<?php
	}

First we create the predefined wrap class for the page. Then, we add a quick header with a default icon. Finally, our form; we need a hidden value so that we can check if it has been submitted. We also need a button that’s going to submit the form, and, again, we use a predefined class for this. Here’s what we have so far:

Now we have our basic structure. So if we check back to the beginning of this tutorial, we planned to implement five options.

  • First of all, we’re going to allow the theme users to change the color scheme. For this, we’ll require a drop down list of color schemes available.
  • Secondly, we’ll have two advertising spots. We’ll need two input fields for the image URLs, and two input fields for the links.
  • Third is the optional sidebar: a simple check box.
  • Fourth is the optional Twitter stream in the sidebar. We’ll need a checkbox and an input field for the username.
  • Finally we’ll need an optional search box: another check box.
function themeoptions_page()
{
	// here's the main function that will generate our options page
	?>
	<div class="wrap">
		<div id="icon-themes" class="icon32"><br /></div>
		<h2>Theme Options</h2>

		<form method="POST" action="">
			<input type="hidden" name="update_themeoptions" value="true" />

			<h4>Colour Stylesheet To Use</h4>
			<select name ="colour">
				<option value="red">Red Stylesheet</option>
				<option value="green">Green Stylesheet</option>
				<option value="blue">Blue Stylesheet</option>
			</select>

			<h4>Advertising Spot #1</h4>
			<p><input type="text" name="ad1image" id="ad1image" size="32" value=""/> Advert Image</p>
			<p><input type="text" name="ad1url" id="ad1url" size="32" value=""/> Advert Link</p>

			<h4>Advertising Spot #2</h4>
			<p><input type="text" name="ad2image" id="ad2image" size="32" value=""/> Advert Image</p>
			<p><input type="text" name="ad2url" id="ad2url" size="32" value=""/> Advert Link</p>

			<h4><input type="checkbox" name="display_sidebar" id="display_sidebar" /> Display Sidebar</h4>

			<h4><input type="checkbox" name="display_search" id="display_search" /> Display Search Box</h4>

			<h4><input type="checkbox" name="display_twitter" id="display_twitter" /> Display Twitter Stream</h4>
			<p><input type="text" name="twitter_username" id="twitter_username" size="32" value="" /> Twitter Username</p> 

			<p><input type="submit" name="search" value="Update Options" class="button" /></p>
		</form>

	</div>
	<?php
}

4. Updating The Database

So far, we have an options page with a form that submits data to itself, via POST. The next logical step is to take the data submitted, and insert it into the WordPress database. To do so, we’re going to create a new function called themeoptions_update(). This function will be called by themeoptions_page(); so add this code to the very top of themeoptions_page();

if ( $_POST['update_themeoptions'] == 'true' ) { themeoptions_update(); }

Of course, the next step is to create the update function. Remember, for the sake of this tutorial, I’m not adding validation or sanitization to my code. When creating a plugin, you should always check the input from your users. However it’s beyond the scope of this tutorial. Now you could rely on WordPress to validate your input, but it’s best to do so yourself, to make sure.

Anywhere in the functions.php file, add this block of code:

function themeoptions_update()
{
	// this is where validation would go
	update_option('mytheme_colour', 	$_POST['colour']);

	update_option('mytheme_ad1image', 	$_POST['ad1image']);
	update_option('mytheme_ad1url', 	$_POST['ad1url']);

	update_option('mytheme_ad2image', 	$_POST['ad2image']);
	update_option('mytheme_ad2url', 	$_POST['ad2url']);

	if ($_POST['display_sidebar']=='on') { $display = 'checked'; } else { $display = ''; }
	update_option('mytheme_display_sidebar', 	$display);

	if ($_POST['display_search']=='on') { $display = 'checked'; } else { $display = ''; }
	update_option('mytheme_display_search', 	$display);

	if ($_POST['display_twitter']=='on') { $display = 'checked'; } else { $display = ''; }
	update_option('mytheme_display_twitter', 	$display);

	update_option('mytheme_twitter_username', 	$_POST['twitter_username']);
}

The update function, as the name suggests, updates an option you can store in the database. If the option doesn’t exist, then WordPress creates it. We’ve prepended all our options with mytheme_, just to make sure we don’t overwrite options that another plugin/theme might be using.

So far, we have a settings page that can save our options, however, when we hit submit, and our options are stored, our form is blank when we re-visit it. This is because we need to load our values back from the database.


5. Fetching Options

We now need to fetch our options so that we can populate the settings form. This is an easy one, and we’ll do it by using the get_option() function. We could use variables, but for this example, we’ll simply echo the output of the function where it should go in the form. Our new code looks like this;

function themeoptions_page()
{
	// here's the main function that will generate our options page

	if ( $_POST['update_themeoptions'] == 'true' ) { themeoptions_update(); }

	//if ( get_option() == "checked"

	?>
	<div class="wrap">
		<div id="icon-themes" class="icon32"><br /></div>
		<h2>Theme Options</h2>

		<form method="POST" action="">
			<input type="hidden" name="update_themeoptions" value="true" />

			<h4>Colour Stylesheet To Use</h4>
			<select name ="colour">
				<?php $colour = get_option('mytheme_colour'); ?>
				<option value="red" <?php if ($colour=='red') { echo 'selected'; } ?> >Red Stylesheet</option>
				<option value="green" <?php if ($colour=='green') { echo 'selected'; } ?>>Green Stylesheet</option>
				<option value="blue" <?php if ($colour=='blue') { echo 'selected'; } ?>>Blue Stylesheet</option>
			</select>

			<h4>Advertising Spot #1</h4>
			<p><input type="text" name="ad1image" id="ad1image" size="32" value="<?php echo get_option('mytheme_ad1image'); ?>"/> Advert Image</p>
			<p><input type="text" name="ad1url" id="ad1url" size="32" value="<?php echo get_option('mytheme_ad1url'); ?>"/> Advert Link</p>

			<h4>Advertising Spot #2</h4>
			<p><input type="text" name="ad2image" id="ad2image" size="32" value="<?php echo get_option('mytheme_ad2image'); ?>"/> Advert Image</p>
			<p><input type="text" name="ad2url" id="ad2url" size="32" value="<?php echo get_option('mytheme_ad2url'); ?>"/> Advert Link</p>

			<h4><input type="checkbox" name="display_sidebar" id="display_sidebar" <?php echo get_option('mytheme_display_sidebar'); ?> /> Display Sidebar</h4>

			<h4><input type="checkbox" name="display_search" id="display_search" <?php echo get_option('mytheme_display_search'); ?> /> Display Search Box</h4>

			<h4><input type="checkbox" name="display_twitter" id="display_twitter" <?php echo get_option('mytheme_display_twitter'); ?> /> Display Twitter Stream</h4>
			<p><input type="text" name="twitter_username" id="twitter_username" size="32" value="<?php echo get_option('mytheme_twitter_username'); ?>" /> Twitter Username</p> 

			<p><input type="submit" name="search" value="Update Options" class="button" /></p>
		</form>

	</div>
	<?php
}

So there you have it. The back end has now been completed. We’re able to update our options in the database, so all that’s left to do is make the theme react to these changes in the options page. This works similarly to how we updated the options fields: we fetch the option and then either display it or use it as a conditional to do something else. Let’s get started with the front end.


6. Changing the Theme

Changing the Colour Scheme

This is going to deal with CSS and such, which isn’t what this tutorial is about. So we’ll skim over how you’d approach this. One of the best ways to go about this is to have a default stylesheet that uses a colour scheme such as black, then a series of alternative colour schemes. For example style.css could style your layout black, but including red.css AFTER including style.css.

A helpful CSS tip is to use the !important tag. Use this tag in the stylesheets that change colours of the layout to ensure that those properties will, in fact, be used. In order to actually switch the stylesheets, add this code to the header.php file of your layout where the stylesheet would be included:

<link rel="stylesheet" href="<?php bloginfo('stylesheet_directory'); ?>/default.css" type="text/css">
<link rel="stylesheet" href="<?php bloginfo('stylesheet_directory'); ?>/<?php echo get_option('mytheme_colour'); ?>.css" type="text/css">

Adding advertising spots

This section is meant to show you the theory. In real life, you’d probably use a plugin or something like “Buy Sell Ads.” So say we’ve got two spots for our adverts to go in. Similar to above, we simply output the option where it needs to go, like so:

<a href="<?php echo get_option('mytheme_ad1url'); ?>"><img src="<?php echo get_option('mytheme_ad1image'); ?>" height="125" width="125" /></a>
<a href="<?php echo get_option('mytheme_ad2url'); ?>"><img src="<?php echo get_option('mytheme_ad2image'); ?>" height="125" width="125" /></a>

Optional Sidebar

This time, we’ll use the option as a conditional to decide whether or not we should output a block of code, that in this case would display a sidebar. Of course, your layout should be able to still display properly if a sidebar is not visible; so that one is up to you. The following code will be added wherever you’d usually call your sidebar, usually mine is called from header.php.

if ( get_option('mytheme_display_sidebar') == 'checked') { get_sidebar(); }

// or alternatively...
if ( get_option('mytheme_display_sidebar') == 'checked') { get_sidebar(); } else { /* display something else */ }

Optional Recent Tweets

For this little option, we’ll need to do two things. If tweets are enabled we’ll first need to display the area where the tweets should appear, we’ll also need to insert a block of JavaScript before the </body> tag to get the tweets from a specific user.

We need to place the following where we actually want the tweets to appear:

<?php if (get_option('mytheme_display_twitter') ) { ?>
<div id="twitter_div">
	<ul id="twitter_update_list"></ul>
</div>
<?php } ?>

Next we need to place this code before the </body> tag, which most probably resides in footer.php;

<script src="http://twitter.com/javascripts/blogger.js"></script>
<script src="http://twitter.com/statuses/user_timeline/<?php echo get_option('mytheme_twitter_username'); ?>.json?callback=twitterCallback2&count=5"></script>

Tip: why not try and add your own option to change how many tweets are fetched above?

Optional Search Box

Finally, we come to our optional search box, which functions just as our sidebar did. We use the option as a conditional and display code dependent on the user’s choice.

if ( get_option('mytheme_display_search') == 'checked') { ?>
<form role="search" method="get" id="searchform" action="" >
	<input type="text" value="" name="s" id="s" />
</form>
<?php }

Wrapping Up

I hope you’ve learned the basics of how to create an options page for your theme, and make it function properly. I’ve tried to skip a few of the tedious bits, like the actual CSS and the validation that should be in place, primarily because it was outside of the scope of this tutorial.

As usual, if you have any questions at all, leave a comment below! Thanks for reading!

Quick Tip: You Need to Check out LESS.js


You might be familiar with such services as LESS and Sass. They allow for far more flexibility when creating your stylesheets, including the use of variables, operators, mix-ins, even nested selectors. However, because LESS was originally built with Ruby, a lot of PHP developers, despite the fact that there are PHP versions available, never used it.

That’s all going to change now that LESS is being rewritten in JavaScript, is about forty times faster than the Ruby version, and can be used by any of us!


Step 1. Reference LESS.js

<script src="http://lesscss.googlecode.com/files/less-1.0.18.min.js"></script>

Step 2. Import a Stylesheet

<link rel="stylesheet/less" href="style.less" />

Note that we’ve set the rel attribute to “stylesheet/less,” and that our actual stylesheets has an extension of .less, not .css. Also, we must link to this stylesheet before Less.js.


Step 3. Have Fun!

With this minimal amount of work, you now have access to everything from variables to mix-ins. Be sure to watch the four minute video tutorial above for full examples, but here are a few quickies.

/*
Variables!
*/
@primary_color: green;

/*
Mix-ins are like functions for commonly used operations,
such as apply borders. We create variables by prepending
the @ symbol.
*/
.rounded(@radius: 5px) {
	-moz-border-radius: @radius;
	-webkit-border-radius: @radius;
	border-radius: @radius;
}

#container {
/* References the variable we created above. */
	background: @primary_color;

/* Calls the .rounded mix-in (function) that we created, and overrides the default value. */
	.rounded(20px); 

/* Nested selectors inherit their parent's selector as well. This allows for shorter code. */
	a {
		color: red;
	}
}

It’s important to remember that LESS.js isn’t finished; hopefully, it will be soon. Nonetheless, it’s working wonderfully so far. What do you think?

Excellent writers needed Natives Preferred by Wasif23

Hi!! I need some excellent writers.. Writer must be able to provide original articles.. with excellent grammar .. Writer must be able to write minimum 10 articles per day.. Writer must stick to deadlines Grammatical mistakes will not be tolerated…. (Budget: $30-250, Jobs: Academic Writing, Article Rewriting, Articles)


Need experienced Team of 10 members for the Sidereel & Yidio by intensecool

Hello there, We need a team of 10 guys or girls who can work on Sidereel.com & Yidio.com. Prior experience is preferred. You will need to follow the following steps : 1. You need to take links from the www.sidereel.com, www.yidio.com for the serials coming on that day… (Budget: $250-750, Jobs: Data Entry, Data Processing, Internet Marketing, Virtual Assistant)


500 Computer Based Training needed in flash by priyanshusinghal

I need 500 CBTs with female voice to be developed in Flash. These CBTs are developed keeping in mind that it will be used for 3-6 yrs children. Please find the sample attached. Please contact me as soon as possible… (Budget: $1500-3000, Jobs: Animation, Audio Services, Flash, Graphic Design, Silverlight)