Quick Tip: Understanding Garbage Collection in AS3

Have you ever used a flash application and noticed lag in it? Still don’t know why that cool flash game runs slowly on your computer? If you want to know more about a possible cause of it, then this article is for you.

We found this awesome author thanks to FlashGameLicense.com, the place to buy and sell Flash games!


Final Result Preview

Let’s take a look at the final result we will be working towards:


Step 1: A Quick Run Through Referencing

Before we get into the real subject, you first need to know a bit about how instantiating and referencing works in AS3. If you have already read about it, I still recommend reading this small step. That way, all the knowledge will be fresh in your head and you won’t have trouble reading the rest of this Quick Tip!

The creation and reference of instances in AS3 is different than most people think. The instantiation (or “creation”) of something happens only when the code asks to create an object. Usually, this happens through the “new” keyword, but it is also present when you use a literal syntax or define parameters for functions, for example. Examples of this are shown below:

// Instantiation through the "new" keyword
new Object();
new Array();
new int();
new String();
new Boolean();
new Date();

// Instantiation through literal syntax
{};
[];
5
"Hello world!"
true

// Instantiation through function parameters
private function tutExample(parameter1:int, parameter2:Boolean):void

After an object is created, it will remain alone until something references it. In order to do that, you generally create a variable and pass the object’s value to the variable, so that it knows which object it currently holds. However (and this is the part most people don’t know), when you pass a variable’s value to another variable, you aren’t creating a new object. You are instead creating another link to the object that both variables now hold! See the image below for clarification:
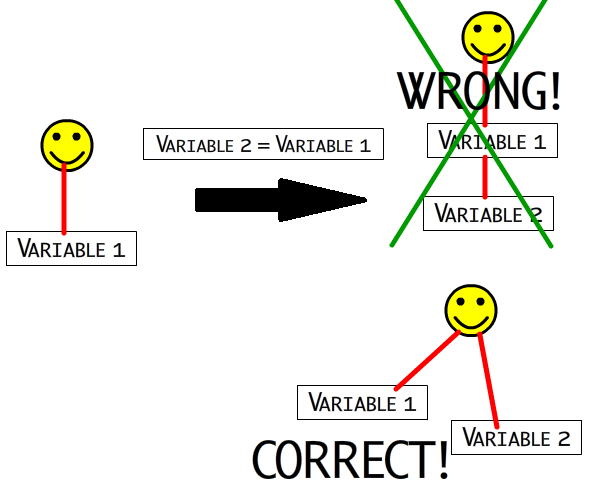
The image assumes both Variable 1 and Variable 2 can hold the smiley (i.e. they can hold the same type). In the left side, only Variable 1 exists. However, when we create and set Variable 2 to the same value of Variable 1, we are not creating a link between Variable 1 and Variable 2 (top-right part of the image), instead we are creating a link between the Smiley and Variable 2 (bottom-right part of the image).

With this knowledge, we can jump to the Garbage Collector.


Step 2: Every City Needs a Garbage Collector

It is obvious that every application needs a certain amount of memory to run, as it needs variables to hold values and use them. What isn’t clear is how the application manages the objects that aren’t needed anymore. Does it recycle them? Does it delete them? Does it leave the object in the memory until the application is closed? All three options can happen, but here we will talk specifically about the second and third ones.

Imagine a situation in which an application creates a lot of objects when it is initialized, but once this period ends more than half of the objects created remain unused. What would happen if they were left in the memory? They would certainly take a lot of space in it, thus causing what people call lag, which is a noticeable slow-down in the application. Most users wouldn’t like this, so we must avoid it. How can we code in order to make the application run more efficiently? The answer is in the Garbage Collector.

The Garbage Collector is a form of memory management. It aims to eliminate any object that is not used and is occupying space in the system’s memory. This way the application can run with mimimum memory usage. Let’s see how it works:
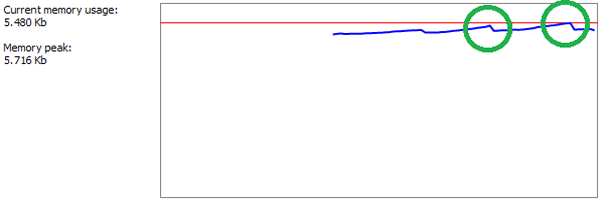
When your application starts to run, it asks for an amount of memory from the system which will be used by the application. The application starts then filling this memory with any information you need; every object you create goes into it. However, if the memory usage gets close to the memory requested initially, the Garbage Collector runs, seeking any object not used to empty some space in the memory. Sometimes this causes a bit of lag in the application, due to the big overhead of object searching.

In the image, you can see the memory peaks (circled in green). The peaks and the sudden drop are caused by the garbage collector, which acts when the application has reached the requested memory usage (the red line), removing all unnecessary objects.


Step 3: Starting the SWF File

Now that we know what the Garbage Collector can do for us, it’s time to learn how to code in order to get all the benefits from it. First of all, we need to know how the Garbage Collector works, in a practical view. In code, objects become eligible for Garbage Collection when they become unreachable. When an object cannot be accessed, the code understands that it won’t be used anymore, so it must be collected.

Actionscript 3 checks reachability through garbage collection roots. At the moment an object can’t be accessed through a garbage collection root, it becomes eligible for collection. Below you see a list of the principal garbage collection roots:

  • Package-level and static variables.
  • Local variables and variables in the scope of an executing method or function.
  • Instance variables from the application’s main class instance or from the display list.

In order to understand how objects are handled by the Garbage Collector, we must code and examine what is happening in the example file. I will be using FlashDevelop’s AS3 project and Flex’s compiler, but I’m assuming you can do it on any IDE you want, since we are not going to use specific things that exist only in FlashDevelop. I have built a simple file with a button and text structure. Since this isn’t the objective in this quick tip, I will quickly explain it: when a button is clicked, a function fires. At any time we want to display some text in the screen, you call a function with the text and it is displayed. There is also another text field to show a description for buttons.

The objective of our example file is to create objects, delete them and examine what happens to them after they are deleted. We will need a way to know whether the object is alive or not, so we will add an ENTER_FRAME listener to each of the objects, and make them display some text with the time they’ve been alive. So let’s code the first object!

I created a funny smiley image for the objects, in tribute to Michael James Williams’s great Avoider game tutorial, which also uses smiley images. Each object will have a number on its head, so we can identify it. Also, I named the first object TheObject1, and the second object TheObject2, so it will be easy to distinguish. Let’s go to the code:

private var _theObject1:TheObject1;

private function newObjectSimple1(e:MouseEvent):void
{
	// If there is already an object created, do nothing
	if (_theObject1)
		return;

	// Create the new object, set it to the position it should be in and add to the display list so we can see it was created
	_theObject1 = new TheObject1();
	_theObject1.x = 320;
	_theObject1.y = 280;
	_theObject1.addEventListener(Event.ENTER_FRAME, changeTextField1);

	addChild(_theObject1);
}

The second object looks almost the same. Here it is:

private var _theObject2:TheObject2;

private function newObjectSimple2(e:MouseEvent):void
{
	// If there is already an object created, do nothing
	if (_theObject2)
		return;

	// Create the new object, set it to the position it should be in and add to the display list so we can see it was created
	_theObject2 = new TheObject2();
	_theObject2.x = 400;
	_theObject2.y = 280;
	_theObject2.addEventListener(Event.ENTER_FRAME, changeTextField2);

	addChild(_theObject2);
}

In the code, newObjectSimple1() and newObjectSimple2() are functions that are fired when their corresponding button is clicked. These functions simply create an object and add it in the display screen, so we know that it was created. Additionally, it creates an ENTER_FRAME event listener in each object, which will make them display a message every second, as long as they are active. Here are the functions:

private function changeTextField1(e:Event):void
{
	// Our example is running at 30FPS, so let's add 1/30 on every frame in the count.
	_objectCount1 += 0.034;

	// Checks to see if _objectCount1 has passed one more second
	if(int(_objectCount1) > _secondCount1)
	{
		// Displays a text in the screen
		displayText("Object 1 is alive... " + int(_objectCount1));

		_secondCount1 = int(_objectCount1);
	}
}
private function changeTextField2(e:Event):void
{
	// Our example is running at 30FPS, so let's add 1/30 on every frame in the count.
	_objectCount2 += 0.034;

	// Checks to see if _objectCount2 has passed one more second
	if(int(_objectCount2) > _secondCount2)
	{
		// Displays a text in the screen
		displayText("Object 2 is alive... " + int(_objectCount2));

		_secondCount2 = int(_objectCount2);
	}
}

These functions simply display a message on the screen with the time the objects have been alive. Here is the SWF file with the current example:


Step 4: Deleting the Objects

Now that we have covered the creation of objects, let’s try something: have you ever wondered what would happen if you actually delete (remove all references) an object? Does it get garbage collected? That’s what we will test now. We are going to build two delete buttons, one for each object. Let’s make the code for them:

private function deleteObject1(e:MouseEvent):void
{
	// Check if _theObject1 really exists before removing it from the display list
	if (_theObject1 && contains(_theObject1))
		removeChild(_theObject1);

	// Removing all the references to the object (this is the only reference)
	_theObject1 = null;

	// Displays a text in the screen
	displayText("Deleted object 1 successfully!");
}
private function deleteObject2(e:MouseEvent):void
{
	// Check if _theObject2 really exists before removing it from the display list
	if (_theObject1 && contains(_theObject2))
		removeChild(_theObject2);

	// Removing all the references to the object (this is the only reference)
	_theObject2 = null;

	// Displays a text in the screen
	displayText("Deleted object 2 successfully!");
}

Let’s take a look at the SWF now. What do you think will happen?

As you can see. If you click “Create Object1″ and then “Delete Object1″, nothing really happens! We can tell the code runs, because the text appears in the screen, but why doesn’t the object get deleted? The object is still there because it wasn’t actually removed. When we cleared all references to it, we told the code to make it eligible for garbage collection, but the garbage collector never runs. Remember that the garbage collector will only run when the current memory usage gets close to the requested memory when the application started to run. It does make sense, but how are we going to test this?

I’m certainly not going to write a piece of code to fill our application with useless objects until the memory usage gets too big. Instead, we will use a function currently unsupported by Adobe, according to Grant Skinner’s article, which forces the Garbage Collector to run. That way, we can trigger this simple method and see what happens when it runs. Also, from now on, I will refer to Garbage Collector as GC, for the sake of simplicity. Here’s the function:

private function forceGC(e:MouseEvent):void
{
	try
	{
		new LocalConnection().connect('foo');
		new LocalConnection().connect('foo');
	}
	catch (e:*) { }

	// Displays a text in the screen
	displayText("----- Garbage collection triggered -----");
}

This simple function, which only creates two LocalConnection() objects, is known to force the GC to run, so we will call it when we want this to happen. I don’t recommend to use this function in a serious application. If you are doing it for test, there are no real problems, but if it’s for an application that will get distributed to people, this isn’t a good function to use, since it may incur negative effects.

What I recommend for cases like this is that you just let the GC run at its own pace. Don’t try to force it. Instead, focus on coding efficiently so that memory issues don’t happen (we will cover this in Step 6). Now, let’s take a look at our example SWF again, and click the “Collect Garbage” button after creating and deleting an object.

Have you tested the file? It worked! You can see that now, after deleting an object and triggering the GC, it removes the object! Notice that if you don’t delete the object and call the GC, nothing will happen, since there is still a reference to that object in the code. Now, what if we try to keep two references to an object and remove one of them?


Step 5: Creating another Reference

Now that we have proved that the GC works exactly as we wanted, let’s try something else: link another reference to an object (Object1) and remove the original. First, we must create a function to link and unlink a reference to our object. Let’s do it:

private function saveObject1(e:MouseEvent):void
{
	// _onSave is a Boolean to check if we should link or unlink the reference
	if (_onSave)
	{
		// If there is no object to save, do nothing
		if (!_theObject1)
		{
			// Displays a text in the screen
			displayText("There is no object 1 to save!");

			return;
		}

		// A new variable to hold another reference to Object1
		_theSavedObject = _theObject1;

		// Displays a text in the screen
		displayText("Saved object 1 successfully!");

		// On the next time this function runs, unlink it, since we just linked
		_onSave = false;
	}
	else
	{
		// Removing the reference to it
		_theSavedObject = null;

		// Displays a text in the screen
		displayText("Unsaved object 1 successfully!");

		// On the next time this function runs, link it, since we just unlinked
		_onSave = true;
	}
}

If we test our swf now, we will notice that if we create Object1, then save it, delete it and force the GC to run, nothing will happen. That is because now, even if we removed the “original” link to the object, there is still another reference to it, which keeps it from being eligible for garbage collection. This is basically all you need to know about the Garbage Collector. It isn’t a mystery, after all. but how to we apply this to our current environment? How can we use this knowledge to prevent our application from running slowly? This is what Step 6 will show us: how to apply this in real examples.


Step 6: Making Your Code Efficient

Now for the best part: making your code work with the GC efficiently! This step will provide useful information that you should keep for your entire life – save it properly! First, I’d like to introduce a new way to build your objects in your application. It is a simple, but effective way to collaborate with the GC. This way introduces two simple classes, which can be expanded to others, once you understand what it does.

The idea of this way is to implement a function – called destroy() – on every object that you create, and call it every time you finish working with an object. The function contains all the code necessary to remove all references to and from the object (excluding the reference which was used to call the function), so you make sure the object leaves your application totally isolated, and is easily recognized by the GC. The reason for this is explained in the next step. Let’s look at the general code for the function:

// Create this in every object you use
public function destroy():void
{
	// Remove event listeners
	// Remove anything in the display list
	// Clear the references to other objects, so it gets totally isolated

}

// ...
// When you want to remove the object, do this:
theObject.destroy();

// And then null the last reference to it
theObject = null;

In this function, you’ll have to clear everything from the object, so it remains isolated in the application. After doing that, it will be easier for the GC to localize and remove the object. Now let’s look at some of the situations in which most memory errors happen:

  • Objects that are used only in an interval of execution: be careful with these ones, as they can be the ones that consume a lot of memory. These objects exist only for some period of time (for example, to store values when a function runs) and they aren’t accessed very often. Remember to remove all references to them after you’re done with them, otherwise you can have many of them in your application, only taking memory space. Keep in mind that if you create a lot of references to them, you must eliminate each one through the destroy() function.
  • Objects left in the display list: always remove an object from the display list if you want to delete it. The display list is one of the garbage collection roots (remember that?) and so it is really important that you keep your objects away from it when removing them.
  • Stage, parent and root references: if you like to use a lot these properties, remember to remove them when you’re done. If a lot of your objects have a reference to these, you may be in trouble!
  • Event listeners: sometimes the reference that keeps your objects from getting collected is an event listener. Remember to remove them, or use them as weak listeners, if necessary.
  • Arrays and vectors: sometimes your arrays and vectors can have other objects, leaving references within them which you may not be aware of. Be careful with arrays and vectors!

Step 7: The Island of References

Although working with the GC is great, it isn’t perfect. You have to pay attention to what you are doing, otherwise bad things can happen with your application. I’d like to demonstrate a problem that may crop up if you don’t follow all the required steps to make your code work with the GC properly.

Sometimes, if you don’t clear all the references to and from an object, you may have this problem, especially if you link a lot of objects together in your application. Sometimes, a single reference left can be enough for this to happen: all your objects form an island of references, in which all the objects are connected to others, not allowing the GC to remove them.

When the GC runs, it performs two simple tasks to check for objects to delete. One of these tasks is counting how many references each object has. All objects with 0 references get collected at the same time. The other task is to check if there is any small bunch of objects that link to each other, but can’t be accessed, thus wasting memory. Check the image:
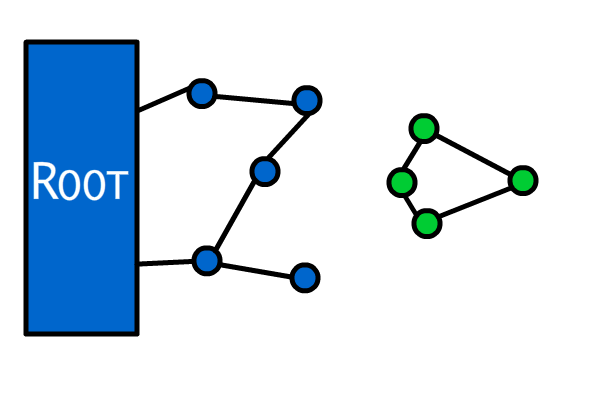
As you can see, the green objects can’t be reached, but their reference counting is 1. The GC performs the second task to check for this chunk of objects and removes all of them. However, when the chunk is too big, the GC “gives up” on checking and assumes the objects can be reached. Now imagine if you have something like that:
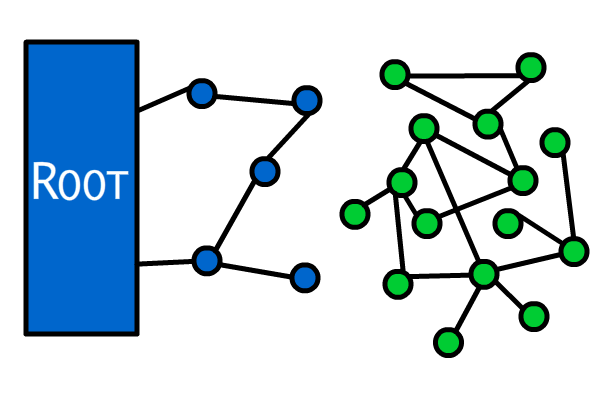
This is the island of references. It would take a lot of memory from the system, and wouldn’t be collected by the GC because of the complexity of it. It sounds pretty bad, huh? It can be easily avoided, though. Just make sure you have cleared every reference to and from an object, and then scary things like that won’t happen!


Conclusion

This is it for now. In this Quick Tip we learned that we can make our code better and more efficient in order to reduce lag and memory issues, thus making it more stable. In order to do this, we have to understand how referencing objects work in AS3, and how to benefit from them to make the GC work properly in our application. Despite the fact that we can make our application better, we have to be careful when doing it – otherwise it can get even messier and slower!

I hope you liked this simple tip. If you have any questions, drop a comment below!

Quick Tip: An Introduction to Sculptris

In this video Evan Schaible take a look at Sculptris, the robust freeware 3d sculpting application for Windows. To download this application go to : http://drpetter.se/project_sculpt.html

Video 1

Download

Note: click the ‘Monitor’ icon to view tutorial in full-screen HD.


Don’t miss more CG tutorials and guides, published daily – subscribe to Cgtuts+ by RSS.

The Making of Lost – Part 1

In this tutorial series, I will be covering the basic process of how I created my piece “lost.” The first part of this two part series covers the basics of creating 3D abstract pieces and how to incorporate them with photo manipulation; the second part will focus on the creation of effects in Photoshop and how to enhance and strengthen the final image.

A key to succeed in following this tutorial series is to experiment. I will be teaching the basic techniques but in order to create a strong composition and attractive shapes, you will need to alter the settings, change/redo splines and experiment with other effects. Patience and determination are mandatory skills for any artist. So let’s get started!

Let’s take a look at the image we’ll be creating for this two part series (above): Part 1 here on Cgtuts+ in today’s tutorial and Part 2 will be covered over on Psdtuts+ in the final tutorial.


Step 1

Open the image we’ll be working with in Photoshop.

s1

Step 2

Using the Pen Tool, cut out the unwanted part as shown below.

s2

Step 3

Open Cinema 4D. Use the freehand spine tool to draw three splines in the three views. This can be totally random, or you can carefully plan out the wanted shape and draw precisely according to that.

s3

Step 4

Create a loft NURBS, drag the three splines created under loft NURBS creating a three-dimensional object.

s4

Step 5

Use the twist deformer (under the deformer menu) and do adjustments to its properties as needed. The effect can also be affected by the orientation and position of the deformer.

s5

Step 6

Use the explosion effects deformer, the result of this can be affected not only by its property settings but also by its position.

s6

Step 7

Create a HyperNURBS, make the loft NURBS create its child through dragging.

s7

Step 8

Add a few lights, the position of the lights at this point depend on your model and how the most details possible can be shown.

s8

Step 9

Create a new texture using the following settings.

s9

Step 10

Create a simple white texture.

s10

Step 11

Create a simple black texture.

s11

Step 12

Create a glass texture. Apply these textures to the model; duplicating the model, altering their settings allows you to create a more complex render and apply the different textures created.

s12
s12-cont

Step 13

Jump back over to our Photoshop document. Use the Pen Tool to create a curve according to the contour of the suit.

S13

Step 14

Select the shape created, nudge the selection to the right, then down, and then delete. This creates a white edge. If you’re not satisfied with the effect, then duplicate the layer, invert the color, and nudge it to the left to give the edge depth.

S14

Step 15

Take the renders created in Steps 2-12, then place one of them behind the “man” layer and one above. Erase the unwanted parts to achieve the following.

s15

Step 16

Take another render to place below the suit.

s16

Step 17

Create a sphere by first creating the simple image below then applying it to a sphere object.

s17

Final Image

To achieve the final effect, slightly adjust the level to enhance the image.

s18

Stay Tuned for Part 2

You could end here with an illustration that mixes 3D and Photographic elements. Though if you want to add more interest to the final image with Photoshop effects, then stay tuned for Part 2, which will post over on Psdtuts+ soon.

r17

Animating with Deformers in Maya

Although animating with deformers is a commonly used technique in the VFX industry, a lot of people don?t know about it’s benefits. Well, after this tutorial that?’s going to change. We’ll be looking at how to animate complex expressions with deformers, along with why they can be extremely useful. Enjoy!

Step 1

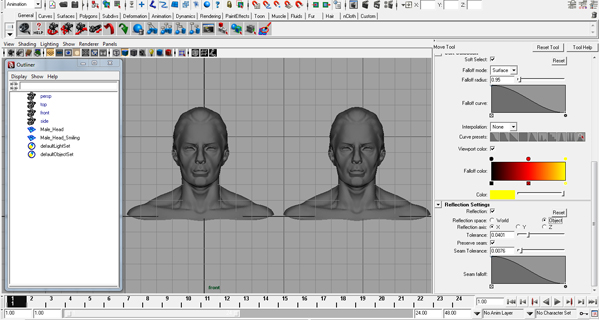
First of all, open Maya and import your model. For this tutorial I’ll be using a version of ZBrush’s standard head model as it will help to easily show the main benefits of deformer-based animation, however this technique will apply across all models no matter how complex. Now go to the front view, duplicate your model (Ctrl+d) and rename the new copy. Be sure to use a descriptive name as this will later become the name of your blend-shape – in this case, I’ve used Male_Head_Smiling. Position both models next to each other to make things easier to work with. Now I’m going to actually deform the second mesh to make it smile!


Step 2

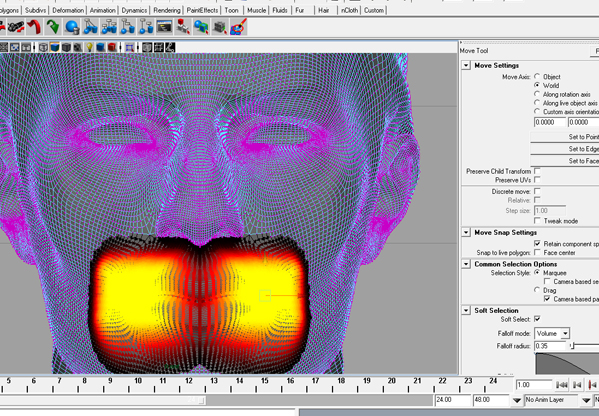
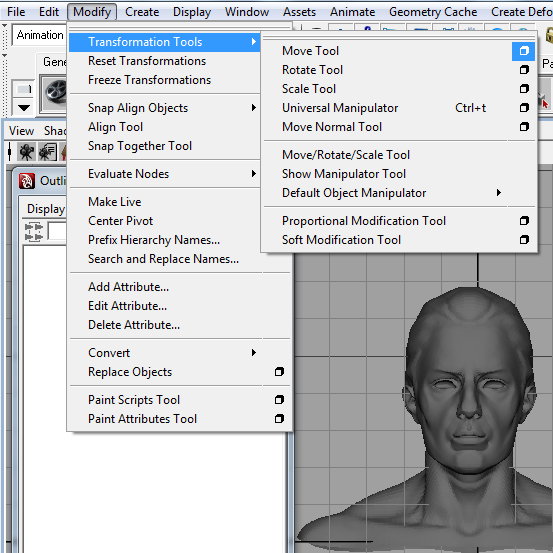
First we need to setup our mesh selection tools. In the top menu, go to Modify > Transformation Tools > Move Tool > Option Box. Turn on Soft Select and set the Falloff radius. This is, of course, a relative value due to the fact the every model you work with will likely be different in size. In this case I want to select an area just large enough to move the cheek a little bit to create the realistic effect I’m going for, so have chosen a value of about 0.35. Now turn on the Reflection setting, lower the Tolerance to about 0.04 and set the Reflection axis to X. This enables us to easily make the same changes to one side of the model as we do on the other, saving us time! We can now start deforming!


Step 3

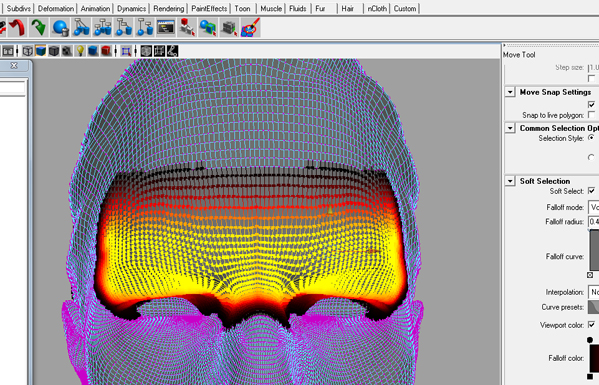
Next, right-click on the model and go to Vertex mode, which will allow us to move the vertexes instead of the mesh itself. As I’m intending to make the model smile, I’m going to be affecting the vertexes around the corners of the mouth, so I start by dragging a selection from the right corner of the mouth, slightly to the right and then slightly upwards. As you can see below, both sides of the model are affected because of the Reflection setting we previously enabled. The brightly colored areas represent the extent of our falloff.


Step 4

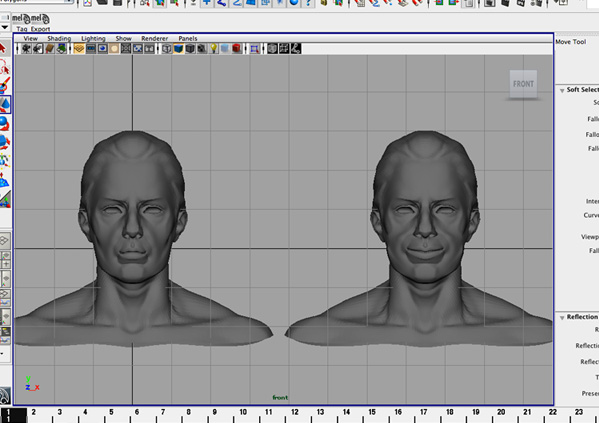
So with our vertexes selected, and with our falloff in place, now activate the move tool. To make this model smile, I needed to move the affected verts slightly to the right and slightly up, and with a little bit of trial and error, this is my result :


Step 5

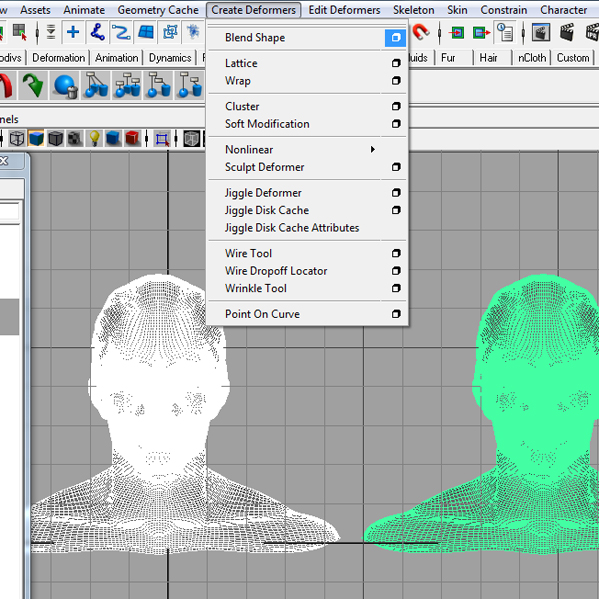
Now that we?’ve got our original model and our deformed model, we need to create the blend shape deformer itself, so first select the Animation menu-set and then in the top menu choose Create Deformers > Blend Shape > Option Box. In the background, first select the deformed model (in my case the smiling man), then shift click the original model (it’s very important to select the model you want to have the blendshapes implied to last of all.) Enter a name for our deformer in the BlendShape node box, for instance something like Smile.

Now we come to a very important setting – Origin. The default setting is Local, and although you may need to choose World for some rare circumstances, the Local deformer the most useful one. Just to cover it quickly, if you set the origin to World, all deformations are created as relative to the model, meaning that if you move the model around the scene, the won’t move with it! So, for now we’re going to stick to the Local setting. Leave the other settings as they are and then click Create.


Step 6

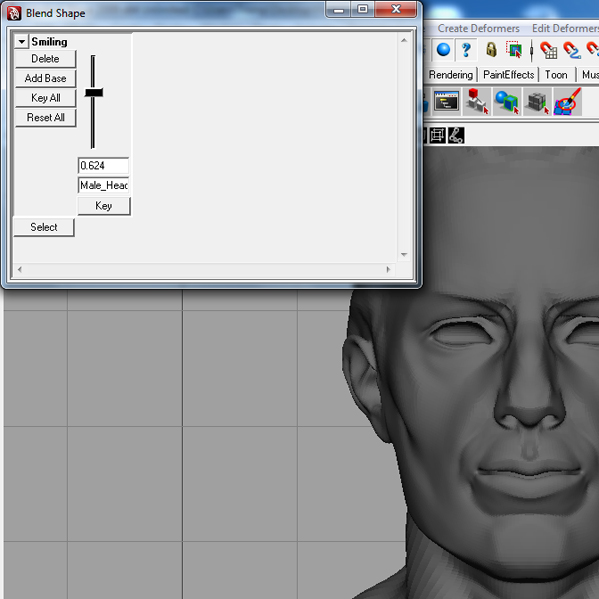
To use the blend shape we’?ve just created, go to Window > Animation Editors > Blend Shape. You should now have a single slider there (in my case Male_Head_Smiling) and if you move it up and down you’ll quickly start to understand the advantage of animating using deformers – if you move the slider halfway, you see a mix of both models, meaning that with a few blend shapes you can create literally thousands of expressions!


Step 7

To do a little animation test, go to the first frame, move the slider all of the way to the bottom and click Key. Now move forward a few frames, move the slider to the top, and click Key again. If you play back the animation you can actually see the mouth moving.

You can actually add as many blend shapes together as you want, so I’m going to add another one to control my model’s eyebrows.


Step 8

Start by duplicating your original mesh, moving it over to the left of the original, and renaming it, in my case to Eyebrows. Now repeat step 3 as above. This time I moved the area above the eyes downwards slightly, ensuring the eyes themselves remained untouched. Now go to Create Deformers > Blend Shape > Option Box, and select first your newly deformed mesh, and then shift-click the original. Give the blend shape a name and then click Create. On returning to the Blend Shape editor you can see we now have two sliders, in my case one for the mouth and one for the eyebrow expressions.


Step 9

To have more control we can do something else that you may have seen before – interactive controlling. Interactive controlling uses geometry ‘rig’ to control the motion of the blend shapes – something that can be very handy for facial expressions!

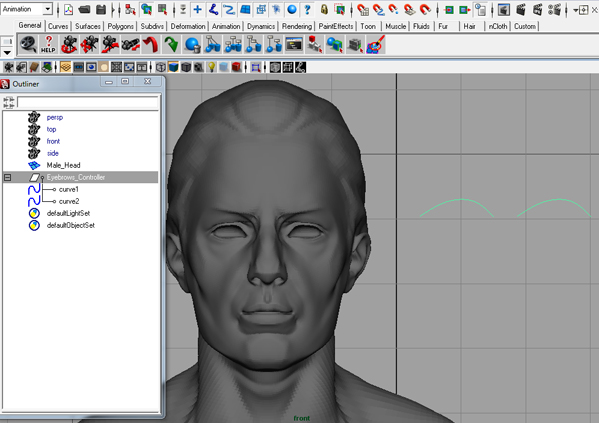
In the top menu go to Create > EP Curve Tool, and draw a curve something like that in the picture below – in my case, as this will be the eyebrow controller, I’ve styled it to match. Now go to Modify > Center Pivot, then duplicate your curve and move the duplicate to one side. Select both curves and group them by going to Edit > Group and give the group a clear name – in my case, Eyebrows_Controller. Finally select both of your curves and go to Modify > Freeze Transformations to reset their initial positions.


Step 10

We’?ll now setup the curves to control the blend shapes, using Maya’s Set Driven Keys. First of all ensure that all of your blend shapes are set to 0 – this is very important! Then go to Animate > Set Driven Key > Set to bring up the Set Driven Key window.

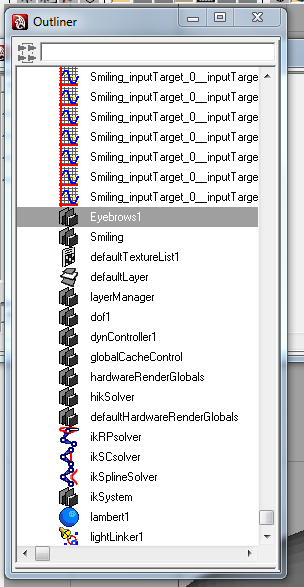
Open the Outliner and select your controller group. Then select it again in the Set Driven Key window, and click Load > Selected as Driver. Now back in the Outliner, right-click in the main section and deselect Show DAG Objects Only. This will allow us to see all of the nodes currently in our scene, as shown below :


Step 11

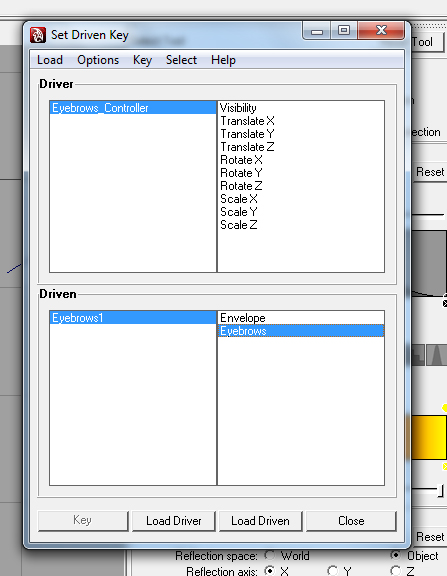
Locate your blendshape node in the Outliner – it will have the name we entered earlier on creation followed by a number, in my case Eyebrows1. Then in the Set Driven Key window, click Load > Selected as Driven. Now you should have something like the picture below :


Step 12

First all you want to work out the axis on which our controller is going to affect the blend shape. As I want the eyebrows to move up and down I’ll be using the Y-Axis, so I’m going to select Translate Y in the right side of the driver pane, at the top of the Set Driven Key window.

Now to create the keys themselves, we first need to setup the start states for the blendshape and our controller curve. I want the eyebrows to be lowered initially, so that moving the controller group up has the effect of raising them. So I’ll set the TranslateY value of my controller to 0 in the attribute editor, and then set the Eyebrows blend shape the value to 1 (lowered). When you’re happy with your initial setup, click the Key button at the bottom of the Set Driven Key window.


Step 13

With the first key created, we now need to set up the second. First of all I set the Eyebrows blend shape value to 0 in order to bring them back to their original position. I can then select the controller group and move them up on the Y-Axis to sit along side the newly raised eyebrows. When you’re happy with your second position, hit the Key button one last time.

With that done you can now close the Set Driven Key window, and try to move the curves around – your mesh is actually responding! I could now go on to apply this technique in exactly the same way to control the position of the mouth, eyes and any other object you can imagine.

So that’s it for today! I hope you enjoyed this tutorial and I especially hope that you?ve learned some new useful techniques you can apply to your own models. Be sure to stand out and be creative!


Don’t miss more CG tutorials and guides, published daily – subscribe to Cgtuts+ by RSS.

Monotasking: Focus on One Thing at a Time

No matter how much you have piled up on your desk, and regardless of how bad-ass a multitasker you are, you can only do one thing at a time. Remembering this is one sure-fire way to increase your productivity, ease your mental load and knock things off your to-do list with efficiency.

There are two schools of thought on this. One says: juggle tasks and get stuff done a little at a time. This type of incremental thinking is prone to mistakes. It’s easy to lose focus this way and while I consider myself to be pretty good at mental juggling, I’ve found that when I split mind time between a bunch of projects, they can get jumbled and this opens us up to error.

The other school of thought is a little more pure, and a lot more simple: Focus on one thing at a time, get it done and move on to the next task.

(Note: Taking a little mental or musical break in between each task doesn’t hurt either as a way of keeping focused and inspired)

Stacks Upon Stacks of Stuff

We’ve all been there—busy and seemingly without enough time in the day to get everything we’re responsible for done. Here’s where panic can set in. That little voice in your head—the really doubtful, negative one—goes from a whisper to a shout screaming:

We are soooo screwed this time!

Yet, the truth is, when we compartmentalize our thoughts, keep our focus on the moment and the project, it’s amazing how much we can accomplish.

When we get rattled by our busyness, we’re in trouble. It’s easy to let anxiety and the pressure of stacks upon stacks of stuff grind us to a productivity stand-still. All the more reason to remember the simple mantra:

Monotasking – One and Done.

Getting Into The Flow of Monotasking

Stay focused on one task and you’ll be through even the biggest pile of work in no time. In fact, when you stay completely focused, fully in the moment and deeply engaged in the project before you, it’s amazing how quickly time flies. The term for this is known as flow and it’s been written about widely by noted psychologist Mihaly Csikszentmihalyi. (See his TED talk on the topic.)

This is the productivity holy grail. Entering a state of flow puts us in the optimal “get more stuff done” zone. The catalyst for this is focus and one-pointedness of mind regarding how we work. This is often a change of course for the modern worker. With a million windows and documents open, emails constantly dinging in the inbox and an equal number of text, tweets and other information streaming in, it’s challenging to get to flow in the first place – if ever.

But I promise you’ll work better, smarter and get more done if you can:

  • disengage from the information onslaught;
  • let the other work fall into the periphery and;
  • fully immerse ourselves in the moment.

That’s not just a promise…that’s a guarantee.

Are Modern Conveniences Really a Time Saver?

Real Simple recently discussed modern time savers that aren’t all the supposed “improvements” that we twenty-first century folk take for granted. You know…things like microwaves, iPhones and the DVR.

The author makes a very valid point. Many of these innovations are a good idea in theory but actually end up requiring more time, not less. Take interstate highways – they’re fabulous until you’re mired in endless miles of traffic when you could be doing something (anything!) else.

One of the so-called “conveniences” that comes to mind for me is NetFlix (the poor man’s DVR). It’s a great way to avoid the video rental store, but then you end up spending the time you saved rearranging your queue or obsessively reading other people’s movie reviews. And if I didn’t have it, I’d probably spend less time watching movies and more time reading books (all right…or surfing the web).  While trying to end up with more hours in the day, you end up with the same – or less.  That’s pretty much the opposite of what you really want in a time saver.

What about you? Can you think of other “time-saving” innovations that actually take up more of our time?

To Beer or Not to Beer: Do You Liquid Lunch?

The other day I went out to have a quick lunch with a good friend of mine.  Nothing fancy, just a cheap pizza place that just happened to have a few excellent beers on tap.  (I’m not 100% sure, but I think it might be illegal here in Canada to eat pizza without drinking beer.)

Since I’m self-employed, had no need to drive, and was enjoying the first nice Friday afternoon in what seemed like an eternity, I opted to have a beer with my pizza.  I tried to get my beer-loving friend to join me, but he felt that it wasn’t appropriate given that he still had to go back to his office.

It got me thinking over the past week:  When is it okay to have an adult beverage?

When I was a cable guy, driving a company vehicle – no question.  And let me say this clearly – if you are driving, there’s no acceptable time to have a drink.  But when I got into the advertising world and learned that a beer fridge in the office was not grounds for immediate termination – let’s just say I didn’t think it was that big of a deal to have a “pop” and then walk back to a communications position in an office building.

Now, there’s a world of difference between wanting a drink and needing a drink – and if you are in the latter stage on a regular basis, you might want to consider asking for help.

My question to the folks in WorkAwesome:  Is there an acceptable time to have a drink during the work day?  Do you take part in a “liquid lunch” ritual?

11 Productivity Tools for Road Warriors and Telecommuters

I love working from home.  I don’t miss the commute or the distractions from coworkers. It’s a pretty good gig.

But at least once a week, I take this show on the road. I have a meeting in town and then need to find a place to set up shop nearby afterward to get some work done.  While I considered renting some co-working space, I decided to go to public spaces instead. You could say I was too cheap to pay rent. But the numbers didn’t work for me.

What does work for me is free public wifi. I have some options around town that give me the ability to set up a mobile office. It’s not perfect, but it works well enough. Like other road warriors and telecommuters, I keep a few key productivity tools in my arsenal to get things done:

Location

I need a place that understands people like me are going to spend more time than money. This place is comfortable and offers ample power outlets.

I know the local joints and what they have to offer. If I’m out of my area, I look for McDonalds, Panera Bread or Starbucks.

I have a Starbucks card that gives me access to two free hours of wifi daily. But come July, that won’t be necessary. They will offer free wireless Internet.

If food or socializing isn’t so important, I like the large desks and quiet of the public library. Finding a power outlet may be a challenge though.

Laptop

You may prefer a netbook or very small laptop because of price and weight. I’m sticking with my 15-inch MacBook Pro. The screen and keyboard are big enough for me to work comfortably. The speed and memory don’t hold me back when I’m surfing the web, writing in Google Documents or watching videos. To be honest, I would prefer a 17-inch model but not enough to pay  the extra money. What I have is the right tool for my work.

You may not need it. But assess what you’re going to do on the road. If you’re not going to do more than check e-mail or some lightweight websites, go with as little as you can get.

Security

My laptop and browser are locked behind different passwords. If someone were to “find” it, they can’t have access to my information. I don’t do top secret work but clients should be able to trust me.

That’s also why my laptop is not my primary computer. Any sensitive work like banking or database maintenance is done at home. That data doesn’t move out of the house.

Also, there are some services that will help you recover your laptop if it’s stolen. Basically when someone uses your laptop to connect to the Internet, these services will find it and collect enough evidence to get the police involved.

Bookmark syncing

I primarily use a desktop machine in the home office. Two computers means two browsers and sets of bookmarks.  I use Xmarks – a Firefox extension – to sync my bookmarks and passwords between the two machines. It’s seamless and fast. Whatever passwords and bookmarks I save are accessible no matter where I am.

Foursquare account

Foursquare is a social network that lets you check-in at various venues and let your friends in the network know where you are. Yes it’s a bit self-indulgent. But when I check-in at a coffee place, the message goes out to my Twitter and Facebook accounts. It’s the equivalent of hanging a sign that says “The Blogger Is In.” This way people can find me if they want to talk. It’s part of the strategy to keeping in touch with my networks.

Clouds

I use Google Apps to handle e-mail and files. I can access my work from anywhere I can access the Internet. Otherwise I know I’m going to forget the thumb drive with the files I need some day. It’s all handy in the clouds.

  • TIP: If you’re worried about security, then make your own cloud. I have my own domain, and installed a secret WordPress blog on the site. No one knows where it and it’s not linked from anywhere. I use it as a notebook. If Google Docs are down, I use my secret blog as a word processor.

The same goes for e-mail. Web-based email services store your messages where you can always get to them. You have a lot of information stored in those messages. Make sure they’re where you can find them.

Smartphone

Of course I’m always reachable by cell phone. It’s a must have for anyone who works out of the “office.” But a smartphone adds a new layer of connectivity. A lot of times it’s easier to check e-mails on a mobile device than firing up a laptop.

Productivity apps such as task managers, calendars and time trackers are handier on a mobile device.

It’s also nice to have some games for diversions.

USB drive

Yes it’s handy to have your documents in the clouds. But sometimes someone wants to give you files directly from their computer. Having them use file sharing services (Or you may need to give them files and documents) may not work so well for them.

A password protected drive will accommodate most of your file transfer needs.

Dress code

“No shirts, no shoes, no service” sets the baseline. But if you want people around you to treat you like a professional, you have to dress the part.

Manners

You’re an adult so show some consideration. Keep your work area neat. Lower your volume on your computer and your voice when talking on the phone. Don’t take up more room than you need. Or hog bandwidth. This isn’t the time to download movies with Bittorrent.

Even if you don’t care about etiquette and don’t see a problem with being self-centered, remember that you are very visible. Your boorish  behavior can hurt your professional reputation.

A bag

We’ve got a lot listed here. But it’s physically not too much to fit into a professional computer tote or messenger bag. Be sure you have room for some a pens or pencil and a notebook. Sometimes you need to take notes old school.

And pick your bag like you would pick your wardrobe. It can round out the professional look and be very functional. Your mileage may vary.

This system works pretty well for me. The biggest downsize is that it’s hard to watch what I eat. Spending a few hours so close to tempting baked goods that are on most coffeehouse menus is tough. But I’m able to be reasonably productive and connect with people.

How productive are you when working with public wifi?

Ars Technica Explores iOS 4 in Detail

We asked you if you are considering new iPhone 4. Whether or not you go for the new device, if you own an iPod touch or an old iPhone, you got to upgrade to the latest iPhone operating system, called the iOS 4.

Why do you need to upgrade? Well, the new OS that Apple launched along with iPhone 4 has some amazing features. Multitasking, ability to create folders, creating playlists directly on iPod/iPhone, iBooks and much more.

Tempted, already? Check out Ars Technica’s super-comprehensive iOS 4 review. Probably the best one among hundreds of such articles out there.  (If you are an iPod touch user, check out Apple’s page on what the iOS 4 update means for you.)

3 Perspectives on Marketing a New Business through Blogging

Blogging is the new marketing. It’s a cost effective way to grow your business by attracting new customers and communicating with your existing customer base with new marketing ideas. Three business bloggers share their advice on marketing a new business with blogs:

Why A Blog Won’t Help Your Business

Rich Brooks explains that a blog is just a tool and you need to use it properly to benefit your business. It’s a great discussion of how to develop a blog strategy.

A Simple Blogging Formula

Chris Brogan outlines some pretty simple steps to creating  consistent blog entries that attract traffic to your website.

5 Reasons Why You Should Respond to Every Comment

Pat Flynn makes the argument that you should answer every comment on your blog with a comment. It makes sense until you start to actually spend the time doing it. Are you ready to make this kind of commitment?

How do build your business by blogging?

The “Upgrade iPhone” Dilemma: Will You Be Getting an iPhone 4?

As the iPhone 4 prepared to hit stores today, I recall my Apple-obsessed boyfriend is trying to get me to camp out with him at the Apple store last night. I’m quite content with my Blackberry, thank you very much.

And after reading these tips from Geek Juice on Smartening Up a “Dumb Phone”, I’m starting to wonder whether I need a BlackBerry at all. Still, it seems like it would be simpler to use my smartphone’s browser than “googling” things via text message (Google and I are BFFs – I probably do several dozen searches per day).

What about you current or prospective iPhone users? Are you on the yearly “Upgrade iPhone” cycle? Will you be jumping on the faster, shinier, newer bandwagon or sticking with your current phone?

7 Power Tips For Productive RSS News Feed Reading

I believe RSS is one of the best inventions of the last decade. RSS news feed reading has made consuming information on the web so much easier. You can read content from hundreds of blogs and sites from a single interface. No need to visit them separately.

RSS is extremely useful without a doubt. But once you get into the feed reading mode, it can be quite addictive too. You keep checking the feeds one after the other, visiting sites, sharing articles, and, of course, losing track of time in the process.

RSS feeds are meant to keep you informed, not make you unproductive. Here are seven useful tips, which, if implemented correctly, could make sure that you stay productive even without giving your favorite website RSS feeds a miss. Check them out.

1. Use Google Reader and/or FeedDemon

This is a no-brainer. If you are using any other feed reading tool other than Google Reader (web based, offficial Google RSS reader) or FeedDemon (a desktop based RSS news aggregator), I’d say not only you are missing on some cool features, but you are also spending more time than you should reading feeds.

Both Google Reader and FeedDemon come with a great set of features like shortcuts, quick sharing, panic button(in FeedDemon) etc, that enhance your feed reading productivity . You can even sync Google Reader with FeedDemon quite well, so you could use both of them too.

2. Make use of keyboard shortcuts

I could go on and on while praising the usage of keyboard shortcuts, especially when it comes to feed reading with Google Reader or FeedDemon. Other RSS readers also provide keyboard shortcuts so don’t be worried if you are not ready yet to make the switch. But using keyboard shortcuts is a must when it comes to productive RSS feed reading.

Once you learn and use keyboard shortcuts, you won’t need to toggle between the mouse and keyboard frequently. And you can’t imagine the time it saves in the long run. Web Worker Daily has a great tutorial on Google Reader keyboard shortcuts.

3. Create a ‘ Top Feeds ‘ Folder

If you are subscribed to a hundred website feeds then it’s never a good idea to read them all everyday. Instead, it’s better to create a folder named “top feeds” or anything similar, and group the most important feeds, the ones which you can’t miss, under it.

The top feeds folder can contain main news sites, major blogs which publish daily, and blogs of friends and kins if any. Be selective while putting feeds in this folder. Only select a site which really deserves your time and attention every single day.

4. Set aside time

I think it’s important to set aside time for RSS feed reading everyday. You don’t need to read them all at one go. You could select 2-3 time intervals of 15-20 minutes each, spread evenly throughout the day. This would ensure that you stay abreast with the latest news around the world.

Setting aside time ensures that feed reading activity won’t interfere with your other tasks. You have set specific time intervals when the RSS reader gets your attention and those should be the only times when you open it. This technique is a part of batch processing tasks, which made Darren Rowse 10 times more productive.

5. Hit the panic button when required

Don’t hesitate to hit the “Mark all as read” or the panic button when you’ve got too many unread feeds and can’t decide which ones to read. This could happen when you’ve been out for some days and come back to find an overloaded RSS reader.

It’s always better to start with a clean slate instead of wasting time trying to find what you’ve missed. Don’t worry about that. The web is too dynamic and the information will find you through Twitter, Facebook and other such means. You won’t stay ignorant. So don’t worry.

6. Save some feeds for weekends

Like creating a top feeds folder is important, it’s also essential that you save some feeds for the weekend. This means you won’t touch these feeds on weekdays, no matter what. If you have spare time, do stuff like reading a book, watching a TED video or reading feeds which aren’t a part of top feeds or weekend reading.

Setting aside certain feeds only for the weekends would ensure that you aren’t tempted to read them during the week, when you need to focus on other tasks. Plus, it also helps to reduce your obsession with RSS feeds.

7. Use Reeder 2.0 for iPhone

If you read feeds on the iPhone, which I am sure many of you do, then I’ll recommend using Reeder 2.0, a nifty app for the purpose. For other mobile platforms like Android, Windows Mobile and Blackberry, I think Google Reader’s native mobile interface should work fine. If you know of any cool apps for these devices then share them in the comments. I’d love to know.

Productive Working Hours: What Are Your Best Work Times?

Although most offices operate on 9 to 5 (or 8 to 6) working hours, not all workers work best on this timetable. Night owl workers prefer to burn the midnight oil, working late into the night when there are no distracting coworkers and their brain is at its sharpest.

I, on the other hand, prefer to follow regular business hours (roughly 9-6), so I’m available for dinner or drinks when my cubicle-dwelling friends get out of work. Plus, I like that feeling of accomplishment when the clock strikes noon and I can strike a bunch of items from my to-do list and break for lunch. When I’m still tethered to my computer at 7 or 8 at night, I feel antsy and unproductive (though I’ll do it if that’s what it takes to meet a deadline).

What about your working hours? What are your best work times? Why?

Buzzword Bingo

Have you heard of Buzzword Bingo?

The idea is that you have a little fun during a dull meeting by using bingo cards filled with vague, commonly-used office terminology. The first one to connect 5 buzzwords in a row wins.

I doubt anyone has ever truly played this game (and it’s hardly productive), but many of us have found ourselves in a meeting where the conditions are perfect for buzzword bingo.  Let’s give it a try now.

How many buzzwords can you find in the following example:

If we have some extra bandwidth while we’re circling the wagons, perhaps we could piggy-back a little morale booster to add value to the meeting and get our arms around the bigger picture. It’s not reinventing the wheel, but if we commit to best practice, this paradigm shift could push the envelope and ramp up to be a win-win situation with a strategic fit that lands us on the fast track towards proactive thinking outside the box.

(Just writing that made my head buzz.)

Do you have any favorite buzzwords? Do some make you laugh? Do some make you cringe?  Let’s “bat this around” for a while.

Win a Canon Selphy ES30 Compact Photo Printer

We’re kicking off a new competition today, to win a Canon Selphy ES30 Compact Photo Printer. It’s a handy piece of kit to have around, and entering is really easy. Read on to find out how!


About the Printer

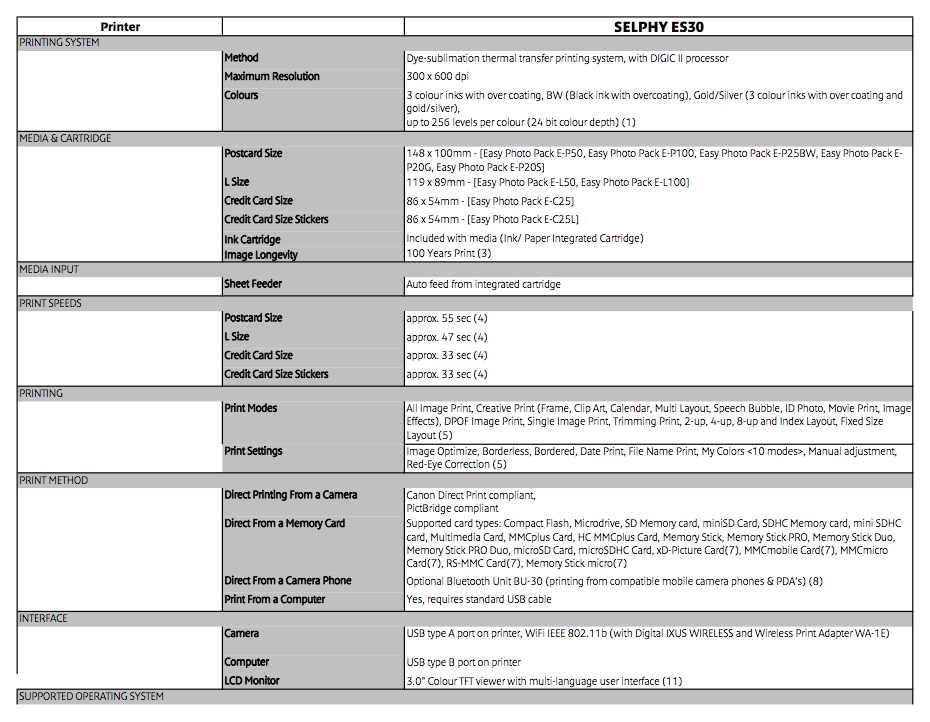
Stylish and easy to use, the Selphy ES30 puts the fun into printing lab-quality photos. Optimise your pictures with onboard retouching tools, add clipart and frames, or simply enjoy one-touch direct printing.

Some of the touted features include:

  • Easy Photo Pack integrates ink and media
  • Gold & Silver inks
  • Compact, vertical design with handle
  • Easy Scroll Wheel and 3.0” LCD
  • Direct & wireless printing*
  • DIGIC II processing
  • Image optimisation & editing
  • Creative Print button

How to Enter

This competition is sponsored by Energizer and National Geographic, and they are providing the prize. It’s run in conjunction with their current photography competition. You can find out more about it here, or check out some of last years winning photos below. You only have a few days left to enter, so you’ll need to be quick if you want to get your entry in!

National Geographic Ultimate Photo Contest

Entering our giveaway is really simple (it’s completely seperate to the Energizer/National Geographic competition). All you need to do is leave a comment below! We’ll select the winning comment at random when the competition closes.
Make sure to include your correct email address with your comment so that we can contact you. The giveaway is only open to US residents. I’m really sorry about this, but it’s out of our hands this time I’m afraid! Make sure to get your comment in before midnight on Saturday 3rd July, Pacific Eastern Standard Time. We’ll be in touch with the lucky winner shortly after then, and this post will be updated to let you know who won!

Please Note: Envato staff or people who have written more than two articles or tutorials for Phototuts+ are ineligible to enter.

Good luck, and be sure to subscribe via RSS or follow us on Twitter to find out if you’re a winner!