PROJECT DETAIL – 12 Articles on Self Improvement using Brainwave Entrainment Technology – All articles MUST address the benefits of Brainwave Entrainment technology, even if keywords provided are contrary… (Budget: $30-250, Jobs: Articles, Editing, Ghostwriting, Link Building, Research)
Static Site to WordPress by stickyweb
I need native English Speakers to Edit Articles by mdvanfleet
I need traffic of 6,000 unique visitor per day… by joeanucha
1. I need traffic of 6,000 unique visitor per day to my 3 web sites (mobile phone related site) for about 6-7 months until December 2010. (and will extend more if this turned out well) 2. Traffic must be able to tracked with Google Analytics 3… (Budget: $750-1500, Jobs: Google Analytics, Internet Marketing, Leads)
Slideshow Tool
Graphic Design Artist
AGAIN… I am looking for a genuine Graphic Design artist to do graphic work for my new website. I don’t have time to do it myself.
I need 1 header, 1 footer, 1 3-D e-box, and 2 e-book covers.
I am talking about high end, artisticlly pleasing, detailed work. I will provide you with all images for this project.
It would be nice if you could visit my another site: www.lonelinesstohappiness.com to get a better idea of what I expect.
I am rather an easy person to work with but I will be quite demanding. Please keep that in mind… I don’t want any drama arousing from this reason latter.
If you have any questions regarding this project… just ask.
Please include samples of your work as I would like to select a programmer for this project within next 12 hours.
It is a TIME SENSITIVE PROJECT so you would have to be able to start almost IMMEDIATELY.
I will escrow 25% of total cost… I think my reviews speak for themselves.
Thank you and good luck.
Andre
Magento Expert needed for simple module by monimon
Programming Project 1277786385
Online Games Website
Customize WordPress Plugin
I need a wordpress plugin customized ASAP. This should be a simple customization for a knowledgeable programmer. It will be in PHP.
I want the modifications to the plugin to be well notated within the script so when an update is released it is easy to find the code and inject it into the new release. Any replaced code should be left in and commented out.
Contact me via PMB for details before you bid. If your PMB does not contain the word “ogres” then I will assume you either cannot read, do not pay attention to detail, or are a bot. Your bid will not be considered.
If you have programmed or modified WP plugins in the past provide links to your work for extra consideration. Also, let me know if you are ready to begin now and when you will be complete. I expect this will take a quality PHP programmer under 2 hours.
I will pay 100% upon project completion — once project is delivered and tested. This will be the same day; see my feedback.
Dtata Entry Sign Up
Please don’t bid if you are not serious this the report job before i have hired a provider but he did not do any thing so please bid only serious bidder
I need unique visitor and referral sign up for the below link..many of the provider know how this is work if don’t know then please sign up and and bid ..in the time of interview i will asked the sign up user name and details process how you will do that. The link are as below.
http://Internet-Ejobs.com
please send your best bid ..with out reading details bid will be ignore immediately.. Thanks And happy bidding..
Replicate an Active Camouflage Effect with Flash
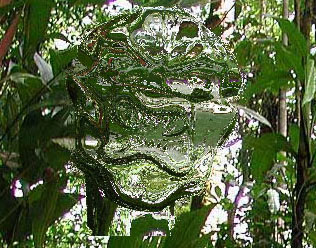
Active camouflage is a sci-fi concept, usually seen in the form of a suit that allows the wearer to become almost invisible. It can be seen in movies such as Predator and Die Another Day, and games like Halo and Crysis.
This tutorial shows you how to achieve such an effect in Flash by animating a displacement filter using a sequence of bitmaps. Not only is the effect cool, but this technique is rarely seen in online tutorials.
Final Result Preview
Let’s take a look at the final result we will be working towards:
Step 1: Displacement Mapping in Flash
Displacement mapping is a texture map that is used to modulate the displacement strength. Displacement means literally moving the pixels of a surface out of place. In most 3D applications, the pixels are displaced along the surface normal. In Adobe Flash, the displacement happens in 2D space, along the X and Y coordinates of an image.
Displacement filters in Flash are usually animated by dynamically changing their intensity (the scaleX, and scaleY parameters), changing the position of the displacement bitmap (the mapPoint parameter), or by manipulating the color channels. This tutorial will further explain these techniques, but we’ll also study a different one, which uses a bitmap sequence to draw a new displacement map on every frame.
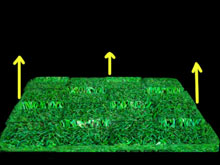
Example of displacement along the surface normal.
Example of displacement mapping in flash, along the X and Y axes.

Step 2: Flash Document
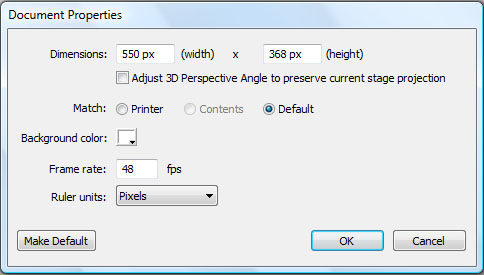
Open a new document in Flash and set up the size to 550×368 so it matches our background image. Set the frame rate to 48fps. The displacement filter is actually going to run at 12fps, but in case you want additional animation later on it would look smoother at 48fps.

Click File > Publish Settings > ActionScript 3.0 Settings and turn off “auto-declare stage instances”.
Step 3: Import the Background
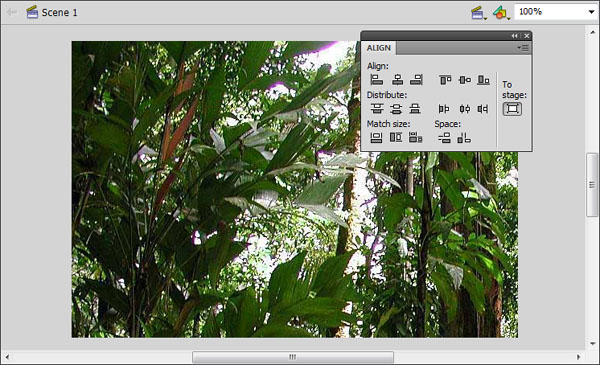
Import rainforest.jpg to the stage.

Press Ctrl+K to align and match the canvas size. This is going to be our background image.

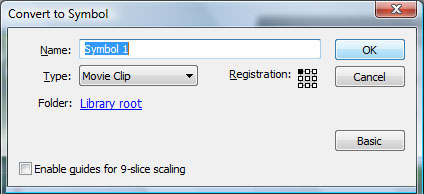
Now with the image selected, press F8 to convert it to a Symbol. Select “Movie Clip” in the type menu.

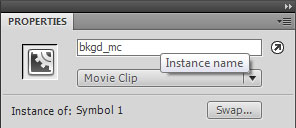
If the properties window is closed, press Ctrl + F3 to open it. We are going name the movie clip that was just created. On the instance name field, type “bkgd_mc”.

Step 4: Import the Bitmap Sequence
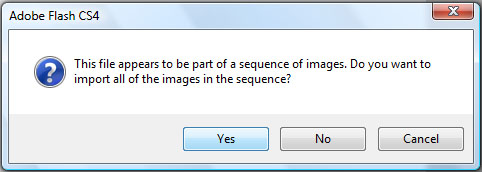
Now press Ctrl+F8 to create a new movie clip altogether. We aren’t naming this just yet. First we’re going to import the bitmap sequence inside this movie clip. Go to File > Import > Import to Stage. Select the first image of the sequence, which is called ” pred0001.jpg ” . Flash is going to ask if you want to import all images in this sequence. Click yes.

Step 5: Convert The Bitmap Sequence
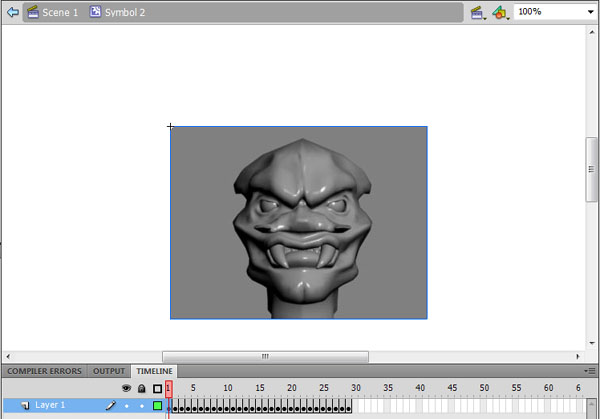
You will notice that each bitmap is placed on a keyframe along the movie clip time line. Starting on frame 1, select the image and press F8 to covert it to movie clip. Do this on every frame until the end of the sequence. Do it in order, from first to last and make sure you don’t skip any frames, otherwise it will mess up the animation.

Once you are done, each key frame should have one movie clip containing a frame of the character’s face. Select frame one again and press enter to see the animation.
Step 6: Distribute to Layers
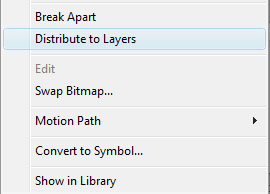
Select the movie clip on frame 1. Right-click and distribute to layers. Again, do it to all movie clips on all frames. When you’re finished you will no longer be able to see the animation, only the image on the top layer.

Step 7: Drag the Movie Clip to the Stage
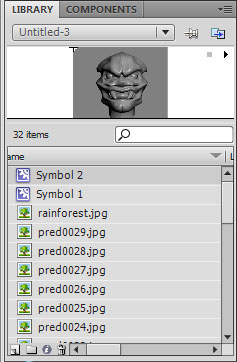
Press Ctrl + L to open up the library, and drag “Symbol 2″ to the stage. In the properties tab name this instance “displ_mc”. This movie clip will be used in our displacement filter.

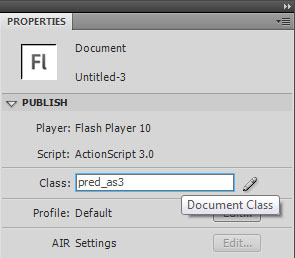
Step 8: Create the Document Class
We are going to write the code for our displacement map filter inside a document class file. Create a new Actionscript file and name it “pred_as3″. Now paste this code:
package {
import flash.display.MovieClip;
import flash.display.BitmapData;
import flash.display.IBitmapDrawable;
import flash.display.BitmapDataChannel;
import flash.filters.DisplacementMapFilter;
import flash.filters.DisplacementMapFilterMode;
import flash.geom.Point;
import flash.events.Event;
public class pred_as3 extends MovieClip {
}
}
Go back to the flash document and name the class pred_as3.

As you can see we’ve already imported all the classes that we’ll need in this tutorial, now let’s continue writing the document class. Add this code to it:
private var clipcont= new Array();// all the animated frames will be stored in this array private var count:Number; //part of the enterframe loop; tells which frame of animation will be shown private var timer:uint = 0;//sets the speed of the animation public var displ_mc:MovieClip; public var bkgd_mc:MovieClip;
We are stating a few variables that will be used later on. They need to be declared before the class constructor if they are to be used by more than one function in the document class.
Step 9: Create The Displacement Filter
Right below the last line, we begin to write the parameters and the constructor of the displacement map filter.
private var strength1:int = 120; // the value of scaleX and scaleY - sets the intensity of the displacement filter private var mapBitmap:BitmapData = new BitmapData(320,240);// the size of the displacement map in pixels private var mapPoint:Point = new Point(0,0);// the position of the displacement bitmap private var componentX = BitmapDataChannel.GREEN;// which color channel is used; doesn't really matter since it's in shades of gray; private var componentY = BitmapDataChannel.GREEN; private var spe:int = 1;//changes the strenght of the displacement filter //all variables are then applied to a new filter private var filter:DisplacementMapFilter = new DisplacementMapFilter(mapBitmap, mapPoint, componentX, componentY, scaleX, scaleY); private var filterList = new Array();// a filter list array.
So we’ve set parameters for strength, size, position and RBG channel. Let’s take a closer look at each one of these parameters..
Step 10: Displacement Strength
As mentioned earlier, displacement in flash is only possible along the X and Y axes. The parameters that set the displacement strength for X and Y are scaleX and scaleY respectively. In this tutorial we’re going to use the same strength on both X and Y axes, so we’re using the same variable strength1 for both parameters. Below is an example of displacement along the horizontal axis, with scaleY set to zero (left image), and the vertical axis, with scaleX set to zero (right).


Step 11: Size of the Displacement Map
Notice how the size is set to 320×240. We already know the size of the bitmaps in the animation and the constructor must have the same size as them. If the value in the constructor is greater than that of the bitmaps, there’s going to be displacement in areas where it should not happen. The #808080 gray around the character’s head is a neutral color, on the other hand any area that is empty, or a transparent bitmap would actually displace the background image.
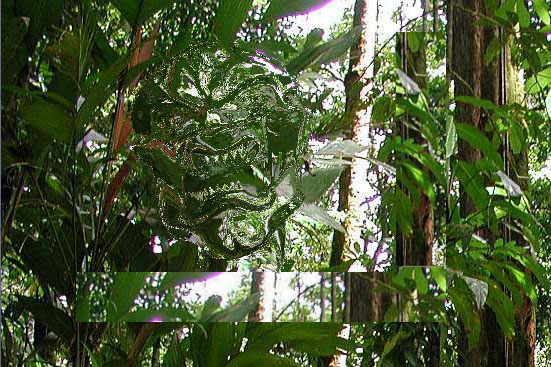
Example of the value set in the constructor being larger than the actual displacement map: The empty areas displace the background.
Step 12: RGB Channel
The displacement filter uses only one of the 3 RGB channels on a bitmap for each axis. When using a colored bitmap as a displacement map, each channel will give very different results as shown in the example below. In this tutorial we’re using an image in shades of gray, so the channel is irrelevant. ComponentX and componentY are set to green, but the same effect would be obtained using the red or blue channels.
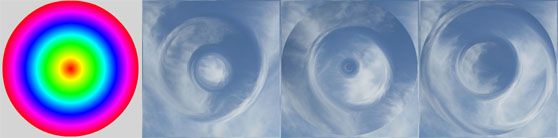
The different results obtained using the green channel, red channel or the blue channel.
Step 13: MapPoint
The parameter mapPoint sets the position of the displacement map. The position is relative to the object that it’s applied to, and not the stage. By setting the position to (0,0), the displacement map appears in the top left corner of our background image, which won’t always coincide with the top left corner of the stage, as shown below.
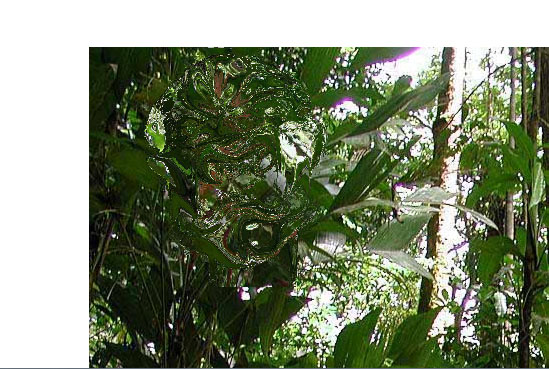
The mapPoint parameter is relative to the object, not the stage.
Step 14: Apply The Filter
Now let’s apply the displacement filter to our background image “displ_mc”. The displacement filter is pushed into an array of filters, and we do this inside the class constructor. We’re also adding our two main movie clips to the stage with the addchild method. In AS3 the class constructor is the first function to be executed in a document class and it’s called automatically, so it’s better that any functions or methods that need to be run upon loading are called from inside a class constructor.
public function pred_as3() {
addChild(displ_mc);
addChild(bkgd_mc); // add both Movie Clip instances to the stage
filterList.push(filter);// add the displacement map filter to the array.
bkgd_mc.filters = filterList; // applies the array of filters to the target movie clip.
storeClips();
}
The last line of code is calling a function that hasn’t been written yet. As the name suggests this function will store all animated movie clips in an array. So let’s go ahead and write that now.
Step 15: Store The Animation Into an Array
So we created a displacement map filter and applied it to the movie clip, but we haven’t added any bitmaps to the filter yet. We are going to do this in two steps: First we are going to store the animation in an array, then later we will add this animation to the filter.
private function storeClips():void //stores the animation in an array
{
count = displ_mc.numChildren;//the total number of movieclips inside displ_mc
for (var i:int = 0; i < displ_mc.numChildren; i++)//finds all movieclips inside displ_mc
{
clipcont.push(displ_mc.getChildAt(i));// frames are pushed inside the clipcont array
}
}
This function uses a for loop to scan all the movie clips inside displ_mc. We want the animation frames that were converted to movie clips earlier in this tutorial. Remember when I said to convert them frame by frame? We did that so the frames could be sorted properly and later on accessed using the getChildAt() method. Since we didn’t name any of those instances, Flash sorts them internally by order of creation. If the bitmaps were randomly converted into movie clips, the animation would never play correctly. So the frames can now be pushed into the clipcont array, one by one.
The code so far should look like this:
package {
import flash.display.MovieClip;
import flash.display.BitmapData;
import flash.display.IBitmapDrawable;
import flash.display.BitmapDataChannel;
import flash.filters.DisplacementMapFilter;
import flash.filters.DisplacementMapFilterMode;
import flash.geom.Point;
import flash.events.Event;
public class pred_as3 extends MovieClip {
private var clipcont= new Array();// all the animated frames are stored in this array
private var count:Number; //part of the enterframe loop; tells which frame of animation is being shown
private var timer:uint = 0;
public var displ_mc:MovieClip;
public var bkgd_mc:MovieClip;
private var strength1:int = 120; // sets the intensity of the displacement filter
private var mapBitmap:BitmapData = new BitmapData(320,240);// the size of the displacement map in pixels
private var mapPoint:Point = new Point(0,0);// the position of the displacement bitmap
private var componentX = BitmapDataChannel.GREEN;// which color channel is used; doesn't really matter since it's in shades of gray;
private var componentY = BitmapDataChannel.GREEN;
private var spe:int = 1;
//all variables are then applied to a new filter
private var filter:DisplacementMapFilter = new DisplacementMapFilter(mapBitmap, mapPoint, componentX, componentY, scaleX, scaleY);
private var filterList = new Array();// a filter list array.
//CLASS CONSTRUCTOR
public function pred_as3() {
addChild(displ_mc);
addChild(bkgd_mc); // add both Movie Clip instances to the stage
storeClips();
filterList.push(filter);// add the displacement filter to the array.
bkgd_mc.filters = filterList; // applies the set of filters to the target movie clip.
}
private function storeClips():void //stores the animation in an array
{
count = displ_mc.numChildren;//the total number of movieclips inside displ_mc
for (var i:int = 0; i < displ_mc.numChildren; i++)//finds all movieclips inside displ_mc
{
clipcont.push(displ_mc.getChildAt(i));// frames are pushed inside the clipcont array
}
}
}
}
Step 16: Animate the Displacement Filter
Now that we have the animation ready to use, let’s put it in the displacement filter. We are going to access the clipcont array with a “time released” loop using the Event.ENTER_FRAME class. Every 4 frames, a new bitmap in the array is accessed, and then applied to the filter using the draw() method. After the last frame in clipcont is drawn, the loop starts over and the first frame in clipcont is drawn. It’s an endless loop.
private function animate(e:Event) {
filter.scaleX = strength1; //sets the value of scaleY and scaleX
filter.scaleY = strength1;
if(timer > 3) // a new frame is drawn every 4 frames
{
if(count <= 0)
{
count = clipcont.length;// setting an infinite loop
}
count--;
timer = 0;
}
if (clipcont[count])
{
filter.mapBitmap.draw(clipcont[count]);// a new frame of animation is drawn
}
bkgd_mc.filters = filterList;//updates the filter
}
Copy the above lines to your actionscript file. Now let’s make this run by adding an event listener to the class constructor.
public function pred_as3() {
addChild(displ_mc);
addChild(bkgd_mc); // add both Movie Clip instances to the stage
filterList.push(filter);// add the displacement map filter to the array.
bkgd_mc.filters = filterList; // applies the set of filters to the target movie clip.
storeClips();
addEventListener(Event.ENTER_FRAME, animate); //calls the animate function on enter frame
}
Update the class constructor with the addEventListener method. Now the animate function has been added to the stage and is called on every frame. Test the effect pressing Ctrl + Enter. You should see the animated face on the top left corner of your movie.
Step 17: Make it Follow the Mouse
We have an animation loop running in the corner of the movie. Let’s make the displacement map follow the mouse, this way you will be able to see how the active camouflage effect looks against different parts of the background. Paste this line inside the animate function:
private function animate(e:Event) {
filter.scaleY = strength1; //sets the value of scaleY and scaleX
filter.scaleX = strength1;
timer++;
if(timer > 3) // a new frame is drawn every 4 frames
{
if(count <= 0)
{
count = clipcont.length;// setting an infinite loop
}
count--;
timer = 0;
}
if (clipcont[count])
{
filter.mapBitmap.draw(clipcont[count]);// a new frame of animation is drawn
}
filter.mapPoint = new Point(mouseX-160, mouseY-240); // displacement map follows the mouse
bkgd_mc.filters = filterList;
}
This way we update the displacement map position on an enter frame basis using the mouseX and mouseY properties. Press Ctrl+Enter to test it. The head should now follow the mouse.
Step 18: Change the Filter Strength
In the last step of this tutorial we are going to play a little bit with the strength of our filter, increasing the value of the scaleX and scaleY parameters over a period of time, then decreasing back to the initial value. What we’re trying to achieve with this is to make the effect look more dynamic and… visible. While the whole point of a camouflage in real life should be to make things less visible, what we’re trying to do here is to make it look cool. Let’s freeze the animation so you can understand what I’m talking about. In the animate function, replace the line
filter.mapBitmap.draw(clipcont[count]);
with this line instead:
filter.mapBitmap.draw(clipcont[20]);
Instead of drawing the animation, we’re telling flash to draw the same frame over and over again. Press Ctrl+Enter to test it.
The effect looks completely static and boring. Let’s give it some movement. Paste the code below inside the animate function:
private function animate(e:Event) {
filter.scaleY = strength1; //updates the value of scaleY and scaleX
filter.scaleX = strength1;
timer++;
if(timer > 3) // a new frame is drawn every 4 frames
{
if(count <= 0)
{
count = clipcont.length;// setting an infinite loop
}
count--;
timer = 0;
}
if (clipcont[count])
{
filter.mapBitmap.draw(clipcont[20]);// a new frame of animation is drawn
}
filter.mapPoint = new Point(mouseX-160, mouseY-240); // displacement map follows the mouse
if (filter.scaleX > 220 || filter.scaleX < 120) // filter keeps changing it's intensity, making the effect more dynamic
{
spe *= -1;
}
strength1 += spe;
bkgd_mc.filters = filterList;
}
Now test it with Ctrl+Enter.
See how much better it looks? Ok so you can now restore the animation, fix the line that has been altered:
filter.mapBitmap.draw(clipcont[count]);
This effect is also helpful in case you want to attach a static body to the facial animation later on. It would look more active next to the bitmap animation.
Conclusion
The file may be a little heavy if you use jpeg quality 100, which is what I recommend. In a lower quality the effect loses a bit of its charm. If you want a smaller movie you can compress the images even more in photoshop, but make sure you’re keeping the color scheme right. The color around the character’s head should always be #808080 or you’ll see a box around it.
So this is it. The first tutorial I’ve ever written, it was fun doing it and I hope you had fun reading and make good use of it. I’d very much appreciate your feedback. Thanks for reading!
Digital Illustration – Creative Session Wrap
It’s a wrap. This session has covered a mix of digital illustration articles on theory and in depth case studies. We’ve looked at various artist’s work and their workflows. We’ve taken a close look at the topic of style development, finding your market, and promoting your work. This session posted across numerous Tuts+ sites: Psdtuts+, Vectortuts+, and Cgtuts+. We’ll continue to expand each session as we cover new topics and integrate your feedback. Let us know what you think of this session’s material.
Digital Illustration – CS Content
-

Basic Principles of Digital Matte Painting
Digital Matte Painting is a huge creative field that can add wonder and excitement to static film shots. Learn about digital matte painting principles, like set extension, camera mapping, as well as professional tips that matte painters employ.
-

Software Assisted Illustration in the Form of Information Visualization
Thinking about illustration inevitably calls to mind images of pencils and sketchpads and an analog, old-school creative process. There’s a certain charm to hand-drawn images, an intimate bridge between artist and page. But the digital age has brought its own magnetism to the illustrative process, liberating artists to do more than they ever could before and offering an entirely new platform for self-expression.
-

Developing a Diverse Range of Illustration Styles
Making a living as an illustrator is a dream for many young artists – but it takes more than dreaming to impress potential clients. A successful illustrator needs flare, persistence and a strong portfolio. Over the years I’ve experimented with various mediums and techniques to establish a broad range of styles. In this article I’d like to share my thoughts and experiences with using multiple illustration styles, as opposed to fixating on just one.
-

From A Childs View: 30+ Creative Children’s Book Covers
This inspirational post is all about showing you a great selection of different ways the digital medium is put to use in the modern day world to create illustrations for children’s book covers: from toddlers’ short novels and picture books, to books about color for the youth, to older kids who have a keen interest in art and design – and of course everything in between.
-

Eighteen Artists Share Their Opinions on Artistic Style – Part I
Talk to some artists or take a look at an online conversation about artwork and there’s a mighty good chance you’ll hear or read a mention of artistic style at some point. But for as often as it’s mentioned, style seems under-appreciated and misunderstood. So what exactly is behind a style? How does an artist develop a style and what does style mean to an artist? To find out, I spoke with eighteen highly-talented artists and I’ve conveniently assembled their responses for your edification and entertainment.
-

Eighteen Artists Share Their Opinions on Artistic Style – Part II
Talk to some artists or take a look at an online conversation about artwork and there’s a mighty good chance you’ll hear or read a mention of artistic style at some point. So what exactly is behind a style? How does an artist develop a style and what does style mean to an artist? To find out, I spoke with eighteen highly-talented artists and I’ve conveniently assembled their responses for your edification and entertainment. This is the second part of a two-part series. What’s that? Missed the first part? Well check it out!
-

Scratching Your Niche Market
As opposed to discussing just the specific techniques used to target a precise niche market, I would like to start off with a few overarching thoughts. I will cover some basic, yet very useful principles to keep in mind for the bigger picture (Get it? ‘Bigger picture,’ like your career – hehe), and then supply a case study of how I have used them in my work.
-

Incorporating Surrealism Concepts into Your Digital Artwork
Have you ever wanted to incorporate Surreal concepts into your artwork, but weren’t sure how to approach it? In this article, I share my personal pipeline for fusing Surrealist notions with my imagination to create fresh work. Learn to unleash your mind, capture your dreams, and fuse wild ideas into well crafted digital works of art through experimentation, planning, and execution.
-

Realistic Vector Motorcycle Portraits
Every semester, in my Illustrator classes, my students always want to know how I create the Motorcycle Portraits I am known for. I often give them a brief explanation, but I have never really sat down and described the process in detail…until now. My approach to getting a realistic look in my work is a bit tedious, but I think you will agree that the end results are well worth it. Enjoy!
-

‘Faux’ Magazine Cover Design
With digital tools (such as, a combination of Poser and Photoshop) one can create faux cover designs much like the surface effects of traditional painting techniques. Furthermore the speed, turn around, and cost benefits in work flow these tools provide might just put a much cherished form of illustration back at the magazine editors doorstep. Let’s review a case study on creating a “Faux Fantasy and Adventure Magazine” cover, with an authentic look and worn vintage feel from yesteryear.
-

The Making of Lost – Part 1
In this tutorial series, I will be covering the basic process of how I created my piece “lost.” The first part of this two part series covers the basics of creating 3D abstract pieces and how to incorporate them with photo manipulation; the second part will focus on the creation of effects in Photoshop and how to enhance and strengthen the final image.
-

The Making of Lost – Part 2
In this second tutorial of this two part series, we will add a background and enhance the image with Photoshop effects. Keep in mind that a key to succeed in following this tutorial series is to experiment. I will be teaching the basic techniques but in order to create a strong composition and attractive shapes, you will need to alter the settings, and experiment with other effects. Patience and determination are mandatory skills for any artist. So let’s finish this image!
-

Selfless Self-Promotion: How to Promote Yourself Without Talking About Yourself
Promoting yourself doesn’t have to mean talking about yourself. There are so many other ways to get your name out there and market your brand. This is something that is too often overlooked by creative professionals. Let’s look a few simple ways to promote yourself without talking about yourself.
Your Thoughts on this Digital Illustration Session
We’d love to here your feedback and suggestions on how to improve Creative Sessions. We’re actively working to improve this project, by consistently adding more high quality material, and new intensive two week sessions releasing each month. We look forward to your comments.
Coming Soon, Interface Design – Creative Session
Our next session will be on interface design. In the next session we’ll cover a wide spectrum of interface design topics. We’ll dive deeper into the theory of user-centered design, creating mobile interfaces, GUI design, and more. We’ll also follow some interface designers through their working process. We have a great session lined up on interface design coming soon. Expect to see this next session post around the middle of July.
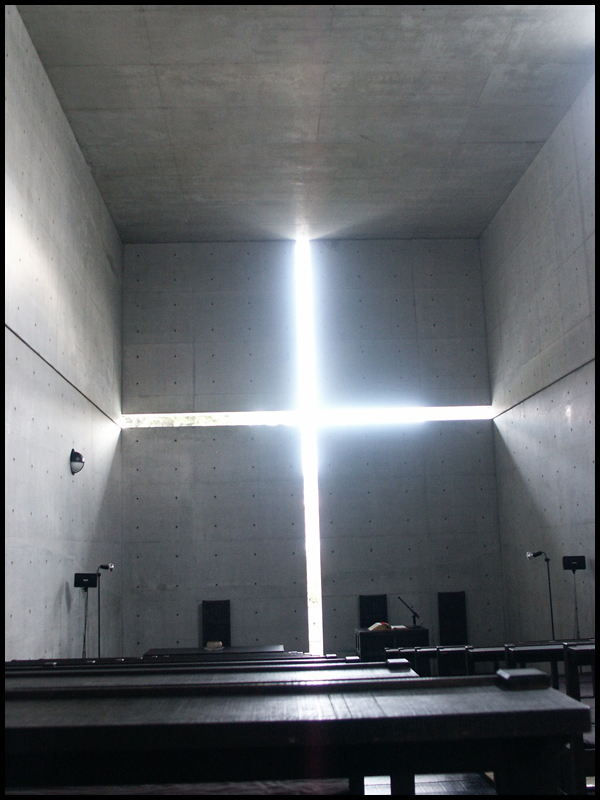
Texturing, Lighting & Rendering ‘The Church Of Light’ in 3Ds Max
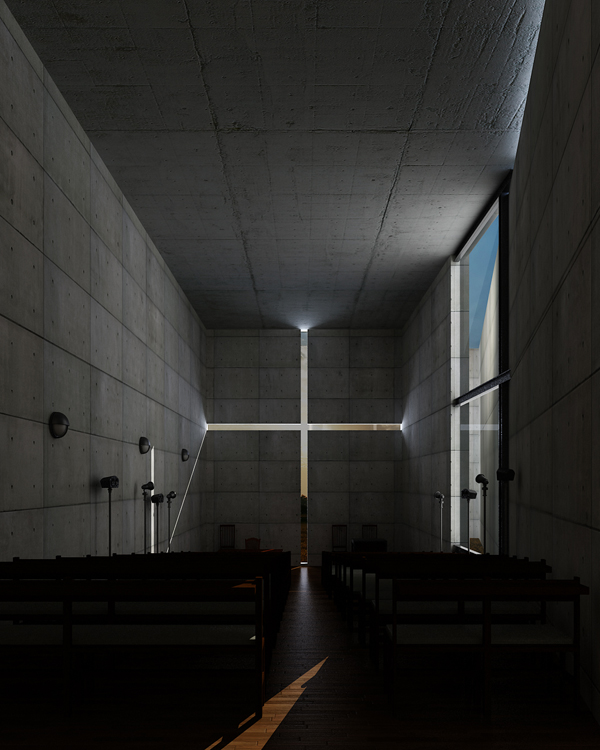
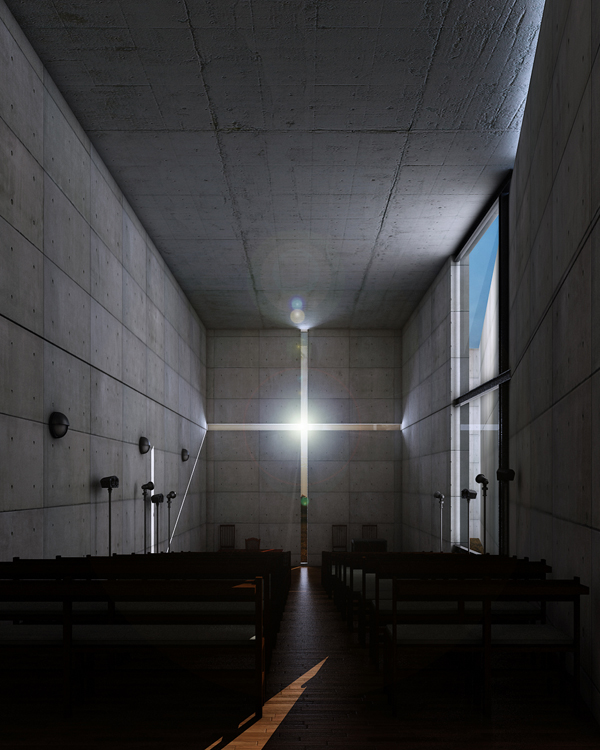
In this tutorial, Pratik Gulati walks us through how he created his stunning image, ‘The Church of Light’, using 3Ds Max. He covering all of the modeling, material creation, lighting, render passes and the post-production techniques used.
A Brief History
The Church of the Light is a small structure on the corner of two streets in the town of Ibaraki, in Osaka, Japan. The architect, Tadao Ando, is famed for using Zen philosophies when conceptualizing his structures, and one theme he expresses in this work is the dual nature of existence. The space within the chapel is defined by the strong contrast between light and solid. In the chapel, light enters from behind the altar through a cross cut in the concrete wall, and it’s at this intersection of light and solid, that the occupant is meant to become aware of the deep division between the spiritual and the secular within themselves.

Modeling
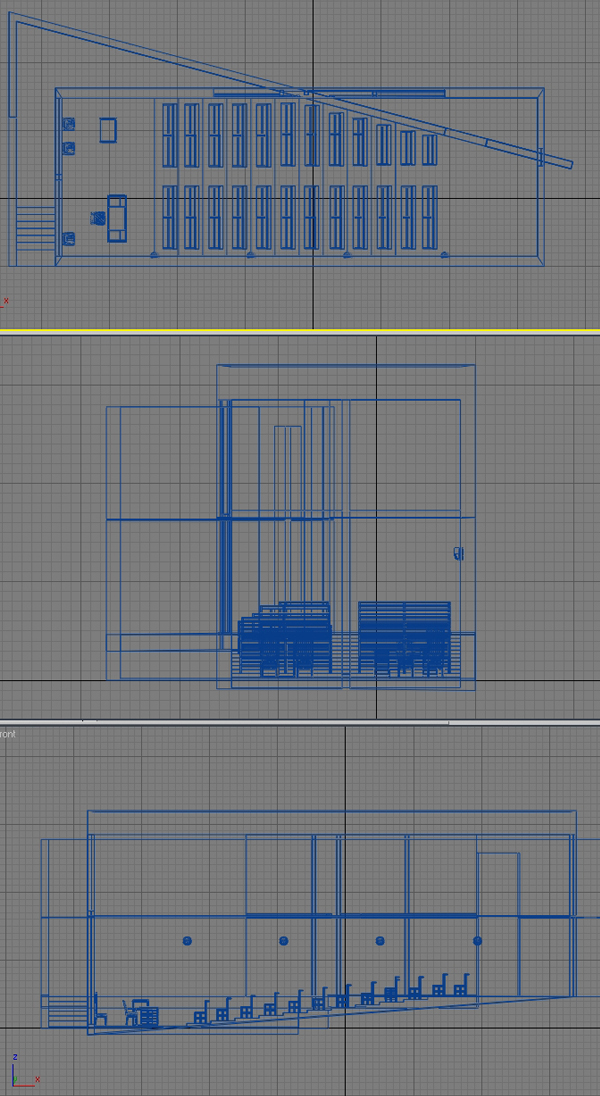
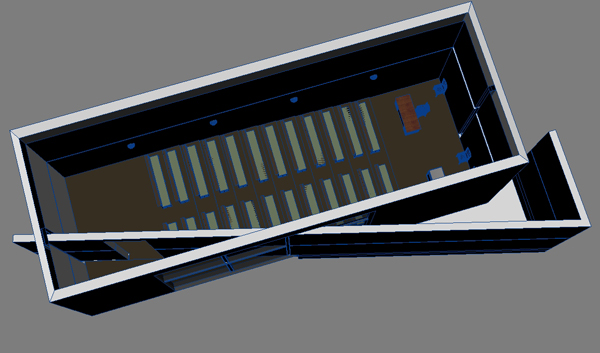
As you can see in the image below, the geometry itself is actually very simple – walls on all four sides and 1 major window at the back-right through which light enters. All of the furniture models in the scene were created using simple box-modeling techniques, and once modelled, I used instancing to create multiple copies throughout the church.


Step 1
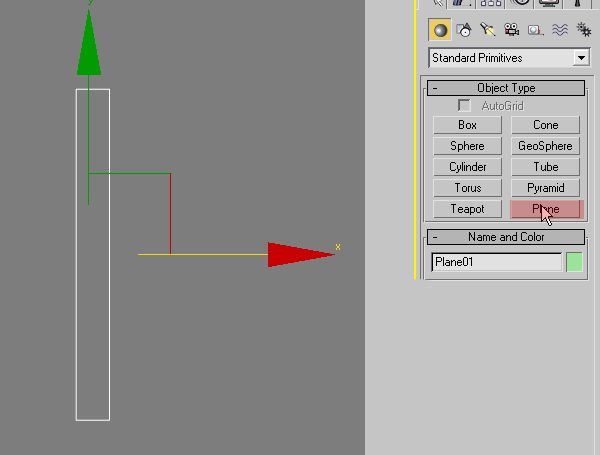
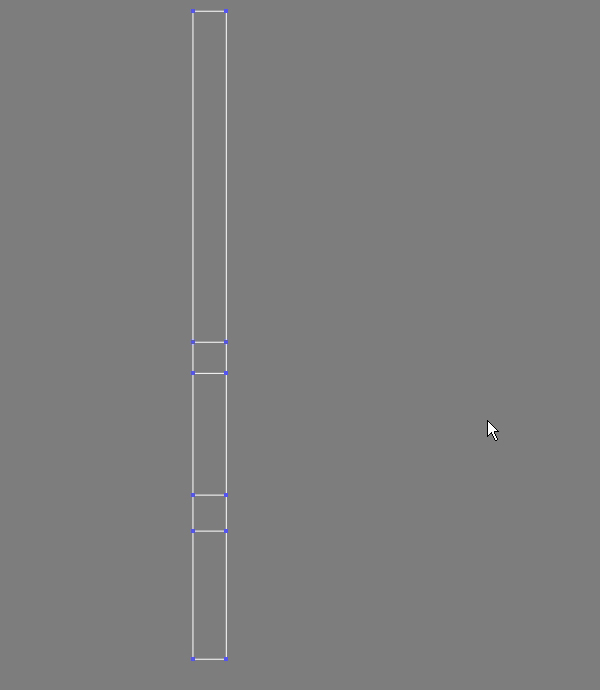
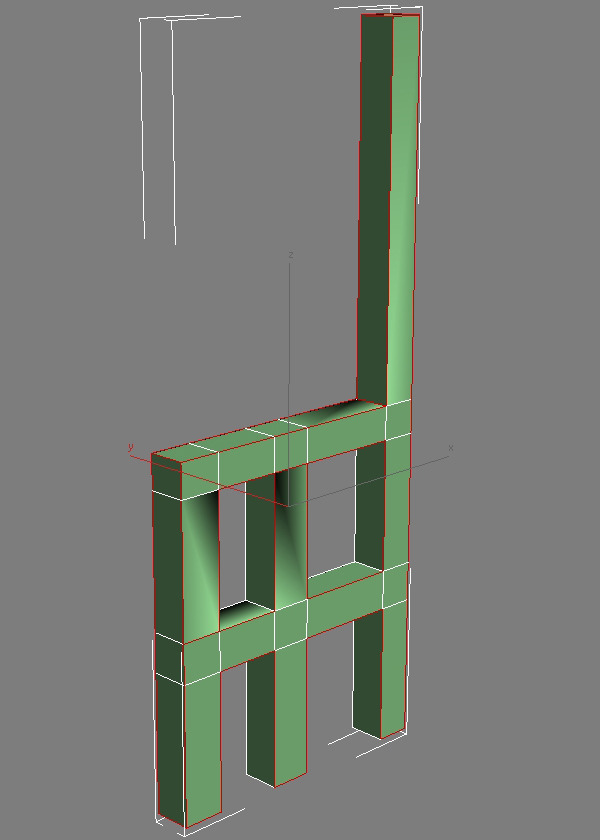
To model the bench, first create a plane in the front view.

Step 2
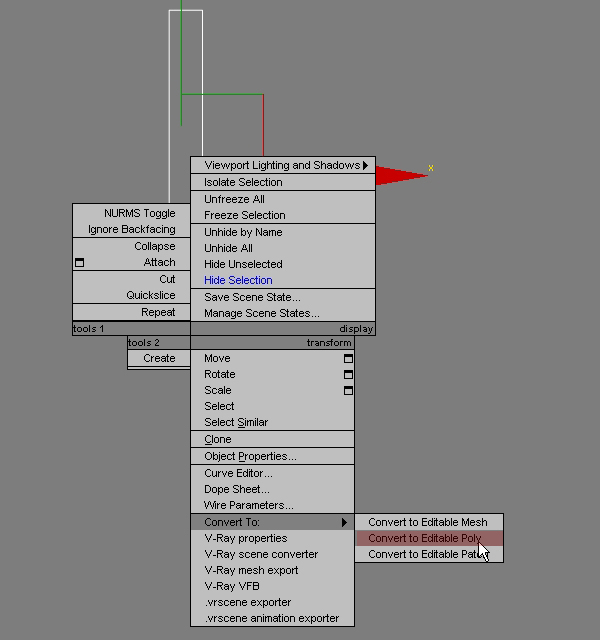
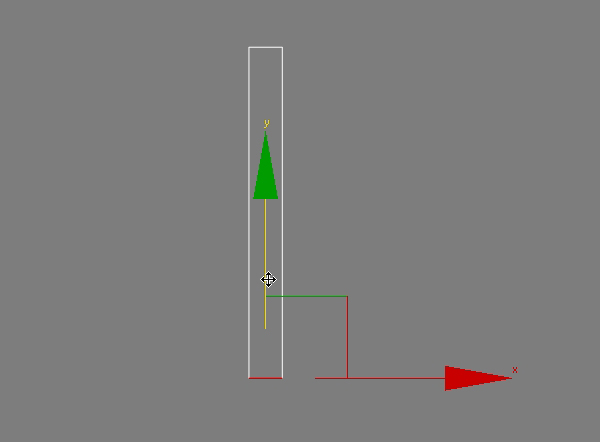
After converting it to an editable poly, select the lower edge and shift drag it downwards to extrude it as shown.


Step 3
Select these two edges and connect them with 3 divisions. With that done, tweak the vertex positions as shown in the final image below.


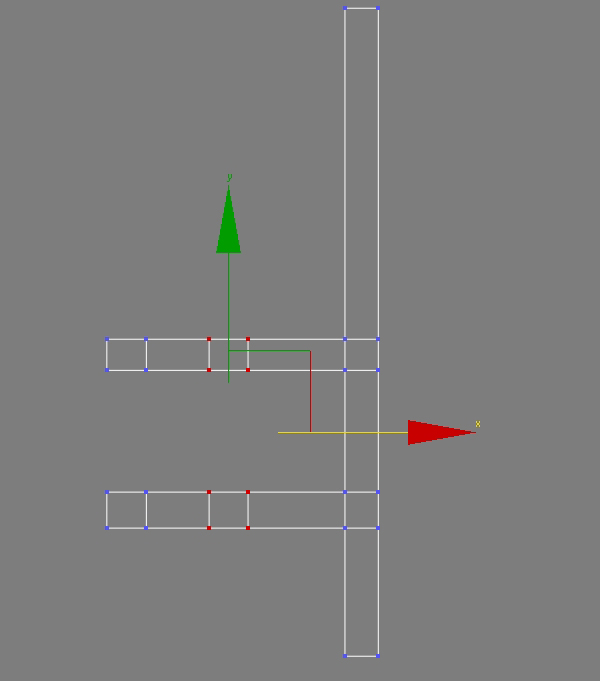
Step 4
Repeat the above process to complete the two horizontal sections shown.

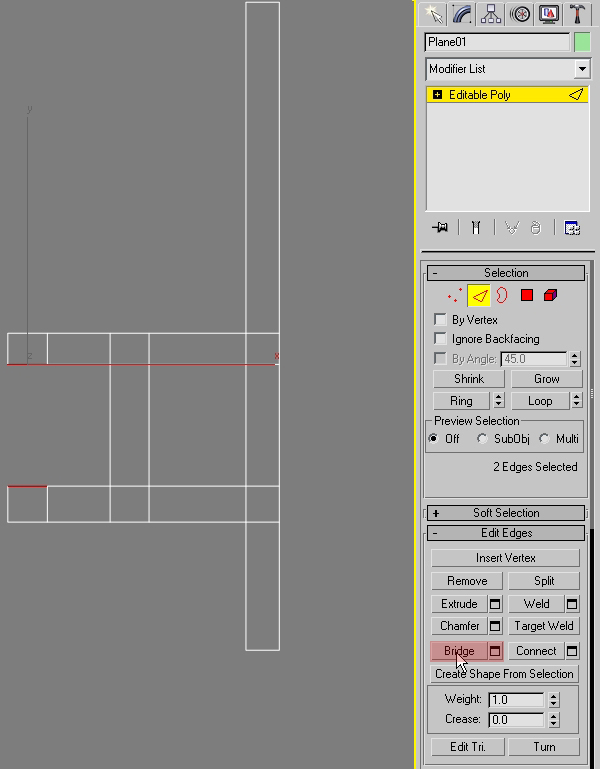
Step 5
Here we can use the bridge tool to easily connect up these two pairs of edges.

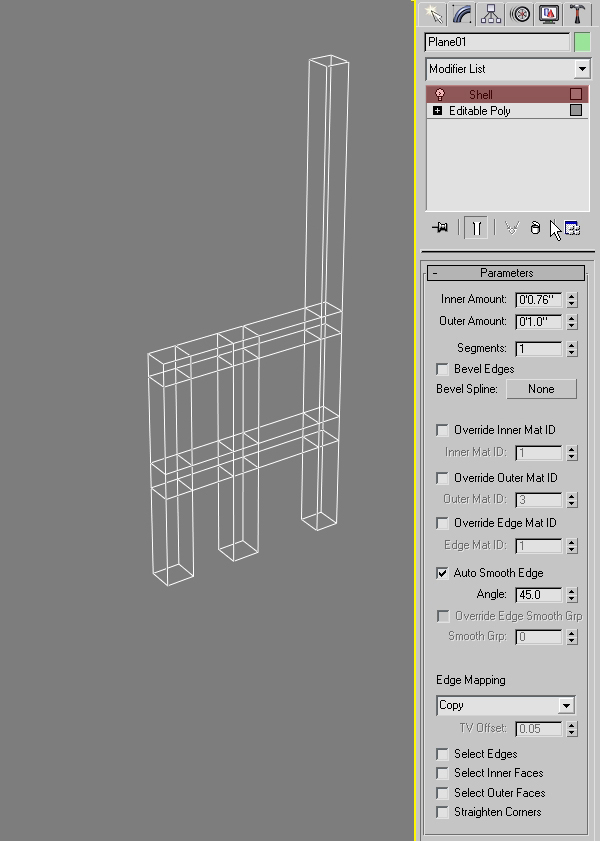
Step 6
With the main shape created, apply a shell modifier to add thickness to the object. We want the different sections to end up roughly square – the settings that I used are shown below.

Step 7
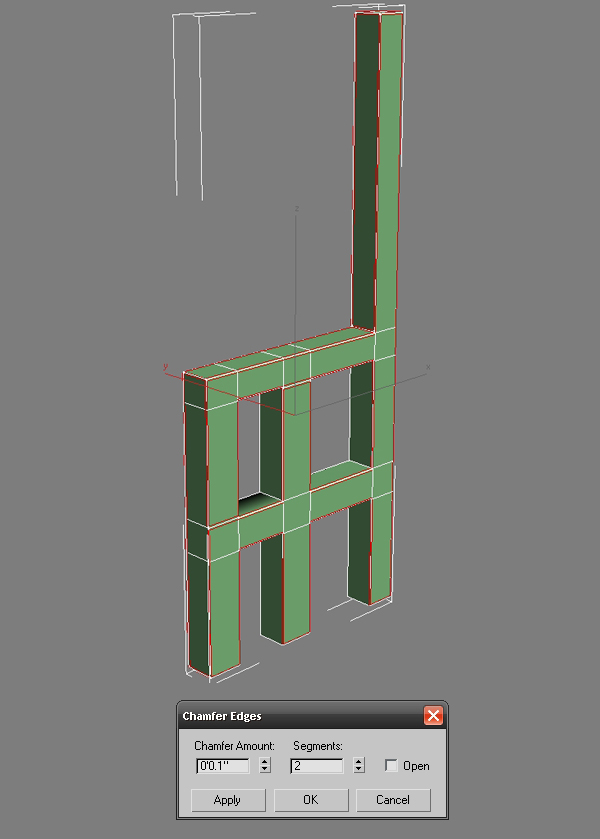
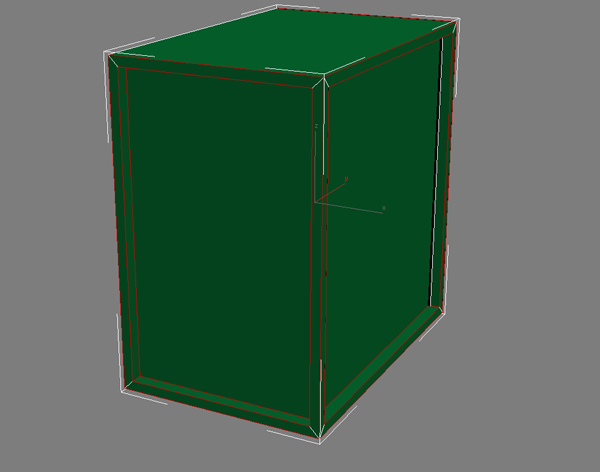
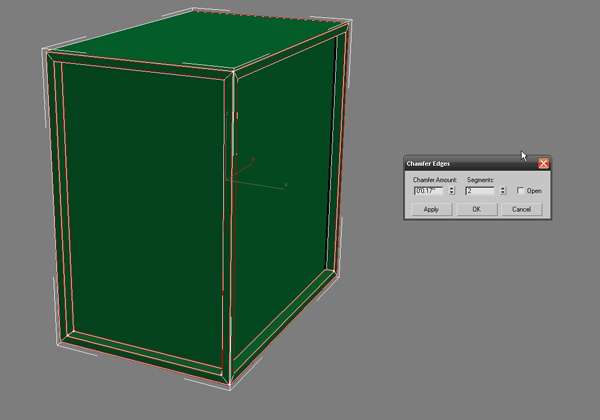
As we should do with all photorealistic models, we now need to chamfer all of the corner edges to give our model a beveled look. My chamfer settings are shown but the important thing is to ensure that it looks right to you!


Step 8
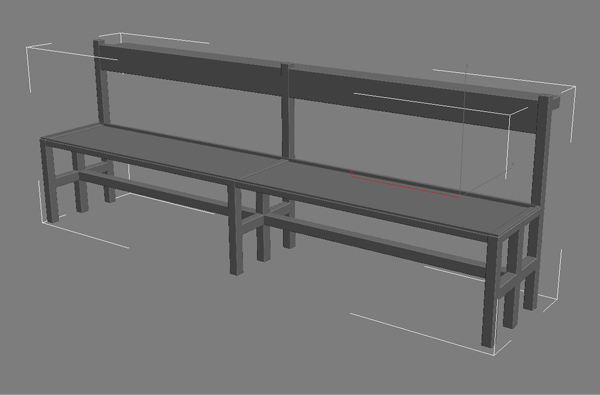
After duplicating this object twice, I also created the back support and the seat itself using exactly the same techniques described above. Our bench is now done!

Step 9
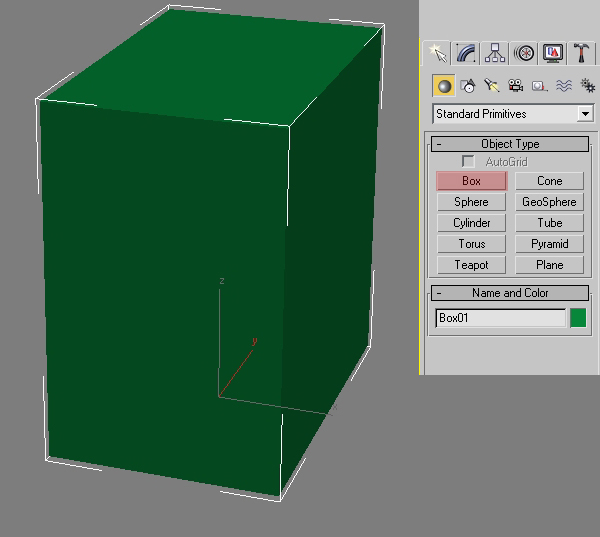
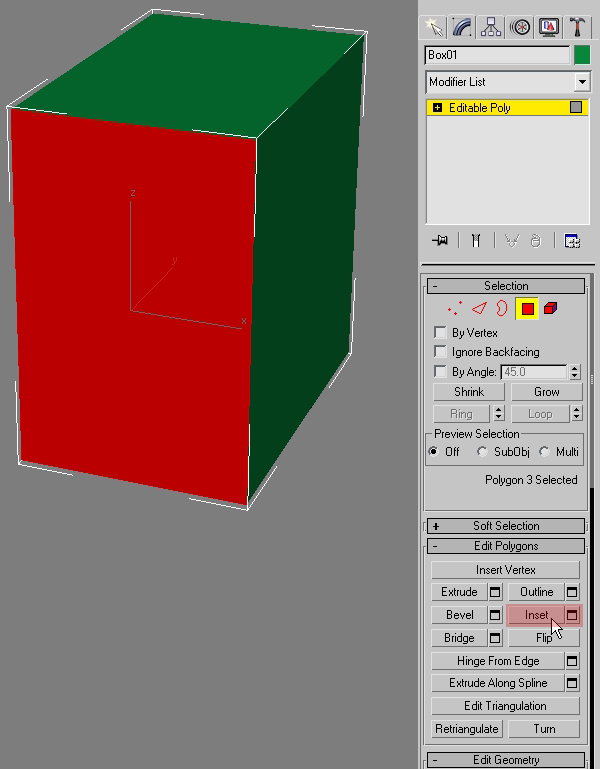
To model the podium, first create a box and convert it to an editable poly.

Step 10
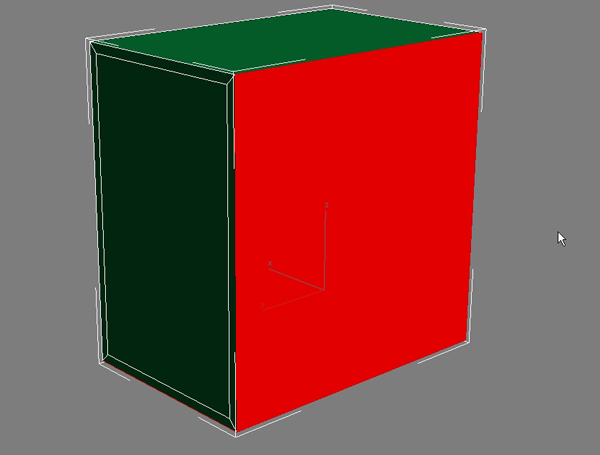
Select 3 of the side faces and inset them as shown.


Step 11
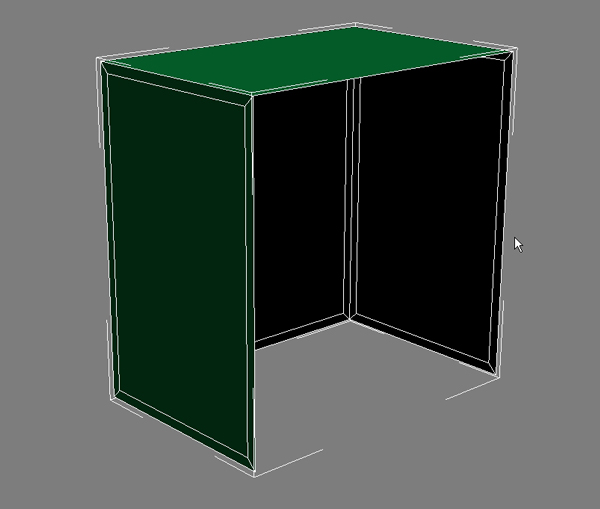
With that done, delete the forth side polygon.

Step 12
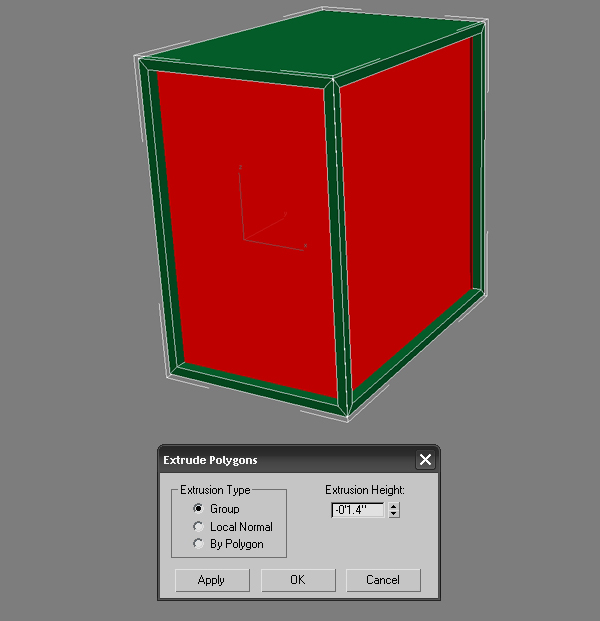
Now select the inset faces and extrude them in slightly.

Step 13
Now, just as on the chair, we need to go in and chamfer all of our edges.


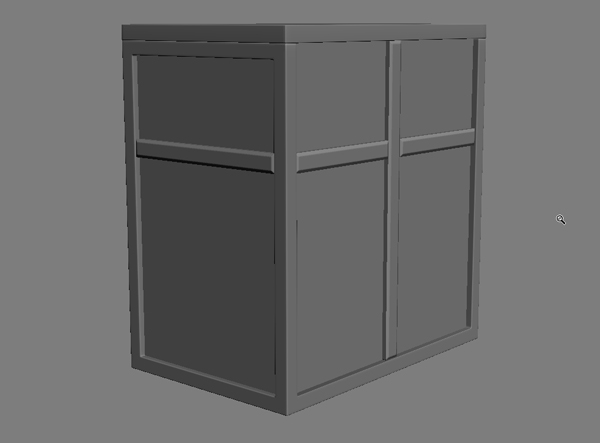
Step 14
To finish the object, add a cube on top of the model, a cross on the front and a cube on each side, making sure to chamfer the edges. The other objects in the scene were all constructed using a similar polygonal modeling method.

Rendering an Ambient Occlusion Pass
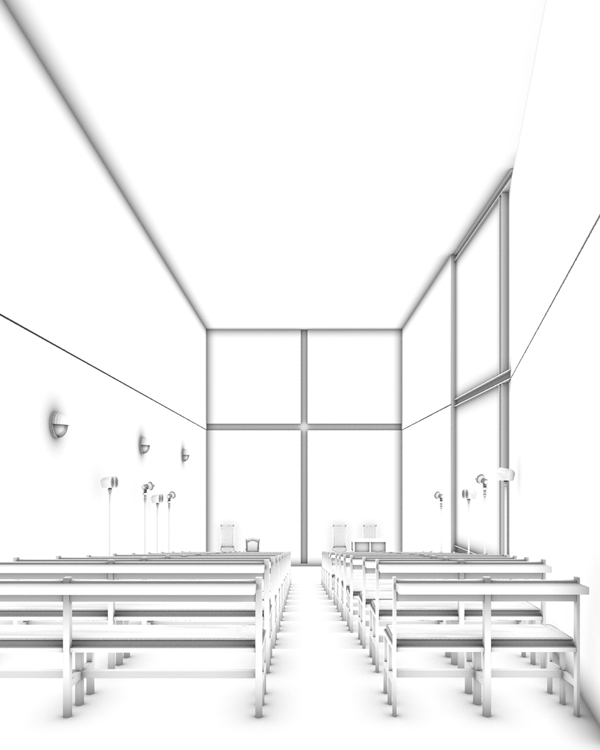
I added in an Ambient occlusion pass using Mental Ray to add more depth and weight to the final render. I personally prefer Mental Ray for this as it’s fast and, in my opinion, gives a better result than the Vray dirt shader.

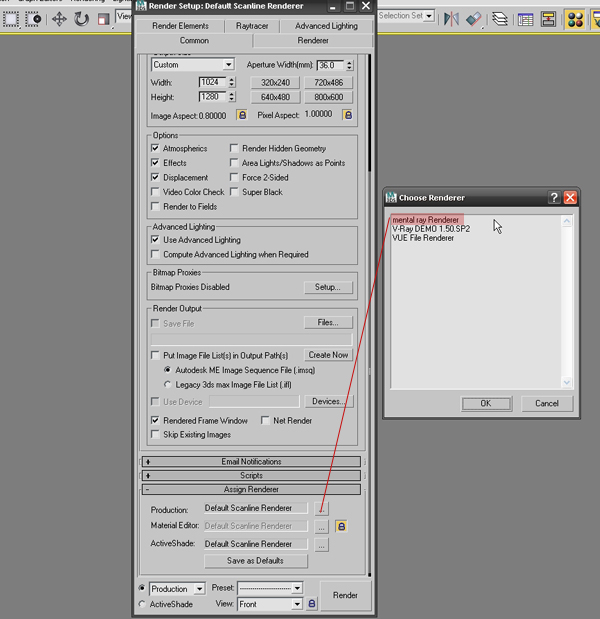
Step 1
First change the current renderer from scan line to Mental Ray.

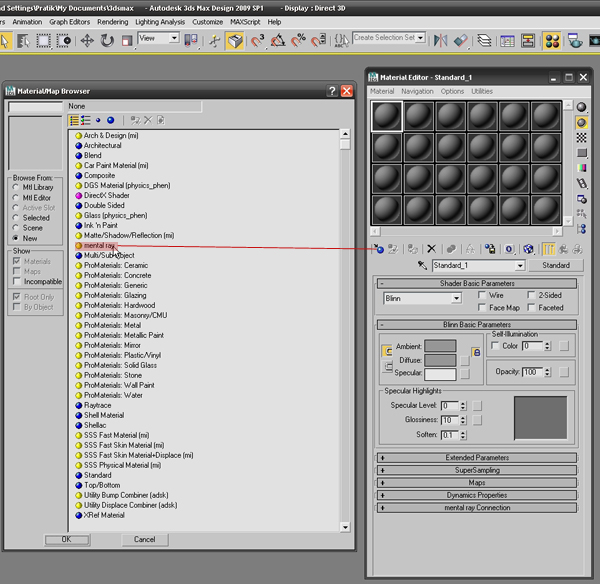
Step 2
Then add in a new Mental Ray material.

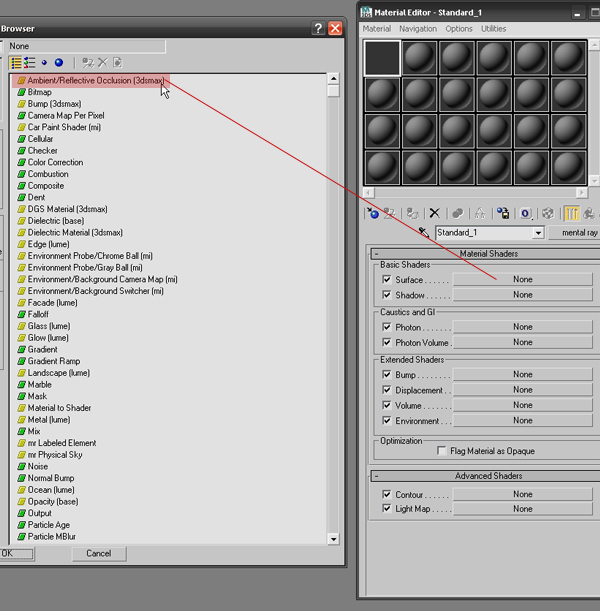
Step 3
Under surface, assign Ambient/Reflective Occlusion.

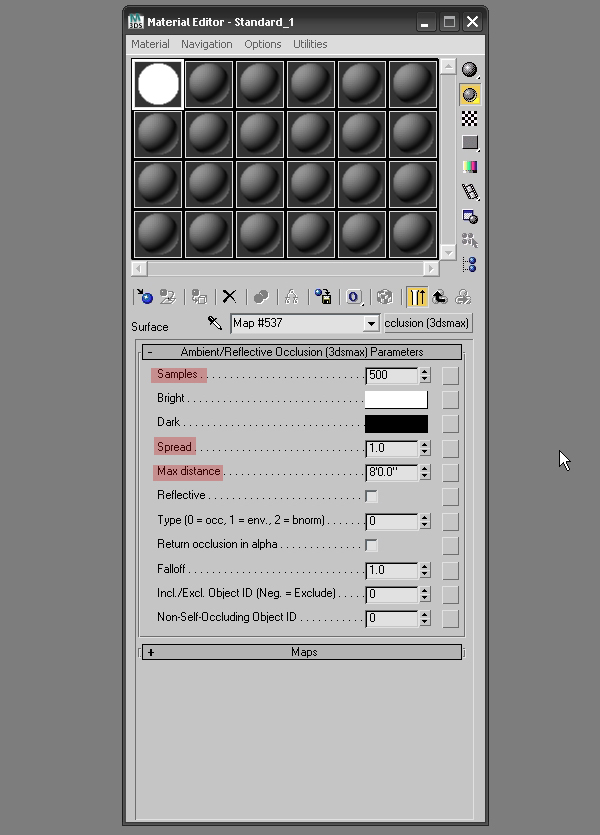
Step 4
Increase the Samples to 500 – the more samples you add, the less grainy the final render will appear. Also increase the Spread and Max Distance as shown.

Step 5
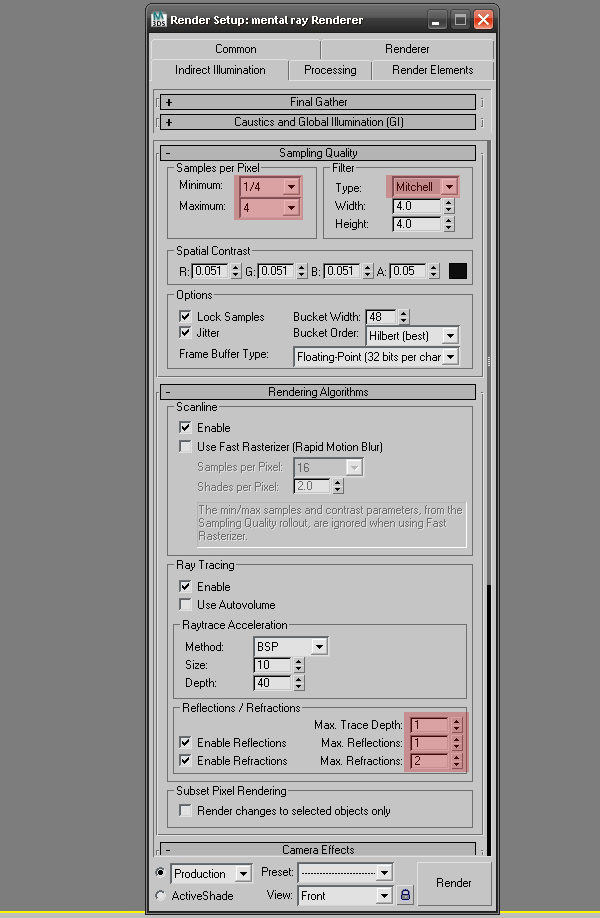
Final Gather and GI should not be turned on while rendering an ambient occlusion pass, so just increase the sampling quality and enable raytracing as shown. You can now render out your AO pass.

Lighting & Render Settings
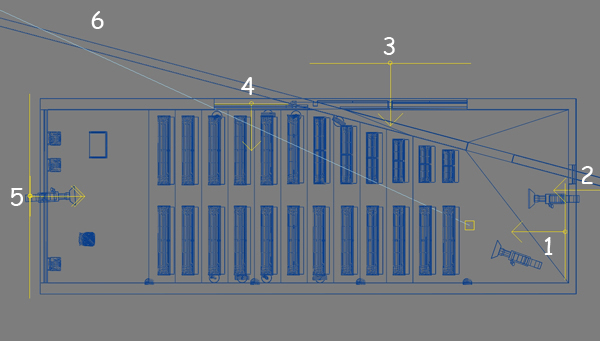
As you can see there are 5 Vray lights (1-5) for the interior illumination and 1 directional light (6) which acts as the sun in the final scene.

Step 1
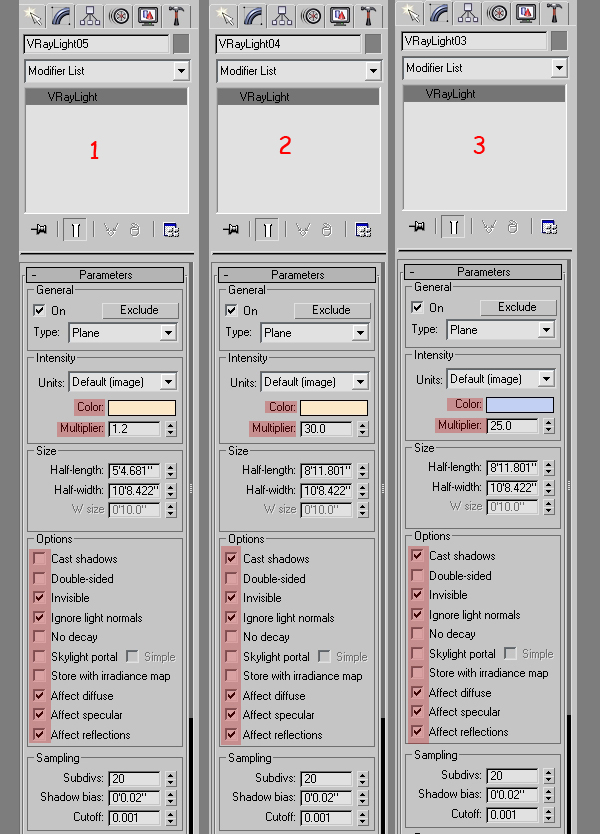
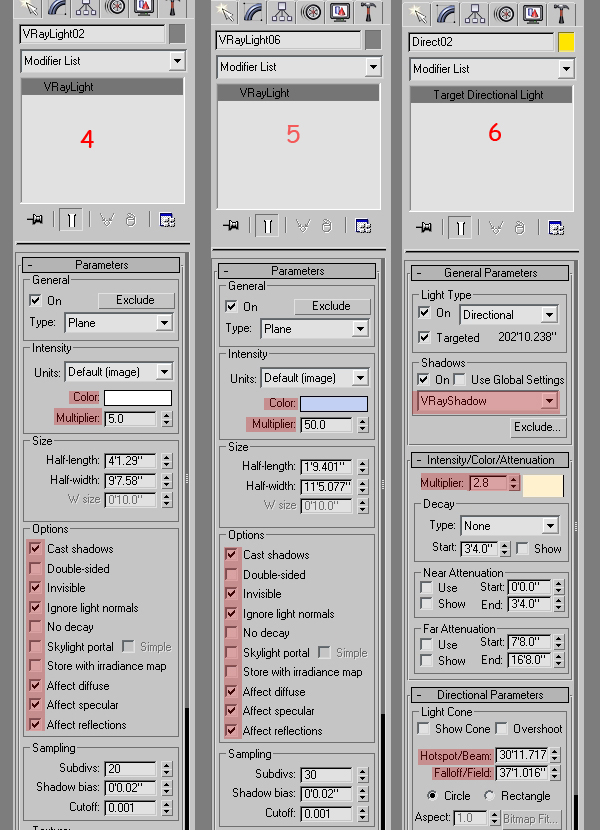
First of all, add the 6 lights shown above in to your own scene. The image below shows the different settings I have used for the 6 lights. The more advanced parameters are as follows :
- Invisible – this setting controls whether the VRayLight source itself is visible in the final render.
- Subdivs – this setting defines the quality of the light. A value of 8-10 should be used for test renders, whilst 15-20 should be used for the final image. Increasing the number of samples increases your overall render time.


Step 2
Now assign a simple Vray material to all of the objects in the scene. We do this to ensure quick render times during the testing process. Then, in the Common tab of the Render Setup dialog, set the image resolution and the file destination output.

Step 3
Moving onto the Vray tab itself, first disable Default Lights, and then set the image sampler type to Adaptive DMC, turn on the Antialiasing filter and set the type to Catmull-Rom. Finally, change the color mapping type to Exponential. This mode will saturate the colors based on their brightness, which can be useful to prevent burn-outs around light sources in the scene, whilst maintaining the overall tone of the image.

Step 4
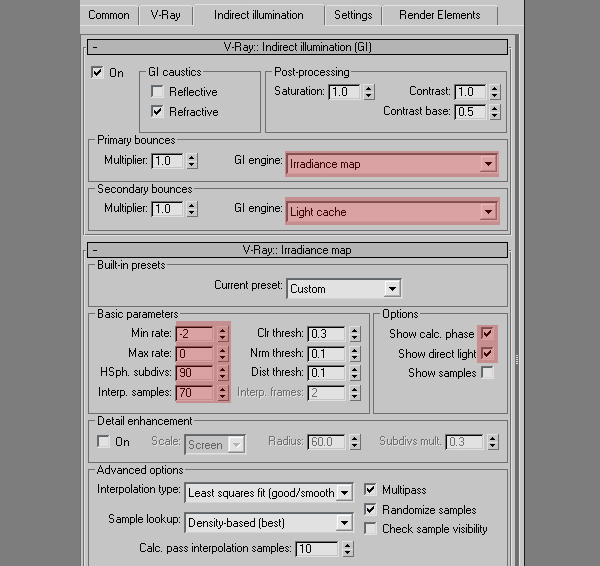
in the Indirect illumination tab, select Irradiance map and Light cache as the primary and secondary bounce engines. Using an Irradiance map computes indirect illumination at only a few within the scene, and Vray then interpolate the rest of the lighting information from that data. As it only looks at a subset of the total information, the Irrandiance map method is very fast compared to direct computation, especially for scenes with large flat areas.
Now select the High custom preset, and change the HSph. subdivs to 90, and the Interp. samples to 70. The Hemispheric subdivs (HSph. subdivs) value controls the quality of the individual GI samples taken by Vray. Smaller values makes things faster, but may produce an overly blotchy result. Higher values produce smoother images at the cost of increased render time.

Step 5
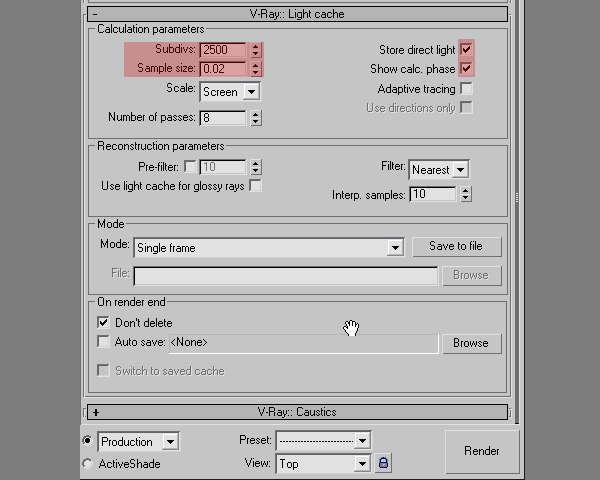
Under the Light Cache settings, set the Subdivs to 1500, the Sample size to 0.02 and Number of Passes to 8. Ensure that Store direct light and Show calc. phase are both turned on.

Step 6
Our render settings are now complete so let’s move on to the materials.

Materials
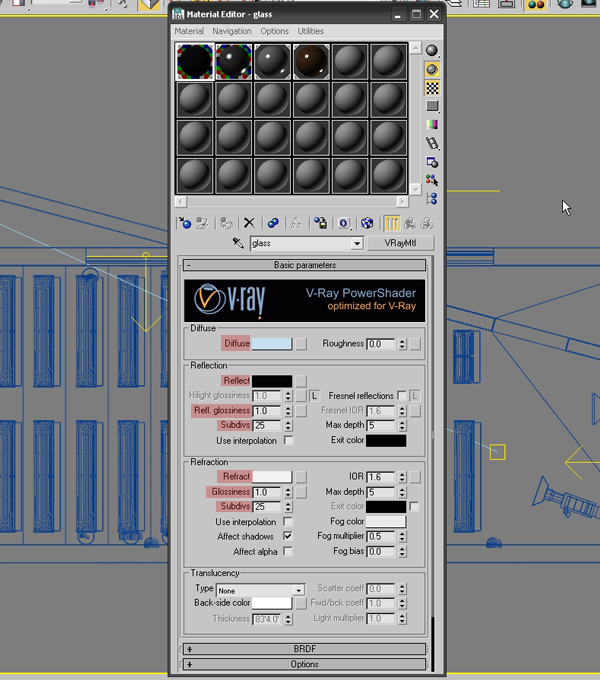
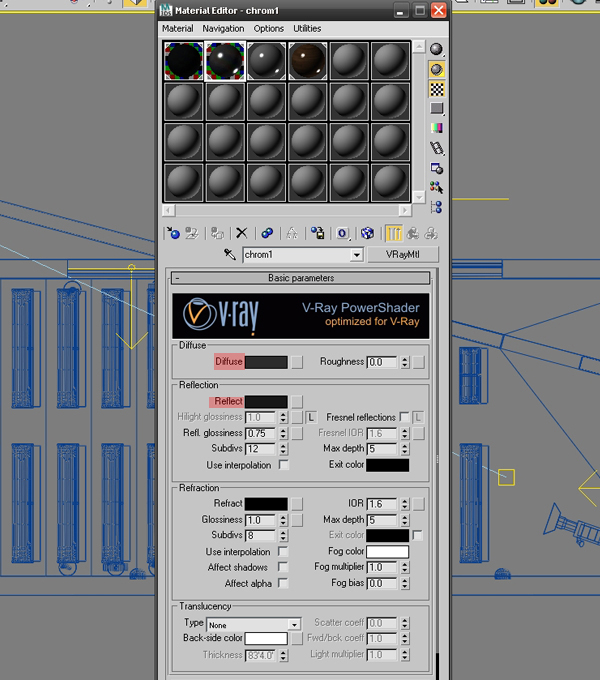
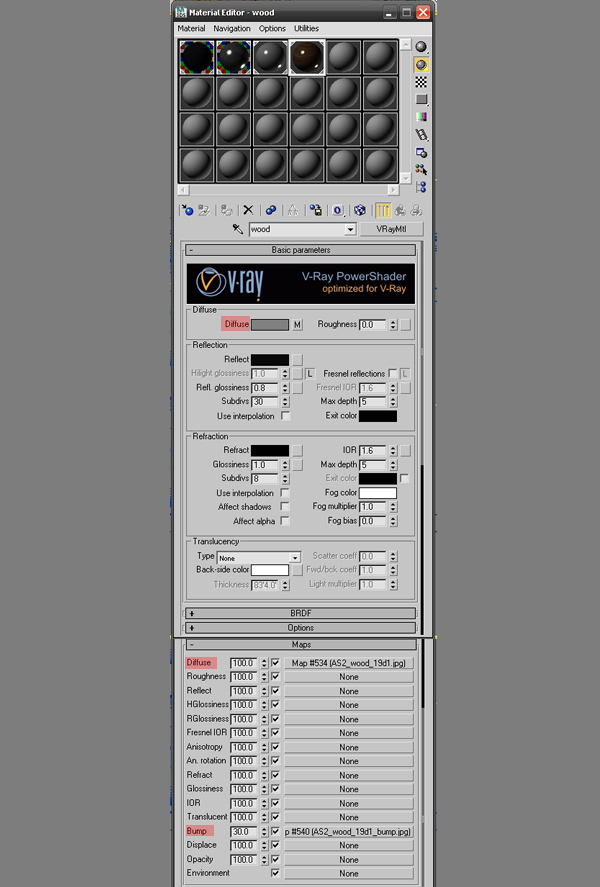
There are 3 main materials in the scene; glass, chrome and wood. Let’s take a look at their parameters.
Step 1
The glass settings :

Step 2
The chrome settings :

Step 3
The wood settings :

Step 4
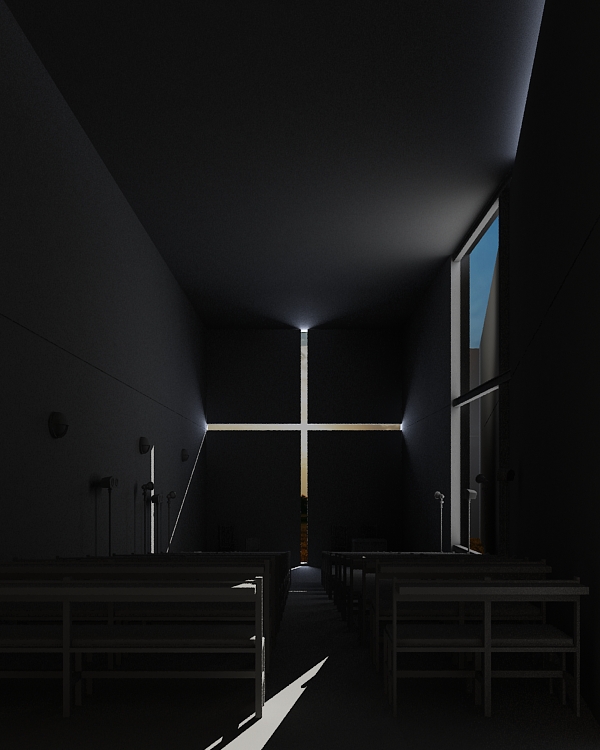
After creating and assigning the materials shown above, and hitting render, you should get an image that similar to that shown below. We now need to move into post processing, so save out the render and open Photoshop.

Post Processing
Step 1
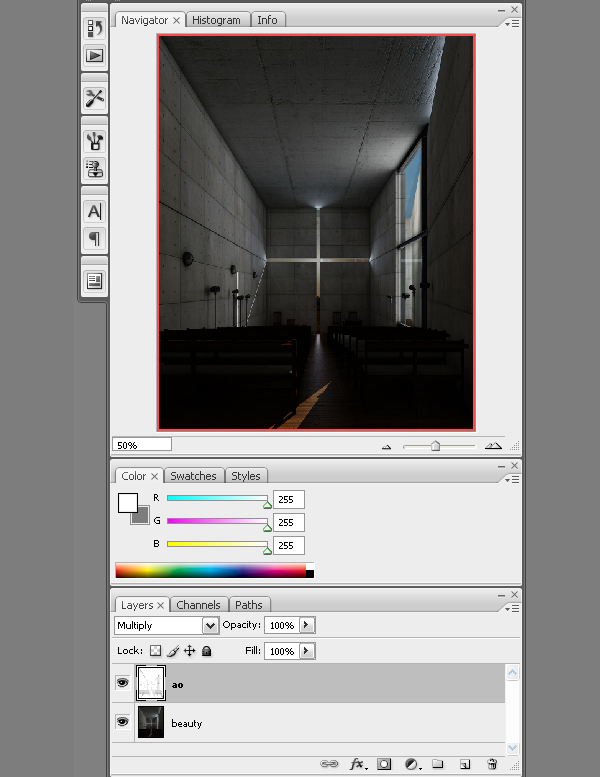
Open both the beauty pass (the main render) and the ambient occlusion pass in Photoshop. With the ambient occlusion image active, select all (Ctrl-A) and then copy (Ctrl-C) the contents. Switch to the beauty pass and paste (Ctrl-P) the ambient occlusion pass into a new layer on top of the stack, as shown below. Then switch the ambient occlusion pass to Multiply mode.

Step 2
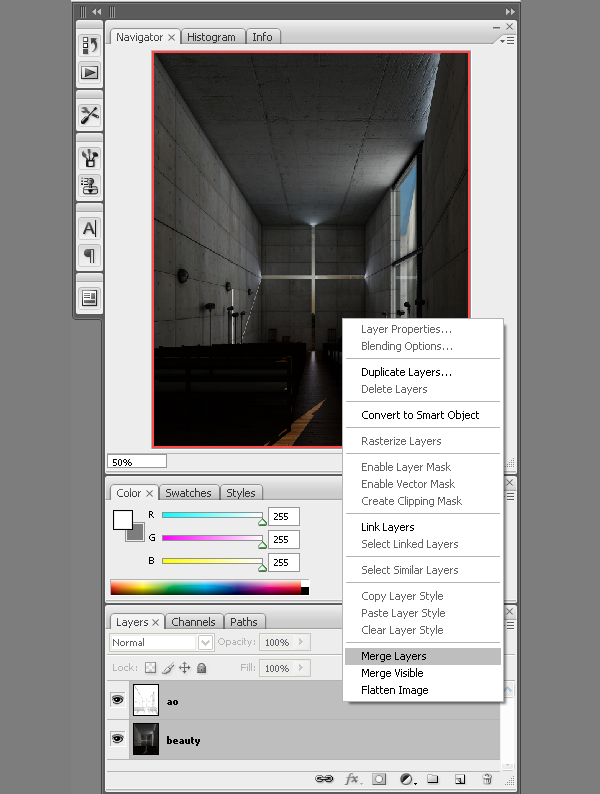
Now merge the two layers by selecting them both, right-clicking either layer and choosing Merge Layers.

Step 3
We’re now going to alter the Brightness and Constrast of our newly merged layer, so with the layer selected go to Image > Adjustment > Brightness/Contrast. Play with the settings until you’re happy with the result – my values are shown below – and then click OK.

Step 4
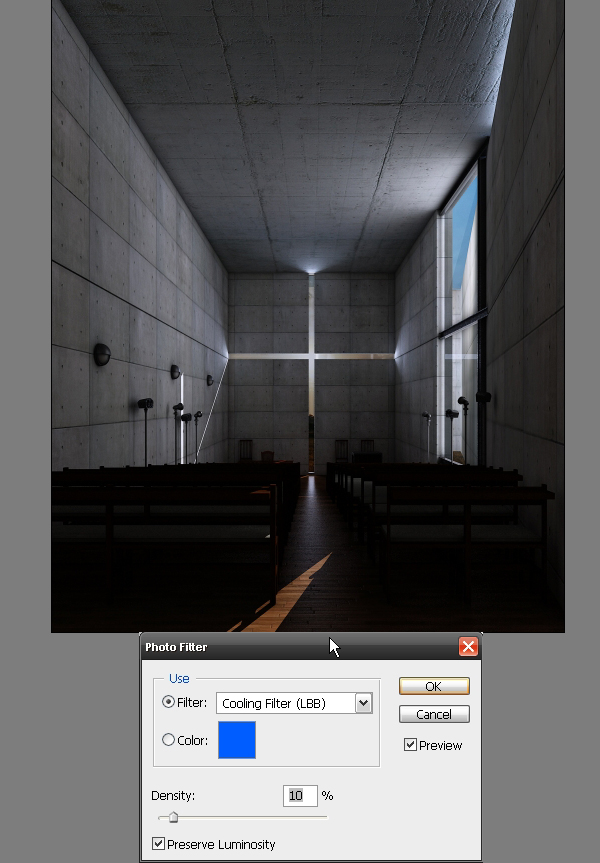
To add a slight blue tint to the render, go to Image > Adjustment > Photo Filter… In the dialog box, select Cooling Filter (LBB) from the dropdown and set the density to about 10%. Click OK once you’re happy with the result.

Step 5
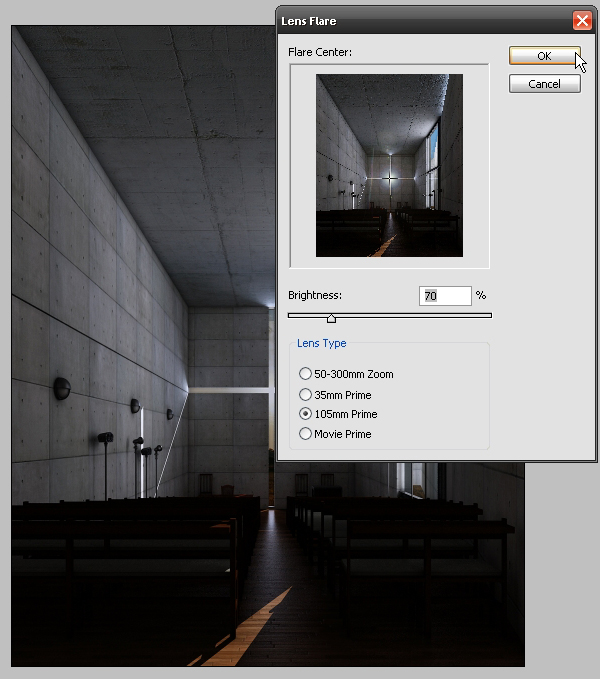
The final step is to add a slight lens flare to our image, so go to Filter > Render >Lens Flare. The first thing we need to do is select the flare center, by clicking right in the centre of the cross in the preview window. With that done, set Brightness to around 70%, and set the Lens Type to 105mm Prime. With that done, click OK to finish.

Step 6
All that’s left to do now is save our final image.

Voila! The image is complete. Happy rendering!
Don’t miss more CG tutorials and guides, published daily – subscribe to Cgtuts+ by RSS.
How to Fight Creative Time Wasting
I was going to write this earlier, but decided to work on another project first. Then fresh emails beckoned. Then I ate dinner.
I found every which way to do everything but the task at hand…even though I knew full well that I had to get it done. Combating these “creative time-wasters” is something ew need to work at every single day. Over at our sister site, FreelanceSwitch, Will Kenny gives us a few tips on how to do just that.
Fight Creative Time Wasting: Tips for Resourceful Time Wasters
But before you go, check out this video by Levni Yilmaz that takes creative time wasting to a whole other level.