Ich erwarte: – ca. 500 Wörter je Text – Gute Recherche – Wer vorhandene Informationen (zB aus dem Internet) nutzt muss diese Informationen komplett neu texten. Die Texte werden auf kopierte Inhalte geprüft… (Budget: $30-250, Jobs: Ghostwriting)

Freelance Projects, Design and Programming Tutorials
Ich erwarte: – ca. 500 Wörter je Text – Gute Recherche – Wer vorhandene Informationen (zB aus dem Internet) nutzt muss diese Informationen komplett neu texten. Die Texte werden auf kopierte Inhalte geprüft… (Budget: $30-250, Jobs: Ghostwriting)
Hello guys, I need someone to setup accounts in a DO FOLLOW social bookmark websites (I ll provide a list) and post there short description of my website and place a link (bookmark). All bookmarks should look natural that s why every link (bookmark) should be different and contain my keywords… (Budget: $30-250, Jobs: Article Submission, Copywriting, Data Entry, SEO, Social Networking)
I am looking for article writer
(1) article should be unique
(2) contain at least 500 words
(3) need 30 x 500 words articles within 3 days
(4) $1 per article, $30 for the whole project
(5) if you can not work on this budget and time-frame please do not bid
thnx
I require an experienced Ezine article writer to write 5-10 articles for me. You only need to write 500 words article on different topics and PM them to me. All articles must have the following; original content and unique, contain at least 500 words. I will check with COPYSCAPE to ensure that they are original and genuine – anything suspicious will be rejected and you will not be paid.
Once the article is finished and passed to me, I will own full copyright or private label rights. You can not reuse the articles or sell them to another person. I only want an experienced writer who understands the exact requirements to get the articles published by article directories. If the written articles are denied by Ezine, you will not be paid.
I will give you more details and the keywords once the job is approved and awarded.
Thank you.
I need an easy to use CMS WordPress with a unique system to manage users. I need it with an automated system to process sale (with PayPal), automatic account creation, and instant delivery of e-product (with e-junkie.com). it would be very similar to his site: unlockalliphone.com but it would be in Spanish (I’ll do all the translation part). The idea is to make the site fully automated.
Funds will only be released from escrow when the job is fully completed. If you don’t agree, please don’t bid.
Hi all,
I need a data entry team for ongoing project. 200 entries per week, Only 8 hrs a day and 5 days per week.
Another freelancer went AWOL on this project. It’s a small project, but Im looking for a long term wordpress WIZARD. You will need to know you way around css, programming and trouble shooting bugs on themes with no support… (Budget: $30-250, Jobs: WordPress)
Besoin de liens pour referencement de sites francais pour la FRANCE A la recherche de personnes pouvant fournir un travail de référencement MANUEL pour des sites français et sur la France uniquement … (Budget: $30-250, Jobs: Forum Posting, Link Building, SEO)
I need a website design website that will retail a custom ecommerce store and shopping cart. I would prefer to buy a site that has already be built so if you have such a site please give me your best bid… (Budget: $30-250, Jobs: Website Design)
Project related to http://www.freelancer.com/projects/Wordpress-eCommerce/Zen-Cart-Expert-updates-current.html For another job of the same. Please bid as discussed abadan. (Budget: $30-250, Jobs: Zen Cart)
Part two of our Silverlight Introduction tutorial. In this screencast, Mike shows you how to save your walking routes to disk, and how to improve your app’s design using Expression Blend.
In the first part of this Silverlight introduction, you learned how to use Silverlight and Bing Maps to create a simple web app for calculating walking routes between any two places.
Now, you’re going to let the user save these routes to their hard drive, and display them in a list so they can easily be loaded later.
And once the app is feature-complete, you’ll learn how to use Microsoft Expression Blend to improve the design of the app. In particular, you’ll see how to define two different “states” for the app, and generate smooth transitions between the two with a few clicks.
Mike Taulty Microsoft (UK): http://mtaulty.com: [email protected]: twitter.com/mtaulty
Where to download the Expression Studio trial:
ActiveDen aren’t the only ones broadening their horizons. Today sees the beginning of regular Microsoft Silverlight content being published on Activetuts+ and I’m thrilled to say we have Silverlight Evangelist Mike Taulty on board to help us meet demand!
This is the first of two screencasts (with the second coming tomorrow) demonstrating how to build a simple Silverlight 4 map application, using Visual Studio and the C# programming language. You’ll get a decent overview of the Silverlight workflow, and learn what advantages it has over …similar technologies.
Go on – check it out and let us know what you think!
Scroll down to see a list of all the links in the text file that Mike writes in this tutorial.
By the end of this part, you’ll have created an app that lets users choose any two points on a map, and displays a route for them to walk between those places.
About Mike:
Mike Taulty Microsoft (UK): http://mtaulty.com: [email protected]: twitter.com/mtaulty
Where to download Visual Studio and the other software required for Silverlight development:
Working with Bing Maps:
How to fix the Web Service issue, if it comes up:
Where to download Expression Studio: (You won’t need this till the second part of the tutorial, but feel free to grab it in advance  )
)
Don’t forget to check back tomorrow to learn how to use Expression Blend to change the design of your app.
As you may have seen or heard we’ve got a new editor doing the rounds at Cgtuts+, Matt Brealey.
Kaleb had to finish his duties with Cgtuts+ at the start of May after successfully landing a position with EA as an Environmental Artist, well done! We’d like to thank Kaleb for the incredible work that he put in with Tuts+ over the last year, including the launch of the Cgtuts+ Premium Program, join us in wishing him all the best with EA!
Thanks to all the readers whose devotion and enthusiasm has made Cgtuts the amazingly involved and supportive community that it is today, to all the authors whose incredible talents and tireless efforts are responsible for making Cgtuts the unparalleled resource that it has become, and to Envato whose unwavering vision and limitless generosity have made it all possible. I’ve truly enjoyed my time here at Cgtuts, and I’m certain that it will forever be one of the most rewarding experiences of my career.
In the hunt for a new site editor we were lucky enough to find Matt Brealey, an established author for Cgtuts+, here’s what he has to say.
Hi everyone! Firstly I’d just like to echo Aaron’s words in thanking Kaleb for the amazing job he’s done for the past year. I’ve personally been visiting the site daily for almost that entire time simply because it was run so consistently well and the tutorials were always outstanding. He has certainly set the bar extremely high for the coming few months, and I wish him nothing but the best for the future. I’d also like to say a huge thank you to Envato for even considering me as a possible replacement.
…I cannot cook in the slightest…
Now, let me introduce myself. For the past 5 years I’ve been working in the UK as a freelance 3D modeler. During that time I’ve completed architectural/product design work and created high-poly models for broadcast and print-campaigns using Maya, Modo and Maxwell Render; I’ve roto’d, keyed and composited VFX for an indie short film or two using Syntheyes, Nuke and After Effects; and I’ve also found just enough spare time to play around with a few other programs such as Houdini, Realflow and Z-Brush (although I am still very much a beginner in that last one. It’s not pretty.) I’ve also had a few Modo tutorials published here myself over the past few months – hopefully they’ve helped at least one or two of you! Outside of my work I also play guitar, I love science and film, and I cannot cook in the slightest.
I’m really looking forward to hearing what you want from the site, and I can’t wait to see where the next few months take us.
Cheers!
Matt
Say hello to Matt in the comments below and feel free to let him know what you’re after!
In the second part of our invaluable, in-depth series looking at smoke and fire simulation techniques within Blender 2.5, Gottfried Hofmann shows us how to create fire! The incredible (and let’s not forget, completely free) result could be used as a flamethrower, dragon breath, a rocket trail…the possibilities are endless!
Techniques covered in this second video include :
So let’s get going!
Download
Note: click the ‘Monitor’ icon to view tutorial in full-screen HD.
The Screencast Key Status Tool used in this tutorial is available here.
Don’t miss more CG tutorials and guides, published daily – subscribe to Cgtuts+ by RSS.
Light-mapping for the Unreal Engine used to be an extremely tedious process, as it could only be prepared in an external program such as Max or Maya. Well, thankfully there is a solution! In the first of our Unreal Dev Kit tutorials, Jarlan Perez walks us through how to first prepare a model, and then setup light-mapping entirely within the UDK itself.
In the RefFiles.zip file you will find two folders : package and scene. Both the start and end file for this tutorial have been provided inside the scene folder.
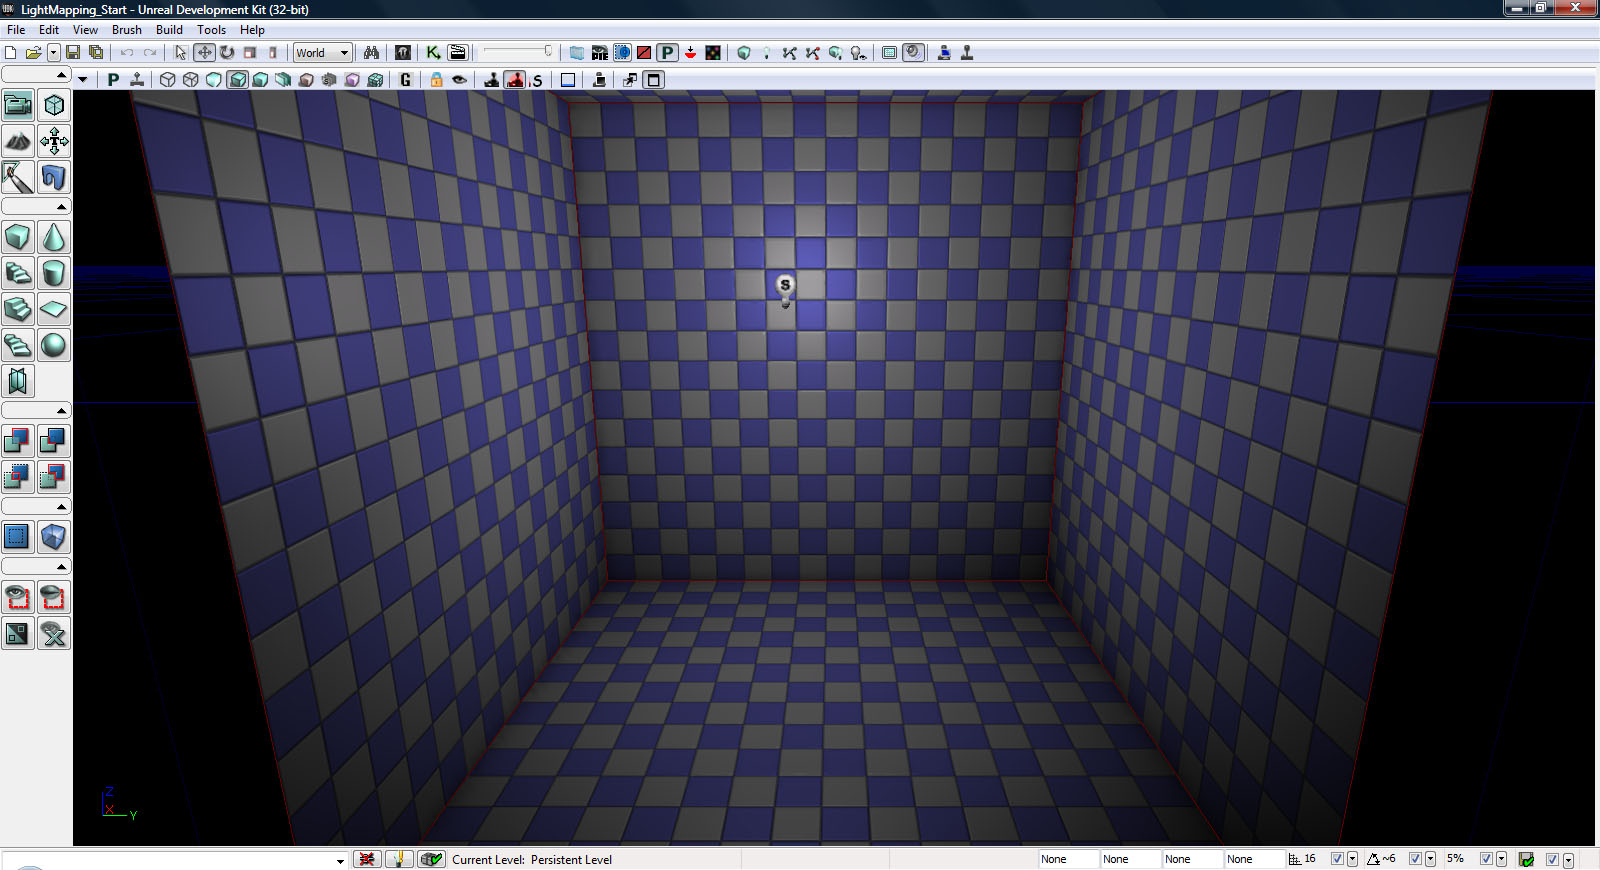
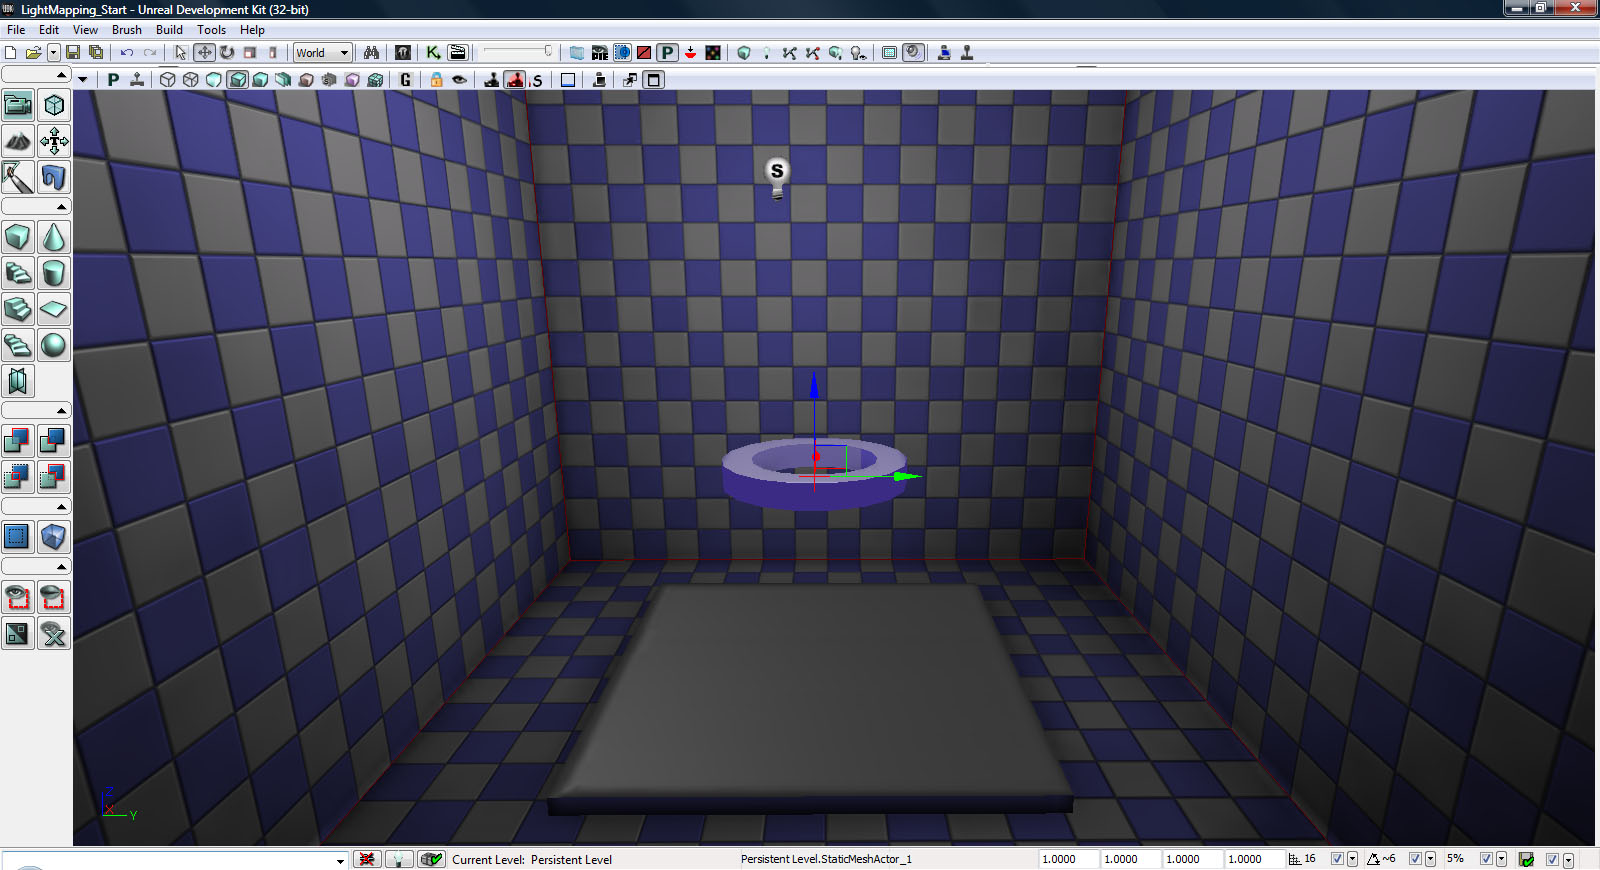
Let’s get started. Launch the UDK and opening up the LightMapping_Start.udk located inside your scene folder. This is a very simple scene consisting of a subtracted cube and a single spotlight as shown below.
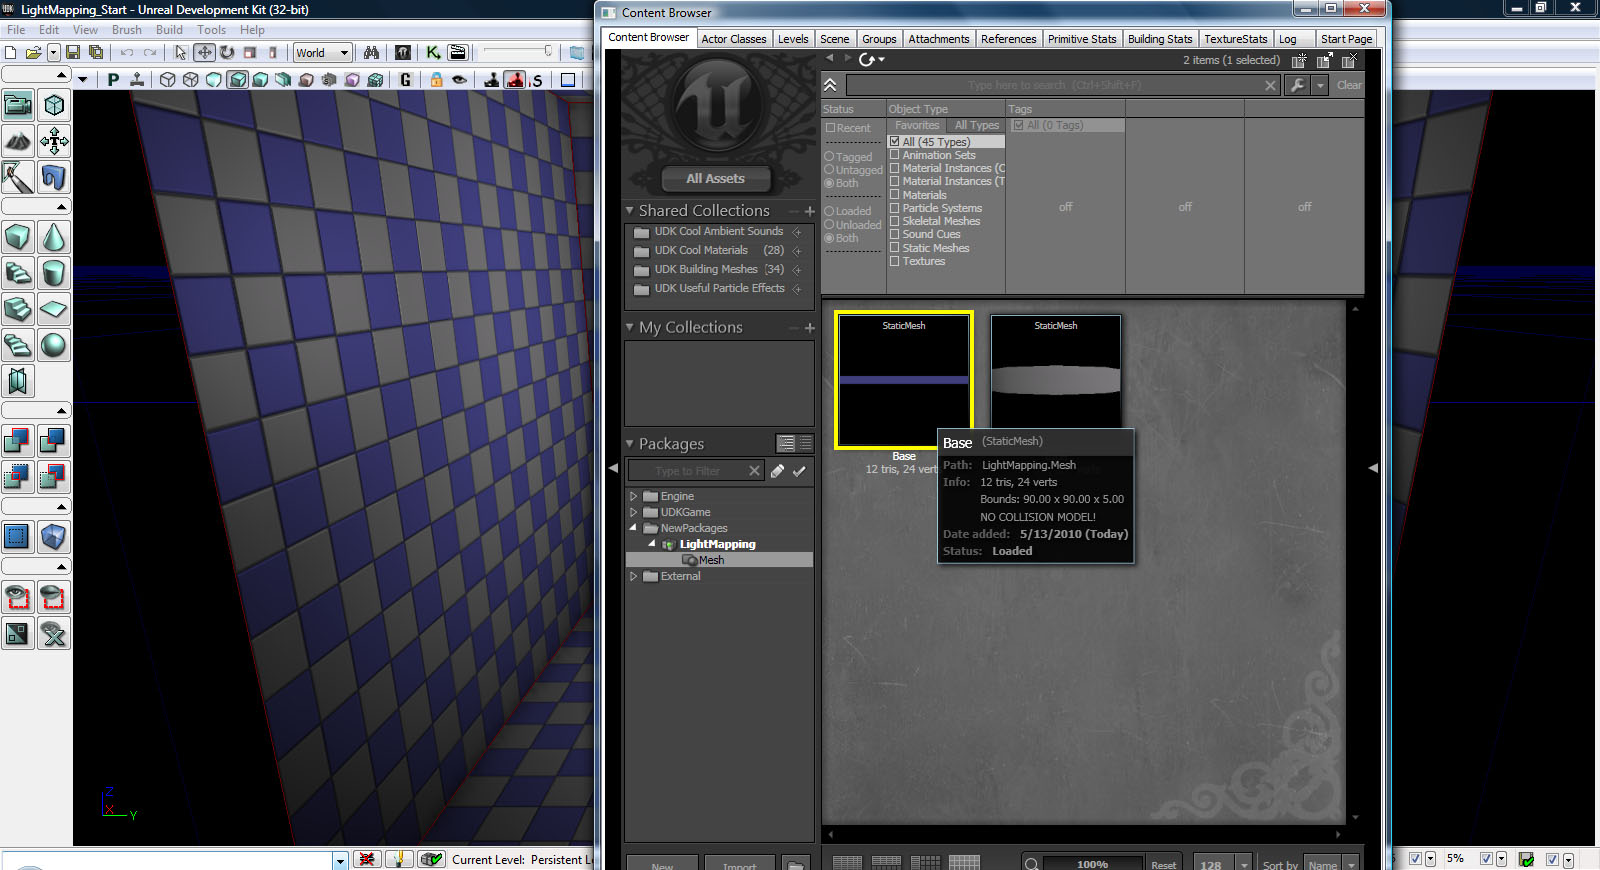
Go ahead and open up the Content Browser and load the LightMapping.upk package located in the package folder, as shown below. Inside you will find two static meshes, a cube named base which we will be using for the floor where our shadows are going to be projecting, and a circular tube shaped mesh named tube which will be the mesh casting the shadows.
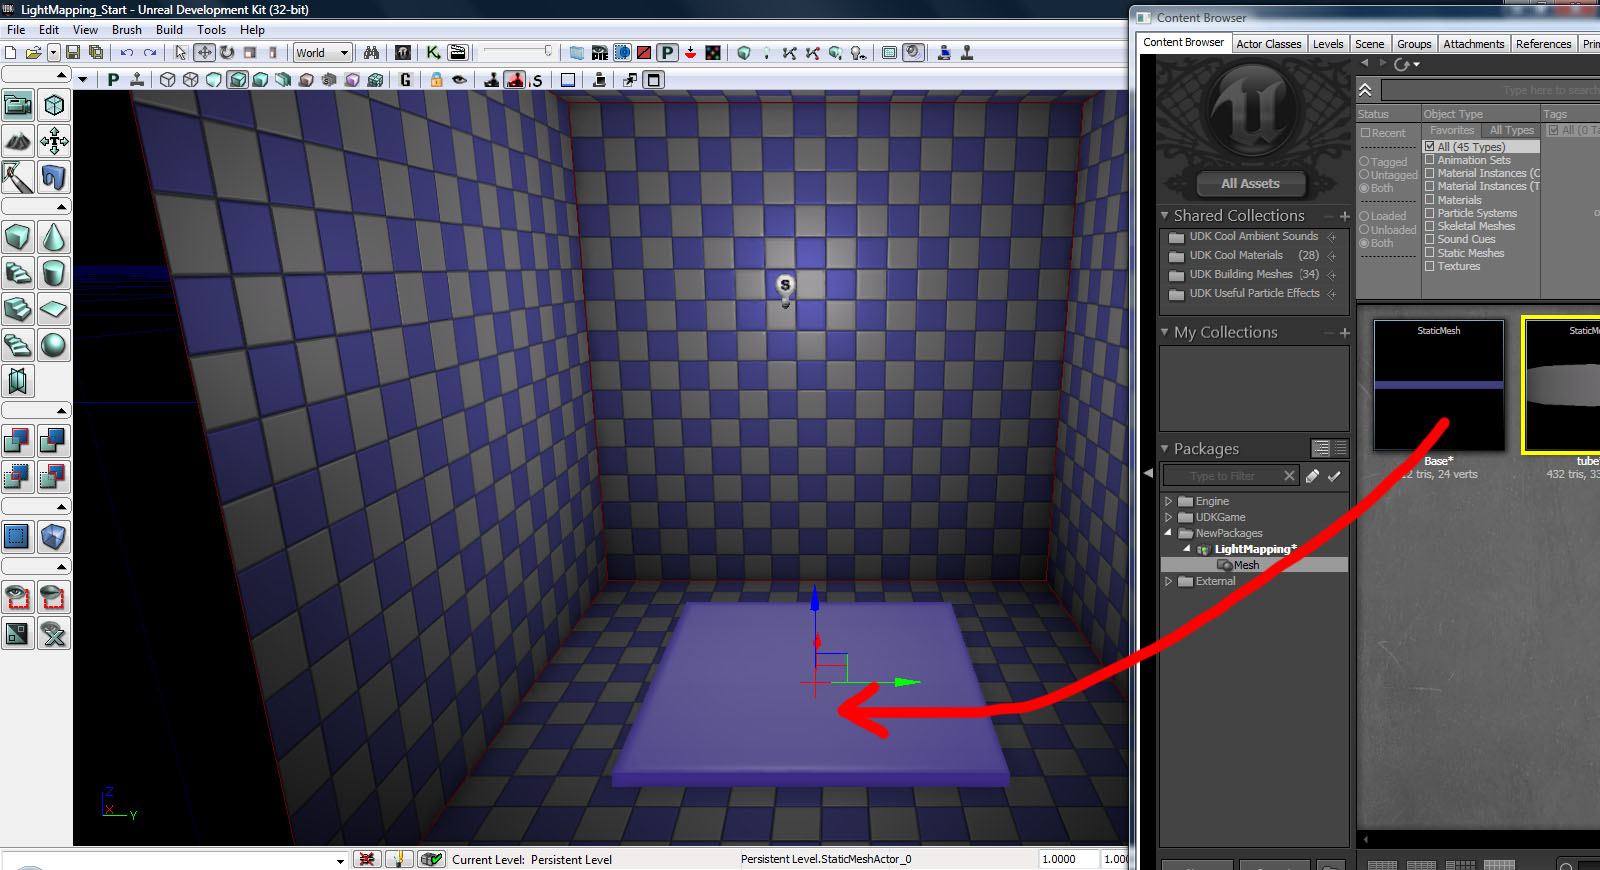
Select that base mesh and drag it over to your scene.
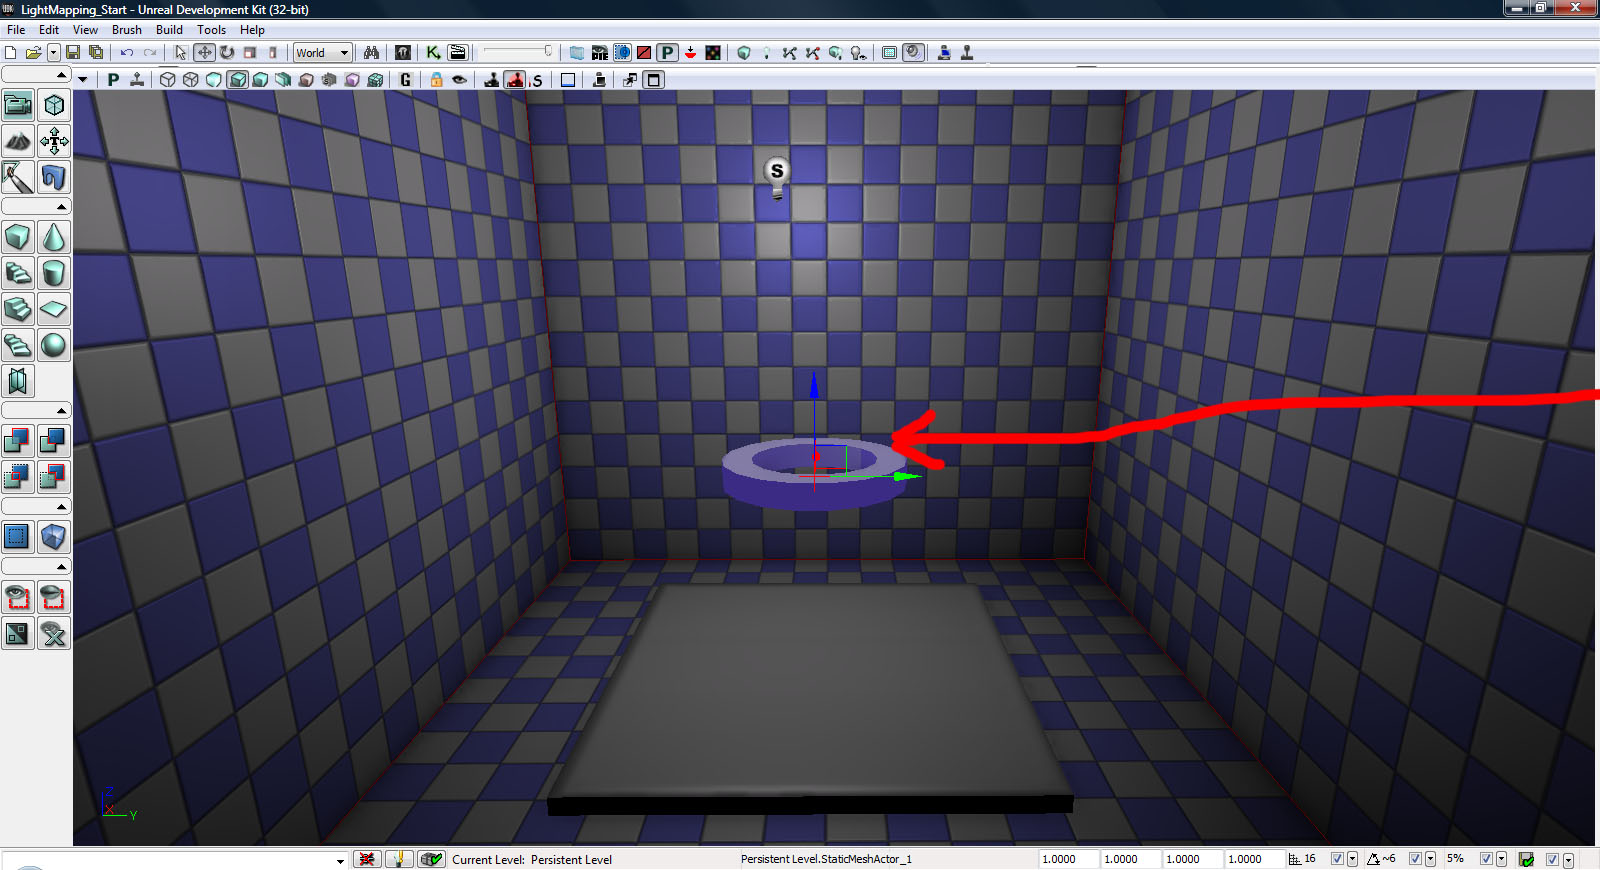
Next we’re going to drag the tube into the scene. Make sure that you leave a reasonable amount of space between the two meshes so that we can get a pretty clear shadow in the final scene.
Let’s go ahead and test the lighting and see what we get. Make sure to turn off the Use Lightmass option, as simulating GI will greatly reduce your build time and at this point we don’t really have much use for it! Use the settings shown below :
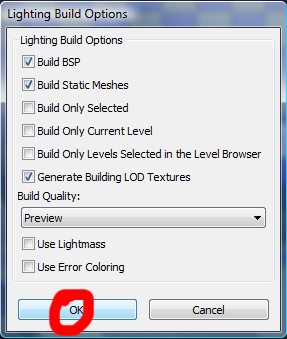
You should get something similar to the image below. We’re currently getting extremely soft, subtle shadows, and why are there no shadows on our base mesh? That’s what we’re going to explore.
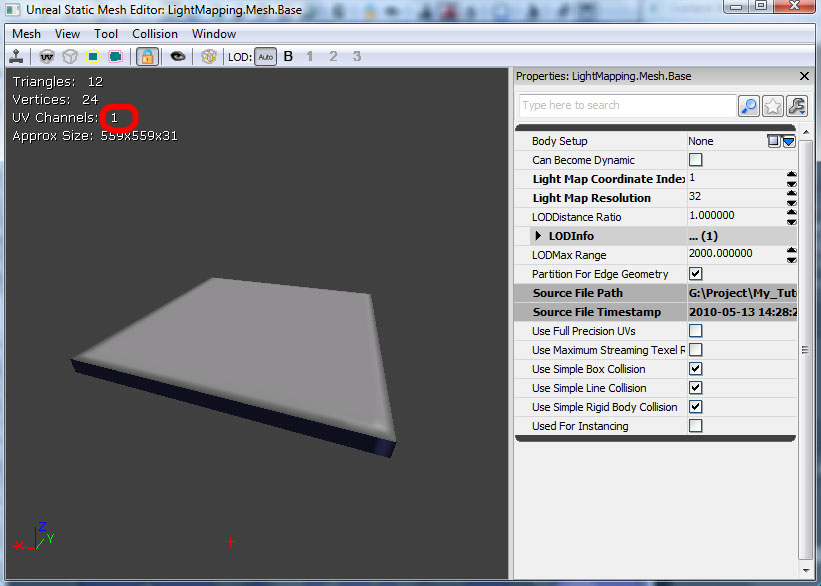
Every single static mesh that is imported into Unreal has its own unique UV set that is used to apply textures. To get the desired, lightmapping effect that we’re looking for we’re going to have to make a brand new UV set that will be used to save the shadows of your Lightmap. As you can see this object only currently has one UV map or channel.
To create our new UV map, first go to Mesh > Generate Unique UVs, as shown below :
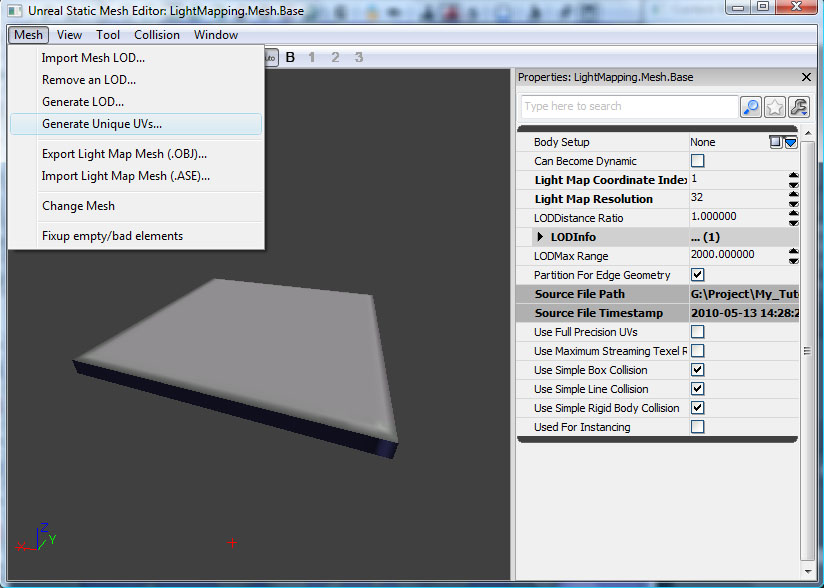
This will open a small submenu for UV generation. Since these UV maps are only going to be used for capturing shadows, there is no longer any need to export your models to an external program in order to create a new UV channel.
Unreal reads UV channels starting from 0 (e.g. the very first UV channel will be Channel 0.) We’re creating a new map in addition to the existing one, so make sure to set the UV channel to save results to dropdown to 1.
For now, leave the Limit maximum stretching (0-1) at the “0.500000” default value. That’s seemed to work great for me in the past, and I really never found much of a reason to change it. When you have all of the settings in place, as shown below, hit Apply.
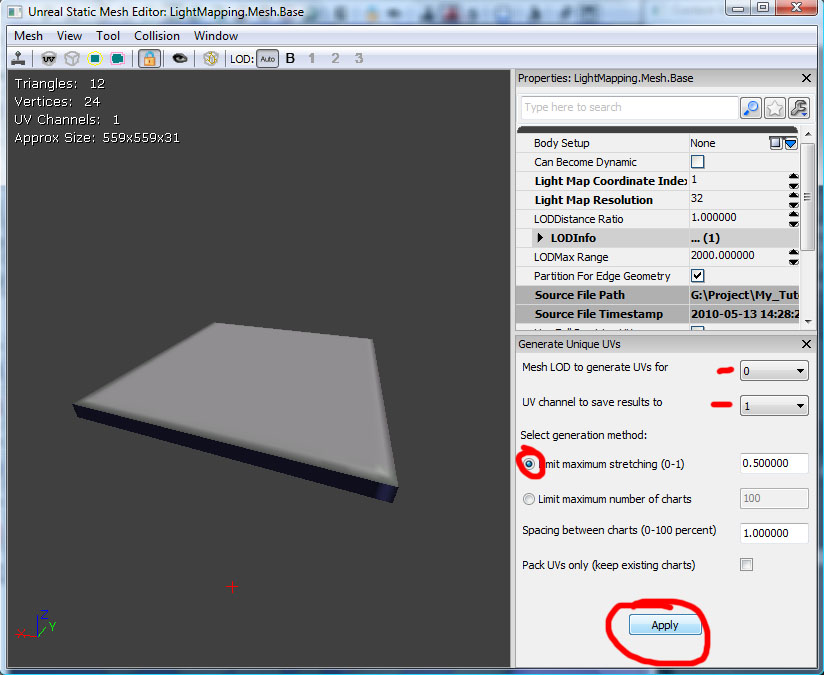
Let’s take a look at our results. You can clearly see that Unreal has created a 2nd UV set, and now we just have to let Unreal know that we’re going to be using this new UV set for light-mapping.
To do this, go to the field titled Light Map Coordinate Index and set that to our new UV set’s channel, which was 1.
Now we have to set up the resolution for our light maps. Go to the field titled Light Map resolution and set that to 512, which should give us pretty good looking shadows. (If we need to increase shadow detail in the future, we can always double this value to 1024.)
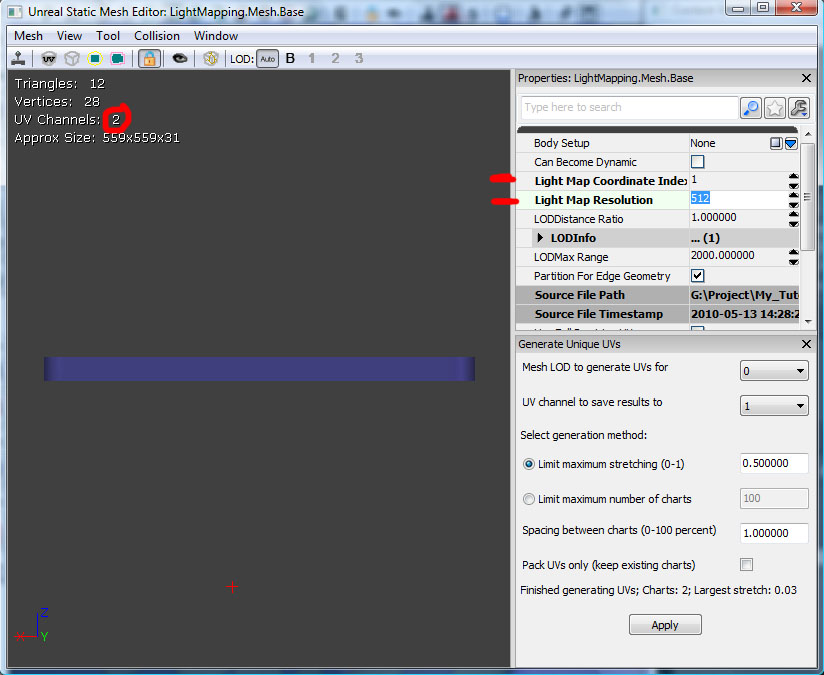
Now there’s just one thing left to do – let the engine know which of the meshes we want to receive shadows. The reason we select specific meshes (and don’t just calculate light-mapping on everything), is to prevent unnecessary processing and save on overall build time. For instance, you could have 50 of the same Meshes in a scene but only want 10 to have very detailed light-mapped shadows. You would designate these 10 items to receive shadows based on your UV map, and the rest would be calculated using Unreal’s default shadow system.
Designating light maps is very simple. Right click on your object and bring up its properties (or you could use the shortcut F4.) Click the StaticMeshActor label, and then in it’s properties section, click the StaticMeshComponent label.
In here we’re only going to be adjusting two things; first of all we want to make sure that Override Light Maps is checked on, and then we want to set the value for the Overridden Light Map field to match the resolution of our UV map, in our case 512.
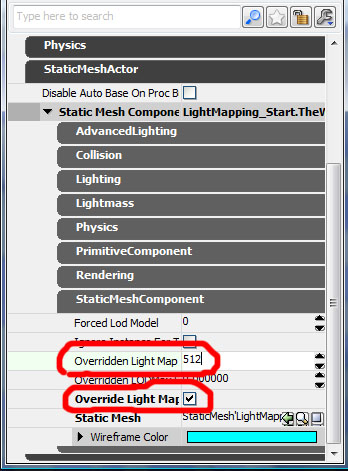
Now hit the Build Light button and use the same settings as in step 5 above. Your final image should look something like that below :
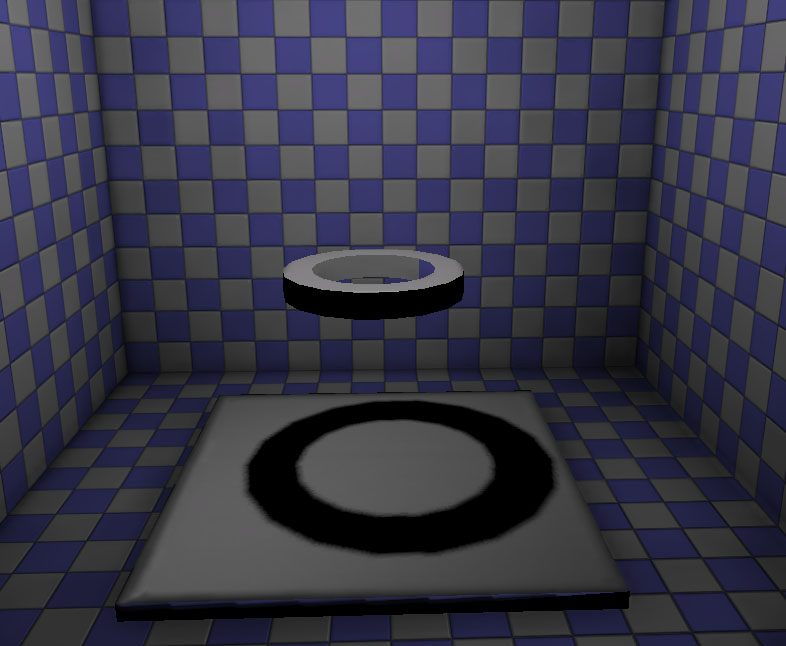
And that’s how to set up light-mapping using only the UDK! I hope this demonstration was helpful, and if you have any questions please feel free to leave them in the comments below!
Don’t miss more CG tutorials and guides, published daily – subscribe to Cgtuts+ by RSS.