Friday Photo Critique #40

Friday Photo Critique is our weekly community project, where we publish a photograph submitted by one of our wonderful readers, then ask you all to offer constructive feedback on the image. It’s a great way to learn more about photography, express your viewpoint, and have your own image critiqued!


Quick Ground Rules

  1. Play nice! We’ve deliberately chosen photographs that aren’t perfect, so please be constructive with any criticism.
  2. Feel free to offer any type of advice – composition, lighting, post-processing etc.
  3. You can also link to photographs that you feel offer a great example of this type of image shot exceptionally well.

Without further ado, here is this week’s candidate for Friday Photo Critique!


The Photograph

Photo Critique

Photographer: Harald Halvorsen

Please let us know what you think in the comments – how would you have approached the scene or taken the photo differently? A massive thank you to everyone who commented last week.

The most constructive and helpful comments will be featured on the site. Interested in submitting your own photo? You can do so here!

DIY: How To Create Your Own White Box for Under $10

In this tutorial we’ll be creating a White Box which will allow you to take awesome close up photos in a seamless “Matrix-like” space. There is plenty of information on the web on how to create a White Box so I don’t claim to have “come up with” this idea. All that’s important to me is that it’s in front of your eyes now so this can be an option for your future projects. Enjoy!


Watch the Video

Download Tutorial .flv

File size 133MB


Related Links

I mentioned a couple of other related tutorials in the video, both of which can be found below:

Be sure to leave a comment below if you try this technique, and let us know how it goes!

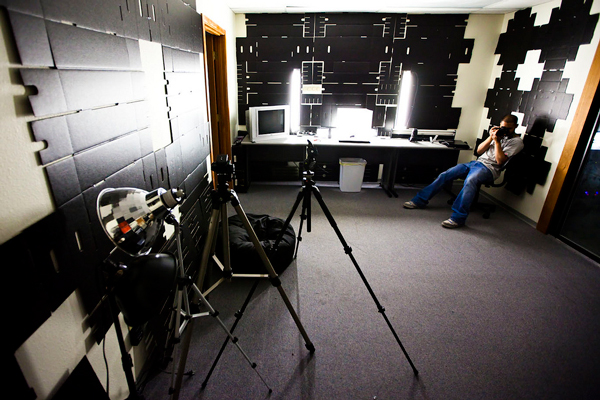
Hints & Tips for Setting Up a Basic Home Studio

Setting up a simple home studio can be extremely beneficial to any photographer. Whether you’re a professional portrait photographer or a graphic designer who needs product shots, a home studio gives you a place to work, experiment and learn new things. Below we’ll take a look at a few considerations to keep in mind when creating your own studio.


The Room

The first thing to consider is obviously space. You’ll need to empty out the garage or convince your spouse to let you convert the spare bedroom.

Ideally, you’ll want something nice and spread out with plenty of room to move around after it gets filled with equipment. Realistically, your home is probably full enough without a studio, so you’ll have to overcome claustrophobia and squish it in wherever you have room.

You’ll want to choose a room where you can tightly control the lighting environment at any time of the day or night. Natural light can be a great tool but if your studio has a window, make sure you have a way to completely block off the light coming from it for the many cases where you won’t want it interfering with the shot.

Another thing you’ll want to consider is whether or not the room is climate controlled, especially if you’re going to be storing your equipment there permanently. Here in Phoenix, the typical garage can get well above 120 degrees fahrenheit in the Summer; not the ideal place to store thousands of dollars in photography equipment. Also, unless you’re going for that sweaty look, this wouldn’t be the best environment to take photos in!

One final consideration is sound. If you only shoot still photos than you’ll be fine with any room but if you’re ever going to shoot video you’ll want to choose a room far away from noisy appliances like a washing machine. You also might want to invest in some soundproofing materials.


Backdrops

Any good studio has a few backdrops to take photos against. It’s probably a good idea to avoid cliche photographic backdrops like you’d expect to see at a shopping mall photo studio and instead opt for something simpler. Solid colors work, as well as something with a little texture (as long as it’s not too busy).

Backdrops commonly come in a variety of different materials and textures including muslin (cotton), canvas, vinyl, or just plain old paper. The cheapest versions are obviously the paper backdrops and typically start around $24.

If you want to go a little more professional, you can typically expect to spend $100-300 on a tougher and more interesting backdrop. You can get a decent backdrop kit complete with stands from Backdrop Source for around $175.

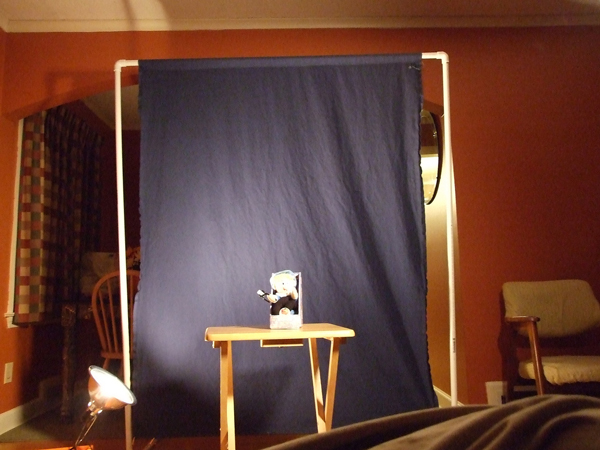
Of course, to start off you could take the poor man route and grab a bed sheet or some butcher paper and build a stand out of PVC pipe like in the picture above.


Lights

Lights are probably the most complicated and costly piece of the studio puzzle. I recently went over great deal of what you need to know in our tutorial on high key lighting.

To quickly reiterate for those that missed it, there are essentially two primary choices for studio lighting: continuous or flash. Continuous lighting rigs tend to run cheaper but burn a lot hotter and aren’t as versatile as flashes. With flashes you tend have much more power, increased quality of light and a much wider range of possibilities.

You can pick up a basic lighting studio kit for a couple hundred bucks, but can also easily spend upwards of $2,000 if you’re really serious about your setup. I recommend starting off small and purchasing a kit with two or three flashes. This should be plenty to achieve excellent results in a number of different styles and you can always add to it a piece at a time.

Check out Alien Bees, CowboyStudio and Square Perfect for some quality but affordable lighting kits.

Umbrellas or Softboxes?

Looking at various lighting kits might have you wondering whether you should go for an umbrella or softbox setup for your studio. Which is better? There’s no absolute solution to this question as they both have pros and cons. Both essentially modify and filter light to make it softer and less harsh when it hits the subject.

Umbrellas are usually cheaper and fairly versatile. They often come with a reflective cover that allows you to shoot light into the umbrella and have it bounce back out or simply filter the light right through the material with the cover removed. Umbrellas can spread light out over a wide area and are therefore great for large rooms or groups of people. Finally, umbrellas are quicker to setup and tear down than softboxes, which can be quite complicated!

Softboxes tend to be a little pricier but they allow you to focus and control your light in a small area a lot better than umbrellas. These are perfect for when you’re shooting a single subject or are confined to a smaller area. Softboxes also make for much less distracting reflections than the shape you’ll get from the umbrella.

Most professional photographers would prefer to have a few of each but if you have a limited budget and are just getting started, umbrellas are a perfect first step.


Props and Costumes

Something you might not think to include but really should consider picking up is a bunch of crazy props. Having your portrait taken is a painfully boring process for many people and having silly stuff for them to dress up and play with can be a great way to loosen everyone up and inject a little fun into the situation.

Even the most stubborn model can become quite humorous with giant sunglasses and a fake mustache. Be sure to have plenty of different options to choose from: baseball bats and sunglasses for the tough guys, huge fake diamond rings for the ladies, and wildly fluffy toy monsters for the kids.

Even if the ultimate goal of the shoot is a serious portrait, starting off with some funny props encourages your subjects to relax and be themselves.

You’ll also want to consider some more practical props as well such as a few pieces of stylish furniture you can quickly move in and out of the scene. Anything you can do to break the typical mold of studio photography will help you stand out as a photographer.


The Necessities

There’s almost no end to the goodies you can put into your studio, but before you start considering mini fridges and plasma televisions, think about the things you’ll absolutely need. For instance, you’ll definitely have to pick up a decent tripod or two. You’ll also need extension cords and surge protectors to rig all that equipment up.

If you’re using flashes, you should consider some wireless flash triggers so you’ll have the freedom to move around. Finally, get a ladder to snag some above shots (and to help hang your backdrop), some curtains that people can change clothes behind, and a mirror or two for those last minute makeup and hair checks.

The costs of all this can mount exponentially and quickly leave you penniless. Don’t feel like you have to get everything at once, plenty of photographers take years to build a respectable studio. Be careful of investing too much money into a hobby that isn’t generating revenue. As you start getting paid gigs you can reinvest some money back into your equipment fund.


Show Us Yours!

Now that you’ve read our guide to setting up a home studio, get out there and build your own. Snap a photo of your setup, upload it to Flickr and leave a link in the comments below.

Also be sure to tell us if there are any items you find essential that we didn’t mention above.

Making Sense of Color Codes


HTML color codes are a common and crucial piece of modern web design. While most sites nowadays are designed largely in part with images, colors are particularly important when you need to come up with a color hex value on the fly while coding. In this guide, we will learn the fundamentals behind color coding, ultimately providing you the power to come up with colors without the use of a color picker.


Introduction: Color Codes

As you may know, there are two common ways to define a color in web design:

  1. rgb(___,___,___)
  2. #_ _ _ _ _ _

Both of these are most often implemented using CSS or HTML, as you can review below:

Text Here
Text Here
.foo {color: rgb(111,222,111);}

In the first code example, each “Text Here” text would show up as a light grey color. We’ll go over why that is later on; however, notice how even though the color methods appear to be quite different, in actuality, they are the exact same color.

In the second example, we just have some quick CSS code. It’s pretty straightforward — anything with a class of “foo” will have a text color of rgb(111,222,111). For the more curious, that would be a lime green-ish color.

So far, most of this should make sense to you. Let’s now get into exactly how we go from those relatively cryptic codes into something a bit more concrete.


Exhibit A: RGB

In RGB, each value between the commas can be a number from 0 to 255. For example:

rgb(10,137,29)

Since RGB stands for “Red Green Blue,” this means that there is a value of 10 for red, 137 for green, and 29 for blue. Inevitably these are a kind of irreducible fraction. Thus:

  • the red would be 10/255 (ten out of
    a maximum value of 255)
  • the green would be 137/255 (137 out of a maximum of 255)
  • and 29/255 for blue.

The higher the number, the more of that certain color there will be in the final result.

When set to zero, there is none of that particular color. At 255, the opposite of course proves true. Therefore:

  • rgb(0,0,0) = black
  • rgb(255,255,255) = white

This holds true because the RGB color system is based on color through light. This is much different from how you would normally create colors, for example, with paint or crayons. If you had a combination of rgb(255,255,255) using paint, you’d probably come out with something like murky brown, but certainly not white!


Exhibit B: Hexadecimal

Hexadecimal color is generally more difficult to explain than RGB. Fundamentally, they are the same. However, hexadecimal’s inner workings are undoubtedly more convoluted.

To explain hexadecimal color, we’ll first have to fall back into some binary and into the base sixteen number system in order to understand what something like this is really trying to “say”:

#554BFF

For those of you who do not know how either of these work, or what either of them are, here is a brief guide:

Binary 101

  • Binary is composed entirely of zeroes & ones.
  • A zero yields a value of zero, and one yields a value of one; but not always.
  • A bit is either a 1 or a zero. 1 is a bit. 0 is a bit. But 01 is not a bit — it’s 2 bits. 10 is not a bit either, it’s 2 bits as well.
  • Let’s imagine that we have four bits; this is cleverly named a nibble, or half a byte. Instead of this number equaling two, or 11, or 110, or whatever you might be guessing, it’s actually much different.
  • As more bits accumulate, the value of each bit doubles.
  • As the first bit has a maximum value of one, and an alternative value of 0, the second bit can be 2 or 0, the third can be 4 or 0, the fourth can be 8 or 0, and so on and so forth.
  • Using this system, you can actually create any normal (base 10) number. Any number at all.
  • Note: The accumulated values add together, depending on whether they are a 1 or a 0. Additionally, you should note that binary reads, in most cases, from right to left.

If that was slightly confusing, I suggest reading over it again. If it still doesn’t make sense after that, that’s perfectly okay–the following examples will help bolster your understanding.

Wait – How Does this Relate to Color Codes?

Hexadecimal, as the name implies, provides sixteen usable “values” for a number to take on. As you might have noticed earlier, a “nibble” can give you any number from 0-15: sixteen values total!

Proof of Concept

Assuming we have the following:

1111

And knowing that the binary values of each bit will become as follows:

8 4 2 1

The binary value of 1111 will become:

8+4+2+1

which is…

15

Likewise, if the binary number had been 0000, the final outcome would have just been zero, because 0+0+0+0 equals 0.

One More Example

binary: 0101

The values for each bit are 8,4,2, and 1 (in order). Add together the binary values of the ones:

0+4+0+1

Equalling 5.

Hopefully those quick examples are helpful. I encourage you to try some others quickly by yourself. I’ll even give you one:

Convert from binary to decimal: 1010
Hint: It’s between 9 and 11.


This may feel like it’s going nowhere in relation to web development, but trust me, we’re almost there.

In hexadecimal, there are sixteen different representations for a binary sequence: 0,1,2,3,4,5,6,7,8,9,A,B,C,D,E, and F. These, in turn, represent the numbers 0-15 (16 numbers total). Both of these represent the same binary number. But quickly — stop and think — #FFFFFF yields white, correct? And you can never have a letter higher than F in an HTML color code. Keep that in mind.

Binary, Decimal, and Hexadecimal Relationships

Here’s a quick chart that maps the relationship between binary, decimal, and hexadecimal:

Decimal|Hex|Binary

This means that, if you wanted to create the number 15, you could write F in hexadecimal, or 1111 in binary. Additionally, if you wanted to make, say, 10, you would write A in hexadecimal or 1010 in binary.


Applying Hexadecimal to Color Codes

Now, we’re a bit closer to figuring out exactly how hexadecimal works. Quickly, let’s imagine an example of an HTML color code being divided into three parts:

#006699 to -> #00,66,99

Now that looks a little familiar; if you’re thinking what I’m thinking, you’re right. Hexadecimal is organized exactly the same way as RGB: it has a value for each red, green, and blue. The core difference is:

  • RGB can take up to three characters in order to define a number from 0-255.
  • Hexadecimal, on the other hand, only requires two to make a value from 0-255. This is partly why hex is the more common way of using colors in web development — simply because it is easier to type, requiring fewer characters.

We’ll now look into how you can create a value up to 255, since so far we’ve only learned how to create numbers up to 15.

  • Let’s say we have a number, like 66. The catch here is that 66 is written in hexadecimal, not in regular numerics. Therefore, this will not equal 66, it will equal something different, something larger.
  • First, let’s convert this problem into binary. According to our handy chart above, 6 in binary is 0110. This means that 66, in binary, would be 0110 0110 (or 01100110, same thing).
  • Since binary reads from right to left, we’d decode the farthest right portion first. As we know, the first 0110 would equal 6.
  • Then, the left. Since there are two hexadecimal characters linked together to make “66”, the far left binary digits would equal something different, and definitely not 6 again. Once again, we would continue doubling the value of each bit.
  • From left to right, the values of each bit (with 8 bits [which is one byte!]) would be: 128, 64, 32, 16, 8, 4, 2, 1. So considering the bits for the left side have a much larger value, we’ll be getting a much larger number:
Binary: 0110
Bit values: 128  64  32  16
Add together all that are true: 0+64+32+0
Yields: 96

We’ve found that the first nibble on the right equals six. And now, we have found that the second nibble on the left equals 96. So, what do you do with these? Just add them! 96+6 = 102. Therefore, the hexadecimal value of 66 is 102 in the normal decimal system.

What this means is that, in hexadecimal, the RGB equivalent of 66 (in hex) is 102. Accordingly, #666666 is equal to rgb(102,102,102).

Let’s do one more hex to decimal conversion:

Hexadecimal: FF
Binary: 1111 1111
Bit values: 128  64  32  16  8  4  2  1
Add: 128+64+32+16+8+4+2+1
Yields: 255

255 is the maximum value for any color. So, if we had #FFFFFF, which we all know to be white, it would be rgb(255,255,255), which is white also.

For comprehension’s sake, let’s do one final conversion. This time, we’re going to convert an entire hexadecimal color to RGB. Our color is #6AB4FF.

6A
------
Binary: 0110 1010
Add: 64+32  +  8+2
	96+10
Yields: 106
------
B4
------
Binary: 1011 0100
Add: 128+32+16  +  4
	176+4
Yields: 180
------
FF
------
(We have already done this, so we know that it's 255)

Conclusion: #6AB4FF is equivalent to rgb(106,180,255).

Now, you may be wondering how we get from these values to an actual color we can envision in our head. The next section will help cover that. So, now that we know how hexadecimal and RGB are related, and now that we know how hexadecimal actually works, we’ll now review how you can come up with a color on the fly in your own code, and help you to make any color without ever needing to use a color picker.


True Color

Quick Fun Fact: Since there are 8 bits in each value of red, green, and blue, that means there are 24 bits total in one RGB color (8*3 = 24). This is where we get the term 24-bit color, often referred to as “True Color”.

With 24-bit color, we are capable of creating up to 16,777,216–over sixteen million–colors. This is typically more than satisfactory for any project. 32-bit color, however, has started to become more prominent, but not necessarily in the area of web design. You can read more about color depth at Wikipedia.org in this article. Additionally, you can view an image of all ~16 million colors in one image here (David Naylor Blog). It’s quite fascinating, really! The image sizes of 4096×4096 make sense since 4096 is the square root of 16,777,216.


Finally: Applications

In order for this knowledge to be of any use to us, you’re going to need to learn how to make your own colors quickly and easily. We’ll start off as simple as possible, and then move into more difficult-to-articulate colors.

Lesson Exploration #1

Let’s say we want to make a grey color on the fly. Greyscale colors are common, and tend to be the most useful in many cases. So far we know the following: #000000 equals black,
and #FFFFFF equals white. Therefore, the more common of the grayscale colors are going to be increments between those two values. To make a shade of gray, we’d appropriately establish values between white and black.

Logically, a value closer to #FFFFFF will be a lighter tone of grey, and a value closer to #000000 will be darker. With that in mind, let’s make a fairly light grey color. Some quick thinking gives us the following resolution: #DDDDDD is comfortably far enough away from white, so it clearly will be a nice light grey for us.

Later on, we want to make a darker grey. Yet again, simple. Just do something like #333333. As you can see, grey values are very simple. If you find that you need an even more specific shade of gray, remember that, as a general rule of thumb,
if each value for red, green, and blue are all the same, or are almost similar, it will appear as grey. One such example of this is the color “Gainsboro” which has a color code of #DCDCDC. This means that it’s just one less than our #DDDDDD color in each value of red, green, and blue. You’ll probably not be able to differentiate between the two, but incrementing or decrementing by 1 will give you a bit more “grey precision.”


#DDDDDD paired with its dark gray counterpart, #333333

Lesson Exploration #2

The second most simple set of colors you can create are red, green, and blue (obviously). Let’s use red as an example. If we want to create pure RGB red, we will give the color value
the maximum value of red, with 0 green, and 0 blue. That makes sense right? To make red in hexadecimal, we’d just put #FF0000. Now we’ve got red.

Creating green and blue follow the exact same principle. To make pure green: #00FF00 (all green, nothing else). To make pure blue: #0000FF (all blue, nothing else).

Simple enough; however, these colors are, under most circumstances, absolutely hideous when used in a web design. Therefore, to put these colors to use we’ll need to shade them accordingly.

Fortunately, shading is easy too. Let’s use blue for this example. We already have #0000FF set up for us. In order to change the shade of our blue value, we merely need to change the last two characters of the hexadecimal color code. Since FF is the highest blue possible, at this point we really can only make it darker. As such, let’s do just that:

Changing #0000FF to #000055 (decreasing the amount of black, thus moving the blue closer to black) will yield a darker blue.

As you can see, shading red, green, and blue is far from difficult–it’s a simple matter of decreasing the quantity of a certain color. The same rule applies to red and green, not just black, so #005500 is a darker shade of green, and #550000 is a darker shade of red. (Of course, you can go lower or higher than 55 if you wish).


Regular red, green, and blue, next to some darker versions of themselves.

Lesson Exploration #3

I suppose you are probably thinking: so what about yellow, purple, and all the other colors? Well, fortunately it’s just a little bit more complex than the big three of RGB. Let’s start with yellow.

To create yellow, we’ll first need to think in terms of the color spectrum. A little mnemonic that people like to use is “Roy G. Biv”, which stands for “red, orange, yellow, green, blue, indigo, violet. Now the logic in this is somewhat confusing, but try to stick with me. To get yellow, we use the two main colors from red, green, and blue on either side of where yellow would be. In this case, it would be red and green. Thus, if we wrote #FFFF00, we would have yellow. Fantastic!

There are only a few other possible combinations using this method, so we’ll go over them quickly. Between red and blue on a color wheel, the code would be #FF00FF, and we would get pink, or magenta as it is traditionally called, Next, between green and blue (#00FFFF), we have cyan. And now, sadly, that is actually all of the simple combinations we can do. The rest requires some thought, which we’ll go over in a minute. First, let’s figure out how to shade these colors.

Simply enough, we’ll start shading cyan this time, which, as we remember, is #00FFFF. And…you probably guessed it, but to shade yellow, cyan, or pink, all you have to do is change any FF values to a smaller one. In this example, shading cyan down to a much darker variety, we could do something like #005555. One of the official HTML color names, DarkCyan, is #008B8B, so that one would be a little lighter than the one we just created. So there we have it: how to shade yellow, cyan, and pink.


Yellow, magenta, and cyan next to their darkened versions

End Note on Shading

In order to make a color lighter, it’s as simple as making the low values (the 00 values, typically) greater and leaving the FF (or other main colors) alone. For example, if we had green, and we wanted to make it lighter, we would start out with #00FF00. Then, to lighten it, we would simply increase the 00 values. #AAFFAA produces a nice, spring color green.

Additionally, in order to make #FF00FF (Pink) lighter, it’s the same process. Increase the low values: #FFAAFF. This produces a light pink color. Works like a charm!


Our spring green and light pink colors.

Applications 2: Logically Creating and Decoding Colors

So far, we’ve learned how to create the most simple of colors, but in most applications, this knowledge will not be helpful for a project. That’s where this second part comes into play.

Creating a Custom Color

In order to create a nice looking color, we’ll need to work off of what we know already, and think through what we are trying to create in a logical manner. Let’s create a scenario; we want to make a subtle orange color that fits our needs — sort of like a slightly darker shade of orange soda.

We’ll start with what we already know how to make, and that’s yellow: #FFFF00. We need to move it a bit closer to the orange area, so to do so, we’d alleviate some of the green “pull,” as I like to call it. Doing so increases the amount of red. I chose to change it to #FF5500. This quick and simple example gives you an idea of how you would go about creating a color. The last thing I’d like to mention is that you might be wondering why I didn’t start adding to the blue quantity, which we left at a value of 00. The reason is because, when you start adding blue slowly in increments of 11, 22, 33, et cetera, it still looks fairly orange. However, once you get past 55, you’ll see some issues. Especially, if we increase it all the way up to something like #FF5599. What happens is that it turns into a really pink color. Why is this? Well think back to when we originally created pink. The code was #FF00FF. The red is maxed out and the blue is maxed out. So, in our orange color, when you start changing #FF5500 to #FF5599, our red and green values are no longer the prominent values. Instead, it’s red and blue, which yield pink. In this fashion, the 55 value for green would simply be lightening our shade of pink, instead of moving it towards the orange area.


Our orange color. It looks like orange soda, huh?

Note to reader: creating complex color codes, admittedly, is quite impractical. In the time it would take you to create a sufficient color, you could have easily gotten several good colors out of a color picker. For a complex color, it would be best not to try and create it yourself. Instead, just leave it to the tried-and-true, and save yourself precious time. You will, however, want to use your skills to perform a simple task like darkening or lightening a color quickly on the go.

Decoding a Color

So you see this lovely color code, staring you in the face, but you have no idea what color it really is. Great! This is probably where the most fun comes in. The best way to teach you how to do this is by performing a simple test. I was once asked the following few questions on a test in one of my Information Technology classes.

1. #000000 represents the color ____.

  1. green
  2. black
  3. white
  4. red

2. #00FF00 represents the color ___.

  1. green
  2. black
  3. red
  4. white

3. #FFCC66 represents a shade of ___.

  1. blue
  2. red
  3. purple
  4. gold

Hopefully you were able to figure all of these out! Especially the first two. You should have been able to figure out that the answer to number one was black, or B. For the second question, the answer was also quite simple. Following the scheme of red, green, blue, we know that since every value except for green is set to 00, that the color will be some shade of green. Additionally, since the value for green is FF (or 255), we know that this color will be pure green. Thus, the answer will be A.

It seems like the only difficult-to-decipher color here would be number three, #FFCC66. This is understandable. Since the blue value (which is 66) is so much smaller than the other two numbers, it could be deemed relatively irrelevant. Thus, you could compare it to the color for yellow, #FFFF00. Between those two, they look somewhat similar. With this method, you can tack out the first three answers, since none of them are remotely close to yellow. Therefore the answer is D. The decreased green value of CC will shade the color slightly, and the increase of blue will push the color into being much more similar to gold.


Regular red, green, and blue, next to some darker versions of themselves.

The process of decoding color codes primarily includes thinking through it and comparing it to colors you already know!


One Laster Pointer

Here is one last quick tip on how you can speed up creating a color using the hexadecimal system. Using this method, you can cut some color codes down from seven characters down to four (e.g. #_ _ _ _ _ _ to # _ _ _ ). This method is called color shorthand, and the idea behind it is that it will take the value of each of the three main characters, and duplicate them invisibly. What I mean by that is this: if you had the color code #123, it would be the equivalent of #112233. You can do this for any color code where each hexadecimal value for red, green, and blue is the exact same character. Some more common shorthands are:

  • #000 for black(#000000)
  • #fff for white (#ffffff)
  • #f00 for red (#ff0000)
  • #0f0 for green (#00ff00)
  • #00f for blue(#00f)

Conclusion

Hopefully this article helped you to learn about how color codes really work. In many programs, like Photoshop, it will admittedly be easiest to use the built in color pickers. The core area where this skill will come in handy is when you are looking through some CSS source code, and want to simply figure out what kind of color it is without having to resort to another resource. Regardless of which method is quicker, as web developers and designers, these are things we should want know! Thanks so much for reading. This is an understandably difficult topic, so let’s talk more in the comments!

Object-Oriented PHP for Beginners


For many PHP programmers, object-oriented programming is a frightening concept, full of complicated syntax and other roadblocks. As detailed in my book, Pro PHP and jQuery, you’ll learn the concepts behind object-oriented programming (OOP), a style of coding in which related actions are grouped into classes to aid in creating more-compact, effective code.


Understanding Object-Oriented Programming

Object-oriented programming is a style of coding that allows developers to group similar tasks into classes. This helps keep code following the tenet “don’t repeat yourself” (DRY) and easy-to-maintain.

“Object-oriented programming is a style of coding that allows developers to group similar tasks into classes.”

One of the major benefits of DRY programming is that, if a piece of information changes in your program, usually only one change is required to update the code. One of the biggest nightmares for developers is maintaining code where data is declared over and over again, meaning any changes to the program become an infinitely more frustrating game of Where’s Waldo? as they hunt for duplicated data and functionality.

OOP is intimidating to a lot of developers because it introduces new syntax and, at a glance, appears to be far more complex than simple procedural, or inline, code. However, upon closer inspection, OOP is actually a very straightforward and ultimately simpler approach to programming.


Understanding Objects and Classes

Before you can get too deep into the finer points of OOP, a basic understanding of the differences between objects and classes is necessary. This section will go over the building blocks of classes, their different capabilities, and some of their uses.

Recognizing the Differences Between Objects and Classes

“Developers start talking about objects and classes, and they appear to be interchangeable terms. This is not the case, however.”

Right off the bat, there’s confusion in OOP: seasoned developers start talking about objects and classes, and they appear to be interchangeable terms. This is not the case, however, though the difference can be tough to wrap your head around at first.

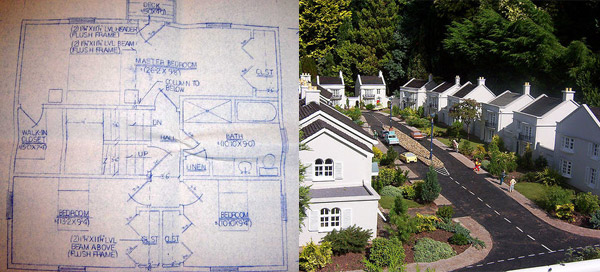
A class, for example, is like a blueprint for a house. It defines the shape of the house on paper, with relationships between the different parts of the house clearly defined and planned out, even though the house doesn’t exist.

An object, then, is like the actual house built according to that blueprint. The data stored in the object is like the wood, wires, and concrete that compose the house: without being assembled according to the blueprint, it’s just a pile of stuff. However, when it all comes together, it becomes an organized, useful house.

Classes form the structure of data and actions and use that information to build objects. More than one object can be built from the same class at the same time, each one independent of the others. Continuing with our construction analogy, it’s similar to the way an entire subdivision can be built from the same blueprint: 150 different houses that all look the same but have different
families and decorations inside.

Structuring Classes

The syntax to create a class is pretty straightforward: declare a class using the class keyword, followed by the name of the class and a set of curly braces ({}):

<?php

class MyClass
{
    // Class properties and methods go here
}

?>

After creating the class, a new class can be instantiated and stored in a variable using the new keyword:

$obj = new MyClass;

To see the contents of the class, use var_dump():

var_dump($obj);

Try out this process by putting all the preceding code in a new file called test.php in [your local] testing folder:

<?php

class MyClass
{
	// Class properties and methods go here
}

$obj = new MyClass;

var_dump($obj);

?>

Load the page in your browser at http://localhost/test.php and the following should display:

object(MyClass)#1 (0) { }

In its simplest form, you’ve just completed your first OOP script.


Defining Class Properties

To add data to a class, properties, or class-specific variables, are used. These work exactly like regular variables, except they’re bound to the object and therefore can only be accessed using the object.

To add a property to MyClass, add the following code to your script:

<?php

class MyClass
{
    public $prop1 = "I'm a class property!";
}

$obj = new MyClass;

var_dump($obj);

?>

The keyword public determines the visibility of the property, which you’ll learn about a little later in this chapter. Next, the property is named using standard variable syntax, and a value is assigned (though class properties do not need an initial value).

To read this property and output it to the browser, reference the object from which to read and the property to be read:

echo $obj->prop1;

Because multiple instances of a class can exist, if the individual object is not referenced, the script would be unable to determine which object to read from. The use of the arrow (->) is an OOP construct that accesses the contained properties and methods of a given object.

Modify the script in test.php to read out the property rather than dumping the whole class by modifying the code as shown:

<?php

class MyClass
{
    public $prop1 = "I'm a class property!";
}

$obj = new MyClass;

echo $obj->prop1; // Output the property

?>

Reloading your browser now outputs the following:

I'm a class property!

Defining Class Methods

Methods are class-specific functions. Individual actions that an object will be able to perform are defined within the class as methods.

For instance, to create methods that would set and get the value of the class property $prop1, add the following to your code:

<?php

class MyClass
{
    public $prop1 = "I'm a class property!";

    public function setProperty($newval)
    {
        $this->prop1 = $newval;
    }

    public function getProperty()
    {
        return $this->prop1 . "<br />";
    }
}

$obj = new MyClass;

echo $obj->prop1;

?>

Note — OOP allows objects to reference themselves using $this. When working within a method, use $this in the same way you would use the object name outside the class.

To use these methods, call them just like regular functions, but first, reference the object they belong to. Read the property from MyClass, change its value, and read it out again by making the modifications below:

<?php

class MyClass
{
    public $prop1 = "I'm a class property!";

    public function setProperty($newval)
    {
        $this->prop1 = $newval;
    }

    public function getProperty()
    {
        return $this->prop1 . "<br />";
    }
}

$obj = new MyClass;

echo $obj->getProperty(); // Get the property value

$obj->setProperty("I'm a new property value!"); // Set a new one

echo $obj->getProperty(); // Read it out again to show the change

?>

Reload your browser, and you’ll see the following:

I'm a class property!
I'm a new property value!

“The power of OOP becomes apparent when using multiple instances of the
same class.”

<?php

class MyClass
{
    public $prop1 = "I'm a class property!";

    public function setProperty($newval)
    {
        $this->prop1 = $newval;
    }

    public function getProperty()
    {
        return $this->prop1 . "<br />";
    }
}

// Create two objects
$obj = new MyClass;
$obj2 = new MyClass;

// Get the value of $prop1 from both objects
echo $obj->getProperty();
echo $obj2->getProperty();

// Set new values for both objects
$obj->setProperty("I'm a new property value!");
$obj2->setProperty("I belong to the second instance!");

// Output both objects' $prop1 value
echo $obj->getProperty();
echo $obj2->getProperty();

?>

When you load the results in your browser, they read as follows:

I'm a class property!
I'm a new property value!
I belong to the second instance!

As you can see, OOP keeps objects as separate entities, which makes for easy separation of different pieces of code into small, related bundles.


Magic Methods in OOP

To make the use of objects easier, PHP also provides a number of magic methods, or special methods that are called when certain common actions occur within objects. This allows developers to perform a number of useful tasks with relative ease.

Using Constructors and Destructors

When an object is instantiated, it’s often desirable to set a few things right off the bat. To handle this, PHP provides the magic method __construct(), which is called automatically whenever a new object is
created.

For the purpose of illustrating the concept of constructors, add a constructor to MyClass that will output a message whenever a new instance of the class is created:

<?php

class MyClass
{
    public $prop1 = "I'm a class property!";

    public function __construct()
    {
        echo 'The class "', __CLASS__, '" was initiated!<br />';
    }

    public function setProperty($newval)
    {
        $this->prop1 = $newval;
    }

    public function getProperty()
    {
        return $this->prop1 . "<br />";
    }
}

// Create a new object
$obj = new MyClass;

// Get the value of $prop1
echo $obj->getProperty();

// Output a message at the end of the file
echo "End of file.<br />";

?>

Note__CLASS__ returns the name of the class in which it is called; this is what is known as a magic constant. There are several available magic constants, which you can read more about in the PHP manual.

Reloading the file in your browser will produce the following result:

The class "MyClass" was initiated!
I'm a class property!
End of file.

To call a function when the object is destroyed, the __destruct() magic method is available. This is useful for class cleanup (closing a database connection, for instance).

Output a message when the object is destroyed by defining the magic method
__destruct() in MyClass:

<?php

class MyClass
{
    public $prop1 = "I'm a class property!";

    public function __construct()
    {
        echo 'The class "', __CLASS__, '" was initiated!<br />';
    }

    public function __destruct()
    {
        echo 'The class "', __CLASS__, '" was destroyed.<br />';
    }

    public function setProperty($newval)
    {
        $this->prop1 = $newval;
    }

    public function getProperty()
    {
        return $this->prop1 . "<br />";
    }
}

// Create a new object
$obj = new MyClass;

// Get the value of $prop1
echo $obj->getProperty();

// Output a message at the end of the file
echo "End of file.<br />";

?>

With a destructor defined, reloading the test file results in the following output:

The class "MyClass" was initiated!
I'm a class property!
End of file.
The class "MyClass" was destroyed.

“When the end of a file is reached, PHP automatically releases all resources.”

To explicitly trigger the destructor, you can destroy the object using the
function unset():

<?php

class MyClass
{
    public $prop1 = "I'm a class property!";

    public function __construct()
    {
        echo 'The class "', __CLASS__, '" was initiated!<br />';
    }

    public function __destruct()
    {
        echo 'The class "', __CLASS__, '" was destroyed.<br />';
    }

    public function setProperty($newval)
    {
        $this->prop1 = $newval;
    }

    public function getProperty()
    {
        return $this->prop1 . "<br />";
    }
}

// Create a new object
$obj = new MyClass;

// Get the value of $prop1
echo $obj->getProperty();

// Destroy the object
unset($obj);

// Output a message at the end of the file
echo "End of file.<br />";

?>

Now the result changes to the following when loaded in your browser:

The class "MyClass" was initiated!
I'm a class property!
The class "MyClass" was destroyed.
End of file.

Converting to a String

To avoid an error if a script attempts to output MyClass as a string, another magic method is used called __toString().

Without __toString(), attempting to output the object as a string results in a fatal error. Attempt to use echo to output the object without a magic method in place:

<?php

class MyClass
{
    public $prop1 = "I'm a class property!";

    public function __construct()
    {
        echo 'The class "', __CLASS__, '" was initiated!<br />';
    }

    public function __destruct()
    {
        echo 'The class "', __CLASS__, '" was destroyed.<br />';
    }

    public function setProperty($newval)
    {
        $this->prop1 = $newval;
    }

    public function getProperty()
    {
        return $this->prop1 . "<br />";
    }
}

// Create a new object
$obj = new MyClass;

// Output the object as a string
echo $obj;

// Destroy the object
unset($obj);

// Output a message at the end of the file
echo "End of file.<br />";

?>

This results in the following:

The class "MyClass" was initiated!

Catchable fatal error: Object of class MyClass could not be converted to string in /Applications/XAMPP/xamppfiles/htdocs/testing/test.php on line 40

To avoid this error, add a __toString() method:

<?php

class MyClass
{
    public $prop1 = "I'm a class property!";

    public function __construct()
    {
        echo 'The class "', __CLASS__, '" was initiated!<br />';
    }

    public function __destruct()
    {
        echo 'The class "', __CLASS__, '" was destroyed.<br />';
    }

    public function __toString()
    {
        echo "Using the toString method: ";
        return $this->getProperty();
    }

    public function setProperty($newval)
    {
        $this->prop1 = $newval;
    }

    public function getProperty()
    {
        return $this->prop1 . "<br />";
    }
}

// Create a new object
$obj = new MyClass;

// Output the object as a string
echo $obj;

// Destroy the object
unset($obj);

// Output a message at the end of the file
echo "End of file.<br />";

?>

In this case, attempting to convert the object to a string results in a call to the getProperty() method. Load the test script in your browser to see the result:

The class "MyClass" was initiated!
Using the toString method: I'm a class property!
The class "MyClass" was destroyed.
End of file.

Tip — In addition to the magic methods discussed in this section, several others are available. For a complete list of magic methods, see the PHP manual page.


Using Class Inheritance

Classes can inherit the methods and properties of another class using the extends keyword. For instance, to create a second class that extends MyClass and adds a method, you would add the following to your test file:

<?php

class MyClass
{
    public $prop1 = "I'm a class property!";

    public function __construct()
    {
        echo 'The class "', __CLASS__, '" was initiated!<br />';
    }

    public function __destruct()
    {
        echo 'The class "', __CLASS__, '" was destroyed.<br />';
    }

    public function __toString()
    {
        echo "Using the toString method: ";
        return $this->getProperty();
    }

    public function setProperty($newval)
    {
        $this->prop1 = $newval;
    }

    public function getProperty()
    {
        return $this->prop1 . "<br />";
    }
}

class MyOtherClass extends MyClass
{
    public function newMethod()
    {
        echo "From a new method in " . __CLASS__ . ".<br />";
    }
}

// Create a new object
$newobj = new MyOtherClass;

// Output the object as a string
echo $newobj->newMethod();

// Use a method from the parent class
echo $newobj->getProperty();

?>

Upon reloading the test file in your browser, the following is output:

The class "MyClass" was initiated!
From a new method in MyOtherClass.
I'm a class property!
The class "MyClass" was destroyed.

Overwriting Inherited Properties and Methods

To change the behavior of an existing property or method in the new class, you can simply overwrite it by declaring it again in the new class:

<?php

class MyClass
{
    public $prop1 = "I'm a class property!";

    public function __construct()
    {
        echo 'The class "', __CLASS__, '" was initiated!<br />';
    }

    public function __destruct()
    {
        echo 'The class "', __CLASS__, '" was destroyed.<br />';
    }

    public function __toString()
    {
        echo "Using the toString method: ";
        return $this->getProperty();
    }

    public function setProperty($newval)
    {
        $this->prop1 = $newval;
    }

    public function getProperty()
    {
        return $this->prop1 . "<br />";
    }
}

class MyOtherClass extends MyClass
{
    public function __construct()
    {
        echo "A new constructor in " . __CLASS__ . ".<br />";
    }

    public function newMethod()
    {
        echo "From a new method in " . __CLASS__ . ".<br />";
    }
}

// Create a new object
$newobj = new MyOtherClass;

// Output the object as a string
echo $newobj->newMethod();

// Use a method from the parent class
echo $newobj->getProperty();

?>

This changes the output in the browser to:

A new constructor in MyOtherClass.
From a new method in MyOtherClass.
I'm a class property!
The class "MyClass" was destroyed.

Preserving Original Method Functionality While Overwriting Methods

To add new functionality to an inherited method while keeping the original method intact, use the parent keyword with the scope resolution operator (::):

<?php

class MyClass
{
    public $prop1 = "I'm a class property!";

    public function __construct()
    {
        echo 'The class "', __CLASS__, '" was initiated!<br />';
    }

    public function __destruct()
    {
        echo 'The class "', __CLASS__, '" was destroyed.<br />';
    }

    public function __toString()
    {
        echo "Using the toString method: ";
        return $this->getProperty();
    }

    public function setProperty($newval)
    {
        $this->prop1 = $newval;
    }

    public function getProperty()
    {
        return $this->prop1 . "<br />";
    }
}

class MyOtherClass extends MyClass
{
    public function __construct()
    {
        parent::__construct(); // Call the parent class's constructor
        echo "A new constructor in " . __CLASS__ . ".<br />";
    }

    public function newMethod()
    {
        echo "From a new method in " . __CLASS__ . ".<br />";
    }
}

// Create a new object
$newobj = new MyOtherClass;

// Output the object as a string
echo $newobj->newMethod();

// Use a method from the parent class
echo $newobj->getProperty();

?>

This outputs the result of both the parent constructor and the new class’s constructor:

The class "MyClass" was initiated!
A new constructor in MyOtherClass.
From a new method in MyOtherClass.
I'm a class property!
The class "MyClass" was destroyed.

Assigning the Visibility of Properties and Methods

For added control over objects, methods and properties are assigned visibility. This controls how and from where properties and methods can be accessed. There are three visibility keywords: public, protected, and private. In addition to its visibility, a method or property can be declared as static, which allows them to be accessed without an instantiation of the class.

“For added control over objects, methods and properties are assigned visibility.”

Note — Visibility is a new feature as of PHP 5. For information on OOP compatibility with PHP 4, see the PHP manual page.

Public Properties and Methods

All the methods and properties you’ve used so far have been public. This means that they can be accessed anywhere, both within the class and externally.

Protected Properties and Methods

When a property or method is declared protected, it can only be accessed within the class itself or in descendant classes (classes that extend the class containing the protected method).

Declare the getProperty() method as protected in MyClass and try to access it directly from outside the class:

<?php

class MyClass
{
    public $prop1 = "I'm a class property!";

    public function __construct()
    {
        echo 'The class "', __CLASS__, '" was initiated!<br />';
    }

    public function __destruct()
    {
        echo 'The class "', __CLASS__, '" was destroyed.<br />';
    }

    public function __toString()
    {
        echo "Using the toString method: ";
        return $this->getProperty();
    }

    public function setProperty($newval)
    {
        $this->prop1 = $newval;
    }

    protected function getProperty()
    {
        return $this->prop1 . "<br />";
    }
}

class MyOtherClass extends MyClass
{
    public function __construct()
    {
        parent::__construct();
		echo "A new constructor in " . __CLASS__ . ".<br />";
    }

    public function newMethod()
    {
        echo "From a new method in " . __CLASS__ . ".<br />";
    }
}

// Create a new object
$newobj = new MyOtherClass;

// Attempt to call a protected method
echo $newobj->getProperty();

?>

Upon attempting to run this script, the following error shows up:

The class "MyClass" was initiated!
A new constructor in MyOtherClass.

Fatal error: Call to protected method MyClass::getProperty() from context '' in /Applications/XAMPP/xamppfiles/htdocs/testing/test.php on line 55

Now, create a new method in MyOtherClass to call the getProperty() method:

<?php

class MyClass
{
    public $prop1 = "I'm a class property!";

    public function __construct()
    {
        echo 'The class "', __CLASS__, '" was initiated!<br />';
    }

    public function __destruct()
    {
        echo 'The class "', __CLASS__, '" was destroyed.<br />';
    }

    public function __toString()
    {
        echo "Using the toString method: ";
        return $this->getProperty();
    }

    public function setProperty($newval)
    {
        $this->prop1 = $newval;
    }

    protected function getProperty()
    {
        return $this->prop1 . "<br />";
    }
}

class MyOtherClass extends MyClass
{
    public function __construct()
    {
        parent::__construct();
		echo "A new constructor in " . __CLASS__ . ".<br />";
    }

    public function newMethod()
    {
        echo "From a new method in " . __CLASS__ . ".<br />";
    }

    public function callProtected()
    {
        return $this->getProperty();
    }
}

// Create a new object
$newobj = new MyOtherClass;

// Call the protected method from within a public method
echo $newobj->callProtected();

?>

This generates the desired result:

The class "MyClass" was initiated!
A new constructor in MyOtherClass.
I'm a class property!
The class "MyClass" was destroyed.

Private Properties and Methods

A property or method declared private is accessible only from within the class that defines it. This means that even if a new class extends the class that defines a private property, that property or method will not be available at all within the child class.

To demonstrate this, declare getProperty() as private in MyClass, and attempt to call callProtected() from
MyOtherClass:

<?php

class MyClass
{
    public $prop1 = "I'm a class property!";

    public function __construct()
    {
        echo 'The class "', __CLASS__, '" was initiated!<br />';
    }

    public function __destruct()
    {
        echo 'The class "', __CLASS__, '" was destroyed.<br />';
    }

    public function __toString()
    {
        echo "Using the toString method: ";
        return $this->getProperty();
    }

    public function setProperty($newval)
    {
        $this->prop1 = $newval;
    }

    private function getProperty()
    {
        return $this->prop1 . "<br />";
    }
}

class MyOtherClass extends MyClass
{
    public function __construct()
    {
        parent::__construct();
        echo "A new constructor in " . __CLASS__ . ".<br />";
    }

    public function newMethod()
    {
        echo "From a new method in " . __CLASS__ . ".<br />";
    }

    public function callProtected()
    {
        return $this->getProperty();
    }
}

// Create a new object
$newobj = new MyOtherClass;

// Use a method from the parent class
echo $newobj->callProtected();

?>

Reload your browser, and the following error appears:

The class "MyClass" was initiated!
A new constructor in MyOtherClass.

Fatal error: Call to private method MyClass::getProperty() from context 'MyOtherClass' in /Applications/XAMPP/xamppfiles/htdocs/testing/test.php on line 49

Static Properties and Methods

A method or property declared static can be accessed without first instantiating the class; you simply supply the class name, scope resolution operator, and the property or method name.

“One of the major benefits to using static properties is that they keep their stored values for the duration of the script.”

To demonstrate this, add a static property called $count and a static method called plusOne() to MyClass. Then set up a do...while loop to output the incremented value of $count as long as the value is less than 10:

<?php

class MyClass
{
    public $prop1 = "I'm a class property!";

    public static $count = 0;

    public function __construct()
    {
        echo 'The class "', __CLASS__, '" was initiated!<br />';
    }

    public function __destruct()
    {
        echo 'The class "', __CLASS__, '" was destroyed.<br />';
    }

    public function __toString()
    {
        echo "Using the toString method: ";
        return $this->getProperty();
    }

    public function setProperty($newval)
    {
        $this->prop1 = $newval;
    }

    private function getProperty()
    {
        return $this->prop1 . "<br />";
    }

    public static function plusOne()
    {
        return "The count is " . ++self::$count . ".<br />";
    }
}

class MyOtherClass extends MyClass
{
    public function __construct()
    {
        parent::__construct();
        echo "A new constructor in " . __CLASS__ . ".<br />";
    }

    public function newMethod()
    {
        echo "From a new method in " . __CLASS__ . ".<br />";
    }

    public function callProtected()
    {
        return $this->getProperty();
    }
}

do
{
    // Call plusOne without instantiating MyClass
    echo MyClass::plusOne();
} while ( MyClass::$count < 10 );

?>

Note — When accessing static properties, the dollar sign
($) comes after the scope resolution operator.

When you load this script in your browser, the following is output:

The count is 1.
The count is 2.
The count is 3.
The count is 4.
The count is 5.
The count is 6.
The count is 7.
The count is 8.
The count is 9.
The count is 10.

Commenting with DocBlocks

“The DocBlock commenting style is a widely
accepted method of documenting classes.”

While not an official part of OOP, the DocBlock commenting style is a widely accepted method of documenting classes. Aside from providing a standard for
developers to use when writing code, it has also been adopted by many of the most popular software development kits (SDKs), such as Eclipse and NetBeans, and will be used to generate code hints.

A DocBlock is defined by using a block comment that starts with an additional asterisk:

/**
 * This is a very basic DocBlock
 */

The real power of DocBlocks comes with the ability to use tags, which start with an at symbol (@) immediately followed by the tag name and the value of the tag. DocBlock tags allow developers to define authors of a file, the license for a class, the property or method information, and other useful information.

The most common tags used follow:

  • @author: The author of the current element (which might be a class, file, method, or any bit of code) are listed using this tag. Multiple author tags can be used in the same DocBlock if more than one author is credited. The format for the author name is John Doe <[email protected]>.
  • @copyright: This signifies the copyright year and name of the copyright holder for the current element. The format is 2010 Copyright Holder.
  • @license: This links to the license for the current element. The format for the license information is
    http://www.example.com/path/to/license.txt License Name.
  • @var: This holds the type and description of a variable or class property. The format is type element description.
  • @param: This tag shows the type and description of a function or method parameter. The format is type $element_name element description.
  • @return: The type and description of the return value of a function or method are provided in this tag. The format is type return element description.

A sample class commented with DocBlocks might look like this:

<?php

/**
 * A simple class
 *
 * This is the long description for this class,
 * which can span as many lines as needed. It is
 * not required, whereas the short description is
 * necessary.
 *
 * It can also span multiple paragraphs if the
 * description merits that much verbiage.
 *
 * @author Jason Lengstorf <[email protected]>
 * @copyright 2010 Ennui Design
 * @license http://www.php.net/license/3_01.txt PHP License 3.01
 */
class SimpleClass
{
    /**
     * A public variable
     *
     * @var string stores data for the class
     */
    public $foo;

    /**
     * Sets $foo to a new value upon class instantiation
     *
     * @param string $val a value required for the class
     * @return void
     */
    public function __construct($val)
    {
        $this->foo = $val;
    }

    /**
     * Multiplies two integers
     *
     * Accepts a pair of integers and returns the
     * product of the two.
     *
     * @param int $bat a number to be multiplied
     * @param int $baz a number to be multiplied
     * @return int the product of the two parameters
     */
    public function bar($bat, $baz)
    {
        return $bat * $baz;
    }
}

?>

Once you scan the preceding class, the benefits of DocBlock are apparent: everything is clearly defined so that the next developer can pick up the code and never have to wonder what a snippet of code does or what it should contain.


Comparing Object-Oriented and Procedural Code

There’s not really a right and wrong way to write code. That being said, this section outlines a strong argument for adopting an object-oriented approach in software development, especially in large applications.


Reason 1: Ease of Implementation

“While it may be daunting at first, OOP actually provides an easier approach to dealing with data.”

While it may be daunting at first, OOP actually provides an easier approach to dealing with data. Because an object can store data internally, variables don’t need to be passed from function to function to work properly.

Also, because multiple instances of the same class can exist simultaneously, dealing with large data sets is infinitely easier. For instance, imagine you have two people’s information being processed in a file. They need names, occupations, and ages.

The Procedural Approach

Here’s the procedural approach to our example:

<?php

function changeJob($person, $newjob)
{
    $person['job'] = $newjob; // Change the person's job
    return $person;
}

function happyBirthday($person)
{
    ++$person['age']; // Add 1 to the person's age
    return $person;
}

$person1 = array(
    'name' => 'Tom',
    'job' => 'Button-Pusher',
    'age' => 34
);

$person2 = array(
    'name' => 'John',
    'job' => 'Lever-Puller',
    'age' => 41
);

// Output the starting values for the people
echo "<pre>Person 1: ", print_r($person1, TRUE), "</pre>";
echo "<pre>Person 2: ", print_r($person2, TRUE), "</pre>";

// Tom got a promotion and had a birthday
$person1 = changeJob($person1, 'Box-Mover');
$person1 = happyBirthday($person1);

// John just had a birthday
$person2 = happyBirthday($person2);

// Output the new values for the people
echo "<pre>Person 1: ", print_r($person1, TRUE), "</pre>";
echo "<pre>Person 2: ", print_r($person2, TRUE), "</pre>";

?>

When executed, the code outputs the following:

Person 1: Array
(
    [name] => Tom
    [job] => Button-Pusher
    [age] => 34
)
Person 2: Array
(
    [name] => John
    [job] => Lever-Puller
    [age] => 41
)
Person 1: Array
(
    [name] => Tom
    [job] => Box-Mover
    [age] => 35
)
Person 2: Array
(
    [name] => John
    [job] => Lever-Puller
    [age] => 42
)

While this code isn’t necessarily bad, there’s a lot to keep in mind while coding. The array of the affected person’s attributes must be passed and returned from each function call, which leaves margin for error.

To clean up this example, it would be desirable to leave as few things up to the developer as possible. Only absolutely essential information for the current operation should need to be passed to the functions.

This is where OOP steps in and helps you clean things up.

The OOP Approach

Here’s the OOP approach to our example:

<?php

class Person
{
    private $_name;
    private $_job;
    private $_age;

    public function __construct($name, $job, $age)
    {
        $this->_name = $name;
        $this->_job = $job;
        $this->_age = $age;
    }

    public function changeJob($newjob)
    {
        $this->_job = $newjob;
    }

    public function happyBirthday()
    {
        ++$this->_age;
    }
}

// Create two new people
$person1 = new Person("Tom", "Button-Pusher", 34);
$person2 = new Person("John", "Lever Puller", 41);

// Output their starting point
echo "<pre>Person 1: ", print_r($person1, TRUE), "</pre>";
echo "<pre>Person 2: ", print_r($person2, TRUE), "</pre>";

// Give Tom a promotion and a birthday
$person1->changeJob("Box-Mover");
$person1->happyBirthday();

// John just gets a year older
$person2->happyBirthday();

// Output the ending values
echo "<pre>Person 1: ", print_r($person1, TRUE), "</pre>";
echo "<pre>Person 2: ", print_r($person2, TRUE), "</pre>";

?>

This outputs the following in the browser:

Person 1: Person Object
(
    [_name:private] => Tom
    [_job:private] => Button-Pusher
    [_age:private] => 34
)

Person 2: Person Object
(
    [_name:private] => John
    [_job:private] => Lever Puller
    [_age:private] => 41
)

Person 1: Person Object
(
    [_name:private] => Tom
    [_job:private] => Box-Mover
    [_age:private] => 35
)

Person 2: Person Object
(
    [_name:private] => John
    [_job:private] => Lever Puller
    [_age:private] => 42
)

There’s a little bit more setup involved to make the approach object oriented, but after the class is defined, creating and modifying people is a breeze; a person’s information does not need to be passed or returned from methods, and only absolutely essential information is passed to each method.

“OOP will significantly reduce your workload if implemented properly.”

On the small scale, this difference may not seem like much, but as your applications grow in size, OOP will significantly reduce your workload if implemented properly.

TipNot everything needs to be object oriented. A quick function that handles something small in one place inside the application does not necessarily need to be wrapped in a class. Use your best judgment when deciding between object-oriented and procedural approaches.


Reason 2: Better Organization

Another benefit of OOP is how well it lends itself to being easily packaged and cataloged. Each class can generally be kept in its own separate file, and if a uniform naming convention is used, accessing the classes is extremely simple.

Assume you’ve got an application with 150 classes that are called dynamically through a controller file at the root of your application filesystem. All 150 classes follow the naming convention class.classname.inc.php and reside in the inc folder of your application.

The controller can implement PHP’s __autoload() function to dynamically pull in only the classes it needs as they are called, rather than including all 150 in the controller file just in case or coming up with some clever way of including the files in your own code:

<?php
    function __autoload($class_name)
    {
        include_once 'inc/class.' . $class_name . '.inc.php';
    }
?>

Having each class in a separate file also makes code more portable and easier to reuse in new applications without a bunch of copying and pasting.


Reason 3: Easier Maintenance

Due to the more compact nature of OOP when done correctly, changes in the code are usually much easier to spot and make than in a long spaghetti code procedural implementation.

If a particular array of information gains a new attribute, a procedural piece of software may require (in a worst-case scenario) that the new attribute be added to each function that uses the array.

An OOP application could potentially be updated as easily adding the new property and then adding the methods that deal with said property.

A lot of the benefits covered in this section are the product of OOP in combination with DRY programming practices. It is definitely possible to create easy-to-maintain procedural code that doesn’t cause nightmares, and it is equally possible to create awful object-oriented code. [Pro PHP and jQuery] will attempt to demonstrate a combination of good coding habits in conjunction with OOP to generate clean code that’s easy to read and maintain.


Summary

At this point, you should feel comfortable with the object-oriented programming style. Learning OOP is a great way to take your programming to that next level. When implemented properly, OOP will help you produce easy-to-read, easy-to-maintain, portable code that will save you (and the developers who work with you) hours of extra work. Are you stuck on something that wasn’t covered in this article? Are you already using OOP and have some tips for beginners? Share them in the comments!

Author’s Note — This tutorial was an excerpt from Pro PHP and jQuery (Apress, 2010).

Free Copies of “Pro PHP and jQuery”


Jason Lengstorf was nice enough to offer our community a handful of copies of his latest awesome book, Pro PHP and jQuery,. Be sure to read his latest Nettuts+ tutorial, “Object-Oriented PHP for Beginners,” based on his book.

“This book is for intermediate programmers interested in building Ajax web applications using jQuery and PHP. Along with teaching some advanced PHP techniques, it will teach you how to take your dynamic applications to the next level by adding a JavaScript layer with jQuery.”

To enter for a chance to win a hardcopy version of the book, leave a comment with a PHP tip. It can be as simple or as long as you like. Just as long as it was something that helped you to learn PHP, that will automatically enter you! On Monday morning, we’ll choose the winners!


You can also purchase “Pro PHP and jQuery” here.

A Beginner’s Guide to Design Patterns


Ever wondered what design patterns are? In this article, I’ll explain why design patterns are important, and will provide some examples, in PHP, of when and why they should be used.


What are Design Patterns?

Design patterns are optimized, reusable solutions to the programming problems that we encounter every day. A design pattern is not a class or a library that we can simply plug into our system; it’s much more than that. It is a template that has to be implemented in the correct situation. It’s not language-specific either. A good design pattern should be implementable in most—if not all—languages, depending on the capabilities of the language. Most importantly, any design pattern can be a double-edged sword— if implemented in the wrong place, it can be disastrous and create many problems for you. However, implemented in the right place, at the right time, it can be your savior.

There are three basic kinds of design patterns:

  • structural
  • creational
  • behavioral

Structural patterns generally deal with relationships between entities, making it easier for these entities to work together.

Creational patterns provide instantiation mechanisms, making it easier to create objects in a way that suits the situation.

Behavioral patterns are used in communications between entities and make it easier and more flexible for these entities to communicate.

Why should we use them?

Design patterns are, by principle, well-thought out solutions to programming problems. Many programmers have encountered these problems before, and have used these ‘solutions’ to remedy them. If you encounter these problems, why recreate a solution when you can use an already proven answer?

Example

Let’s imagine that you’ve been given the responsibility of creating a way to merge two classes which do two different things based on the situation. These two classes are heavily used by the existing system in different places, making it difficult to remove these two classes and change the existing code. To add to this, changing the existing code requires that you’ll also need to test any changed code, since these sorts of edits, in a system which relies on different components, almost always introduce new bugs. Instead of doing this, you can implement a variation of the strategy pattern and adapter pattern, which can easily handle these types of scenarios.

<?php
class StrategyAndAdapterExampleClass {
	private $_class_one;
	private $_class_two;
	private $_context;

	public function __construct( $context ) {
			$this->_context = $context;
	}

	public function operation1() {
		if( $this->_context == "context_for_class_one" ) {
			$this->_class_one->operation1_in_class_one_context();
		} else ( $this->_context == "context_for_class_two" ) {
			$this->_class_two->operation1_in_class_two_context();
		}
	}
}

Pretty simple, right? Now, let’s take a closer look at the strategy pattern.


Strategy Pattern

The strategy pattern is a behavioral design pattern that allows you to decide which course of action a program should take, based on a specific context during runtime. You encapsulate two different algorithms inside two classes, and decide at runtime which strategy you want to go with.

In our example above, the strategy is based on whatever the $context variable was at the time the class was instantiated. If you give it the context for class_one, it will use class_one, and vice versa.

Cute, but where can I use this?

Imagine that you’re currently developing a class which can either update or create a new user record. It still needs the same inputs (name, address, mobile number, etc.), but, depending on a given situation, it has to use different functions when updating and creating. Now, you could probably just use an if-else to accomplish this, however, what if you need to use this class in a different place? In that case, you’ll have to rewrite the same if-else statement all over again. Wouldn’t it be easier to just specify your context?

<?php
class User {

	public function CreateOrUpdate($name, $address, $mobile, $userid = null)
	{
		if( is_null($userid) ) {
			// it means the user doesn't exist yet, create a new record
		} else {
			// it means the user already exists, just update based on the given userid
		}
	}
}

Now, the “usual” strategy pattern involves encapsulating your algorithms inside another class, but in this case, another class would be wasteful. Remember that you don’t have to follow the template exactly. Variations work as long as the concept remains the same, and it solves the problem.


Adapter Pattern

The adapter pattern is a structural design pattern that allows you to repurpose a class with a different interface, allowing it to be used by a system which uses different calling methods.

This also lets you alter some of the inputs being received from the client class, making it into something compatible with the adaptee’s functions.

How can I use this?

Another term to reference an adapter class is a wrapper, which basically lets you “wrap” actions into a class and reuse these actions in the correct situations. A classic example might be when you’re creating a domain class for table classes. Instead of calling the different table classes and calling up their functions one by one, you could encapsulate all of these methods into one method using an adapter class. This would not only allow you to reuse whatever action you want, it also keeps you from having to rewrite the code if you need to use the same action in a different place.

Compare these two implementations.

Non-Adapter Approach

<?php
$user = new User();
$user->CreateOrUpdate( //inputs );

$profile = new Profile();
$profile->CreateOrUpdate( //inputs );

If we needed to do this again in a different place, or even reuse this code in a different project, we would have to type everything all over again.

Better

That’s opposed to doing something like this:

<?php
$account_domain = new Account();
$account_domain->NewAccount( //inputs );

In this situation, we have a wrapper class, which would be our Account domain class:

<?php
class Account()
{
	public function NewAccount( //inputs )
	{
		$user = new User();
		$user->CreateOrUpdate( //subset of inputs );

		$profile = new Profile();
		$profile->CreateOrUpdate( //subset of inputs );
	}
}

This way, you can use your Account domain again whenever you need it—plus, you’d be able to wrap other classes under your domain class as well.


Factory Method Pattern

The factory method pattern is a creational design pattern which does exactly as it sounds: it’s a class that acts as a factory of object instances.

The main goal of this pattern is to encapsulate the creational procedure that may span different classes into one single function. By providing the correct context to the factory method, it will be able to return the correct object.

When can I use this?

The best time to use the factory method pattern is when you have multiple different variations of a single entity. Let’s say you have a button class; this class has different variations, such as ImageButton, InputButton and FlashButton. Depending on the place, you may need to create different buttons—this is where you can use a factory to create the buttons for you!

Let’s begin by creating our three classes:

<?php
abstract class Button {
	protected $_html;

	public function getHtml()
	{
		return $this->_html;
	}
}

class ImageButton extends Button {
	protected $_html = "..."; //This should be whatever HTML you want for your image-based button
}

class InputButton extends Button {
	protected $_html = "..."; //This should be whatever HTML you want for your normal button (<input type="button"... />);
}

class FlashButton extends Button {
	protected $_html = "..."; //This should be whatever HTML you want for your flash-based button
}

Now, we can create our factory class:

<?php
class ButtonFactory
{
    public static function createButton($type)
    {
        $baseClass = 'Button';
        $targetClass = ucfirst($type).$baseClass;

        if (class_exists($targetClass) && is_subclass_of($targetClass, $baseClass)) {
            return new $targetClass;
		} else {
            throw new Exception("The button type '$type' is not recognized.");
		}
    }
}

We can use this code like so:

$buttons = array('image','input','flash');
foreach($buttons as $b) {
    echo ButtonFactory::createButton($b)->getHtml()
}

The output should be the HTML of all your button types. This way, you would be able to specify which button to create depending on the situation and reuse the condition as well.


Decorator Pattern

The decorator pattern is a structural design pattern which enables us to add new or additional behavior to an object during runtime, depending on the situation.

The goal is to make it so that the extended functions can be applied to one specific instance, and, at the same time, still be able to create an original instance that doesn’t have the new functions. It also allows for combining multiple decorators for one instance, so that you’re not stuck with one decorator for each instance. This pattern is an alternative to subclassing, which refers to creating a class that inherits functionality from a parent class. As opposed to subclassing, which adds the behavior at compile time, “decorating” allows you to add new behavior during runtime, if the situation calls for it.

To implement the decorator pattern, we can follow these steps:

  1. Subclass the original “Component” class into a “Decorator” class
  2. In the Decorator class, add a Component pointer as a field
  3. Pass a Component to the Decorator constructor to initialize the Component pointer
  4. In the Decorator class, redirect all “Component” methods to the “Component” pointer, and
  5. In the Decorator class, override any Component method(s) whose behavior needs to be modified

Steps courtesy of http://en.wikipedia.org/wiki/Decorator_pattern

When can I use this?

The best place to use the decorator pattern is when you have an entity which needs to have new behavior only if the situation requires it. Let’s say you have an HTML link element, a logout link, that you want to do slightly different things to based on the current page. For that, we can use the decorator pattern.

First, let’s establish the different “decorations” we’ll need.

  • If we’re on the home page and logged in, have this link be wrapped in h2 tags
  • If we’re on a different page and logged in, have this link be wrapped in underline tags
  • If we’re logged in, have this link wrapped in strong tags

Once we’ve established our decorations, we can start programming them.

<?php
class HtmlLinks {
	//some methods which is available to all html links
}

class LogoutLink extends HtmlLinks {
	protected $_html;

	public function __construct() {
		$this->_html = "<a href=\"logout.php\">Logout</a>";
	}

	public function setHtml($html)
	{
		$this->_html = $html;
	}

	public function render()
	{
		echo $this->_html;
	}
}

class LogoutLinkH2Decorator extends HtmlLinks {
	protected $_logout_link;

	public function __construct( $logout_link )
	{
		$this->_logout_link = $logout_link;
		$this->setHtml("<h2>" . $this->_html . "</h2>");
	}

	public function __call( $name, $args )
	{
		$this->_logout_link->$name($args[0]);
	}
}

class LogoutLinkUnderlineDecorator extends HtmlLinks {
	protected $_logout_link;

	public function __construct( $logout_link )
	{
		$this->_logout_link = $logout_link;
		$this->setHtml("<u>" . $this->_html . "</u>");
	}

	public function __call( $name, $args )
	{
		$this->_logout_link->$name($args[0]);
	}
}

class LogoutLinkStrongDecorator extends HtmlLinks {
	protected $_logout_link;

	public function __construct( $logout_link )
	{
		$this->_logout_link = $logout_link;
		$this->setHtml("<strong>" . $this->_html . "</strong>");
	}

	public function __call( $name, $args )
	{
		$this->_logout_link->$name($args[0]);
	}
}

We should then be able to use it like so:

$logout_link = new LogoutLink();

if( $is_logged_in ) {
	$logout_link = new LogoutLinkStrongDecorator($logout_link);
}

if( $in_home_page ) {
	$logout_link = new LogoutLinkH2Decorator($logout_link);
} else {
	$logout_link = new LogoutLinkUnderlineDecorator($logout_link);
}
$logout_link->render();

We can see here how we are able to combine multiple decorators if we need them. Since all the decorators use the __call magic function, we can still call the original function’s methods. If we assume that we are currently inside the home page and logged in, the HTML output should be:

<strong><h2><a href="logout.php">Logout</a></h2></strong>

Singleton Pattern

The singleton design pattern is a creational design pattern which makes sure that you have one single instance of a particular class in the duration of your runtime, and provides a global point of access to the single instance.

This makes it easier to set up a point of “coordination” for other objects that use the singleton instance as well, since the singleton’s variables will always be the same for anything that calls it.

When can I use this?

If you need to pass a specific instance from one class to another, you can use the singleton pattern to avoid having to pass the instance via constructor or argument. Imagine that you have created a Session class, which simulates the $_SESSION global array. Since this class will only need to be instantiated once, we can implement a singleton pattern like so:

<?php
class Session
{
	private static $instance;

	public static function getInstance()
	{
		if( is_null(self::$instance) ) {
			self::$instance = new self();
		}
		return self::$instance;
	}

	private function __construct() { }

	private function __clone() { }

	//  any other session methods we might use
	...
	...
	...
}

// get a session instance
$session = Session::getInstance();

By doing this, we can access our session instance from different parts of our code, even in different classes. This data will persist throughout all getInstance calls.


Conclusion

There are many more design patterns to study; in this article, I’ve only highlighted some of the more prominent ones that I use when programming. If you’re interested in reading about the other design patterns, Wikipedia’s Design Patterns page has a plethora of information. If that’s not enough, you can always check out Design Patterns: Elements of Reusable Object-Oriented Software, which is considered to be one of the best design pattern books available.

One last thing: when you use these design patterns, always make sure that you’re trying to solve the correct problem. As I mentioned previously, these design patterns are a double-edge sword: if used in the wrong context, they can potentially makes things worse; but if used correctly, they become indispensable.

Write content for a hotel website. by bigkhong

Dear Freelancers, I need an excellent and native English writer to write content for a hotel website. The old website can be found at www.mobilehotel.org. The old website’s contents are not so good so we’ll need to improve this time with a better copy… (Budget: $250-750, Jobs: Article Rewriting, Articles, Copywriting, Travel Writing)


Photoshop PSD to Drupal Template for Video Intensive Website by webcine

We need a Drupal template guru to chop up layered PSD’s. This project is for a video production company building a Drupal site for business portfolio. The sitemap is complete, and the overall functionality is known… (Budget: $250-750, Jobs: Drupal, Photoshop, PSD to HTML, PSD2CMS, Templates)


Re: Joomla site malware error http://fgnfdfthrv.bee.pl/?q= by eyetservices

Hi There One of our Joomla site got hacked need to resolved immediately. What is happening – 1. Search web site URL on Google, it’s going to this site. 2. Did reinstall the web site in past but no success, things are coming back again… (Budget: $30-250, Jobs: Joomla)