Quick Tip: Using the Datagrid With XML

I’m going to demonstrate how to use the datagrid component with an xml file. When you need to display tabular data there is no quicker and easier way than to use a datagrid, and when paired up with an xml file it makes things all the better.


Step 1: Setting up the Flash Document

Create a new flash file (Actionscript 3.0). Set the document to 600x400px with a white background.

Save this file with the name xmlDatagrid.fla


Step 2: Add Components to the Document

Open the components window by going to Menu > Window > Components or pressing Ctrl+F7.

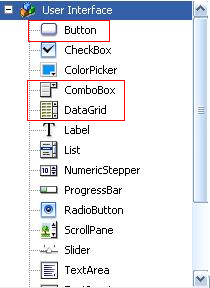
Drag a button, a combobox and a datagrid component to the stage.

Then delete the button, combobox and datagrid components off the stage; they are now in your library.

Here’s a preview of the xml document structure we will be using:

<?xml version="1.0"?>
<books>
	<book>
		<title>Learning ActionScript 3.0: A Beginner's Guide</title>
		<instock>yes</instock>
		<price>26.39</price>
	</book>
	<book>
		<title>Essential ActionScript 3.0</title>
		<instock>yes</instock>
		<price>34.64</price>
	</book>
</books>

The Source download contains three XML files: flash.xml, ajax.xml, and php.xml; each follow the same structure as the snippet above, but contain different books. You’ll need to place them in the same folder as your FLA.


Step 3: Open a New ActionScript File

Open a new actionscript file and save it with the name XMLDataGrid.as

Now open the package declaration and import the classes we will be using:

package {
	import flash.display.MovieClip;
	import flash.net.URLLoader;
	import flash.net.URLRequest;
	import flash.events.MouseEvent;
	import flash.events.Event;
	import fl.controls.DataGrid;
	import fl.controls.ComboBox;
	import fl.controls.Button;

Step 4: Extend the MovieClip Class and Declare Variables

The main document class must extend either the Sprite or MovieClip Class; here we extend the MovieClip Class. Declare the variables we will be using:

package {
	public class XMLDataGrid extends MovieClip {
		var dg:DataGrid;
		var cb:ComboBox;
		var urlLoader:URLLoader = new URLLoader();
		var loadButton:Button;
		var bookXML:XML;

Step 5: Set up the Constructor

Here we set up the constructor with three functions we will be using:

public function XMLDataGrid():void {
		setupGrid();
		setupComboBox();
		setupButton();
}

Step 6: Function Definitions

Here we define the functions we are using in the constructor:

private function setupGrid():void {
	dg=new DataGrid();

	dg.addColumn("Title");
	dg.addColumn("InStock");
	dg.addColumn("Price");
	//This sets the size of the datagrid
	dg.setSize(600,100);
	//This is how many rows you want the datagrid to show
	dg.rowCount=5;
	//When we add colums they are put into an array
	//Here we set the first column "Title" width to 450
	dg.columns[0].width=450;

	//This set the x and y position of the datagrid
	dg.move(0,100);

	addChild(dg);
}

private function setupComboBox():void {
	cb = new ComboBox();
	//This adds item to the comboBox
	cb.addItem({label: "Flash" });
	cb.addItem({label: "Ajax" });
	cb.addItem({label: "Php" });
	//This sets the x and y positions
	cb.move(200,50);

	addChild(cb);
}

private function setupButton():void {
	loadButton = new Button();
	loadButton.label = "Load Books";
	loadButton.addEventListener(MouseEvent.CLICK, loadBooks);
	loadButton.x = 200;
	loadButton.y = 325;
	addChild(loadButton);
}

The setupGrid() function creates a DataGrid component, which will display the data from the XML file we pass to it.

The setupComboBox() function creates a ComboBox, which is a drop-down list that we’ll use to allow the user to pick an XML file to be passed to the data grid.

The button created in setupButton() will be used to pass the XML file, which is selected in the combo box, to the data grid. We’ll write that code next.


Step 7: Define the loadBooks Function

The loadBooks function is used in the eventListener of the loadButton.

private function loadBooks(e:Event):void {
	//Here the cb.selectedLabel returns a string so we call toLowerCase() on it
	//and append .xml to it i.e. if 'Flash' is selected we load 'flash.xml'
	urlLoader.load(new URLRequest(cb.selectedLabel.toLowerCase()+".xml"));
	urlLoader.addEventListener(Event.COMPLETE, populateGrid);
}

Step 8: Define the populateGrid Function

The populateGrid function is used in the eventListener of the urlLoader in the loadBooks function.

	private function populateGrid(e:Event):void {
		var booksXML:XML = new XML( e.target.data);
		//How many items are in the xml file
		var booksLength:int = booksXML.book.length();

		//This removes all the previously added data in the datagrid.
		dg.removeAll();
		//Here we loop through the <book> nodes in the xml file, and add each as a row to the datagrid
		for (var i:int =0; i &lt; booksLength; i++) {
			dg.addItem({Title: booksXML.book[i].title, InStock: booksXML.book[i].instock,Price: booksXML.book[i].price});
		}
	} //Close out the class
} // This is closing the package out

Step 9: Set the Document Class and Test

Set the document class to “XMLDataGrid” and test the movie!


Conclusion

Here we learned that displaying tabluar data in flash is made easy with the datagrid component and that pairing it up with xml makes a great solution.

This is my first tutorial, I hope you have learned something useful and thanks for reading!

Validating Various Input Data in Flash

Today, almost everything on the web is based on user input. A contact form, a user registration form, a search box and so on. As a developer you can’t just rely on the user to write everything as it’s supposed to be. To be sure you always get the correct data from your users you will need to validate the input. Read on to find out how..

In this tutorial you will learn how various data is supposed to be structured and how to validate this data. Note that these methods may not be the best out there or the most complete solutions.

The following topics will be covered in this tutorial:

  • Date and time validation
  • E-mail validation
  • Web address validation
  • Phone number validation
  • International Standard Book Number (ISBN) validation
  • International Bank Account Number (IBAN) validation
  • Credit card number validation

Each topic is handled independently so you can follow the ones you are interested in.


Final Result Preview

This is how our validator will look:

There are multiple fields with the sole purpose of demonstration. In a real scenario you will rarely have all these fields in a single form.

In this tutorial I will only cover the coding part. You will find the graphic interface in the source files. To follow along you will need Flash CS3+.

To better understand this tutorial you must have some basic knowledge about Regular Expressions and string functions. Please check this resource about regular expressions in ActionScript 3.0 if you don’t feel comfortable with the syntax.

Understanding the .fla File

Well it’s not a very complicated interface. If you open the Validator.fla file in the begin folder of the Source download, you will find two frames: one locked, named ActionScript and another one called Interface.

The Interface layer is currently empty. There we will add our text boxes used for the data input.

On the ActionScript layer you will find this code:

var validator:Validator = new Validator();

stage.addEventListener(FocusEvent.FOCUS_IN, register);
stage.addEventListener(FocusEvent.FOCUS_OUT, unregister);

function register(e:FocusEvent):void
{
	e.target.addEventListener(Event.ENTER_FRAME, onFrameUpdate, false, 0, true);
}
function unregister(e:FocusEvent):void
{
	e.target.removeEventListener(Event.ENTER_FRAME, onFrameUpdate);
}

function onFrameUpdate(e:Event):void
{
	var input:String = e.target.text;
	var valid:Boolean;

	switch(e.target)
	{

	}

	if(valid)
		e.target.parent.validTick.gotoAndStop('valid');
	else e.target.parent.validTick.gotoAndStop('invalid');
}

The first line represents an instance of our future Validator class. We’ll use a separate AS file to contain this class, so that it can be used in other projects.

We add event listeners to the stage for focus events. We will use these events to validate our input data only when a text field has focus just to avoid unnecessary calculations.

The onFrameUpdate function is called on every frame when a text field has focus to validate the data in it.

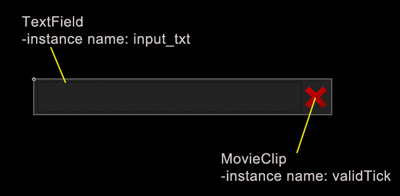
We’ll add our future code in the switch statement. Everything else remains unchanged over this tutorial. In the library you will find a MovieClip called TextBox. This has an input TextField with an instance name of input_txt and another MovieClip called validTick with two frames labeled “valid” and “invalid”.

Now let’s get to the coding.


Step 1: Preparations

First create a new ActionScript file and name it Validator.as

Paste or type in the following code:


package
{
	public class Validator
	{

		public function Validator()
		{
			trace('Validator created');
		}
	}
}

This will be the framework of our Validator class. We will add methods to this class for each validation type we perform. Place this file in the same folder as the Validator.fla file.


Step 2: Calendar Date Structure

The calendar date is one of the most frequently used data on the web. The structure varies from zone to zone. We will look at two main dates formats: United Kingdom version and United States version.

  • The UK date is expressed as DD-MM-YYYY.
  • The US date is expressed as MM-DD-YYYY.

In both cases DD stands for the day, MM stands for the month and YYYY stands for the year. It’s also possible to use another character for the separator, like a slash.

If you need further documentation you can learn more about calendar dates here.


Step 3: Calendar Date Check

Code

First of all we need to check to see if the date format is correct. Paste or type the following code in our Validator class just after the constructor:

public function checkDate(date:String):Boolean
{
	var month:String 		= "(0?[1-9]|1[012])";
	var day:String 			= "(0?[1-9]|[12][0-9]|3[01])";
	var year:String 		= "([1-9][0-9]{3})";
	var separator:String 	= "([.\/ -]{1})";

	var usDate:RegExp = new RegExp("^" + month + separator + day + "\\2" + year + "$");
	var ukDate:RegExp = new RegExp("^" + day + separator + month + "\\2" + year + "$");

	return (usDate.test(date) || ukDate.test(date) ? true:false);
}

Explanation

The first line in the function represents the pattern used to check the month:

var month:String 		= "(0?[1-9]|1[012])";

This pattern will match a number from 1 to 12. For numbers under 10 it will check for digits with leading zero or without.

The second line represents the day pattern:

var day:String = "(0?[1-9]|[12][0-9]|3[01])";

This will match a number from 1 to 31. As previously mentioned, for numbers under 10 it will check for digits with or without leading zero.

The next line represents the year pattern:

var year:String = "([1-9][0-9]{3})";

This will check for numbers between 1000 and 9999. Of course we could of used a pattern to check for years from 0 to more than 9999 but for the sake of ease we will check for numbers within these nine millennia.

The variable separator simply checks if one of these four separators is used: hyphen “-”, dot “.”, front slash “/” and white space ” “.

The two variables usDate and ukDate represent the regular expressions used to check a date. They are the same basically the only difference being the order of the month and day.

var usDate:RegExp = new RegExp("^" + month + separator + day + "\\2" + year + "$");

This will check to see if a valid month is at the beginning of the string. After it checks if a valid separator is used then it checks for a valid day. Next it uses a backreference to the second group used in the expression (the separator) to check if the second separator was used. And lastly it checks for a valid year at the end of the string.

The ukDate expression has the same effect. The only difference is that it will check for the day at the beginning of the string.

In the last line we test the string using the ternary operator to see if it is a valid date in any of the two formats and returns true or false, depending on the case. In a real case scenario you wouldn’t check for both these values as this can cause confusion if the DD is less than 13 (e.g. 01.06.2010).


Step 4: Calendar Date Implementation

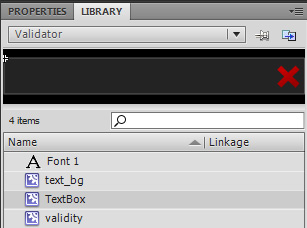
Open the Validator.fla file provided in the source files. Select the Interface layer and place an instance of the TextBox movie clip on the stage. To do this simply drag it from the library anywhere on the stage. Give it an instance name of dateField.

img1

Note: If you can’t see the library panel you can open it by going to Window > Library or by pressing CTRL+L

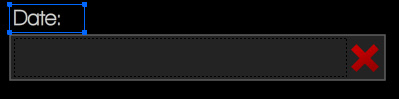
Using the Text Tool (Hotkey T) create a static text field just above the previously created instance of TextBox and write “Date:” in it.

img2

Select the ActionScript layer and open the Actions panel by pressing F9 or by going to Window > Actions. Type in the following code in the switch statement from the onFrameUpdate function on line 22:

case dateField.input_txt:
	valid = validator.checkDate(input);
	break;

This will validate the input using the validator instance as a date.

Test the movie by pressing CTRL+ENTER on the keyboard or going to Control > Test Movie. Enter a date in the text field in any format(UK or US) using the same separator between the month, day and year. If you entered a correct value the green tick should appear.


Step 5: E-mail Address Structure

An email address represents a reference to the electronic mail box where email messages are sent. The RFC specification states that an email address can be composed from the following:

  • Uppercase and lowercase English letters (a-z, A-Z)
  • Digits 0 to 9
  • Characters ! # $ % & ‘ * + – / = ? ^ _ ` { | } ~ .

Most likely you won’t find an email provider which allows all these characters in the email address. To validate such an email address requires a long and very complicated regular expression. As many companies(e.g. Yahoo!, MSN, Gmail) allow only email addresses which contain alphanumeric characters and hyphen “-”, dot “.” and underscore “_”, we will make a checker which we will work with these kind of addresses.

[Ed. Actually, Gmail addresses allow a + sign; we leave it as a challenge for you to implement that ;) ]

An email address is usually formed from the “username”(or “address”) an “@” sign and the domain(name and extension).

If you want to know more about e-mail addresses you can read the E-mail Address wiki page.


Step 6: E-mail Address Check

Code

Paste or type the following code in our Validator class just after the checkDate method:

public function checkEmailAddress(emailAddress:String):Boolean
{
	var address:String 		= "([a-z0-9._-]+)";
	var domainName:String 	= "([a-z0-9.-]+)";
	var domainExt:String	= "([a-z]{2,6})";

	var email:RegExp = new RegExp("^" + address + "@" + domainName + "\\." + domainExt + "$", "i");

	return email.test(emailAddress);
}

Explanation

The first line defines the pattern used to check the actual ‘address’ or username. This checks to see if it contains only the legal characters:

var address:String = "([a-z0-9._-]+)";

The second variable defined represents the domain name pattern. A valid domain name and subdomain name contains only alphanumeric characters, the dot ‘.’ and hyphen ‘-’:

var domainName:String 	= "([a-z0-9.-]+)";

Next there is the domain extension pattern used to check if the domain extension is a valid one. A Top Level Domain(TLD) can only contain characters from A to Z, case insensitive with 2 or more characters(in our case 6):

 var domainExt:String	= "([a-z]{2,6})";

To make the check even more strict you can check if the TLD is an existing one:

 var domainExt:String	= "(com|net|org|info|tv|mobi|museum|gov|biz|tel|name|edu|asia|travel|pro)";

These are just a few generic TLDs. You can see how this becomes quite long as you add more and more TLDs.

The email variable represents the Regular Expression used to test if the email address is a valid one. This checks if a valid username/address exists at the beginning of the email address, if it has the “a” sign somewhere in the middle after which it checks for a valid domain name and extension both separated by the dot “.” Character:

 var email:RegExp = new RegExp("^" + address + "@" + domainName + "\\." + domainExt + "$", "i");

Notice that we haven’t used any uppercase letters. This is because we made use of the case-insensitive modifier “i” as generally email addresses are case-insensitive.


Step 7: E-mail Address Implementation

Note: For more detailed instructions see step 4.

Open Validator.fla, make a new instance of the TextBox movie clip and give it an instance name of emailField.

Create a static Text Field over the TextBox and write in it “E-mail:”

Type the following code on line 25:

case emailField.input_txt:
	valid = validator.checkEmailAddress(input);
	break;

This will check the input data in the emailField TextBox as an e-mail address using the validator instance of the Validator class.

Test the movie and enter an e-mail address in the text field labeled with “E-mail”.


Step 8: Web Address Structure

Every time you surf the web you will most likely type a web address (URL) in your web browser to navigate to your desired location. Another place where you might use it is in a comment form where you are asked to type your website (address) or when manually submitting websites to a search engine.

A web address is made up of the following:

  • Protocol or scheme: http, https or ftp + “://”
  • Domain name: which can contain any alphanumeric character, dot “.” and the hyphen “-”
  • Domain extension: made up of alphanumeric characters

For a more detailed documentation about Web Addresses(URLs) see this page.


Step 9: Web Address Check

Code

Paste or type the following code in our Validator class just after the checkEmailAddress method:

public function checkWebAddress(address:String):Boolean
{
	var protocol:String 	= "(https?:\/\/|ftp:\/\/)?";
	var domainName:String 	= "([a-z0-9.-]{2,})";
	var domainExt:String	= "([a-z]{2,6})";
	var web:RegExp 			= new RegExp('^' + protocol + '?' + domainName + "\." + domainExt + '$', "i");

	return web.test(address);
} 

Explanation

The first line defines the pattern used to check the protocol. Usually this can be optional (depending on the case):

 var protocol:String 	= "(https?:\/\/|ftp:\/\/)?";

The second variable defined represents the domain name pattern. A valid domain name and subdomain name contains only alphanumeric characters, the dot “.” and hyphen “-”:

 var domainName:String 	= "([a-z0-9.-]{2,})";

Next there is the domain extension pattern used to check if the domain extension is a valid one. A Top Level Domain(TLD) can only contain characters from A to Z, case insensitive with 2 or more characters(in our case 6):

 var domainExt:String	= "([a-z]{2,6})";

To make the check even more strict you can check if the TLD is an existing one:

 var domainExt:String	= "(com|net|org|info|tv|mobi|museum|gov|biz|tel|name|edu|asia|travel|pro)";

These are just a few generic TLDs. You can see how this becomes quite long as you add more and more TLDs.

The web variable represents the Regular Expression used to test if the web address is a valid one. This checks if the provided address is made up from the protocol (optional) and domain (the domain must be made up of a domain name and a domain extension separated by the dot “.” character:

 var web:RegExp = new RegExp('^' + protocol + '?' + domainName + "\." + domainExt + '$', "i");
 

As in the case of the e-mail address web addresses are case insensitive so we use the “i”(case insensitive) modifier.


Step 10: Web Address Implementation

Note: For more detailed instructions see step 4.

Open Validator.fla, make a new instance of the TextBox movie clip and give it an instance name of webAddressField.

Create a static Text Field over the TextBox and write in it “Web address:”.

Type the following code on line 28:

case webAddressField.input_txt:
	valid = validator.checkWebAddress(input);
	break; 

This will check the input data in the webAddressField TextBox as a web address using the validator instance of the Validator class.

Test the movie and enter a web address in the text field labeled with “Web address”.


Step 11: Phone Number Structure

The most common place to use a phone number on the web is a contact form or SMS applications. A phone number is made up of the following two elements:

  • Country code: a number between 1 and 999 preceded by a plus “+” sign or double zeros “00″ (optional).
  • Local phone number: made up of only digits. The number of digits depends on the operator, country and phone number type.

Here you will find a complete list of country calling codes if you would like to restrict your phone number input to only several countries. Also you can check the Numbering Plan to see how telephone numbers are used in different networks and countries.


Step 12: Phone Number Check

Code

Paste or type the following code in our Validator class just after the checkWebAddress method:

public function checkPhoneNumber(phoneNumber:String):Boolean
{
	var countryCode:String 	= "((\\+|00)?([1-9]|[1-9][0-9]|[1-9][0-9]{2}))";
	var num:String 		= "([0-9]{3,10})";
	phoneNumber = phoneNumber.match(/[\+\d]/g).join('');
	var phone:RegExp = new RegExp("^" + countryCode + num +"$");

	return phone.test(phoneNumber);
} 

Explanation

The first line defines the pattern used to check the country code. As said this is a number between 1 and 999 preceded by “+” or “00″(optional):

 var protocol:String = "(https?:\/\/|ftp:\/\/)?";

The second variable represents the actual number. We will make it to check for a number with 3 to 10 digits:

 var num:String = "([0-9]{3,10})";

On the third line we strip our phone number of any extra spaces or separators keeping only the “+” sign and digits:

 phoneNumber = phoneNumber.match(/[\+\d]/g).join(''); 

The phone Regular Expression is the expression used to check if the phone number is made out of a country code and a local number:

 var phone:RegExp = new RegExp("^" + countryCode + num +"$");

The last line returns the result of testing the pattern over the provided phone number. Easy enough, right?


Step 13: Phone Number Implementation

Note: For more detailed instructions see step 4.

Open Validator.fla, make a new instance of the TextBox movie clip and give it an instance name of phoneNumberField.

Create a static Text Field over the TextBox and write in it “Phone number:”.

Type the following code on line 31:

case phoneNumberField.input_txt:
	valid = validator.checkPhoneNumber(input);
	break;

This will check the input data in the phoneNumberField TextBox as a phone number using the validator instance of the Validator class.

Test the movie and enter a phone number in the text field labeled with “Phone number”.

Well this is what you should have until now:

And this is the code:

package
{
	public class Validator
	{

		public function Validator()
		{
			trace('Validator created');
		}

		public function checkDate(date:String):Boolean
		{
			var month:String 		= "(0?[1-9]|1[012])";
			var day:String 			= "(0?[1-9]|[12][0-9]|3[01])";
			var year:String 		= "([1-9][0-9]{3})";
			var separator:String 	= "([.\/ -]{1})";

			var usDate:RegExp = new RegExp("^" + month + separator + day + "\\2" + year + "$");
			var ukDate:RegExp = new RegExp("^" + day + separator + month + "\\2" + year + "$");

			return (usDate.test(date) || ukDate.test(date) ? true:false);
		}

		public function checkEmailAddress(emailAddress:String):Boolean
		{
			var address:String 		= "([a-z0-9._-]+)";
			var domainName:String 	= "([a-z0-9.-]+)";
			var domainExt:String	= "(com|net|org|info|tv|mobi|museum|gov|biz|tel|name|edu|asia|travel|pro)";

			var email:RegExp = new RegExp("^" + address + "@" + domainName + "\\." + domainExt + "$", "i");

			return email.test(emailAddress);
		}

		public function checkWebAddress(address:String):Boolean
		{
			var protocol:String 	= "(https?:\/\/|ftp:\/\/)?";
			var domainName:String 	= "([a-z0-9.-]{2,})";
			var domainExt:String	= "(com|net|org|info|tv|mobi|museum|gov|biz|tel|name|edu|asia|travel|pro)";
			var web:RegExp 			= new RegExp('^' + protocol + '?' + domainName + "\\." + domainExt + '$', "i");

			return web.test(address);
		}

		public function checkPhoneNumber(phoneNumber:String):Boolean
		{
			var countryCode:String 	= "((\\+|00)?([1-9]|[1-9][0-9]|[1-9][0-9]{2}))";
			var num:String 		= "([0-9]{3,10})";
			phoneNumber = phoneNumber.match(/[\+\d]/g).join('');
			var phone:RegExp = new RegExp("^" + countryCode + num +"$");

			return phone.test(phoneNumber);
		}

	}

}

Compare your results with mine and make sure everything is where is supposed to be. Now… let’s move on!


Step 14: ISBN-10 Structure

International Serial Book Number, or for short ISBN, is an international identification number given to a book. ISBN numbers are unique and are only give once to a book. Until now we couldn’t check if the data was actually valid but ISBN numbers have a control digit which needs to be verified with a checksum algorithm.

The Checksum Algorithm:

  • We strip the number of slashes or spaces and store the last digit separately (this is the control digit).
  • We multiply every digit in the 9 digits number with his weight. The weights range from 10 to 2 starting from the first digit of the number.
    “>

  • We sum the resulted numbers and we extract the remainder for the division of the number with 11.
  • If the remainder is 0 the control character must be 0. If the remainder is not 0 we substract it from 11 and if the result is 10 the control character must be “x” else the control character must match the result.

If you need more detailed specifications about ISBN numbers you can find all about them Here. The wiki page contains details about both ISBN-10 and ISBN-13 numbers.


Step 15: ISBN-10 Check

Code

Paste or type the following code in our Validator class just after the checkPhoneNumber method:

public function validateISBN10(isbn10:String):Boolean
{
	isbn10 = isbn10.replace(/[ -]/g, '');

	if (isbn10.length != 10)
	{
		return false;
	}else
	{
		var valid:Boolean;
		var weights:Array 	= [10, 9, 8, 7, 6, 5, 4, 3, 2];
		var digits:Array 	= isbn10.split('');
		var control:String 	= digits.pop();
		var result:uint 	= 0;

		for (var i:uint = 0; i < 9; i++)
		{
			digits[i] = digits[i] * weights[i];
			result += digits[i];
		}
		result = (result%11==0)?0:(11 - result % 11);
		switch(result)
		{
			case 10:
				valid = (control.toLowerCase() == 'x');
				break;
			default:
				valid = control == String(result);
				break;
		}
		return valid;
	}
} 

Explanation

The first lines in our method strip the number of any spaces and hyphens. Then it checks if the length is correct. An ISBN-10 number must have 9 digits + a control character:

isbn10 = isbn10.replace(/[ -]/g, '');

if (isbn10.length != 10)
{
	return false;
}

In the else the variable valid stores the validity of the number and weights is an array with the weights of the digits:

var valid:Boolean;
var weights:Array 	= [10, 9, 8, 7, 6, 5, 4, 3, 2];

In the digits array we store the digits of the number and extract the last character which is the control character and store it in the control variable. The result variable will store the result of the check sum:

var digits:Array 	= isbn10.split('');
var control:String 	= digits.pop();
var result:uint 	= 0;

Now that we have every digit in the number we must multiply it by its weight. We can do this with a for-loop in which we multiply every element (digit) in the digits array with its corresponding weight and store the sum of these multiplications:

for (var i:uint = 0; i < 9; i++)
{
	digits[i] = digits[i] * weights[i];
	result += digits[i];
}

In the next line of code we check the remainder of the sum with respect to 11:

result = (result%11==0)?0:(11 - result % 11); 

This could have been done with an if statement but I’ve used the ternary operator which is a shorthand method. The ternary operator works like so variable = condition ? value1 : value2;. If the condition is true value1 will be given to the variable else it will receive value2.

Next we check the result with a switch statement and give the value to the valid variable. If it’s 10 then the the control character must be “x” else the result must match the corresponding digit:

switch(result)
{
	case 10:
	valid = (control.toLowerCase() == 'x');
	break;
	default:
	valid = control == String(result);
	break;
}

And lastly we return the result of the test.


Step 16: ISBN-10 Implementation

Note: For more detailed instructions see step 4.

Open Validator.fla, make a new instance of the TextBox movie clip and give it an instance name of ISBNField.

Create a static Text Field over the TextBox and write in it “ISBN number:”.

Type the following code on line 34:

case ISBNField.input_txt:
valid = validator.validateISBN10(input);
	break; 

This will check the input data in the ISBNField TextBox as a ISBN-10 using the validator instance of the Validator class.

Test the movie and enter a ISBN-10 number in the text field labeled with “ISBN number”.

Be aware that validating an ISBN-10 number doesn’t necessarily mean that this exists or belongs to any book.


Step 17: ISBN-13 Structure

“What? Another ISBN number?” you might say. Well, actually the previous number format is an old standard. This new ISBN-13 standard was introduced in 2005 and until 01.01.2007 the both formats were used for books. The ISBN-13 format has 12 digits and a thirteenth digit being the control digit.

The Checksum Algorithm:

  • We strip the number of spaces and hyphens.
  • We multiply every digit with its corresponding weight. The weights are 1 and 3 and are distributed like so:
    tabel1
  • We sum the resulted numbers and we extract the remainder for the division of the number with 10.
  • If the remainder is 0 the control character must be 0. If the remainder is not 0 we substract it from 10 and the result must match the control character.

Step 18: ISBN-13 Check

Code

Paste or type the following code in our Validator class just after the validateISBN10 method:

public function validateISBN13(isbn13:String):Boolean
{
	var digits:Array 	= isbn13.match(/\d/g);
	var control:uint 	= digits.pop();
	var result:uint;
	var weight:uint;
	if (digits.length != 12)
	{
		return false;
	}else {
		for (var i:uint = 0; i < 12; i++)
		{
			weight = (i % 2 == 0)?1:3;
			digits[i] = digits[i] * weight;
			result += digits[i];
		}
		result = (result % 10 == 0)?0:(10 - result % 10);
		return (result == control);
	}
}
 

Explanation

The digits array contains the digits of the number. We do this by extracting the digits from our number using the match method of the String class. After that we store the control digit in the control variable by extracting the last element in the digits array:

var digits:Array 	= isbn13.match(/\d/g);
var control:uint 	= digits.pop();

The weight variable will hold the current weight of a digit and the result variable will hold the result of the checksum:

var weight:uint;
var result:uint;

We use an in-else statement to see if there is the correct number of digits in the digits array, excluding the control digit.

In the for-loop we iterate through the digits array and multiply every digit with its weight (1 and 3 alternating them every digit) and store the sum in the result variable. If the position of the digit in the array is an even number the weight is 1 else the weight is 3. We do this by checking the remainder for the division of i by 2:

weight = (i % 2 == 0)?1:3;
digits[i] = digits[i] * weight;
result += digits[i];

Lastly we make division by 10 of the sum. If it’s 0 the result is 0 else we substract the remainder from 10:

result = (result % 10 == 0)?0:(10 - result % 10);
return (result == control);

If the result digit is the same as the control digit the number is valid.


Step 19: ISBN-13 Implementation

Open Validator.fla and modify the code on lines 34 to 36 like so:

case ISBNField.input_txt:
valid = validator.validateISBN10(input)||validator.validateISBN13(input);
	break;

This will check the number both as ISBN-10 and ISBN-13.

Test the movie and enter an ISBN number in the text field labeled with “ISBN number”. The same goes for this type of number as in the case of ISBN-10 ones. If a number is valid it doesn’t necessarily mean that it also exists.


Step 20: IBAN Structure

International Bank Account Number or IBAN for short is an international standard for numbering bank accounts. This is made up of the following:

  • Two alphabetic characters (uppercase) representing the country
  • A check number made up of two digits ranging from 00 to 99
  • Four alphabetic characters (uppercase) representing the bank who issued the number
  • An account number of various lengths depending on the country and bank

The Validation Algorithm:

  • We strip the number of spaces.
  • The first four characters in the number (country characters and control digits) are moved to the back of the number.
  • We convert all alphabetic characters in numbers like so:
    A = 10, B = 11, C = 12, …, Z = 35.
  • We compute the remainder of the division by 97.

The number is valid only if the remainder is 1.

Check this page for a complete documentation on International Bank Account Numbers.


Step 21: IBAN Check

Code

Paste or type the following code in our Validator class just after the validateISBN13 method:

public function validateIBAN(iban:String):Boolean
{
	var nums:Object 	= { A:10, B:11, C:12, D:13, E:14,
					F:15, G:16, H:17, I:18, J:19,
					K:20, L:21,	M:22, N:23, O:24,
					P:25, Q:26, R:27, S:28, T:29,
					U:30, V:31, W:32, X:33, Y:34, Z:35 };
	var chars:Array 	= iban.split('');

	for (var i:int = 0; i < 4; i++)
	{
		chars.push(chars.shift());
	}

	var exp:RegExp = /[a-z]/i;
	for (var j:int = 0; j < chars.length; j++)
	{
		chars[j] = exp.test(chars[j]) ? nums[chars[j].toUpperCase()] : chars[j];
	}
	iban = chars.join('');
	return modulus(iban, 97) == 1;
} 

Explanation

The nums object contains the corresponding number for each character:

var nums:Object 	= { A:10, B:11, C:12, D:13, E:14,
				F:15, G:16, H:17, I:18, J:19,
				K:20, L:21,	M:22, N:23, O:24,
				P:25, Q:26, R:27, S:28, T:29,
				U:30, V:31, W:32, X:33, Y:34, Z:35 };
 

The chars array contains the characters in the number:

 var chars:Array 	= iban.split('');

With the first for-loop we move the first four characters to the back by removing them from the beginning of the array and placing them to the back:

for (var i:int = 0; i < 4; i++)
{
	chars.push(chars.shift());
}

The exp regular expression is a simple pattern for alphabetic characters used to test every element in the chars array:

 var exp:RegExp = /[a-z]/i;

In the second for-loop we check every character in the chars array to see if it’s a letter and change it to its corresponding number using the nums object:

for (var j:int = 0; j < chars.length; j++)
{
	chars[j] = exp.test(chars[j]) ? nums[chars[j].toUpperCase()] : chars[j];
}

After converting every letter in a number we transform the array into a string and assign it to the iban variable:

 iban = chars.join('');

Lastly we return if the remainder of the division by 97 of the number is equal to 1 or not.

 return modulus(iban, 97) == 1;

You might wonder why I’ve used a custom function instead of the “%” operator. Well… if you think about it, the number has 20+ digits (very large) and the normal modulus operator will not work as expected. So we need to define a way to calculate the modulus for large numbers.

The Modulus Function

To calculate the modulus of large numbers I’ve used an implementation of the “divide and conquer” method. To keep it short this method substracts a part of the large number and makes the modulus of that part after which it appends the result to the remaining portion of the large number. For a more detailed presentation of this method see This link.

Paste or type the following code in our Validator class just after the validateISBN method:

public function modulus(largeNumber:String, mod:uint):Number
{
	var tmp:String 		= largeNumber.substr(0, 10);
	var number:String 	= largeNumber.substr(tmp.length);
	var result:String;

	do {
		result = String(Number(tmp) % mod);
		number = result + number;
		tmp = number.substr(0, 10);
		number = number.substr(tmp.length);

	} while (number.length > 0);

	return Number(tmp) % mod;
}

The tmp variable stores a part of the large number by substracting 10 characters from it:

 var tmp:String 		= largeNumber.substr(0, 10);

The number variable represents the large number which gets trimmed by the length of the tmp string:

 var number:String 	= largeNumber.substr(tmp.length);

The result variable will obviously hold the result of the division. In the do-while loop we compute the remainder for the division of the tmp number by the mod integer (the divider) and assign the value to the result:

result = String(Number(tmp) % mod); 

We add the result to the beginning of the large number and repeat the previously three steps while the number length is larger than 0:

number = result + number;
tmp = number.substr(0, 10);
number = number.substr(tmp.length);

And lastly we return the result of the modulus.


Step 22: IBAN Implementation

Note: For more detailed instructions see step 4.

Open Validator.fla, make a new instance of the TextBox movie clip and give it an instance name of IBANField.

Create a static Text Field over the TextBox and write in it “IBAN number:”.

Type the following code on line 37:

case IBANField.input_txt:
valid = validator.validateIBAN(input);
	break;

This will check the input data in the IBANField TextBox as an IBAN using the validator instance of the Validator class.

Test the movie and enter an IBAN number in the text field labeled with “IBAN number”.


Step 23: Card Number Structure

On the front of every credit or debit card you will find a number which varies in length. You use this number usually to make online payments using your credit card. As I said, the number varies in length and format depending on the company which it belongs to. But they all have one thing in common: they must pass a checksum algorithm. Credit cards numbers are validated using the Luhn (mod 10) algorithm.

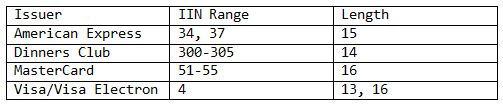
Before we dive into the actual validation we need to check if the number belongs to any valid company. We will check for these three main card issuers: American Express, Dinners Club, MasterCard and Visa. The following table contains the number details for each company:

tabel2

The IIN Range is the number which the card number begins with.

The Luhn Algorithm

  • We double every second digit in the number starting from the first digit if the number has an even number of digits or starting from the second digit otherwise.
  • We sum the digits of the product together with the undoubled digits.
  • We check if the total sum modulo 10 is equal to 0 (or the number ends in 0) the number is valid.

For further reading see the Bank Card Number and the Luhn Algorithm wiki pages


Step 24: Card Number Check

Code

Paste or type the following code in our Validator class just after the validateIBAN method:

public function validateCardNumber(ccNumber:String):Boolean
{
	var americanExpress:RegExp 	= /^(34|37) ([0-9]{13})$/x;
	var dinnersClub:RegExp 		= /^(30[0-5]) ([0-9]{13})$/x;
	var masterCard:RegExp 		= /^(5[1-5]) ([0-9]{14})$/x;
	var visa:RegExp 			= /^4 ([0-9]{12} | [0-9]{15})$/x;
	var valid:Boolean;
	ccNumber = ccNumber.match(/\d/g).join('');

	if (americanExpress.test(ccNumber) || dinnersClub.test(ccNumber) ||
		masterCard.test(ccNumber) || visa.test(ccNumber))
		valid = true;

	return valid && luhnChecksum(ccNumber);
}

Explanation

The americanExpress regular expression defines the pattern used to check American Express card numbers. This will check for numbers beginning with 34 or 37 and has 13 more digits:

 var americanExpress:RegExp 	= /^(34|37) ([0-9]{13})$/x;

The dinnersClub regular expression defines the pattern used to check Dinners Club card numbers. This pattern checks if a credit card number begins with a number ranging from 300 to 305 and has 13 more digits:

 var dinnersClub:RegExp = /^(30[0-5]) ([0-9]{13})$/x;

The masterCard regular expression defines the patter for MasterCard card numbers. This pattern will check if the credit card number begins with a number between 51 and 55 and ends with 14 more digits:

 var masterCard:RegExp 	= /^(5[1-5]) ([0-9]{14})$/x; 

The visa regular expression defines the pattern for Visa/Visa Electron card numbers. This will check if the provided card number begins with 4 and ends with 12 or 15 mode digits:

 var visa:RegExp 	= /^4 ([0-9]{12} | [0-9]{15})$/x;

We use the extended modifier (“x”) in every expression so that whitespaces will be ignored from. This is used just to make the expression easier to read.

The Boolean variable valid will hold the validity status of the card number.

On the sixth line we extract the digits from our number (the number is usually written with hyphens or spaces for readability purposes):

 ccNumber = ccNumber.match(/\d/g).join('');

In the if statement we check if the number matches any of the four patterns defined earlier:

if (americanExpress.test(ccNumber) || dinnersClub.test(ccNumber) ||
	masterCard.test(ccNumber) || visa.test(ccNumber))
			valid = true;

On the last line we return true if the number is valid and passes the Luhn checksum.

The Luhn Algorithm

Type in or paste the following code after the validateCardNumber method in our Validator class:

public function luhnChecksum(number:String):Boolean
{
	var digits:Array = number.split('');
	var start:uint = (number.length % 2 == 0) ? 0:1;
	var sum:int;

	while (start < digits.length)
	{
		digits[start] = uint(digits[start]) * 2;
		start += 2;
	}

	digits = digits.join('').split('');

	for (var i:uint = 0; i < digits.length; i++)
	{
		sum += uint(digits[i]);
	}
	return (sum % 10 == 0);
}

The digits variable contains the digits of the number. The start variable is used to define from which digit to start doubling (this is represented by the index in the digits array). The sum variable holds the total sum. We use the while loop to double every second digit in the array. We also add 2 to the start variable to skip at every second digit in the array:

while (start < digits.length)
{
	digits[start] = uint(digits[start]) * 2;
	start += 2;
}

On the next line we transform the digits array into a string and split it again into an array. We do this because if the doubled numbers are bigger than 9 we must sum the digits (e.g. for 12 we do 1+2):

 digits = digits.join('').split('');

In the for-loop we simply sum all the digits:

for (var i:uint = 0; i < digits.length; i++)
{
	sum += uint(digits[i]);
}

And lastly we check if the remainder is 0 and return true or false otherwise:

 return (sum % 10 == 0);

Step 25: Card Number Implementation

Note: For more detailed instructions see step 4.

Open Validator.fla, make a new instance of the TextBox movie clip and give it an instance name of cardNumberField.

Create a static Text Field over the TextBox and write in it “Card number:”.

Type the following code on line 40:

case cardNumberField.input_txt:
	valid = validator.validateCreditCardNumber(input);
	break;

This will check the input data in the cardNumberField TextBox as a Card Number using the validator instance of the Validator class.

Test the movie and enter a Card Number number in the text field labeled with “Card number”.


Final code

Now this is how our final class looks:

package
{
	public class Validator
	{

		public function Validator()
		{
			trace('Validator created');
		}
		/**
		 * Validates a date in these two formats:
		 *
		 * DD MM YYYY
		 * MM DD YYYY
		 *
		 * The valid separators are dash "-", dot ".", front slash "/" and space " ".
		 *
		 * @param date The date to be validated.
		 * @return	Returns true if the date is valid or false otherwise.
		 */
		public function checkDate(date:String):Boolean
		{
			var month:String 		= "(0?[1-9]|1[012])";
			var day:String 			= "(0?[1-9]|[12][0-9]|3[01])";
			var year:String 		= "([1-9][0-9]{3})";
			var separator:String 	= "([.\/ -]{1})";

			var usDate:RegExp = new RegExp("^" + month + separator + day + "\\2" + year + "$");
			var ukDate:RegExp = new RegExp("^" + day + separator + month + "\\2" + year + "$");

			return (usDate.test(date) || ukDate.test(date) ? true:false);
		}
		/**
		 * Validates an email address. The address should have the following
		 * format:
		 *
		 * [user]@[domain].[domain_extension]
		 *
		 * @param	emailAddress
		 * @return	Returns true if the address is valid or false otherwise.
		 */
		public function checkEmailAddress(emailAddress:String):Boolean
		{
			var address:String 		= "([a-z0-9._-]+)";
			var domainName:String 	= "([a-z0-9.-]+)";
			var domainExt:String	= "(com|net|org|info|tv|mobi|museum|gov|biz|tel|name|edu|asia|travel|pro)";

			var email:RegExp = new RegExp("^" + address + "@" + domainName + "\\." + domainExt + "$", "i");

			return email.test(emailAddress);
		}
		/**
		 * Validates a web address. The address should have the following
		 * format:
		 *
		 * [protocol://(optional)][domain].[domain_extension]
		 *
		 * @param	address	The web address to be checked.
		 * @return	Returns true if the address is valid or false otherwise.
		 */
		public function checkWebAddress(address:String):Boolean
		{
			var protocol:String 	= "(https?:\/\/|ftp:\/\/)?";
			var domainName:String 	= "([a-z0-9.-]{2,})";
			var domainExt:String	= "(com|net|org|info|tv|mobi|museum|gov|biz|tel|name|edu|asia|travel|pro)";
			var web:RegExp 			= new RegExp('^' + protocol + '?' + domainName + "\." + domainExt + '$', "i");

			return web.test(address);
		}
		/**
		 * Validates a phone number. The phone number should have the following
		 * format:
		 *
		 * [countryCode(optional)][XXX][YYY][ZZZZ]
		 *
		 * Separators between X's, Y's and Z's are optional.
		 * Valid separators are dash "-", dot "." and space " ".
		 *
		 * @param	phoneNumber	The phone number to be checked.
		 * @return	Returns true if the number is valid or false otherwise.
		 */
		public function checkPhoneNumber(phoneNumber:String):Boolean
		{
			var countryCode:String 	= "((\\+|00)?([1-9]|[1-9][0-9]|[1-9][0-9]{2}))";
			var num:String 		= "([0-9]{3,10})";
			phoneNumber = phoneNumber.match(/[\+\d]/g).join('');

			var phone:RegExp = new RegExp("^" + countryCode + num +"$");

			return phone.test(phoneNumber);
		}
		/**
		 * Checks if an ISBN-10 number passes the checksum.
		 *
		 * @param	isbn10 The ISBN-10 number to be validated.
		 * @return	Returns true if the number is valid or false otherwise.
		 */
		public function validateISBN10(isbn10:String):Boolean
		{
			isbn10 = isbn10.replace(/[ -]/g, '');

			if (isbn10.length != 10)
			{
				return false;
			}else
			{
				var valid:Boolean;
				var weights:Array 	= [10, 9, 8, 7, 6, 5, 4, 3, 2];
				var digits:Array 	= isbn10.split('');
				var control:String 	= digits.pop();
				var result:uint 	= 0;

				for (var i:uint = 0; i < 9; i++)
				{
					digits[i] = digits[i] * weights[i];
					result += digits[i];
				}
				result = (result%11==0)?0:(11 - result % 11);
				switch(result)
				{
					case 10:
						valid = (control.toLowerCase() == 'x');
						break;
					default:
						valid = control == String(result);
						break;
				}
				return valid;
			}
		}
		/**
		 * Checks the format of an ISBN-13 number and validates it.
		 *
		 * @param	isbn13	The ISBN-13 number to be validated.
		 * @return	Returns true if the number is valid or false otherwise.
		 */
		public function validateISBN13(isbn13:String):Boolean
		{
			var digits:Array 	= isbn13.match(/\d/g);
			var control:uint 	= digits.pop();
			var result:uint;
			var weight:uint;
			if (digits.length != 12)
			{
				return false;
			}else {
				for (var i:uint = 0; i < 12; i++)
				{
					weight = (i % 2 == 0)?1:3;
					digits[i] = digits[i] * weight;
					result += digits[i];
				}
				result = (result % 10 == 0)?0:(10 - result % 10);
				return (result == control);
			}
		}
		/**
		 * Validates an IBAN number.
		 *
		 * @param	iban	The IBAN number to be validated.
		 * @return 	Returns true if the number is valid or false otherwise.
		 */
		public function validateIBAN(iban:String):Boolean
		{
			var nums:Object 	= { A:10, B:11, C:12, D:13, E:14,
									F:15, G:16, H:17, I:18, J:19,
									K:20, L:21,	M:22, N:23, O:24,
									P:25, Q:26, R:27, S:28, T:29,
									U:30, V:31, W:32, X:33, Y:34, Z:35 };
			var chars:Array 	= iban.split('');

			for (var i:int = 0; i < 4; i++)
			{
				chars.push(chars.shift());
			}

			var exp:RegExp = /[a-z]/i;
			for (var j:int = 0; j < chars.length; j++)
			{
				chars[j] = exp.test(chars[j]) ? nums[chars[j].toUpperCase()] : chars[j];
			}
			iban = chars.join('');
			return modulus(iban, 97) == 1;
		}
		/**
		 * Checks if the provided Credit Card number is a correct one for each
		 * of these providers: American Express, Dinners Club, MasterCard and Visa.
		 *
		 * @param	ccNumber	The credit number to be validated.
		 * @return	Returns true if the number is valid or false otherwise
		 */
		public function validateCardNumber(ccNumber:String):Boolean
		{
			var americanExpress:RegExp 	= /^(34|37) ([0-9]{13})$/x;
			var dinnersClub:RegExp 		= /^(30[0-5]) ([0-9]{13})$/x;
			var masterCard:RegExp 		= /^(5[1-5]) ([0-9]{14})$/x;
			var visa:RegExp 			= /^4 ([0-9]{12} | [0-9]{15})$/x;
			var valid:Boolean;
			ccNumber = ccNumber.match(/\d/g).join('');

			if (americanExpress.test(ccNumber) || dinnersClub.test(ccNumber) ||
				masterCard.test(ccNumber) || visa.test(ccNumber))
				valid = true;

			return valid && luhnChecksum(ccNumber);
		}
		/**
		 * Returns the modulus of a very large number.
		 *
		 * @param	largeNumber	The divided number.
		 * @param	mod			The dividing number.
		 *
		 * @return	Returns the remainder.
		 */
		public function modulus(largeNumber:String, mod:uint):Number
		{
			var tmp:String 		= largeNumber.substr(0, 10);
			var number:String 	= largeNumber.substr(tmp.length);
			var result:String;

			do {
				result = String(Number(tmp) % mod);
				number = result + number;
				tmp = number.substr(0, 10);
				number = number.substr(tmp.length);

			} while (number.length > 0);

			return Number(tmp) % mod;
		}
		/**
		 * Makes a Luhn mod 10 checksum for a specified number.
		 *
		 * @param	number	The number to be checked.
		 * @return	Returns true if the number passes the checksum or false otherwise.
		 */
		public function luhnChecksum(number:String):Boolean
		{
			var digits:Array = number.split('');
			var start:uint = (number.length % 2 == 0) ? 0:1;
			var sum:int;

			while (start < digits.length)
			{
				digits[start] = uint(digits[start]) * 2;
				start += 2;
			}

			digits = digits.join('').split('');

			for (var i:uint = 0; i < digits.length; i++)
			{
				sum += uint(digits[i]);
			}
			return (sum % 10 == 0);
		}
	}

}

I’ve added comments to the final result so that you remember how each method works and how the tested value should look like.

You can use this class in any of your AS3 projects.


Conclusion

Remember that even if you’ve validated your data this might not be real (as in the case of ISBNs, email addresses, IBANs etc) as many of these can be generated or random. But checking the data before registering it to your database, sending emails or submiting it to a payment server might catch some typos and get the user on the right track.

I hope this tutorial about various validations in ActionScript has helped you to understand the basics of input data validation. Next you can try to modify these methods and make them more restrictive, or more specific to your needs. Also you can try to make your own validation methods for any other data.

Thanks for reading my tutorial and please leave your feedback about it!

Build a Chatroom with Flash, Adobe AIR and PHP – Active Premium

It’s that time again; we have another Active Premium tutorial exclusively available to Premium members. If you want to take your ActionScript (and PHP, MySQL and XML) skills to the next level, then we have an awesome tutorial for you, courtesy of Jeremy Green.


This Premium Tutorial is Filled with Creative Tips

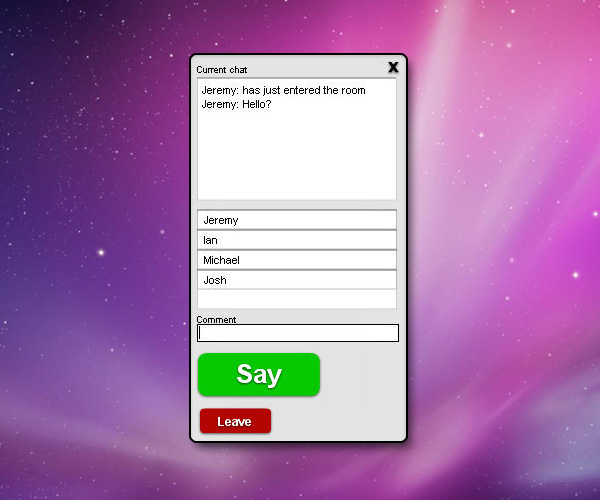
The primary use of a chat room is to share information via text with a group of other users. Generally speaking, the ability to converse with multiple people in the same conversation differentiates chat rooms from instant messaging programs, which are more typically designed for one-to-one communication.

Source: Wikipedia

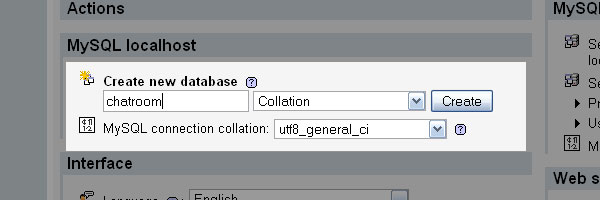
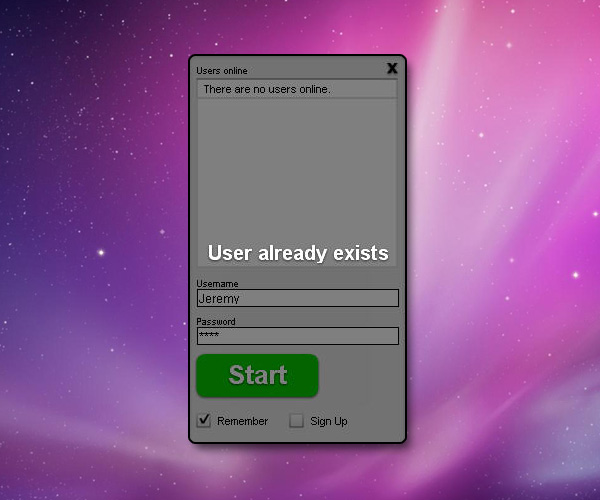
During this Premium tutorial, I’ll show you how to create a chatroom using Flash, AIR, PHP, MySQL and XML.


Professional and Detailed Instructions Inside

Premium members can Log in and Download! Otherwise, Join Now! Below are some sample images from this tutorial.


Active Premium Membership

We run a Premium membership system which costs $9 a month (or $22 for 3 months!) which periodically gives members access to extra tutorials, like this one! You’ll also get access to Psd Premium, Vector Premium, Audio Premium, Net Premium, Ae Premium and Cg Premium too. If you’re a Premium member, you can log in and download the tutorial. If you’re not a member, you can of course join today!

Also, don’t forget to follow @activetuts on twitter and grab the Activetuts+ RSS Feed to stay up to date with the latest tutorials and articles.

Assembly/Disassembly with Particle Flow in 3Ds Max

Being creative with the dynamic systems in our 3D applications can produce stunning, exciting and elegant results. In this tutorial, Sachin Joshi walks us through one such example using Particle Flow in 3Ds Max, showing us how to assemble and disassemble objects within your scene.


Video 1

Download

Note: click the ‘Monitor’ icon to view tutorial in full-screen HD.


Don’t miss more CG tutorials and guides, published daily – subscribe to Cgtuts+ by RSS.

‘The Skateshop’ – A PFTrack, Maya & AE Workflow, Day 1 – Premium Tutorial

Set extension and/or CG integration with live action footage is a key aspect of Visual Effects work, and it’s our job as CG artists to ensure that we use a suitable workflow for the job at hand. In this detailed 3-day Premium tutorial series, Alvaro Castañeda shows us one possible workflow, moving from PFTrack for tracking, to Maya for modelling, texturing and rendering, and then compositing the result in Maya Composite, having used AE along the way! ‘The Skateshop’ is an unmissable tutorial for anyone looking to get into VFX. Can’t wait to get started? Become a Premium member, or learn more after the jump!

Breakdown of Day 1

Today we’ll start by processing the footage into something we can use throughout the whole process. We’ll then track the footage, and finish by importing it into our 3D application to help us build our 3D models.

Want to Join Plus?

The Tuts+ network runs a membership service called Premium. For $9 per month, you gain access to exclusive high quality screencast tutorials, downloadable content packs, and freebies at CGtuts+, Psdtuts+, Vectortuts+, Audiotuts+, Nettuts+ and Aetuts+! For less than the price of a movie, you’ll learn from some of the best minds in the business all month long!!. Become a Premium member today!


Don’t miss more CG Premium tutorials and content packs, published weekly – subscribe to Cgtuts+ by RSS.

Compositing V-ray Render Layers in Photoshop

In this tutorial Ahmed Fathi takes a look at how to composite together V-ray render layers using blending-modes and masks in Photoshop. Once completed, this process allows you to change or tweak any aspect of your image in seconds without having to re-render a thing! Ahmed also covers a few extra post production techniques such as Chromatic Aberration and Depth Of Field, as well as how to emulate a Cross-processed look.

Step 1

As this is a compositing tutorial, not a lighting/rendering tutorial, I’ll assume that you have at least a basic knowledge of V-ray, and that you are able to render out your own scenes already. We’re going jump straight ahead into setting up the different render elements for the compositing process.

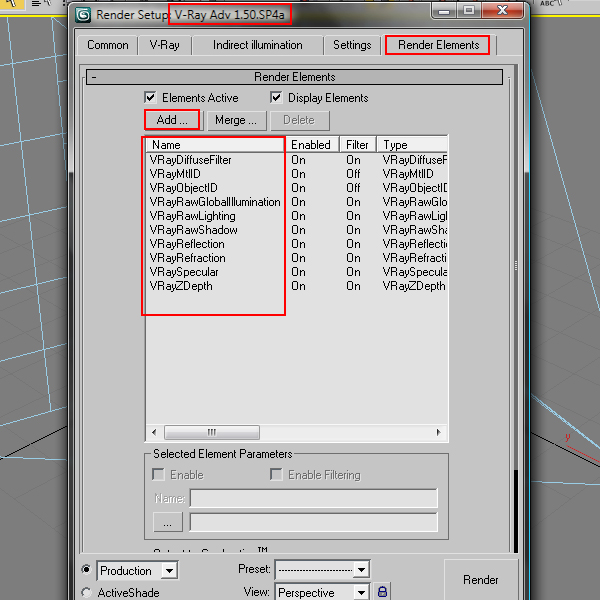
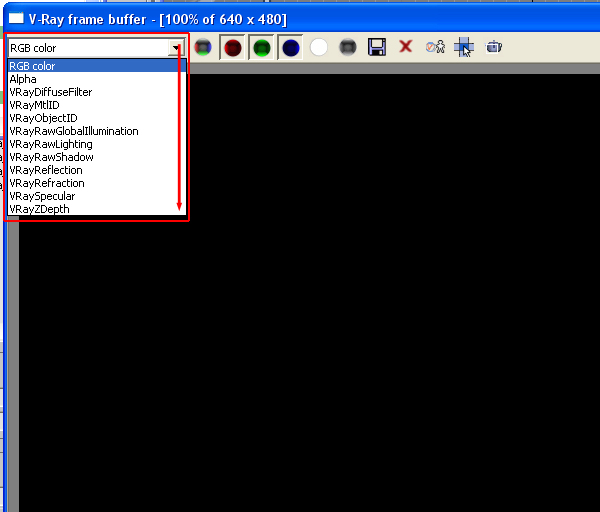
In order to make V-ray render out the different layers, we first have to enable them in the V-ray Render Elements tab within the Render Settings window. Once in the tab, we want to enable the following render elements as shown :

  • VrayDiffuseFilter
  • VrayMtlID
  • VrayObjectID
  • VrayRawGlobalIllumination
  • VrayRawLighting
  • VrayRawShadow
  • VrayReflection
  • VrayRefraction
  • VraySpecular
  • and VrayZDepth.

Most of these elements don?t need much work to get them right, but we are going to need to take a few steps to set up the VrayMtlID, VrayObjectID and VrayZDepth layers.


Step 2

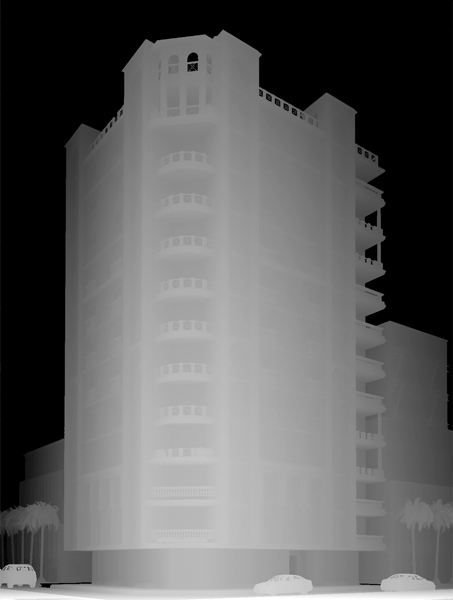
We’ll start with the VRayZDepth element. The ZDepth layer is a black and white map that is used to tell Photoshop how far each object in our scene sits away from the render camera – the further the object is from the camera, the darker it will appear in the Zdepth layer. Typically the Min value is used to tell the compositor which objects will be in focus.

In order to correctly setup a Zdepth map, we have to adjust the Min & Max distances that V-ray should calculate, and therefore what appears as white (the Min value) and black (the Max value) within our scene. Select the VRayZDepth item in the elements list. At the bottom you’ll see the zdepth min and zdepth max values we need to adjust.


Step 3

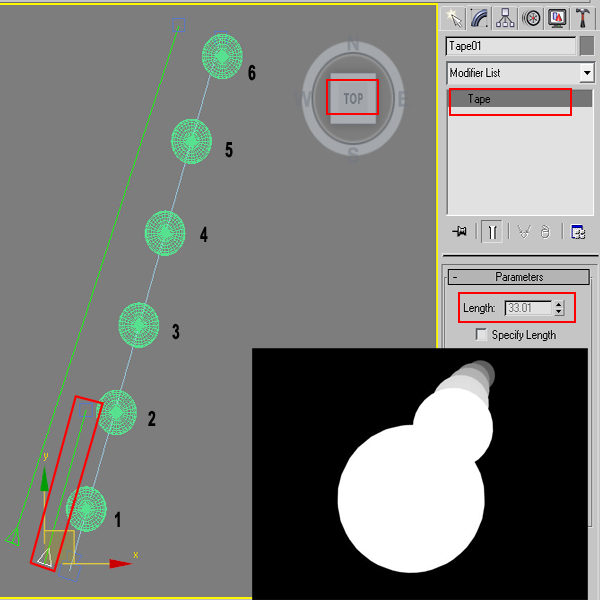
To get a sense of what values you should use for the min and max values, you should use a tape helper object to measure the distance between the camera and your closest and furthest objects.
To simplify things, let?s say sphere #2 in the image below is the closest sphere we want to be in focus, whilst Sphere #6 should be slightly out of focus. We would use two tapes to measure those distances and put them in as your Min & Max Values.


Step 4

Here’?s what the VRayZdepth render for this composite looked like after setting the Min to 20 and Max to 70 meters


Step 5

The VrayMtlID render layer creates an image with a different solid colour for each material in your scene, and to use it, we need to adjust your material IDs. In your material editor you will find an icon with the number 0 on it (as shown below.) If you click the 0, a grid of numbers from 0 to 15 will appear – this is your material ID. Go through your scene and apply a different number to each material you want to have a different color in your MtlID element. As we have 16 numbers, we can have 16 different materials appearing in our MtlID render layer.


Step 6

Here?’s how your VRayMtlID element would look like after setting up the ID’s for each required material. Your result may have different colors, but the important thing is that they are separate from one another.


Step 7

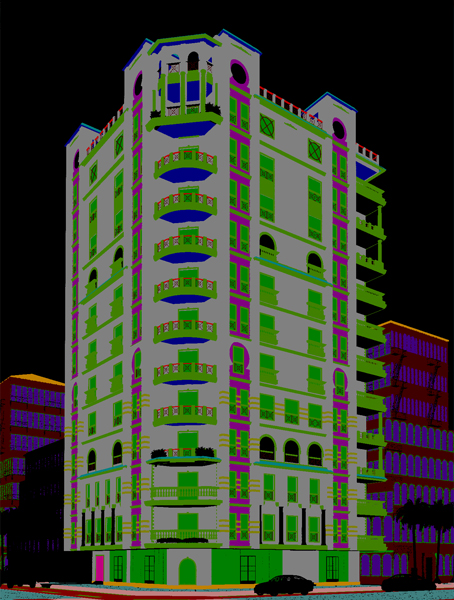
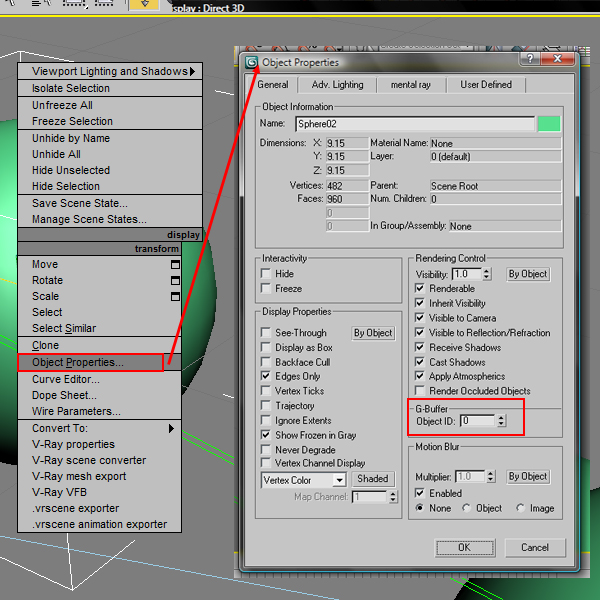
VRayObjectID element is just like material IDs element mentioned above, but it outputs a different colour based on the different objects in your scene – the Materials are irrelevant to it. To set this up, right click your desired object, select Object Properties and give each object a different number in the Object ID field in the G-Buffer section.


Step 8

I only needed to use the VRayObjectID element in order to make selecting the cars and the surrounding buildings easier in post. Here?’s how it looks after rendering.


Step 9

The last element we need to add in is the ambient occlusion layer, but as you’ll remember, this wasn’t added to our render elements list in V-ray. We actually need to render it separately after your initial render has been completed, but don’t worry, there is an easy, fast way to do it!

Apply a VrayLightMtl to your entire scene, and then add a VrayDirt map into the color channel. You’ll then need to go in and tweak the dirt map settings until you get a good, clean result result. For this scene, I got a nice looking AO map with a Radius of 2 in my dirt map settings.

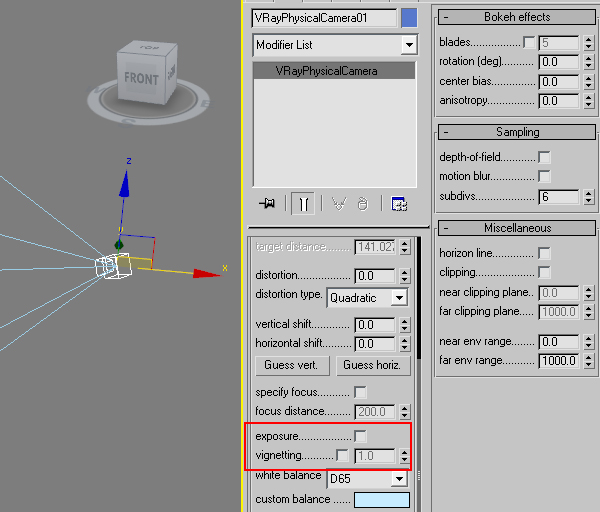
Note: if you use a V-ray Physical Camera in your scene, (which I highly recommend,) you will need to turn off your Exposure and Vignette options in your camera settings in order to render the AO pass properly.


Step 10

After a couple of trials with the dirt map radius, I ended up with the following AO element. I also increased the dirt map subdivs from 8 to about 64 which helped to smooth out the final render, and it still rendered out relatively fast.


Step 11

Just a couple more steps and we’ll be ready to fire up Photoshop and start compositing! But first, how do we get all of these elements out of V-ray? For starters, there is the obvious way of saving them to file one at a time, however there are infact two techniques used for saving the different channels to disk and we’ll cover both of them in the next few steps.

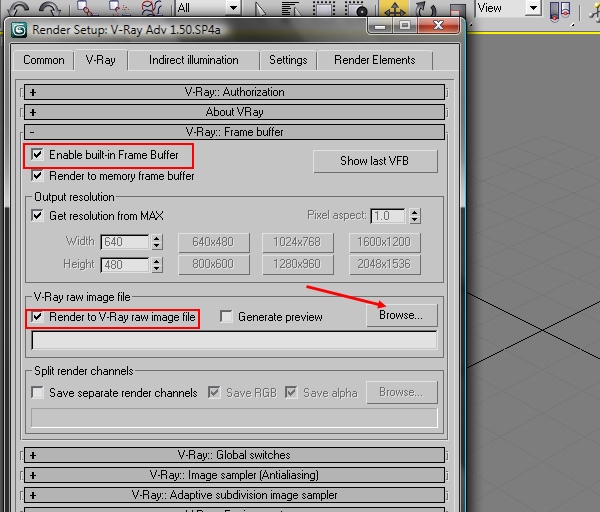
The first method is really helpful, especially for those who use a Linear Workflow, and that is saving all the render elements out into a single .EXR file. To do that you should first select Enable built-in Frame Bufferfrom the V-Ray::Frame buffer menu, and then turn on the ?Render to V-Ray Raw image file option ?below. With that done, we can click browse.


Step 12

Browse to the place where you want to save your file, and enter your file name making sure to add the .EXR extension onto the end of it. Then select All Files(*.*) as your file type. This will allow you to save your render as a single .EXR file that contains all your different render layers.

If, however, you try to open your new .EXR file in Photoshop, you will only see the first render layer. To see the others, you’ll need to install a commercial Photoshop plug-in called ProEXR, and that is why I prefer the next method!

Note: EXR files burn in any gamma correction as it assumes you’ll be using a linear workflow. If your image appears washed out in Photoshop, go to Image > Adjustments > Exposure, and set your Gamma to 0.454, which is the inverse of 2.2 (calculated by dividing 1.0 by 2.2).


Step 13

The second method (my preferred one) is to save all your elements out manually as .TGA files. I prefer TGAs to JPGs as they are 32-Bit, and can hold much more color Information than the normal 8-Bit JPG file. Another bonus is that they support having a built-in alpha channe.

Note: if you have never used the V-Ray Frame Buffer to render out elements before, you can find all of your elements in the top left drop down menu that says Diffuse by default.


Step 14

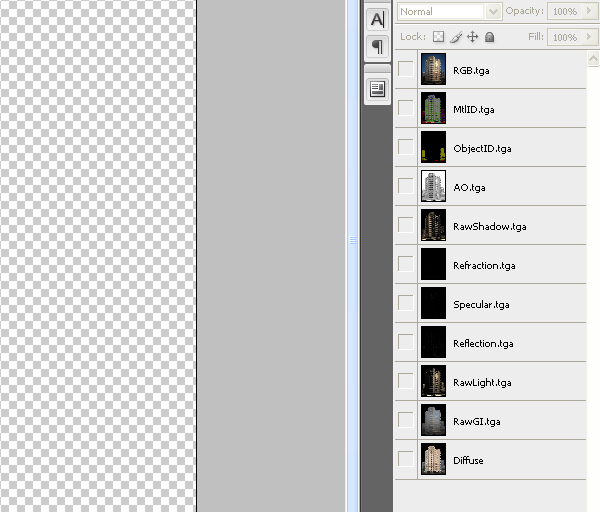
Now that you have finished our 3Ds Max and V-Ray Part, fire up Photoshop and let?s start playing! First a small tip to help you get all of the different files into layers in one Photoshop document. It is a script built into Photoshop that will stack your files as layers and arrange them in alphabetical order. Go to File > Scripts > Load Scripts as Stack, and then browse for your files, select them all and click Ok. Some people prefer bringing in the elements one at a time, however I do prefer this method myself.


Step 15

This is actually your first step in compositing! We’ll start by turning off the visibility on all layers except for the Z-Depth. Select all of the contents of this layer (Ctrl+A), copy them (Ctrl+C) and then switch to your Channels tab.
Some people prefer adding a little bit of Gaussian blur to their Z-Depth before using it, however as most of my clients hate DOF, thinking that it’s a needless loss of detail, I do not do this! In the end it is a matter of personal preference.


Step 16

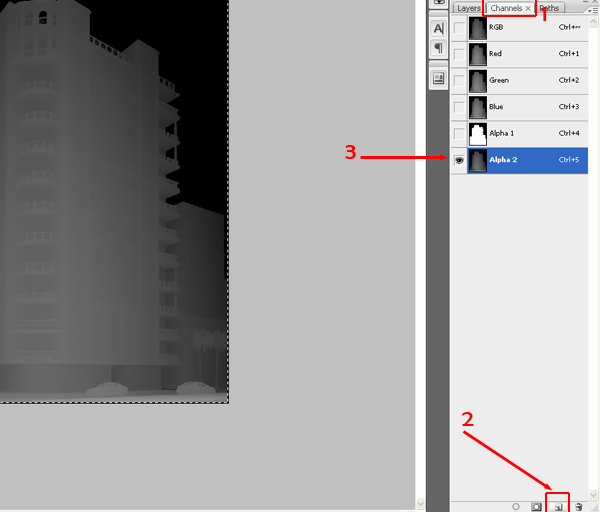
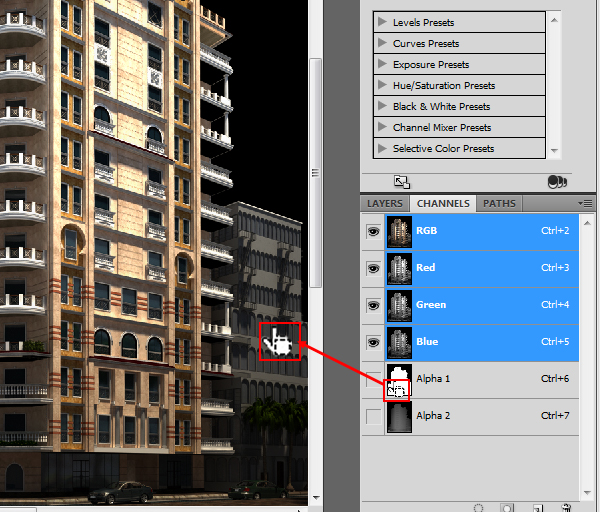
Once in the Channels tab, first check to see that your original Alpha layer is present. If it isn’t, open up the Diff.tga file seperately, switch to it’s Channels tab, and drag and drop the Alpha channel from there onto our Z-depth image – an Alpha1 channel should appear. You can then close the Diff.tga file.

Now, click the Create New Channel and paste your Zdepth render into it. You can then switch back to the Layers tab and delete your Z-Depth layer as we don?t need it anymore.


Step 17

To follow along with me in the next few steps, first arrange your layers in the order shown. The RGB layer at the top of the stack is the raw render, straight out of V-ray. I’ve kept it there so that we have something to compare to at the end.


Step 18

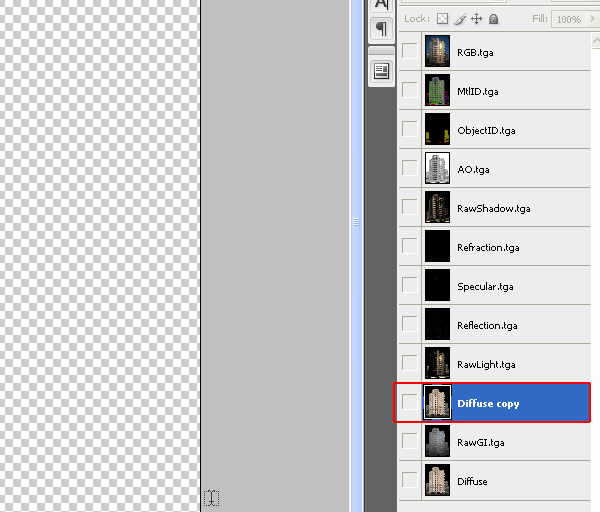
First, duplicate your Diffuse layer by right clicking it and choosing the Duplicate option, and then move the copy under your RawLight layer as shown.


Step 19

Turn on visibility for your Diffuse layer and your RawGI layer. Set your Raw GI blending mode to Multiply.


Step 20

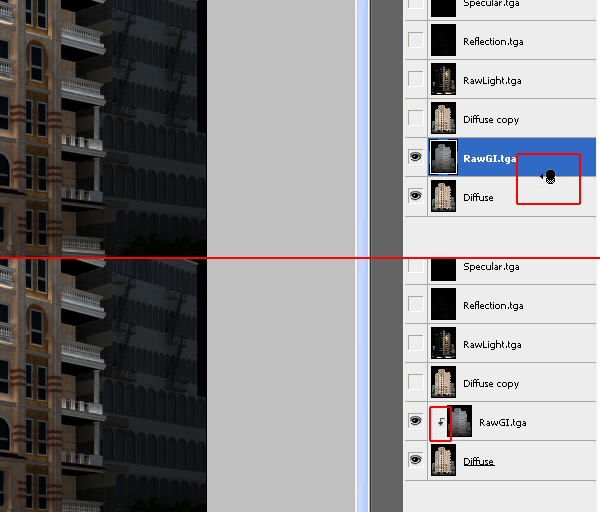
Next hold down the Alt key and click between you RawGI layer and your Diffuse layer (the cursor will change into this two circles and an arrow icon when you’re in the correct place). This little bent arrow that appears indicates that this layer (RawGI) is only affecting the Diffuse layer. This is called a clipping mask, and you can find out more about it using a simple online search. There are tons of tutorials out there!


Step 21

Using the same technique that you learned in the last two steps. Enable visibility for both ?Diffuse Copy? and RawLight. Set the blending mode for the RawLight Layer to Multiply then use it to only affect ?Diffuse Copy? layer (Alt+click between the two layers).


Step 22

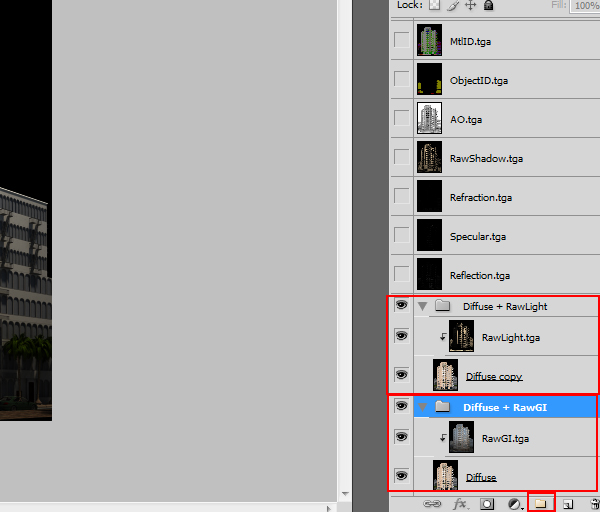
For the sake of better organization, group both the Diffuse & RawGI layers into a group, and the Diffuse Copy & RawLight layers into a different group. To create a group you can click on the small folder icon at the bottom right of your layers (I should say sorry for people who actually know all this basic stuff. I am just trying not to let anything pass by for beginners too!)


Step 23

Change the blending mode the of ?Diffuse + Raw Light? Group to Linear dodge (Add). This adds the information contained in this group to the information contained in the group ?below?. The image should start looking more natural now.


Step 24

At this point things look much better, but you may be asking yourself – ?why is my glass black?? Well, most of the glass? information in the final render is contained in the reflection and refraction passes, and we haven?t composed them just yet.

So, enable visibility for your Reflection Layer and set it’s blending mode to Linear Dodge (Add) and see the difference. One of the main benefits of having a composite like this is that, for example, on this reflection layer you can paint/paste in any reflection you want to appear in the windows.

Note: I should explain a little bit what linear Dodge (Add) blending mode does. It adds the color information of the pixels to each other. We know that for example Pure White is 255 and Pure Black is 0. So adding pure black adds 0 whilst adding pure white adds 255. Therefore, pure black (0) + pure white (255) = Pure white (255), Mid grey (125) + Mid grey (125) = White (250) and so on. That is why when you use this mode you no longer see any of your black, because it?s a zero-value color.


Step 25

To illustrate how easy it is to edit any of your elements (color correct it, adjust exposure, etc?) I will assume that I now want to change the reddish color of my stone texture. If we hadn’t used this multi-pass compositing method, we would have two options:

  1. Adjust the texture itself in Photoshop and then re-render, perhaps completing a dozen test renders before you were satisfied with the result, and could render a HQ render. This obviously takes a lot of time and patience!
  2. Using selection tools in Photoshop, we could select the texture and apply the desired corrections to it. The first problem with this is that selection is really a very tedious job, and when you come to add color corrections, you?’ll be affecting all of the image – your shadows and highlights will look odd and overall things won’?t look that good.

Step 26

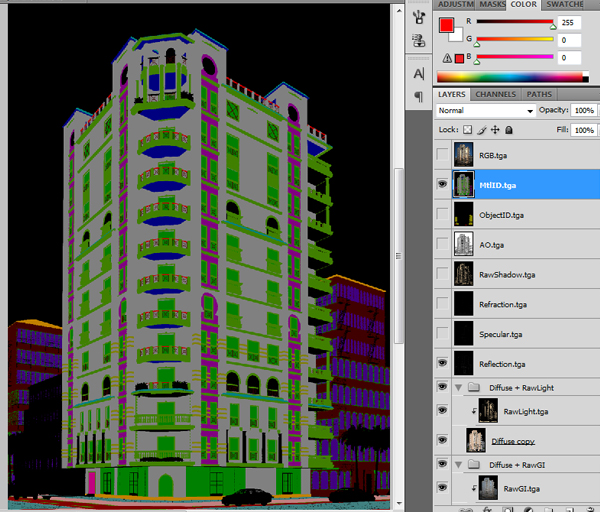
Well, remember that element called MtlID that we rendered out? It is time to enable that layer. The only use for this layer is to create MUCH faster selections with only a couple of mouse clicks. Using this layer we will easily select our stone texture in no time at all.


Step 27

With the layer selected, go to Select > Color Range. Then use the eye dropper tool to sample the magenta color on our materials layer that represents the ID of the stone texture. With that done, press OK and you have your selection.


Step 28

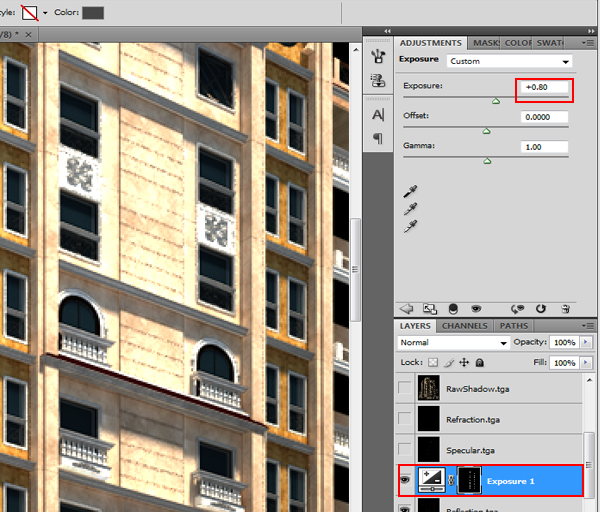
Now turn off the visibility of your MtlID layer. Then while keeping that selection active, add an Exposure adjustment layer. This will create the adjustment layer and automatically add a mask so that it only affects your Stone. It doesn?t matter where you have this layer now, we will move it later on.


Step 29

In the Exposure adjustment layer’s settings, set your Exposure to +0.80 to brighten it up a bit.


Step 30

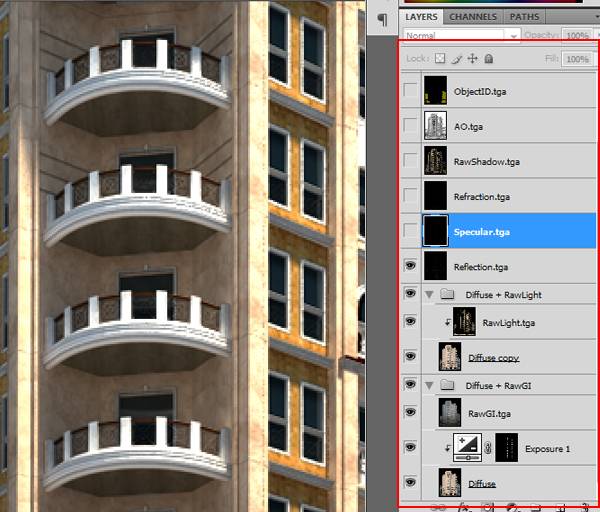
As we want this layer to affect our diffuse only, you will have to place it right above the Diffuse layer (remember that one inside the group?) Move it into position as shown and remember to Alt-click between the layers to make it only affect your Diffuse channels.

Just as a side note; whether you add it to your Diffuse layer or your ?Diffuse Copy? Layer shouldn?t make a difference at all. Some corrections might require you to place them on both Diffuse layers though, and it?s just a matter of trial and errors until till you fully understand it all.


Step 31

Take your Refraction layer one step down so that it sits right above your Reflection layer. Enable both and set their blending modes to Linear Dodge (Add). I’ve added another Exposure adjustment, with the Exposure value set to +0.80, to my Refraction layer as I wanted it to appear a little brighter.

Note: Editing the Refraction layer is one of the best ways to adjust the tint of clear glass in interior renders.


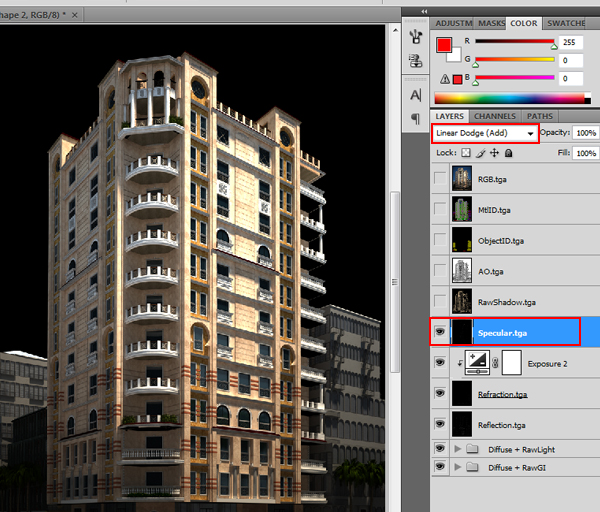
Step 32

Enable your Specular layer and once again change its blending mode to Linear Dodge (Add).


Step 33

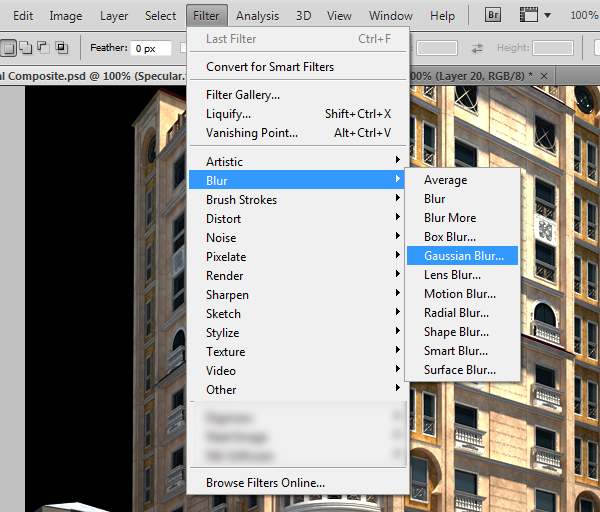
Duplicate your Specular layer (Ctrl+J) – notice it still has Linear dodge (Add) as its blending mode – and then with the copy selected, goto Filter > Blur > Gaussian blur.


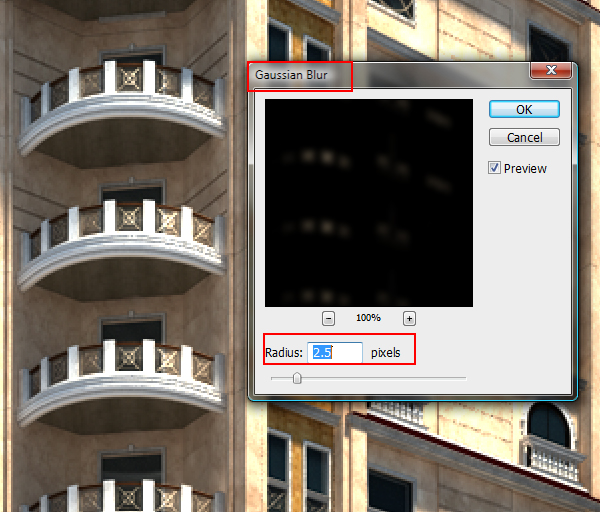
Step 34

Set your Gaussian Blur Radius to around 2.5 pixels and press OK. Set your layer Opacity to around 65%. This should help create a specular bloom effect around your specular highlights.

Note: These values are not constant numbers as they depend on your resolution, and of course your taste. Just don?t over-do it!

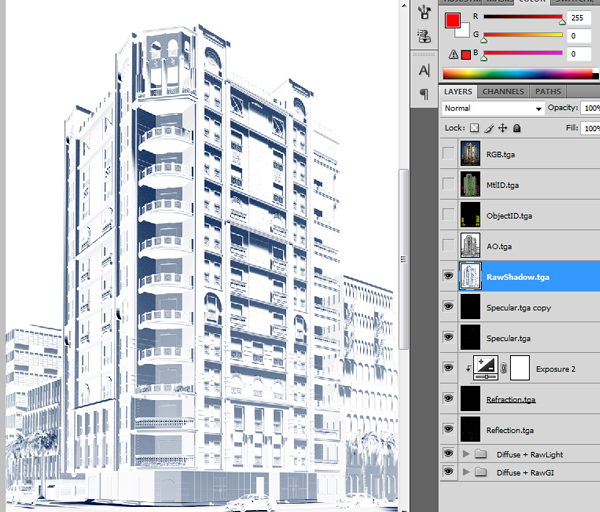
Step 35

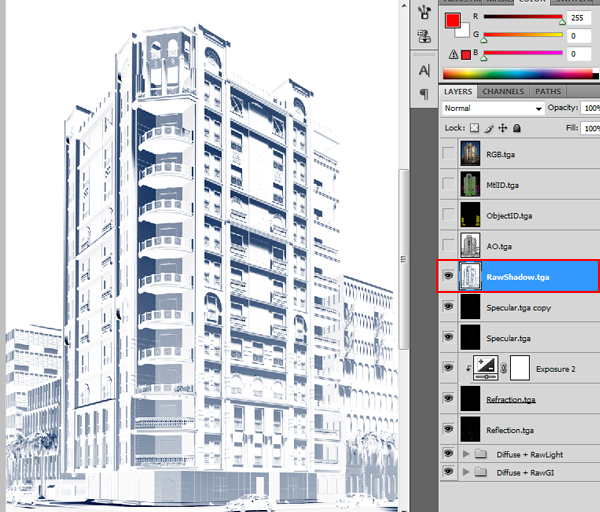
Enable your RawShadow Layer and invert it (Ctrl + I).


Step 36

You might be surprised that your shadows are bluish but this is in fact normal, they always are during the day because V-ray’s GI has a bright blue sky. Set your RawShadow layer’s blending mode to Multiply and it’s Opacity to around 20%.


Step 37

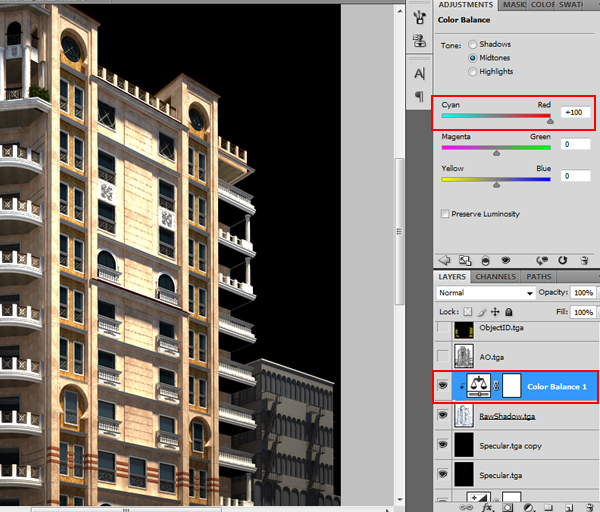
This step is not a must but I like enhancing my shadows a bit as it gives the image a bit more contrast. Add a ?Color Balance? adjustment layer, making it only affect the RawShadow layer, and with the Tones value set to Shadows, give your shadows a reddish tint. Set the opacity for this adjustment layer down to around 20%, although again, this is just a matter of personal preference.

In other scenes when I find my shadows a little too sharp for my taste, I add a small radius Gaussian blur filter to the shadow layer, which helps smooth out those hard edged shadows a lot.


Step 38

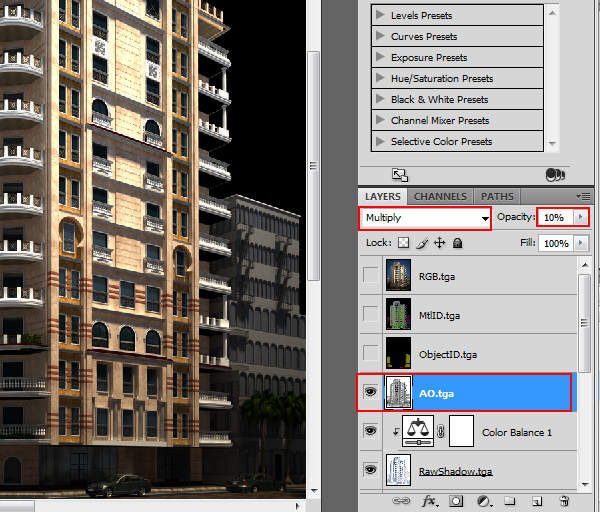
Now enable your Ambient Occlusion layer. Set its blending mode to Multiply and its Opacity to around 10%. Ambient Occlusion shouldn’?t be too obvious in your final render, as it just helps you enhance the look of the little details in your final image.


Step 39

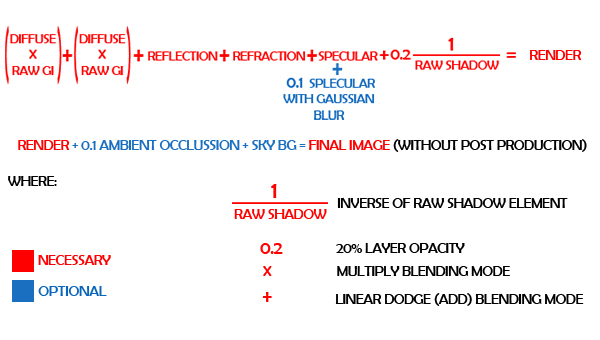
At this point, we are pretty much done with the compositing! To sum it all up here?’s a simple equation that I used until I memorised the different blending modes. If you follow it through, you’ll see it exactly matches what we’ve done in this tutorial!


Step 40

The only thing missing now is a sky with a few clouds, and that?’s what we are going to add next. You can also use a bluish gradient or, if you prefer, you can cut out the V-ray sky from your original render and paste it behind this image. To do any of these things however, we first need to access our alpha information.

Go to the Channels pane and Ctrl-click on your main alpha channel’?s thumbnail. This will make an automatic selection of your image ignoring any transparent pieces so that we can easily add in a background image.


Step 41

Invert your selection (Ctrl + Shift + I) so that we only have the sky background selected.

In my original render I used a cyan-ish gradient with some stock clouds. However as I don?t have the rights to redistribute those we will have to find another image. Using Google images search the words ?sky field? or clouds field or something similar. Set your search options to Large Images only so you get high resolution pictures only. I found this one on the first page.


Step 42

Save the image and open it in Photoshop. Select all of its contents (Ctrl + A), copy them (Ctrl + C), and as we still have that selection we made using our alpha, use Photoshop’?s command ?Paste Into? (Ctrl + Shift + V) command. This should automatically add a mask to our new sky layer. Rename this new layer something like Sky BG
.
Note: In Photoshop CS5 this shortcut changed to (Ctrl + Alt + Shift + V).


Step 43

Using Free transform (Ctrl + T) adjust the size of your sky until it fits the image. Remember to hold Shift while resizing to uniformly scale.

Then add a ?Color Balance? adjustment layer over your sky BG only (again using the clipping mask method) and play with the settings until you’re happy with the result. I liked mine with a bit of a cyan tint to it.


Step 44

We are now done with the compositing! Now I’m going to cover some post production tips like adding motion blur to cars, adding DOF using ZDepth, and adding chromatic aberration. You have come a really long way, so let’?s compare our composite to the original V-ray output (the RGB layer).

As you can see, apart from the skies, they both look extremely similar, the only difference being that in our composite, anything can be changed or tweaked without having to re-render anything.


Step 45

Now begins the fun part – post production! There are many different workflows for this part, it all just depends on your own personal preferences. I will be showing you some of the techniques I use, to help you get started.

First make sure you have the look of your render exactly how you want it. If you want to increase reflections or refractions, add more specular highlights, now is the time!

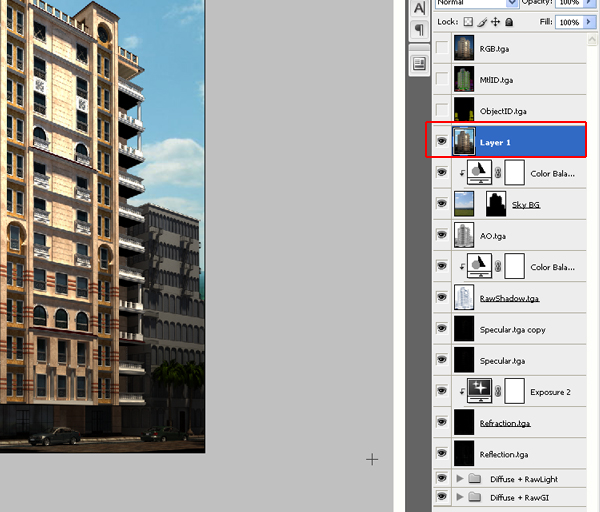
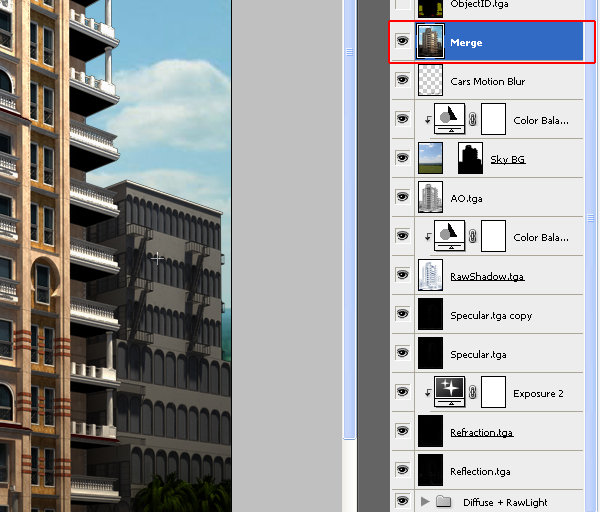
Now merge all your visible layers into one single layer by selecting the top-most visible layer and pressing Ctrl + Alt + Shift + E. This will paste a merged copy of all your layers into a new layer called ?Layer 1?.


Step 46

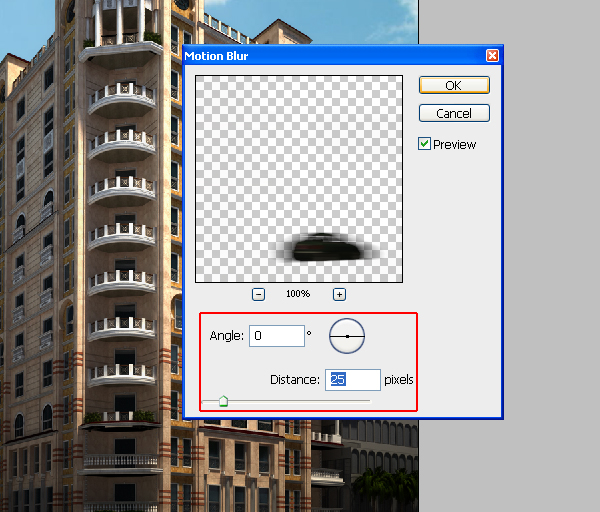
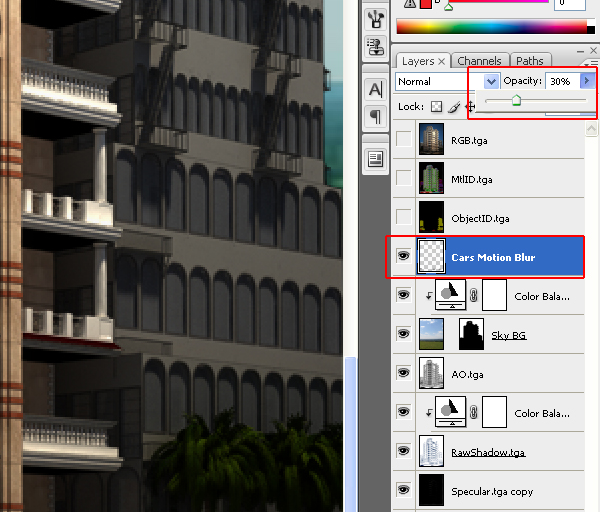
Making sure you’ve got the new Layer 1 selected, use the same ?select color range? technique we learned earlier (steps 26 & 27) but this time on the ?Object ID? layer, to select the cars.


Step 47

We want to create a new layer containing only the cars, and to do this we press Ctrl + J. Rename the new layer (initially called Layer 2) to ?Cars Motion Blur? then delete the merged ?Layer 1?.


Step 48

With the Cars Motion Blur layer selected, go to Filter > Blur > Motion Blur.


Step 49

Alter the direction of motion so that it matches the direction of the cars, and then choose a medium Distance (I used around 25 pixels). Click OK to finalise.


Step 50

Lower the Opacity of this layer to around 30%. The motion blur is complete!


Step 51

Now to add some chromatic aberration. Please be advised that CA is an effect that should be used as little as possible, as too much can cause your renders to look blurry and ugly. Before attempting to use this effect on your own renders I suggest you read more about this phenomenon, so that you know where and when CA should appear. When done right however, this effect can really enhance the realism of your picture.
Use the same shortcut as before (step 45) to merge your visible layers together, and rename this new layer ?Merge?.


Step 52

Making sure the Merge layer is selected, go to Filter > Distort > Lens Correction. We will use this filter again in a moment to add a vignette, so remember where to find it!


Step 53

Deselect Show Grid and then experiment with the values for ?Fix Red/Cyan Fringe? and ?Fix Blue/Yellow? Fringe (I used +5 & -5) until you get a suitable, subtle effect. Then set your Edge mode to Edge Extension to prevent your picture from having transparent edges, although if this issue is visible, you’ve likely set your values too high already!

Although this is the native way of adding CA in Photoshop, There are many other ways people use. Some people use three different layers with the red, green and blue data and shift them manually, other people use plug-ins. I decided to show you the native way as almost all the plug-ins are commercial.

Some of the greatest commercial plug-ins for photoshop post-production are ?Magic Bullet Photolooks?, 55 mm Digital Film Tools and Knoll Light Factory ?. One of my favorites is ?Nik Software: Color Efex Pro?. If you can afford these then by all means they are worth it, but if you can’t you now know how to add the effect manually!


Step 54

Now that you have completed your CA effect, it’s time to add some DOF. Remember that we pasted our ZDepth render element into a new ?channel? We will use that now! Start by going to Filter > Blur > Lens Blur.


Step 55

In Source choose your Zdepth channel (in my case Alpha 2) and enable the Invert checkbox. Radius controls the amount of blurriness, so experiment with that although don?t over-do it! I chose a radius of 4 and then pressed OK.

As a rule of thumb if a filter/effect is really noticeable, it is too much! (Unless of course it is some kind of an artistic approach). Maybe take some time to surf around in the CG forums and see how the pros use DOF in their images. Try to learn the best ways to add it in without hurting your own visualization. Also, remember that some clients hate DOF, so be careful with it!


Step 56

Another effect that looks really good on some pictures (and awful on others) is cross processing. Cross processing is basically playing with your color curves to achieve a more dramatic look. So add a Curves adjustment layer on top of your ?Merge? layer.


Step 57

Go to the Channel drop down menu in the adjustment layer, and adjust your curves individually by selecting them one at a time. Here’?s the Red channel curve that I used.


Step 58

Here?’s the Green channel curve.


Step 59

Finally, here?’s the Blue channel curve. Remember that this is just an example; hundreds of looks can be achieved with this method, and your curves will very likely vary from one shot to another depending on the look you’?re after.


Step 60

I felt the final effect of this adjustment was too much for my taste, so I decreased the Opacity of the adjustment layer to around 65%.


Step 61

The final step is to add a vignette to your render. Some people prefer adding a black layer with an oval shaped soft mask, however I actually prefer adding it using Magic Bullet Photolooks. For this tutorial, we’ll stick with the built-in tools, so let?s add it using the Lens Correction Filter.

First we have to merge our Merge layer with the Curves adjustment layer. To do that use the shortcut Ctrl + Alt + Shift + E as before, and then, with the new layer selected, go to Filter > Distort > Lens Correction.


Step 62

I used an Amount of ?-20? for this render, however it’s important that you don’?t over-do the vignette, as it just won’?t look that good!


Step 63

With that, your image is complete! I really hope you enjoyed this tutorial and learned at least a new trick or two. If you have any comments, questions or criticisms please go ahead and post in the comments below, and I’?ll be more than happy to answer you.


Don’t miss more CG tutorials and guides, published daily – subscribe to Cgtuts+ by RSS.

Are Work Friends Counterproductive?

A few years ago when I began working at a startup company, I made friends with several of my colleagues in the marketing and creative departments. We’d grab lunch together and occasionally meet up on the weekends or after work. I’d never been super-close with any of my coworkers before, so it was exciting to form such friendly bonds!

Having work buddies can make the workday pass more quickly and take the sting out of working late, but it can sometimes be a distraction. Plus, hanging out with coworkers after hours blurs the lines between your personal and professional life. In the case of my work posse, we got chastised a few times for taking longer lunches than we should (we were having so much fun chatting we lost track of time!).

Some career experts warn that being too chummy with friends at work also makes it less likely that you’ll be tapped for a promotion, because you may be seen as someone who’s serious about advancing their career (or you may subconsciously avoid any changes that would split up you and your work clique). Now that I’m working from home, I actually have the opposite of this problem: too few opportunities to interact with colleagues.

What’s your take on work friendships? Are work friends bad for your career?

Problem Solvers vs. Opportunity Creators

We all have different professions and titles, but ultimately we can be separated into two categories: problem solvers and opportunity creators. Those who work in areas like “operations” or “technical support” are quintessentially problem solvers. On the other hand, positions in “sales,” “sponsorship” or “marketing” are intrinsically opportunity creating efforts.

The two have a symbiotic relationship – neither can survive without the other. Either a plethora of problems or a lack of opportunities could sink a business.

The main difference between these two is one of visibility. A great team of problem solvers is rarely recognized, as a lack of problems can seem “normal” and even make those who solved all the problems seem unnecessary.

In contrast, opportunity creators are celebrated at every possible juncture. A successful sponsorship, contract or campaign is good news for everyone, so of course it should be celebrated. However, this can cause opportunity creators to appear more appreciated (or more valuable) than problems solvers.

They’re not.

Don’t get me wrong. As a purebred problem solver, I don’t want the spotlight. What am I going to say that warrants it?  I mean, this isn’t exactly going to set the world on fire:

“Today, our systems are working as expected. We’ve enabled you all to do you work.”

Although new opportunities “sound better” than solved problems, neither one is more valuable than the other. Problem solvers and opportunity creators are joined at the hip; they’ll sink or swim together.

Inspirational Quotes for Work

Do inspirational quotes affect your daily life? Do you surround yourself with them in your cubicle or work space? I have found that being constantly surrounded by quotes is something that helps me get by, especially when I’m not having a real motivating day. Inspirational quotes for work are, of course, just words. But if you heed what they have to say, they could aid you in your working and personal life.

“Stand up to your obstacles and do something about them. You will find that they haven’t half the strength that you think that they have.”

This one was actually introduced to me by my daughter. When I read this quote, I immediately think of a phobia that I had growing up which especially manifested itself when I was in high school. That phobia is the fear of public speaking. Who hasn’t experienced this phobia in their lives? If you haven’t, then you are in the minority. Being a former scientist, I oftentimes had to present my research in front of other scientists at national symposiums or seminars. I knew that I was not gifted in the way of articulation and I didn’t want to embarrass myself on the national stage, so to speak. So I turned to the international speaking group called Toastmasters International whose mission is to make effective oral communication a worldwide reality. Well, it worked for me. After joining and having to give organized speeches as well as extemporaneously speaking at each meeting, my skills progressed well enough that I was able to deliver an effective presentation. I looked at that obstacle in the eye and hit it head on. Recently, after years of being away from a Toastmasters club, I rejoined a local club near my work. I had almost forgotten how supportive fellow club members can be.

“When you change the way you look at things, the things you look at change.”

How true is the above quote? We affect how we think. No one else can control our thoughts. When I hear someone say “He made me sad” or “She got under my skin”, I say NO. You made yourself sad or upset. We are all responsible for our own thoughts and our own actions. Take responsibility for your own thoughts and your own actions. Turn around the way you look at things. A fundamental change in your thoughts could lead to a huge change in your life.

“Be impeccable with your word.”

Don Miguel Ruiz wrote a book entitled the “Four Agreements” and his 1st agreement is entitled “Be impeccable with your word.” If there is one thing that we all have in common it is that our words define us. We can control how we speak and what we say, just as we can control our thoughts. If we do not choose our words wisely then we will be judged by others according to those words. So it is imperative in our lives to think before we speak. At work, and in our personal lives, it is our words that represent us. Being careless and irresponsible with your words, can be disastrous. The common expression “Loose lips sink ships” is synonymous with the above quote. Being responsible in your verbal interaction is extremely important, not only in your work life, but in your personal life, as well.

“The Truly Educated never Graduate.”

If there is one quote that I tend to live my life by it is the above quote. I’m not sure of its origin as I saw it on a car, as a bumper sticker. I always try to learn something new every day, whether it be in my working life or otherwise. I know that this is the reason that I gravitate to non-fiction versus fiction. I don’t learn anything new by reading fiction. You cannot go wrong by learning something new. As an older worker, I am always concerned that a younger worker could be brought in to take my place. OK, I may be slightly paranoid, but I’ve seen it over and over again. They say they are having a layoff, but miraculously the position is supposedly abolished and then a young buck is hired who just happens to have the same job duties. How surprising is that? Being complacent in your job is dangerous. Open yourself up to the bleeding edge technologies. Immerse yourself in skills you do not yet know. Never graduate!

Inspiration can come from many sources. It’s up to you to use those words to make the positive changes that can benefit your life.

Do You Get More Done Working Alone or Around Others?

The idea of working all alone seems pretty tempting: nothing to distract your thinking process, no stress from the jerk on the cell phone.  Just quiet.

Too quiet.

Sometimes my mind gets distracted by the silence – I find myself wondering where everyone is.  So, like some other people who work from home I put on the television.  Sometimes that does the trick, but at other times I just really wish there were some people around.  Not co-workers, not people I know, but just (quiet) people as background noise.  I worked from a café the other day and I got so many things done, so many ideas just popped up in my mind.  The ambient noise was a catalyst of sorts.

What about you? Are you more productive at home, working alone, or when you’re around others?

Why Resumes and Cover Letters Still Matter

Some people think that in this high-tech day and age that resumes and cover letters are no longer necessary.  I believe they not only still have a place, but are important.

Why?

Doesn’t a LinkedIn profile tell you everything you need to know? Aren’t these pages relics of an old way of hiring that is becoming obsolete?  Can’t social networks serve the purpose that resumes and cover letters did?

Barbara Hart, a hiring consultant who runs Hire Well, says maybe – but insists on getting a cover letter and resume from every job candidate who wants to go through her. Here’s why:

  • Too Much Information: LinkedIn is the social network for business people but it still has information she doesn’t need. In fact some of what it reveals cannot be legally considered for hiring.
  • Hard to Compare: Social media profiles aren’t standard enough to compare candidates. Resumes and cover letters are boring in that way. But boring and standard allow comparison between candidates.
  • Not All Employers Are That Savvy: It may be 2010, but some human resource departments just still want to do it the way they always have done it. They’re the ones with the job that you want. Do you really want to tell them they’re doing it wrong?
  • Not Print-Friendly: Have you tried to print your LinkedIn profile? Human resources wants to print or copy your resume and pass it around to hiring managers. Even if you save it as an electronic document and e-mail it, it’s print ready for them.

When it comes down to it, who’s life are you trying to make easier? Yours or the hiring manager? Trust me, hiring managers like employees who are trying to make their lives easier.

Are You Truly Being Productive?

When you’re a productivity hound, you’re nearly considered a hero. You’re praised for your ability to do a ton of work in a day, and your productivity is exalted.

There’s a problem with being productive, though. Productivity is quantity-based, not quality-based. This means its purpose is simply to get things done – doesn’t matter what.

And while you might get lots of praise for being able to multitask like a ninja and move heaven and earth, the truth is that moving stuff around isn’t very useful.

Well, it is if your goal is just to get things done. But if your goal is to achieve more for your business, your productivity may just need to be revisited.

Think about it: What are you truly accomplishing by being productive? Where is your productivity getting you in life? You do lots in a day, but at the end of each one, are you closer to your business goals and dreams?

Or are you just crowing about how much you did, versus how much you’ve accomplished?

Accomplishment is important. It’s easy to lose focus on accomplishing larger goals when your eyes are glued to accomplishing small stuff. The result is that you mix up priorities, and your goal becomes producing in quantity versus producing quality.

Some people even end up working in a way that’s just about getting stuff done. Any work. Doesn’t matter what kind.

There’s no real prize for simply being productive, though. All it accomplishes is that you shovel lots of tasks from “to-do” to “done”. You don’t end up going anywhere with your business, because you’ve been so busy. It’s tough to go places when you’re stuck in one place, shovelling from one pile to another.

When you’re truly productive, you put your abilities to work in a way that helps bring you closer to where you want to be in life. You’re not just getting work done. You’re doing work that matters.

It’s about switching your focus from quantity to quality, and making sure that you use your productivity for a greater good: reaching your goals.

By reaching goals, I don’t just mean goals like completing 10 tasks every day or finishing three projects every week. I mean reaching goals like improving your business, creating more passive income, increasing revenues… the goals that get you a better life.

Being productive is just an ability. Use that ability to create results.

If you truly want to be productive, do more of what matters and less of what doesn’t. Before working on a task, ask yourself how completing that task helps get you closer to your goals. You might realize that a lot of items on your to-do list are just busywork, and getting them done doesn’t get you anywhere.

Of course, you do have to take care of day-by-day operations…but make sure that this day-to-day work keeps you out of a GTD rut and on the path of getting where you want to be.

You might be surprised how much faster you can reach your dream just by focusing your productivity in the right place!

Job Titles and Descriptions: Less is More?

Job titles were originally meant to succinctly describe a person’s basic duties in a few words. When you looked at someone’s business card or shook their hand in a meeting, their job title would give a general  (but clear) idea of their role within their organization.

Some titles have stayed true to this purpose, remaining concise and unpretentious, like “Software Developer,” or “Account Manager.” But others have grown more vague and grandiose, like “Senior Vice President of Partnerships and Marketing,” or “Solutions Architect and Change Management Lead.”

Indistinct job titles and descriptions may impress some people, but they also risk giving the impression that your organization is overstaffed and that you are one of the nonessential fringe-workers. If you can’t answer the question, “What do you do?” without resorting to intentional ambiguities, you’re going to sound more like a cornered, dodgy politician than a competent worker.

The truth is, any job can sound impressive and important if you craft a little complexity into the title. You could call a window washer a “Transparency-Enhancement Facilitator,” or give the title of “Media Distribution Specialist” to a paperboy, but it doesn’t change the nature of the work.  After a short conversation, their roles will be clear – regardless of their job title.

Is a long, vague job title a sign of ordinary, mundane work being embellished? Is it a sign of “bloat” in an organization? Or is it just part of the game?

Is It Lunch Theft?

You forgot to bring a lunch today, and you don’t have time to run out and get anything.  Time constraints aside, you also forgot your wallet.   You’ve got a long day ahead of you, with a client presentation in the afternoon. You need to get something in your system to stay on top of things.  There are a few lunches in the fridge, and they’ve been unclaimed for a little while.  What do you do?
  • Grab one of the unclaimed lunches.  Check to make sure the green parts are supposed to be green, and chow down.  They’re probably going to get thrown out later this week anyway – so where’s the harm?
  • Skip lunch – you can afford to miss a meal or two.
  • Find the owner of the best looking lunch, and beg them to share.
  • Send an email out to the team, asking everyone to give you part of their lunch.
  • “Accidentally” eat whichever one you want – even though the name is clearly on it.
  • Send the office intern out to get you a lunch, with your promise to pay them tomorrow.

Since I’ve experienced “lunch theft” on more than one occasion, I’m curious to know what you folks think.

What would you do?

How to Create an Engaging and Effective Bio Page

When building out your website or blog, one of the most important—and frustrating—tasks at hand is creating your bio page. We can write for days about our topic of expertise, but when it comes to writing about ourselves, it’s tempting to cower under the desk and hope the need will pass.

Your bio page, however, is arguably the most important page of your site. It’s where you define and contextualize yourself to an audience of strangers in a concise and accessible format—it’s your landing page, and it’s where a big chunk of your traffic will end up. Understandably, the fear of not getting it right can be paralyzing. But rather than being daunted by the blank page with no idea how to proceed, here are some questions and tips to help structure the creation of your bio page.

Before You Even Start Writing

  • The most important thing to do is to think about your audience. Your bio is not an exercise in self-esteem building for you; it is a tool for your audience to determine if your expertise and interests align with their needs. You want to signal to your reader early on if your bio is relevant to them.
  • Think about the impression you want people to have upon reading your bio and the action you want them to take. How can you craft a page that will shape these goals?

Writing About Yourself

  • The biggest goal your bio can accomplish is to communicate what makes you distinctive. Of all the people out there in your field, why should someone keep reading your bio? Do you have a prestigious award or ranking to your credit? Are you an innovator in a particular respect? Do you have an impressive product (e.g. a book) to your credit? Consider leading with what makes you special.
  • To that end, remain credible. The best way to do this is to make sure you remain specific. If you make a claim, back it up with the facts (via hyperlink, if necessary). For example, if you say your company is “award-winning,” clarify which award or hyperlink the term “award-winning” to the award announcement.
  • A bio is not a CV or a resume. While you may certainly summarize your professional history, you also want to give a sense of your professional philosophy, your areas of interest and expertise and your personality. Be human.
  • One of the best ways to be human is to tell a story. In this case, it’s your story. Consider all the things that make a story compelling. Engage your audience in the tale of how you became who you are, or how you do what you do. Even if it doesn’t end up published in that format, approaching your bio as a story may be a helpful exercise.
  • Remember, having someone read your bio page may be the beginning a relationship. This is where story and personality are critical, as those are some of the building blocks of relationships.
  • Incorporate some of your non-work life into your bio. If you are a triathlete, a Humane Society volunteer or a member of an improve comedy troupe, share it at the end of your bio. It adds another dimension to your personality and gives your audience a fuller sense of who you are.

Tone and Style

  • Third person vs. first person is a big debate when it comes to bios, but I don’t fall on one side of this argument. I think it will be different for each person, depending on goals, audience, tone and comfort level.
  • Be honest about your accomplishments without coming off as self-congratulatory. One of the easiest ways to do this is by watching your adjectives and adverbs. Your work and accomplishments should speak for themselves. You don’t want to call yourself the best, the most XYZed or the ABCiest in your field. A bio that reads as a giant pat on your own back will be a huge turnoff.
  • It may be tempting to try to be clever and humorous, but your first consideration should be your audience. Is this the tone you want to present? Depending on your line of work and the personality you want to convey, it may be very fitting. But unless you are skilled at that type of writing, it can be very difficult to pull off.
  • Make sure you keep your bio fresh. Schedule a quarterly, if not monthly, review into your personal calendar. As a failsafe, avoid phrases like “last month”; say “June 2010” instead. The reader may be encouraged by a bio that feels alive and current, but if it smells stale, they may bail on your site.
  • Use your words meaningfully. Don’t use words that mean little and say nothing concrete (e.g. “goal-driven”). Avoid jargon that may confuse or alienate people who are unfamiliar with its meaning.
  • Including a quote you feel is relevant to the way you think about your line of work can be a nice personal touch, but steer clear of an overused or generically inspirational quote. Depending on your audience, a song lyric may come off as trite. Avoid quoting a controversial figure who may polarize your audience or give an impression about you that may be inaccurate.
  • Seek honest feedback from a trusted friend or associate before publishing. It’s also a good idea to get a thorough copy edit for your bio (and any other page on your site) from a skilled editor. Even the most skilled writer and communicator needs a good editor.

Web Tips

  • Including an up-to-date photo with your bio page can draw people into the page and help them make a connection with you. Avoid using a random snapshot from your vacation or a camera phone shot and get a headshot or environmental portrait professionally taken. (The type of photo you want may depend on the nature of your work or the tone of your site.) The investment will pay dividends if other needs for a photo (e.g. a conference program) arise down the line.
  • Third-party reviews and recommendations can be powerful to feature on your bio page, be they from LinkedIn, Yelp or personally solicited from clients, customers or colleagues. Just be certain you are curating the positive comments and not drawing from a raw feed that may contain negative feedback—unless, of course, you want to provide a very open and accessible portal into what others think of you, but do so wisely. Relatedly, have you been quoted or referenced in an article or blog post? Either include those mentions here or link to them prominently.
  • Give people pathways to connect with you. Even if you have a contact page linked in your site navigation, link to it again here. Hyperlink any website or organization you mention; if you have a personalized page on that site (e.g. an author byline page), link to that. Include icons that link to your social media accounts (e.g. Twitter, LinkedIn) if applicable, but think twice before embedding your social media feeds on your bio page, as to avoid potential clutter.
  • Just as with any web content, make the text scannable with headers, bullets and paragraph breaks. Consider boldfacing key terms, but do so in moderation.
  • After you write your bio, consider aligning it with other bios you have on LinkedIn, other websites (such as Flavors.me), even Twitter. Of course, you may need to vary your bio depending on the context.
  • While it’s always important to keep search engine optimization (SEO) in mind while creating pages on your site, don’t err on the side of having your bio read like keyword bait as opposed to a personal summary.

Need more guidance? This questionnaire from Copylicious may provide some helpful direction, as might this analysis from the Content Marketing Institute on what makes a remarkable ‘about’ page.

What else have you found helpful when crafting a bio page?