Adobe Camera RAW for Beginners: Adjustment Brush-Part 1

In this video tutorial we will introduce you to the Adjustments Brush and put it to work. This tool can really help to improve certain types of photo, and is great fun to experiment with. You can control exposure, brightness, contrast, saturation, clarity and even color in very specific areas of a photo.


Watch the Video


What Does it Do?

The Adjustment Brush allows you to make subtle or drastic adjustments to a localized area of your photo. Think of it like painting on top of your photo except you can undo anything you change.

Feather: This controls how soft your brush is. The more feather you have the more gradual the edges of your brush will fade out.

Flow: This is how much “paint” is coming out on each pass of the brush. The more you go over the same area the greater the effect added.

Density: Think of this like a maximum cap. Set this to the highest setting that you would like to opacity to get and it will go no higher no matter how many times you go over the same spot.

We’re using another picture from photographer Dusan Simonovic to show how we can add subtle light to the hair and face as well as remove some of the shadow under our model’s eyes.

By just using the exposure setting and different flow and feather sizes on the brush we can add some nice highlight areas to the photo.

A word of reminder – while the brush can be very fun to play around with, don’t go overboard. Too many or too drastic of an adjustment can make the photo look horrible. Take it easy and go light on the adjustments. You can always start off strong and pull back the effect if you feel that it’s gone too far!

100 Action Packed Concert & Gig Photographs

Concerts provide a rich atmosphere for any artist. The sights, the sounds, the people and the excitement-charged atmosphere all come together to create unforgettable experiences. Today we’ll discuss how you can effectively capture these events using your DSLR, and also take a look at 100 photos that you can use as inspiration for your own live concert shoots!


Hints & Tips For Shooting Live Concerts

So you’re going to a concert and hoping to get a few good shots? Think again. Shooting a live concert can be one of the most difficult tasks for a photographer. Poor vantage points, dark rooms, wildly varying lighting conditions, unpredictable facial expressions and constant motion all stack the odds against your favor.

The key here is to use all of these cons in your favor and turn them into pros. For instance, use poor lighting to capture amazing silhouettes, your cheap seat in the back to grab sweeping shots of the arena and the constant motion of the artists to experiment with intentional blur. Think about what you’re experiencing and how to translate that artistically into an image without necessarily being too literal.

flickr pic

Some general tips for shooting under these constraints include keeping your ISO high and your aperture open. This will help you pull in as much light as possible. Battling this is going to be your need to keep your shutter speed as quick as possible to capture the ever moving subjects on the stage without too much blurring. You’ll have to experiment a lot with different combinations to see what works best in your specific venue.

Depending on where you’ll be sitting, you’ll definitely want to pack a lens with a hefty zoom and preferably one that will allow a fairly wide open aperture (just beware of a shallow DOF). If you can afford it, a 70-200mm f/2.8 should work brilliantly.

If there’s a light show wreaking havoc on your settings, consider shooting in AV so that the camera quickly adjusts the shutter speed based on its own readings. One last trick that you’ll see quite a bit from dark shoots: if you find that your images have too much color noise from cranking up your ISO, try converting them to black and white. What appears ugly and accidental in a color shot can often appear classy and deliberate in black and white.

Bottom line, just remember that it’s going to be extremely difficult to get anything amazing, even if you don’t normally have trouble producing stunning shots. Don’t expect to figure it all out right away or to walk out with hundreds of professional grade shots. Even many of the photos below are great in composition while suffering from noise or lighting issues (or vice versa). Try to have fun experimenting and learning about how your camera resounds to the environment.

Need some more advice? Here are a few great places to start:


100 Live Show and Concert Shots

AC DC Concert Stage (Montreal) – Colorful Lights

flickr pic

Coldplay Concert Stage (Osheaga 2009) with Fireworks & Butterflies

flickr pic

Bryan Adams Concert Stage

flickr pic

KISS Concert in Montreal – Kiss Alive 35 Tour

flickr pic

Van Halen Concert – Remote Controlled Helium Blimp

flickr pic

Beyonce Concert – BBC TVC – London

flickr pic

Franz Ferdinand Live Concert @AB Brussels Tour Gig-68

flickr pic

Beyoncé Concert

flickr pic

Britney Spears Concert – Sparks Falling on Stage

flickr pic

Glee- (Choir Concert Weekend, 05-06/02/2006)

flickr pic

Nazippé

flickr pic

Hands in the air – in concert

flickr pic

in Concert – blue

flickr pic

PJ Harvey

flickr pic

U2 – Croke Park – Dublin – 27 July 2009

flickr pic

Wygraj Sukces 2007 – Fram #1

flickr pic

To Excel and Ascend

flickr pic

Harmonica Hands

flickr pic

Sing it

flickr pic

guitar hero

flickr pic

The Flaming Lips Rock Austin @ SXSW

flickr pic

Unity in Diversity

flickr pic

Beautyproof

flickr pic

[Paper]tiger Jams {Explored}

flickr pic

Telefon Tel Aviv

flickr pic

Dir en grey

flickr pic

hives_01

flickr pic

Beastie Boys

flickr pic

Regina Spektor at Stubbs 2007–a black and white study

flickr pic

The Jazz Singer

flickr pic

Worship During Vertical Window’s Set

flickr pic

pipettes_04

flickr pic

Nx Zero

flickr pic

The Police Dress Rehersal – Vancouver

flickr pic

Arms Wide

flickr pic

david gilmour munchen 29/7/2006. 36 (B&W)

flickr pic

Anthony Green (Circa Survive)

flickr pic

placebo_03

flickr pic

26th 566

flickr pic

Charlotte Cooper of the Subways

flickr pic

U2 5/14/05 Philadelphia- City of Blinding Lights

flickr pic

Jonsi in Action

flickr pic

Chhom Nimol

flickr pic

Teemu Tuominen

flickr pic

Goggi, Popplagio

flickr pic

Vive La Fete @ Dour Festival 2009

flickr pic

Ra Ra Riot

flickr pic

siouxsie and the banshees_02

flickr pic

sonic youth_01

flickr pic

I’m no photographer…

flickr pic

Bloc Party @ The Concourse in San Francisco and cameras

flickr pic

taking back sunday_01

flickr pic

Antennen 2 (Schlachthof)

flickr pic

Bob Dylan That’s Right

flickr pic

shooting into the sun

flickr pic

The Donnas @ Rockefeller, Oslo

flickr pic

kind of blue

flickr pic

Maja Ivarsson :: The Sounds

flickr pic

Julian Casablancas

flickr pic

Mikko Salovaara

flickr pic

Eths (Festival Art Sonic 2008)

flickr pic

A Soul’s Expression

flickr pic

The Hague Jazz 2009 – Hugh Masekela

flickr pic

Deftones

flickr pic

Pitchfork Music Festival 2009

flickr pic

Parkpop 2008 – Jason Mraz

flickr pic

Return To Forever – 1976

flickr pic

Freddie Hubbard – trumpet

flickr pic

Kiuas

flickr pic

The Killers (37)

flickr pic

Katie Melua @ Tractor Tavern, Seattle 5-9-09

flickr pic

Picture perfect

flickr pic

The Avett Brothers

flickr pic

Violin

flickr pic

The Strokes (49)

flickr pic

Scorpions @ PPM Fest

flickr pic

Coldplay 16

flickr pic

My Bloody Valentine

flickr pic

Mankind

flickr pic

Zephyr in the sky at night I wonder

flickr pic

Leslie Feist/Cat’s Cradle

flickr pic

Blake Judd

flickr pic

moviestar junkies 05

flickr pic

david gilmour münchen 29/7/2006. 56

flickr pic

{ The Chap }

flickr pic

Ninja Dolls at Arenan, Falun

flickr pic

The Amazing Tim Swanson

flickr pic

Fresno

flickr pic

Ben Riley & Percy Heath

flickr pic

Nice Shirt

flickr pic

Scott Van Djembe

flickr pic

the hives – 10 – Pelle alone in the dark

flickr pic

Dag in de Branding 11 – Vic Chesnutt

flickr pic

“Contre-Jour Amour”

flickr pic

cesk freixas:avui serem el món

flickr pic

Damien Rice

flickr pic

oasis.gallagher.bros.001

flickr pic

Coldplay 39

flickr pic

Eagles Of Death Metal Concert @AB Gig Tour -51

flickr pic

Andre

flickr pic


Show Us Yours!

I hope the photos above inspire you to try your hand at shooting a few live performances. Once you get the hang of it, the resulting shots can be quite amazing and provide really unique portfolio pieces.

Use the comment section below to leave a link to your own live show and concert shots and be sure to let us know how you captured them!

Bonus points to anyone who can spot the author of this post in one of the images above!

New Premium Tutorial: All About the “Static” Keyword


Today, we are going to learn how to use the ’static’ keyword in PHP. We are going go over the basics and build some examples. It is time to add this interesting language feature to your web development bag of tricks. Become a Premium member today to see this and many other tutorials!


Join Net Premium

NETTUTS+ Screencasts and Bonus Tutorials

For those unfamiliar, the family of TUTS sites runs a premium membership service. For $9 per month, you gain access to exclusive premium tutorials, screencasts, and freebies from Nettuts+, Psdtuts+, Aetuts+, Audiotuts+, and Vectortuts+! For the price of a pizza, you’ll learn from some of the best minds in the business. Become a Premium member!

How to Create a Web Service in a Matter of Minutes


Offering your content or logic as a service on the web is a great idea. For starters it allows you to build numerous front-ends for your own information without having to access the databases all the time (and thus making scaling your system much easier).

The even more practical upshot is that you allow people on the web to play with your information and build things you never even dreamed of doing. A lot of companies understand that this “crowd-sourced innovation” is a freebie that is too good to miss which is why there are so many great APIs around.

Providing an API to the world is a totally different story though. You need to know how to scale your servers, you need to be there for answering questions by implementers, and you need to maintain a good documentation to allow people to use your content. You also need to think about a good caching strategy to keep your servers from blowing up and you need to find a way to limit access to your system to avoid people abusing it. Or do you?


Enter YQL

Yahoo offers a system for people to access their APIs called the Yahoo Query Language, or YQL. YQL is a SQL-style language that turns information on the web into virtual databases that can be queried by end users. So if you want to, for example, search the web for the term “elephant,” all you need to do is to use the following statement:

select * from search.web where query="elephant"

You send this statement to a data endpoint, and you get it back as either XML, JSON, or JSON-P. You can request more results, and you can filter them by defining what you want to get back:

http://query.yahooapis.com/v1/public/yql
?q={yql query}
&diagnostics={true|false}
&format={json|xml}
&callback={function name}

Mix and Match

All of Yahoo’s APIs are available through this interface, and you can mix and match services with sub-selections. For example, you could run a keyword analysis tool over the abstract of a web search to find relevant keyterms. Using the unique() functions, you can also easily remove false positives.

select * from search.termextract where context in (
  select abstract from search.web(50) where query="elephant")
| unique(field="Result")

See the results of this more complex query here.

Keywords extracted from the abstract of search results

The Console

The easiest way to play with YQL as a consumer is to use the console at http://developer.yahoo.com/yql/console/. There you can click on different tables to see a demo query how to use it and if you click the desc link you find out which options are available to you.


YQL Limits

The use of YQL has a few limits which are described in the documentation. In essence, you can access the open data endpoint 1,000 times in an hour, per IP. If you authenticate an application with oAuth, you get 10,000 hits an hour. Each application is allowed 100,000 hits a day.

This, and the caching of results that YQL does automatically means that the data does only get requested when it changed. This means that YQL is sort of a firewall for requests to the data people offer with it.

Be careful when using jQuery’s “$.getJSON,” and an anonymous function as its callback. This can bust YQL’s caching abilities, and hinder performance.


Building Web Services with Open Tables

The really cool thing for you as a provider is that YQL is open for other data providers.

If you want to offer an API to the world (or just have one for yourself internally) you can easily do that by writing an “open table” which is an XML schema pointing to a web service.

People do this a lot, which means that, if you click the “Show community tables” link in the YQL console, you will find that there are now 812 instead of 118 tables to play with (as of today – tomorrow there will probably be more).

To get your service into YQL and offer it to the world all you need to do is to point YQL to it. Let’s look at a simple example:


Real-World Application: Craigslist as an API

The free classified ad web site Craigslist has no public API – which is a shame, really. However, when you do a search on the site you will find that the search results have an RSS output – which is at least pointing towards API functionality. For example, when I search for “schwinn mountain bike” in San Francisco, the URL of the search would be:

http://sfbay.craigslist.co.uk/search/sss?format=rss&query=schwinn+mountain+bike

This can be changed into a URL with variables, with the variables being the location, the type of product you are looking for (which is the section of the site) and the query you searched for (in this case I wrapped the parameters in curly braces):

http://{location}.craigslist.co.uk/search/{type}?format=rss&query={query}

Once you found a pattern like this you can start writing your open table:

<?xml version="1.0" encoding="UTF-8"?>
<table xmlns="http://query.yahooapis.com/v1/schema/table.xsd">
  <meta>
    <author>Yahoo! Inc.</author>
    <documentationURL>http://craigslist.org/</documentationURL>
    <sampleQuery>select * from {table} where
    location="sfbay" and type="sss" and
    query="schwinn mountain bike"</sampleQuery>
    <description>Searches Craigslist.org</description>
  </meta>
  <bindings>
    <select itemPath="" produces="XML">
      <urls>
        <url>http://{location}.craigslist.org/search/{type}?format=rss</url>
      </urls>
      <inputs>
        <key id="location" type="xs:string" paramType="path" required="true" />
        <key id="type" type="xs:string" paramType="path" required="true" />
        <key id="query" type="xs:string" paramType="query" required="true" />
      </inputs>
    </select>
  </bindings>
</table>

For a full description of what all that means, you can check the YQL documentation on open tables but here is a quick walkthrough:

  1. You start with the XML prologue and a table element pointing to the schema for YQL open tables. This allows YQL to validate your table.
  2. You add a meta element with information about your table: the author, the URL of your documentation and a sample query. The sample query is the most important here, as this is what will show up in the query box of the YQL console when people click on your table name. It is the first step to using your API — so make it worth while. Show the parameters you offer and how to use them. The {table} part will be replaced with the name of the table.
  3. The bindings element shows what the table is connected to and what keys are expected in a query.
  4. You define the path and the type of the output in the select element – values for the type are XML or JSON and the path allows you only to return a certain section of the data returned from the URL you access.
  5. In the urls section, you define the URL endpoints of your service. In our case, this is the parameterised URL from earlier. YQL replaces the elements in curly braces with the information provided by the YQL user.
  6. In the inputs section, you define all the possible keys the end users can or should provide. Each key has an id, a paramType which is either path, if the parameter is a part of the URL path, or query, if it is to be added to the URL as a parameter. You define which keys are mandatory by setting the mandatory attribute to true.

And that is it! By putting together this XML document, you did the first of three steps to get your web services to be part of the YQL infrastructure. The next step is to tell YQL where your web service definition is. Simply upload the file to a server, for example http://isithackday.com/craigslist.search.xml. You then point YQL to the service by applying the use command:

use "http://isithackday.com/craigslist.search.xml" as cl;
select * from cl where location"sfbay" and type="sss" and query="playstation"

You can try this out and you’ll see that you now find playstations for sale in the San Francisco Bay Area. Neat, isn’t it?


Logic as a Service

Sometimes you have no web service at all, and all you want to do is offer a certain logic to the world. I found myself doing this very thing the other day. What I wanted to know is the distance between two places on Earth. For this, I needed to find the latitude and longitude of the places and then do very clever calculations. As I am a lazy person, I built on work that other people have done for me. In order to find the latitude and longitude of a certain place on Earth you can use the Yahoo Geo APIs. In YQL, you can do this with:

select * from geo.places(1) where text="paris"

Try this out yourself.

In order to find a function that calculates the distance between two places on Earth reliably, I spent a few minutes on Google and found Chris Veness’ implementation of the “Vincenty Inverse Solution of Geodesics on the Ellipsoid”.

YQL offers an executable block inside open tables which contains server-side JavaScript. Instead of simply returning the data from the service, you can use this to convert information before returning it. You can also do REST calls to other services and to YQL itself in these JavaScript blocks. And this is what I did:

<?xml version="1.0" encoding="UTF-8"?>
<table xmlns="http://query.yahooapis.com/v1/schema/table.xsd">
  <meta>
    <sampleQuery>
      select * from {table} where place1="london" and place2="paris"
    </sampleQuery>
    <author>Christian Heilmann</author>
    <documentationURL>

http://isithackday.com/hacks/geo/distance/

    </documentationURL>
    <description>
      Gives you the distance of two places on earth in miles or kilometers
    </description>
  </meta>
  <bindings>
    <select itemPath="" produces="XML">
      <inputs>
        <key id='place1' type='xs:string' paramType='variable'
             required="true" />
        <key id='place2' type='xs:string' paramType='variable'
             required="true" />
      </inputs>
      <execute><![CDATA[
        default xml namespace = "http://where.yahooapis.com/v1/schema.rng";
        var res = y.query("select * from geo.places(1) where text='" +
                          place1 + "'").results;
        var res2 = y.query("select * from geo.places(1) where text='" +
                           place2 + "'").results;
        var lat1 = res.place.centroid.latitude;
        var lon1 = res.place.centroid.longitude;
        var lat2 = res2.place.centroid.latitude;
        var lon2 = res2.place.centroid.longitude;
        var d = distVincenty(lat1,lon1,lat2,lon2);
        function distVincenty(lat1, lon1, lat2, lon2) {
          /* ... vincenty function... */
        var d = d / 1000;
        var miles = Math.round(d/1.609344);
        var kilometers = Math.round(d);
        response.object = <distance>
                            <miles>{miles}</miles>
                            <kilometers>{kilometers}</kilometers>
                            {res.place}
                            {res2.place}
                          </distance>;
      ]]></execute>
    </select>
  </bindings>
</table>
  1. The meta element is the same as any other open table.
  2. In the bindings we don’t have a URL to point to so we can omit that one. However, we now add an execute element which ensures that the keys defined will be sent to the JavaScript defined in this block.
  3. As the Geo API of Yahoo returns namespaced XML, we need to tell the JavaScript which namespace that is.
  4. I execute two YQL queries from the script using the y.query() method using the place1 and place2 parameters to get the locations of the two places. The .results after the method call makes sure I get the results. I store them in res and res2 respectively.
  5. I then get the latitude and longitude for each of the results and call the distVincenty() method.
  6. I divide the result by 1000 to get the kilometers and multiply the result with the right number to get the miles.
  7. I end the script part by defining a response.object which is what YQL will return. As this is server-side JavaScript with full E4X support all I need to write is the XML I want to return with the JavaScript variables I want to render out in curly braces.

Using this service and adding a bit of interface to it, I can now easily show the distance between Batman and Robin.

Showing the distance between two places on earth

Using server-side JavaScript you can not only convert data but also easily offer a service that only consists of calculations – much like Google Calculator does.


Turning an Editable Data Set into a Web Service

What you really want to do in most cases though is to allow people to edit the data that drives the web service in an easy fashion. Normally, we’d build a CMS, we’d train people on it, and spend a lot of time to get the data from the CMS onto the web to access it through YQL. It can be done easier though.

A few months ago, I released a web site called winterolympicsmedals.com which shows you all the information about the Winter Olympics over the years.

The data that drives the web site was released for free by The Guardian in the UK on their Data Blog as an Excel spreadsheet. In order to turn this into an editable data set, all I had to do was save a copy to my own Google Docs repository. You can reach that data here. Google Docs allows sharing of Spreadsheets on the web. By using “CSV” as the output format, I get a URL to access in YQL:

Sharing a spreadsheet in Google docs

And using YQL you can use CSV as a data source:

select * from csv where
url="http://spreadsheets.google.com/pub?
key=0AhphLklK1Ve4dHBXRGtJWk1abGVRYVJFZjQ5M3YxSnc &hl=en&output=csv"

See the result of that in your own browser.

As you can see, the CSV table automatically adds rows and columns to the XML output. In order to make that a more useful and filter-able web service, you can provide a columns list to rename the resulting XML elements:

select * from csv where url="http://spreadsheets.google.com/pub?
key=0AhphLklK1Ve4dHBXRGtJWk1abGVRYVJFZjQ5M3YxSnc&hl=en&output=csv" and
columns="year,city,sport,discipline,country,event,gender,type"

See the renamed columns in your browser.

This allows you to filter the information, which is exactly what I did to build winterolympicsmedals.com. For example to get all the gold medals from 1924 you’d do the following:

select * from csv where url="http://spreadsheets.google.com/pub?
key=0AhphLklK1Ve4dHBXRGtJWk1abGVRYVJFZjQ5M3YxSnc&hl=en&output=csv" and
columns="year,city,sport,discipline,country,event,gender,type"
and year="1924" and type="Gold"

See the gold medals of 1924 in your browser.

So you can use the free storage of Google and the free web service infrastructure to convert free data into a web service. All you need to do is create a nice interface for it.


Adding your Service to YQL’s Community Tables

Once you’ve defined your open table, you can use it by hosting it on your own server, or you can go full in by adding it to the YQL table repository. To do this, all it needs is for you to add it to the YQL tables repository at GitHub which can be found at http://github.com/yql/yql-tables/. Extensive help on how to use Git and GitHub can be found in their help section.

If you send a request to the YQL team to pull from your repository, they’ll test your table, and if all is fine with it, they’ll move it over to http://datatables.org/ which is the resource for the communities table in the YQL console.

This does not only make the life of other developers more interesting, but is also very good promotion for you. Instead of hoping to find developers to play with your data, you bring the data to where developers already look for it.


Advanced YQL Topics

This introduction can only scrape the surface of what you can do with YQL. If you check the documentation, you’ll find that, in addition to these “read” open tables, you can also set up some services that can be written to, and YQL also offers cloud storage of your information. Check the extensive YQL documentation for more.


Summary

Combining open systems like YQL and Google Docs, and some knowledge of XML and JavaScript, you can offer a web service to people in a matter of minutes. In any case, moving your development from accessing local files and databases to accessing services makes it much more versatile and allows you to switch providers any time in the future. With YQL, you can dip your toes into the water of web services without drowning as most of the tough work has already been done for you. Thanks for reading!


About the Author

Christian Heilmann is an international Developer Evangelist who works for the Yahoo Developer Network.


Three Steps to Fostering a User-Centered Design Culture


As responsible designers we must educate clients on the importance – both the validity as well as the viability – of the user-centered design process, one that gives due consideration to the needs of potential users. With the three steps that follow, we’ll go over techniques that you can use to get your team thinking about what’s really important with regards to the design of their websites you’ll help them create.


Shattering False Idols

Anyone who’s worked as a web designer or developer for a sizable length of time has had a client say “Hey, I’ve got a great idea for a website; can you help me build it?” While their enthusiasm is wonderful, this question is typically loaded with preconceptions (read: misconceptions). The process for creating a website is never as straightforward as even we would hope it to be.

It is with these projects that we must be most careful—the ones where clients seem to know exactly what they want. They probably have a particular layout in mind, perhaps some specific functionality that should be included. But more often than not, these images of perfection give little-to-no consideration for the users that will actually visit and use the final work product. What can we do with such steadfast clients?


Step One: Introduce Design Thinking

As with any collaborative endeavor, it is particularly important to ensure that all members of the team are fighting for the same goal. The earlier this is done, the better.

In effect, we want to move clients away from subjective goals (“I want it to look cleaner.”), towards measurable, objective ones (“I want it so clean that sales increase by 20%.”). By asking a few straightforward questions, you’ll find the design that client’s require isn’t littered with nearly as many obstacles.

To start the ball rolling, have your client jot down five things he wants his website to do for him (don’t be surprised when not-a-one of them has to do with end users). Next, inform clients how their goals will affect your design and development process.

Consider, too, forming an experience strategy.

An experience strategy is a clear set of experiential goals used to add cohesion to design and development endeavors. It should answer some fundamental questions, such as: What’s our eventual experience goal? Should user’s love our site? Should they feel that we’re really really good at something in particular? How should they feel about feature [x]?

Lastly, get a development strategy put in place. In formulating such a strategy, the questions you’ll address include:

What research and development methodologies work best for this project? What deliverables are best for any given stage of this project?

Although these questions are simple, they’re extremely important.

1

Suggested Reading


Step Two: Replace Bad Habits with Good Ones

Before hopping into sketching interfaces and pushing pixels, we must first ask the ever-important question: what do users need?

Remember: without user research, design is meaningless. Make sure your client knows this, too.

So, how do we answer such a question? Well, with design research. That’s how.

But you, the experience designer, already know this. The important part is getting the client and/or organization with which you’re working to understand why design research is so important, especially considering that they probably have some pretty bad design habits in place already.

Back in the old days, websites were born from functional specs—cold, heartless documents outlining every functional aspect of the website. Needless to say, this took users out of the development equation.

Utilize prototyping methods (such as sketching or storyboarding) and employ user-testing to show your client what kind of feedback they can expect from their new website. Once you tell him he’ll be saving both time and money by building his website with the results from your research findings, he won’t ever miss his functional spec.

Remember: without user research, design is meaningless. Make sure your client knows this, too. Providing even rudimentary research findings can help everyone on the team make informed decisions as we move our design process forward.

2

Suggested Reading


Step Three: Share the Wealth

Experience design is both a visual and physical process, so it clearly benefits from collaboration. As a designer, you likely have lots of research, wireframes, personas, and other deliverables filed away for the projects on which you’re working. Take them out and share them with your colleagues.

Foster a fertile environment for design growth.

Listen to their feedback and provide your own. Foster a fertile environment for design growth. Storyboarding is a great tool, introduced at Adaptive Path, for this kind of collaboration. Once previous design deliverables have been shared and passed about, team members collectively pitch design solutions to advance towards the aforementioned end goal. The final storyboard is yet another fantastic tool to prompt further conversation later on in the process.

Regardless of the specific techniques or deliverables that you employ, collaboratively working on and sharing user-centered design deliverables helps facilitate a shared design understanding amongst your entire team.

3

Suggested Reading


Moving Forward

In this article, we’ve explored three simple steps that you can follow to blaze the user-centered trail at your organization. Don’t take them the wrong way: these steps do not constitute some kind of magical collection of UX incantations; instead, they are merely illustrative of the way forward.

By drawing your project team’s attention towards the following aspects of design and development, your organization is much more likely to think about its challenges in holistic, user-driven fashion. The rest, as they say, is up to you.


Calling All Bleeding Edge HTML5 Devs


Hey, everyone. The next big category from our popular sister-coding-marketplace, CodeCanyon, will be for HTML5 “apps” — some might call them web stacks. This category will feature everything from advanced to-do lists with offline support, to advanced video, to presentation apps, to even games; all built with HTML5, CSS, and JavaScript.

I’m looking to commission some incredibly talented, cutting-edge developers to help me fill the category for launch. If this appeals to you, please leave a comment, or email sitemanager[AT]codecanyon.net to discuss things further. When you do, please include samples of your work, and, for bonus points, an item idea that you personally think will sell quite well in the community. This is a paid gig.

Why Wine and Macbooks Don’t Mix…and How to Handle the Aftermath


Ready for a revelation? A concept that you’ve never considered before? Well here it is: never ever, ever pour a glass of wine into your Macbook keyboard. Or, more practically put, be extremely careful when there’s a drink of any kind near your laptop. If a spill occurs, and you don’t act quickly enough, you’ll find yourself staring at a massive bill for a new logic board, hard-drive, battery, and anything in between.

Accidents do happen — so plan on it. What’s more important is that you learn exactly what to do when these spills inevitably occur.


Step 1. Don’t Freeze. Unplug!

Macbook Wine Spill

Ahhhh! The wife (meaning, you) accidentally spilled wine all over your keyboard. From personal experience, I can assure you that, for some odd reason, your first instinct with a massive computer spill is to freeze for five seconds or so, in shock. Don’t do this! Luckily Apple laptops are pretty helpful about automatically shutting down to prevent as many issues as possible before they happen. The more recent laptops even have liquid detection…though I’m certain that Apple is more interested in voiding your warranty than protecting you. For those uninformed, most laptop warranties do not cover spills.

Nonetheless, don’t waste a single second. Quickly unplug the computer, and shut it down.

The walls and carpet may have liquid on them as well, but ignore that. The computer is far more important right now.


Step 2. Flip that Sucka

Turn the laptop over to let the liquid drain

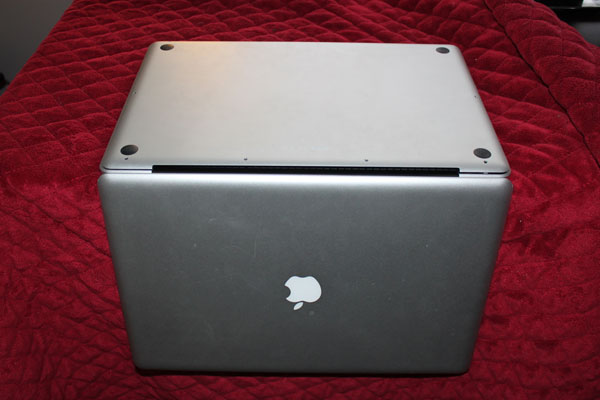
The next step, which should occur within seconds of beginning Step 1, is to flip the laptop upside down, into an L-shape. Gravity will then force as much liquid to drain out of the keyboard as possible. Make sure that you lay it on a towel so that it can soak up the liquid.

Let gravity do its job. Immediately flip the laptop into an L-shape.


Step 3. Open the Back

Unscrew the laptop to reveal the insides

Using a tiny screw driver, unscrew the back-side of your laptop. This will, of course, vary, depending upon which model you’re using. I’m sure you can figure it out.

Particularly on Macs, not all of the screws are the same size. Make a note of which screw goes where.


Step 4. Remove the Battery and Hard Drive

Remove the Macbook Pro battery

Before progressing, ensure your livelihood and touch some metal objects nearby to remove any potential static electricity from your body.

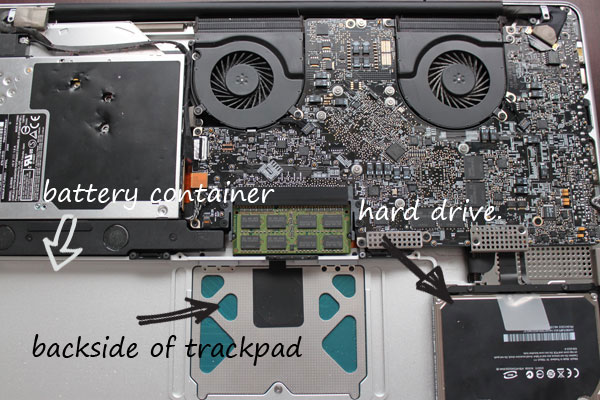
Needless to say, batteries and liquids — especially sugary, acidic liquids — don’t play nice together. Wherever yours is located on your laptop, remove it as quickly as possible. Next, get the hard drive out as well. We don’t want to risk any liquid seeping in, and corrupting your file system!

And now that you know how easy it is to remove a hard drive, don’t ever again pay a person to upgrade your hard drive. It only takes a moment to do yourself. ;)


Step 5. Dry the Insides

Clean the insides of the computer after a drink spill

With a paper towel of some sort, begin cleaning the insides of your computer. Depending upon how much liquid was spilled, this may either be a quick or lengthy process. For yours truly, it took around ten minutes to clean everything.

Some people prefer to use a hair dryer to clean the insides. This one is up to you; however, I’d encourage you to not do so. Play it safe and use a towel. We don’t want to risk frying the insides.


Step 6. Rubbing Alcohol and Cotton

Clean the insides with a cotton swab

Next, we need to continue removing as much sugar and acid as possible from the logic board. Otherwise, over time, it can begin to corrode the wiring. Yeah, this isn’t good!

Using rubbing alcohol and a cotton swab, begin dabbing any stained areas — but be gentle. If you have access to the backside of your keyboard, clean that area as well. Unfortunately, on the newer Macbook Pro models, it’s extremely difficult to access this section. With past models, it was quite easy to remove the keyboard entirely, for cleaning purposes. Unfortunately, that’s no longer the case.

Rubbing alcohol will help dissolve any remaining acid or sugar on the logic board.


Step 7. Leave it Alone

Leave the computer off for 3-5 days after a spill

Anxiety is a dangerous thing. Resist the urge to determine whether or not you’ve destroyed your laptop, and keep it off for a minimum of 72-120 hours (3-5 days). This will allow any remaining liquid to dry/evaporate first. Make sure that, while its drying, you keep the battery outside of the computer. This is mostly a precaution.

Keep the computer off for 3-5 days — no questions asked. Do not turn it on during this window.


Step 8. Cross Your Fingers

Cross your fingers

After 72-120 hours, reconnect the battery, screw everything back in, cross your fingers, say a prayer, and turn on the computer. Particularly if you’re using a new Macbook Pro (2009+ models), you’ve done everything you can do. With hope, and more often than not, it’ll chime, and start-up like a charm. However, if the battery is dead, or the hard drive is corrupted, you’re next best option is to take it in for official repair. Of course, this will somewhat depend upon how skilled you are, when working under the hood.


About the Author

Jeffrey Way — me…yes, I’m speaking in third person — recently committed a Cardinal Sin, and caused a massive wine spill into his Macbook Pro. Had he not followed these exact steps, he’d be forking over another life savings for a new Mac. Luckily, that was not the case.

Thanks for reading. Should the same ever happen to you, I hope this guide will help a bit!

Data maintenance / customer service- computer sales website by HectorXu

I am looking for a professional(not a company) to work with us as a virtual assistant on a variety of projects and tasks. Candidates should meet the following requirements: Work 8 hours a day (Monday to Friday) online and that time should exclude anything that is not related to work… (Budget: $250-750, Jobs: BPO, Customer Support, eBay, Logistics & Shipping, Virtual Assistant)