In this tut, we will be exploring the wonder that is SWFAddress, discussing why your site should have deep linking, and the processes involved in implementing deep linking in your Flash projects.
This website is XML driven. Also we shall be looking at SWFAddress’s built in functions and how they are used to create the final result. Enjoy!
Check out the demo above in a new window. Notice how your browser’s URL changes as you navigate through the mini-site.
Step 1: Why use Deep Linking?
Deep linking is a great way to structure a website and also is great way to structure code.
Deep linking is basically giving the user a chance to link to a certain area of a Flash movie through a simple URL.
For example if you wanted to show a portfolio to a client and you gave them the link to a Flash website without deep linking. Well their guess is as good as yours where to find that content within the SWF. But with deep linking you can link to any content in a Flash movie — for example: website.com/#/portfolio/section_3. This may seem a complex task but it isn’t with SWFAddress deep linking.
Deep linking has other benefits (for example, SEO) and it basically turns a boring Flash movie into an expandable application.
Step 2: Getting Prepared
You will need for this tut: Caurina Tweener, SWFAddress for AS3, SWFObject.
You’ll also need main.html from the Source download.
Step 3: Import, #include, what??
If you have previous experience with swfaddress, you may have come in contact with this issue. You have tried to use the import directive to use swfaddress or if that failed you tried #include 'SWFAddress.as'. Well the truth is you don’t have to do anything at all.
All you need to do is put the SWFAddress.as file where your swf is and swfaddress is automatically available for actionscript.
Step 4: File Structure
Create an empty main.fla. (I would normally write code in external as files but I think all the code in one place is better understood).
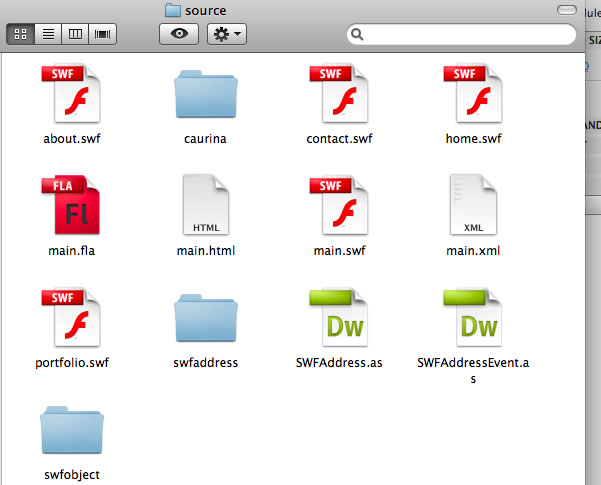
From the SWFaddress download get the swfobject and swfaddress folders and place them in the main folder. If you are having trouble finding these just download them from the source at the top of the page.
And of course get the SWFAddress.as and SWFAddressEvent.as and place them in the main folder. They are also in the Source download if you are having trouble finding them.
Download the source and copy main.html to the main folder.
Step 5: Create Four SWFs
Create 4 dummy SWFs; for example, SWFs with some random text in them, each with a different title and color of font. There are four random ones included in the Source download.
Step 6: Create the XML File
<?xml version="1.0" encoding="UTF-8"?>
<xml>
	<menu>
		<item item_name = "Home" item_module = "home.swf" />
		<item item_name = "About" item_module = "about.swf" />
		<item item_name = "Portfolio" item_module = "portfolio.swf" />
		<item item_name = "Contact" item_module = "contact.swf" />
	</menu>
</xml>
Call it main.xml. We will use xml to store our data. Now we have created the xml file we will start the good stuff, coding…
Step 7: Create the Menu Array
Below is the code required to load the xml menu in Flash. The comments in the code guide you through the process.
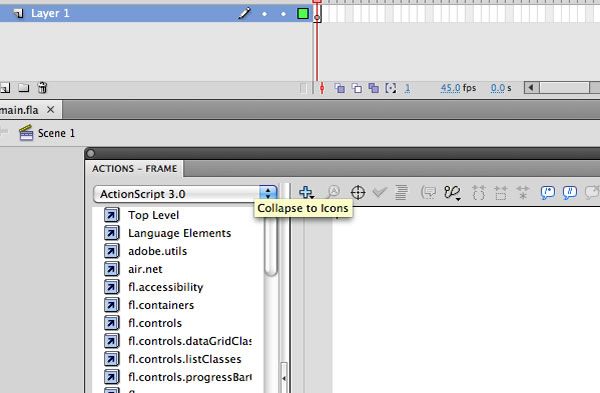
Go to frame 1, Layer 1 in the main .fla file you created earlier.
Add this code. It’s well-commented to help you understand what it does.
// set stage settings

var fileStage:Stage = this.stage;
fileStage.scaleMode =  StageScaleMode.NO_SCALE;
fileStage.align = StageAlign.TOP_LEFT;

// import caurina tweener

import caurina.transitions.Tweener;

// main timeline object

var index:Object = this;

// New Xml Object

var fileXml:XML;

// check how many menu items we have.

var totalMenuItems:Number;

// New URL Request - Add a COMPLETE event listener to load the site once the XML load has been completed.

var xmlLoader:URLLoader = new URLLoader(new URLRequest ("main.xml"));
xmlLoader.addEventListener(Event.COMPLETE, createSite);

function createSite (e:Event):void {

// store the xml file in our xml variable

	fileXml = new XML(e.target.data);

// use a constructor function to use the xml

	index.createMainMenu(fileXml.menu);

}

function createMainMenu(xmlData:XMLList):void {

	// create the length of our menu

	index.totalMenuItems = xmlData.*.length();

	// create a movie clip with the instance name menu_clip and add it to the stage.

	// then use a <code>for</code> loop to create our menu

	for (var i:uint = 0; i < index.totalMenuItems; i++) {

		/*
		create a movieclip and export for actionscript with the class name: menuItem
		it should contain one dynamic textbox with the instance name of menu_item_text.
		*/

		// create our new menu item

		var menu_item:menuItem = new menuItem();

		// set the identification

		menu_item.id = i;
		menu_item.name = "id" + i;

		// position our menu items dynamically

		menu_item.x = (i * menu_item.width);

		// add the xml values to the text box inside the new item.

		menu_item.menu_item_text.text = xmlData.item.@item_name[i];

		// add the module address to the menu variable / It will come in useful later.

		menu_item.item_module = xmlData.item.@item_module[i];

		/*
		create a new layer and place the menu_clip movieclip onto that layer.
		Give it an instance name of menu_clip
		*/

		// add each menu item to the menu_clip movieclip using addChild()

		index.menu_clip.addChild(menu_item);

	}

}
Step 8: Create Button Actions
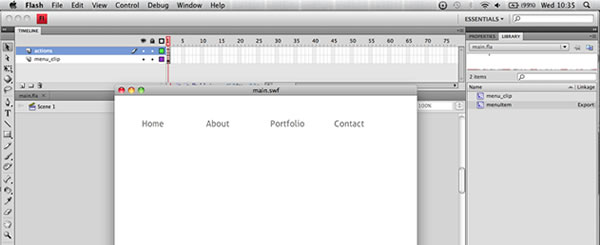
This is what our site should look like now:
So let’s continue by giving button events. The code below should be placed on line 78 on frame 1 actions layer just above the addchild method we used.
	// assign events to menu buttons.

	// rollover & rollout effects

	menu_item.addEventListener(MouseEvent.MOUSE_OVER, menuRollOver);
	menu_item.addEventListener(MouseEvent.MOUSE_OUT, menuRollOut);
	menu_item.addEventListener(MouseEvent.MOUSE_DOWN, menuPress);
Add the functions below to handle these events below the createMainMenu function:
function menuRollOver (e:MouseEvent) {

	// menu button variable - We use getChildByName to aim at the correct menu item

	// e.target.id is referring to the menu_item.id we defined earlier.

	var button:MovieClip = index.menu_clip.getChildByName("id" + e.target.id) as MovieClip;

	// set the animation usign caurina tweener

	Tweener.addTween( button, {alpha: 0.5, time: 2, transition:"easeOutExpo"});

}

function menuRollOut (e:MouseEvent) {

	// menu button variable - We use getChildByName to aim at the correct menu item

	// e.target.id is referring to the menu_item.id we defined earlier.

	var button:MovieClip = index.menu_clip.getChildByName("id" + e.target.id) as MovieClip;

	// set the animation using caurina tweener

	Tweener.addTween( button, {alpha: 1, time: 2, transition:"easeOutExpo"});

}

function menuPress (e:MouseEvent) {

	// SWFAddress set value function

	SWFAddress.setValue(e.target.deep_link);

}
Step 9: SWFAddress on Change Function
This is the main event that handles all the swfaddress changes. It is where we will apply our application logic in order for our site to work. Let’s have a look at the main function in detail.
function handleSWFAddress(e:SWFAddressEvent) {

	/*
	set html title names
	*/

	var htmlTitle:String= "XML Deep linking Tutorial";
	for (var i:Number = 0; i < e.pathNames.length; i++) {
		htmlTitle+=' / '+String(e.pathNames[i].substr(0,1).toUpperCase()+e.pathNames[i].substr(1)).split("_").join(" ");
	}

	/*

	To format the HTML title we use the split and join techniques.
	These replace _ with a space. We make it a string to ensure it is useable, like so:

	String(e.pathNames[i].substr(0,1).toUpperCase()+e.pathNames[i].substr(1)).split("_").join(" ");

	*/

	// this function does all the work and  assigns the HTML title

	SWFAddress.setTitle(htmlTitle);

}

// when the SWFAddress.setValue() is fired this event listens for it and inits the function above.

SWFAddress.addEventListener(SWFAddressEvent.CHANGE, handleSWFAddress);
Step 10: setValue() Explanation
SWFAddress.setValue(“somevalue”);
When this event is fired — for example when someone presses the button — the swfaddress value is set and triggers the onChange() listener. Therefore in order to create our modules to load we need to create some code inside the swfAddress onChange() listener.
Step 11: Events Function
Now we are going back up to our menu for loop. We need to add an additonal variable that contains a function:
// Place this code in our <code>for</code> loop below the addEventListeners

		/*
		this variable contains a function that will contain the events when the swfaddress in changed.
		*/

		menu_item.init = function () {

			/*
			create a new movieclip and call it module_clip, then place it on a new layer then give it
			the instance name of module_clip
			*/

			// new variable that has contains the path of the swf we are loading in.

			var module:String = this.item_module;

			// fade out our current module if any, then commence the load of our new module using the tweener's onComplete function

			Tweener.addTween( index.module_clip, {alpha: 0, time: 2, transition:"easeOutExpo", onComplete:function ()
				{

					index.createModule(module);

					// remove the previous module only if it isn't the first load

					if (index.firstLoad == false) {

						index.module_clip.removeChildAt(0);

					}

				}
			});

		}
Step 12: Creating the Module Function
Before we look at the swfaddress events, we will create the module to load the module in. It is complete with I/O error handling. It is good practice to handle errors when you can.
// At the top of the actionscript place this:

var firstLoad:Boolean = true; // prevents null errors
This is the module function. The comments guide you through the process.
function createModule (url:String) {

	// we create a new loader

    var loader:Loader = new Loader();

	// we create a new url request for our loader

    var moduleURL:URLRequest = new URLRequest(url);

	// we add event listeners to the loader. some are not necessary but I included them for convenience

    loader.contentLoaderInfo.addEventListener(ProgressEvent.PROGRESS, loadProgress);

	// when the module has loaded we trigger loadComplete() with a event listener.

    loader.contentLoaderInfo.addEventListener(Event.COMPLETE, loadComplete);
    loader.contentLoaderInfo.addEventListener(IOErrorEvent.IO_ERROR, loadError);
    loader.load(moduleURL);

    function loadProgress (e:ProgressEvent) {

    }

	// triggered when module has loaded

    function loadComplete (e:Event) {

		// fade in the module

		Tweener.addTween( index.module_clip, {alpha: 1, time: 2, transition:"easeOutExpo"});

		// add the current module to the module_clip movieclip by using addChild

		index.module_clip.addChild(e.currentTarget.content);

		// now we have the first load we set firstLoad to false. It then remains false for the whole session.

		index.firstLoad = false;

    }

    function loadError (e:Event) {

        trace("error");

    }
}
Step 13: Summary
To recap: We have created the menu, created the function that will occur when SWFAddress.setValue() is triggered but we still need to create our application logic. What I mean by application logic is how we are going to use swfAddress to load in certain parts of our application.
Step 14: Creating the Deep Link
Let’s go back to our menu for loop and define the deep link there. Below where we set the menu_item.name place this code. This code creates the deep link value:
// set the menu item deep link plus formatting with split and join. toLowerCase() makes every character lowercase.
menu_item.deep_link = xmlData.item.@item_name[i].split(" ").join("_").split("/").join("_").toLowerCase();
Its use will become clear very soon.
Step 15: Application Logic
Now let’s go back to our function that handles swfaddress events: handleSWFAddress
We now need a certain part of code that will load the correct module. The code below shows you how to apply the correct logic in order for the application to load the correct module. The comments guide you through the process. The new part of this function starts at the creating the for loop.
// function to handle swfaddress events.
function handleSWFAddress(e:SWFAddressEvent) {

	/*
	set html title names
	*/

	var htmlTitle:String= "XML Deep linking Tutorial";
	for (var i:Number = 0; i < e.pathNames.length; i++) {
		htmlTitle+=' / '+String(e.pathNames[i].substr(0,1).toUpperCase()+e.pathNames[i].substr(1)).split("_").join(" ");
	}

	/*

	To format the HTML title we use the split() and join() techniques.
	These replace _ with a space. We make it a string to ensure it is useable, like so:
	String(e.pathNames[i].substr(0,1).toUpperCase()+e.pathNames[i].substr(1)).split("_").join(" ");

	*/

	// this function does all the work and  assigns the HTML title

	SWFAddress.setTitle(htmlTitle);

	// create a <code>for</code> loop to iterate through the total number of menu items. use index.totalMenuitems to do so.

	/*
	You may be wondering why I am using n instead of i in the <code>for</code> loop. Well if there are two <code>for</code> loops in the same function
	and both loops are iterating through the variable i it throws an error. Using n or another var solves this error.
	*/

	for (var n:uint = 0;  n < index.totalMenuItems; n++) {

		// this var is used to iterate through all our menu items

		var button:MovieClip = index.menu_clip.getChildByName("id"+ n) as MovieClip;

		// the if statement below is the most important part of our code.

		// SWFAddress.getValue() is explained in the next step

		// we need to get rid of the "/" on the front in order for it to equal the button's deep link

		if (button.deep_link == SWFAddress.getValue().split("/")[1]) {

			// if any of button deep links equal the URL set then it initiates the menu_item.init function we set earlier

			button.init();

			// to stop the code we use return.

			return;

		}
	}
}

SWFAddress.addEventListener(SWFAddressEvent.CHANGE, handleSWFAddress);
Step 16: SWFAddress.getValue()
SWFAddress.getValue() is a great way to test your deep linking site without web server. The best way to test your deep linking using SWFAddress.getValue() is to use the trace function. For example:
trace(SWFAddress.getValue());
This will trace the current swfAddress value in the output.
Step 17: Loading the First Menu Item
Why on earth wouldn’t you want to load the first menu item? There’s no good reason, therefore I will show you how to do it. Go to the handleSWFAddress() function and drag it into the createMainMenu() function below all the previous code. Add this code below the second for loop (the one we just created):
// this var is referenced to the first menu item
var firstButton:MovieClip = index.menu_clip.getChildByName("id" + 0) as MovieClip;

// use the dispatch event to fire the press event on the first button. This then sets the deep link. The swfAddress on change listener function inits.
// Therefore the <code>for</code> loop above will load the first module.
firstButton.dispatchEvent( new MouseEvent(MouseEvent.MOUSE_DOWN));
Step 18: Extra Enhancements
We are now going to apply validation to the menu as gift for reading this tut. 
Go up to the menu_item.init function in the menu for loop.
for (var i:uint = 0; i < index.totalMenuItems; i++) {

	var button:MovieClip = index.menu_clip.getChildByName("id" + i) as MovieClip;

	if( button != this ) {

		button.enabled = true;
		button.addEventListener(MouseEvent.MOUSE_OUT, menuRollOut);
		button.dispatchEvent(new MouseEvent(MouseEvent.MOUSE_OUT));

	} else {

		button.enabled = false;
		button.dispatchEvent(new MouseEvent(MouseEvent.MOUSE_OVER));
		button.removeEventListener(MouseEvent.MOUSE_OUT, menuRollOut);

	}
}
Step 19: Troubleshooting
OK! Now we should have a working project. But don’t throw a party just yet. Check the following things:
- You have completed every step.
- DO NOT PUBLISH the SWF, just export the movie otherwise you will override the main.html document you obtained from the Source download.
- Make sure you have imported all the necessary imports. Well all the imports are necessary without just one the whole thing would not function properly.
- Make sure the handleSWFAddress() function is in the createMainMenu() function.
Step 20: What does main.html do?
Let’s take a look at main.html:
<html xmlns="http://www.w3.org/1999/xhtml" xml:lang="en" lang="en">
    <head>
        <title></title>
        <meta http-equiv="Content-Type" content="text/html; charset=utf-8" />
        <style type="text/css">
        /*<![CDATA[*/
            html, body, #website {
                height: 100%;
                overflow: hidden;
            }
            body {
                background: #f7f7f7;
                font: 86% Arial, "Helvetica Neue", sans-serif;
                margin: 0;
            }
        /*]]>*/
        </style>
        <script type="text/javascript" src="swfobject/swfobject.js"></script>
        <script type="text/javascript" src="swfaddress/swfaddress.js"></script>
        <script type="text/javascript">
        /*<![CDATA[*/
            swfobject.embedSWF('main.swf', 'website', '100%', '100%', '9',
                'swfobject/expressinstall.swf', {domain: '*'}, {allowscriptaccess: 'always', allowfullscreen: 'true', bgcolor: '#f7f7f7', menu: 'false', wmode: 'opaque'}, {id: 'website'});
        /*]]>*/
        </script>
    </head>
    <body>
        <div id="website">
            <p>In order to view this page you need Flash Player 9+ support!</p>
            <p>
                <a href="http://www.adobe.com/go/getflashplayer">
                    <img src="http://www.adobe.com/images/shared/download_buttons/get_flash_player.gif" alt="Get Adobe Flash player" />
                </a>
            </p>
        </div>
    </body>
</html>
A lot of that is just styling the file, changing the background color, positioning the SWF, things like that. Here are the key lines:
<html xmlns="http://www.w3.org/1999/xhtml" xml:lang="en" lang="en">
    <head>
        <script type="text/javascript" src="swfobject/swfobject.js"></script>
        <script type="text/javascript" src="swfaddress/swfaddress.js"></script>
        <script type="text/javascript">
        /*<![CDATA[*/
            swfobject.embedSWF('main.swf', 'website', '100%', '100%', '9',
                'swfobject/expressinstall.swf', {domain: '*'}, {allowscriptaccess: 'always', allowfullscreen: 'true', bgcolor: '#f7f7f7', menu: 'false', wmode: 'opaque'}, {id: 'website'});
        /*]]>*/
        </script>
    </head>
    <body>
        <div id="website">
        </div>
    </body>
</html>
This includes the SWFObject and SWFAddress JavaScript files, and uses SWFObject to load main.swf in the div element called “website”. That’s all there is to it! Check out this screencast for an intro to SWFObject.
Step 20: The Whole Code Commented
Below is the whole code commented and working.
// set stage settings

var fileStage:Stage=this.stage;
fileStage.scaleMode=StageScaleMode.NO_SCALE;
fileStage.align=StageAlign.TOP_LEFT;

// import caurina tweener

import caurina.transitions.Tweener;

// main timeline object

var index:Object=this;

// New Xml Object

var fileXml:XML;

// check how many menu items we have.

var totalMenuItems:Number;

// prevents null errors

var firstLoad:Boolean = true;

// New URL Request - Add a complete event listener to load the site once the load has been completed.

var xmlLoader:URLLoader = new URLLoader();
xmlLoader.load (new URLRequest("main.xml"));
xmlLoader.addEventListener( Event.COMPLETE, createSite);

function createSite(e:Event) {

    // store the xml file in our xml variable

    fileXml=new XML(e.target.data);

    // use a constructor function to use the xml

    index.createMainMenu(fileXml.menu);

}

function createMainMenu(xmlData:XMLList) {

    // create the length of our menu

    index.totalMenuItems=xmlData.*.length();

    // create a movie clip with the instance name menu_clip and add it to the stage.

    // then use a <code>for</code> loop to create our menu

    for (var i:uint = 0; i < index.totalMenuItems; i++) {

        /*
        create a movieclip and export for actionscript with the class name: menuItem
        it should contain one dynamic textbox with the instance name of menu_item_text.
        */

        // create our new menu item

        var menu_item:menuItem = new menuItem();

        // set the identification

        menu_item.name="id"+i;
        menu_item.id=i;

        // set the menu item deep link plus formatting with split and join. toLowerCase() makes every character lowercase

        menu_item.deep_link = xmlData.item.@item_name[i].split(" ").join("_").split("/").join("_").toLowerCase();

        // give it a button cursor & make the target the button and not its children

        menu_item.buttonMode=true;
        menu_item.mouseChildren=false;

        // position our menu items dynamically

        menu_item.x = (i * menu_item.width);

        // add the xml values to the text box inside the new item.

        menu_item.menu_item_text.text=xmlData.item.@item_name[i];

        // add the module address to the menu variable / It will come in useful later.

        menu_item.item_module=xmlData.item.@item_module[i];

        /*
        create a new layer and place the menu_clip movieclip onto that layer.
        Give it an instance name of menu_clip
        */

        // assign events to menu buttons. place the functions to handle these events below the createMainMenu function

        // rollover & rollout effects

        menu_item.addEventListener(MouseEvent.MOUSE_OVER, menuRollOver);
        menu_item.addEventListener(MouseEvent.MOUSE_OUT, menuRollOut);
        menu_item.addEventListener(MouseEvent.MOUSE_DOWN, menuPress);

        /*
        this variable contains a function that will contain the events when the swfaddress in changed.
        */

        menu_item.init = function () {

            /*
            create a new movieclip and call it module_clip, then place it on a new layer then give it
            the instance name of module_clip
            */

            // new variable that has contains the path of the swf we are loading in.

            var module:String = this.item_module;

            // fade out our current module if any, then commence the load of our new module using the tweener's onComplete function

            Tweener.addTween( index.module_clip, {alpha: 0, time: 2, transition:"easeOutExpo", onComplete:function () {

                    index.createModule(module);

                    if (index.firstLoad == false) {

                        index.module_clip.removeChildAt(0);

                    }

            }});

            for (var i:uint = 0; i < index.totalMenuItems; i++) {

                var button:MovieClip = index.menu_clip.getChildByName("id" + i) as MovieClip;

                if( button != this ) {

                    button.enabled = true;
                    button.addEventListener(MouseEvent.MOUSE_OUT, menuRollOut);
                    button.dispatchEvent(new MouseEvent(MouseEvent.MOUSE_OUT));

                    } else {

                    button.enabled = false;
                    button.dispatchEvent(new MouseEvent(MouseEvent.MOUSE_OVER));
                    button.removeEventListener(MouseEvent.MOUSE_OUT, menuRollOut);

                }
            }
        }

        // add each menu item to the menu_clip movieclip using addChild()

        index.menu_clip.addChild(menu_item);

    }

    // function to handle swfaddress events.

    function handleSWFAddress(e:SWFAddressEvent) {

        /*
        set html title names
        */

        var htmlTitle:String= "XML Deep linking Tutorial";
        for (var i:Number = 0; i < e.pathNames.length; i++) {
            htmlTitle+=' / '+String(e.pathNames[i].substr(0,1).toUpperCase()+e.pathNames[i].substr(1)).split("_").join(" ");
        }

        /*

        to format the html title we use the split and join technique. It replaces _ with a space. We make it a string to ensure it is useable.

        String(e.pathNames[i].substr(0,1).toUpperCase()+e.pathNames[i].substr(1)).split("_").join(" ");

        */

        // this function does all the work and assigns the html title

        SWFAddress.setTitle(htmlTitle);

        // create a <code>for</code> loop to iterate through the total number fo menu items. hence we use index.totalMenuitems to do so.

        /*
        You may be wondering why I am using n instead of i in the <code>for</code> loop. Well Adobe failed to realise that if there are two <code>for</code> loops in the same function
        and both loops are iterating through the variable i it throws an error. Using n or another var solves this error.
        */

        for (var n:uint = 0; n < index.totalMenuItems; n++) {

            // this var is used to iterate through all our menu items

            // this var is referenced to the first menu item

            var button:MovieClip = index.menu_clip.getChildByName("id"+ n) as MovieClip;

            // the if statement below is the most important part of our code.

            // SWFAddress.getValue() is explained in the next step

            // we need to get rid of the "/" on the front in order for it to equal the button's deep link

            if (button.deep_link == SWFAddress.getValue().split("/")[1]) {

                // if any of button deep links equal the URL set then it initiates the menu_item.init function we set earlier

                button.init();

                // to stop the code we use return.

                return;

            }
        }

        var firstButton:MovieClip = index.menu_clip.getChildByName("id" + 0) as MovieClip;

        // use the dispatch event to fire the press event on the first button. This then sets the deep link.

        // Therefore the <code>for</code> loop above will load the first module.

        firstButton.dispatchEvent( new MouseEvent(MouseEvent.MOUSE_DOWN));

    }

    SWFAddress.addEventListener(SWFAddressEvent.CHANGE, handleSWFAddress);

}

function menuRollOver(e:MouseEvent) {

    // menu button variable - We use getChildByName to aim at the correct menu item

    // e.target.id is referring to the menu_item.id we defined earlier.

    var button:MovieClip=index.menu_clip.getChildByName("id"+e.target.id) as MovieClip;

    // set the animation using caurina tweener

    Tweener.addTween( button, {alpha: 0.5, time: 2, transition:"easeOutExpo"});

}

function menuRollOut(e:MouseEvent) {

    // menu button variable - We use getChildByName to aim at the correct menu item

    // e.target.id is referring to the menu_item.id we defined earlier.

    var button:MovieClip=index.menu_clip.getChildByName("id"+e.target.id) as MovieClip;

    // set the animation using caurina tweener

    Tweener.addTween( button, {alpha: 1, time: 2, transition:"easeOutExpo"});

}

function menuPress(e:MouseEvent) {

    // SWFAddress set value function

    SWFAddress.setValue(e.target.deep_link);

}

/*
this is the function that loads the selected module
*/

function createModule (url:String) {

    // we create a new loader

    var loader:Loader = new Loader();

    // we create a new url request for our loader

    var moduleURL:URLRequest = new URLRequest(url);

    // we add event listeners to the loader. some are not necessary but I included them for convenience

    loader.contentLoaderInfo.addEventListener(ProgressEvent.PROGRESS, loadProgress);

    // when the module has loaded we trigger the complete with a event listener.

    loader.contentLoaderInfo.addEventListener(Event.COMPLETE, loadComplete);
    loader.contentLoaderInfo.addEventListener(IOErrorEvent.IO_ERROR, loadError);
    loader.load(moduleURL);

    function loadProgress (e:ProgressEvent) {

    }

    // triggered when module has loaded

    function loadComplete (e:Event) {

        // fade in the module

        Tweener.addTween( index.module_clip, {alpha: 1, time: 2, transition:"easeOutExpo"});

        // add the current module to the module_clip movieclip by using addChild

        index.module_clip.addChild(e.currentTarget.content);

        // now we have the first load we set firstLoad to false

        index.firstLoad = false;

    }

    function loadError (e:Event) {

        trace("error");

    }
}
Conclusion
Thanks for reading this tut. If you have any questions or problems leave them below. By now you should understand how to build a deep linking website without needing to understand how a dynamic website should be coded.