I need 2 animated banner ads to promote a adult dating website. I need ads that will stand out and have a high click through rate. The sizes I need are 300×250 and 728×90. I am looking for a person… (Budget: $30-250, Jobs: Banner Design, Photoshop)
Put Out Realistic Candle Smoke
In this tutorial we’ll be going into Tracode Particular’s settings to generate a smoke like result that has a realistic movement wisping through the air. There are lots of Particular tutorials available, but this guy has some really practical uses.
Tutorial
Download Tutorial .flv
File size 74MB
Software Assisted Illustration in the Form of Information Visualization
Thinking about illustration inevitably calls to mind images of pencils and sketchpads and an analog, old-school creative process. There’s a certain charm to hand-drawn images, an intimate bridge between artist and page. But the digital age has brought its own magnetism to the illustrative process, liberating artists to do more than they ever could before and offering an entirely new platform for self-expression.
Continue reading “Software Assisted Illustration in the Form of Information Visualization”
Quick Tip: Additive Graphic Syles
Illustrator’s built–in Additive Graphic Styles are a quick way to add transform effects to objects. This little known little known feature can be used in many ways, from improving work-flow to adding creative flair. Learn more at the jump.
Inspiration: 75 Superb Examples of Bottle Packaging
Packaging design is a specialized area of graphic design, one that carries its own guidelines and best practices. The goal of a package is to make the product stand out among its competition, and better compete in the marketplace. Package design projects might consist of something as basic as a label to a complete packaging solution, with custom materials.
Continue reading “Inspiration: 75 Superb Examples of Bottle Packaging”
Quick Tip: Generating Random Patches With The ES2 In Logic
The ES2 is a great workhorse synth. It’s also capable of creating some of the strangest sounds ever using the ‘Randomize’ feature.
Sometimes the best things that happen in a studio are by mistake. You press the wrong button or trip over your lead and smash your guitar and a magical sound is born! The ES2 ‘Randomize’ feature is just like this but it’s cheaper than having your guitars neck glued back together! Here’s a quick tip on how it works.
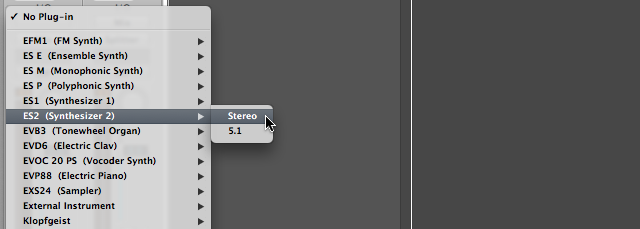
Step 1 – Create An ES2
Start a new project (I think we’ve covered this!) with a Software Instrument track. Load in an ES2 synth.
Step 2 – Initiate the Synth
In the presets list go to Tutorial Settings and load in the ‘Saw Wave Init’ patch. This is just a blank canvas and is usually a good place to start new sounds from.

Step 3 – The ‘Randomizer’ Section.
Just below the filter section you’ll find a set of controls for randomizing parameters on the ES2.

Step 4 – Select Parameters
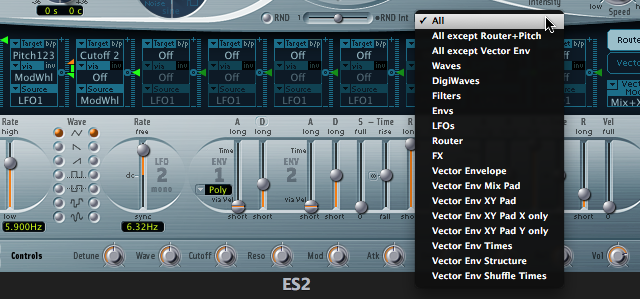
On the far right you’ll see a drop down that says ‘All’. Click on the menu and you’ll see a list of parameters you can target for randomization. If for instance you only wanted to randomize the filter section you’d choose ‘Filters’. All other setting would remain intact. We’re going to choose ‘All’ of course!
Step 5 – Randomize Amount
The middle slider is the Randomization amount. If you only want some subtle changes choose a low value. Set the slider around half way for now.

Step 6 – Randomize That Patch!
The final setting is the actual Randomize button which is marked ‘RND’. Go on, Press it!

Here’s the initial sound we started with. It’s just a saw wave.
Here it is after the randomization.
Download audio file (First.mp3)
Not too far off the initial saw wave. Your version will sound totally different as it is after all ‘Random’.
Step 7 – Randomize it Some More!
Pressing the Random button again will give you another variation based on the current setting. You may want to keep hitting it till you find something you like. Here’s the sound after a few randomizations.
Download audio file (Second.mp3)
We’ve now got some crazy sci-fi effect happening.
Step 8 – Now Really Randomize It!
If you want to go really crazy turn the slider up to 100%.

Now we get something totally crazy! Keep on going with this and see what you get!
Download audio file (Third.mp3)
A word of warning. Some of the sounds that the ES2 comes up with are pretty fierce! It may be a good idea to lower the channels volume to avoid any hearing loss!
Conclusion
The shear number of weird and wonderful sounds that can be made by this are unlimited. As a creative tool this can be used for all manner of things from FX and Transitions to samples that form the bases for other instruments, like in an EXS24 maybe.
Make sure you save any sound you like in the presets list. It’s possible to build quite an enormous library of sounds you could never actually stumble upon otherwise. You can start from scratch or use a preexisting sound from the Library as a starting point.
There are a couple of other synths that use this feature as well. Most notably is Native Instruments ‘Absynth 5′. The ‘Mutate’ function is a great way to generate randomization’s in patches.

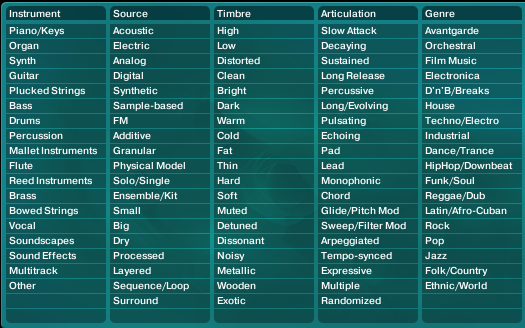
It even goes one step further by allowing you to choose what kind of sound you would like it to mutate into by choosing characteristics from the browser library. Pretty smart!
Till the next time!
Making the Most of Match EQ
In this week’s Audio Premium content, Ryan Leach teaches you how to quickly improve the sound of your tracks with Match EQ. While the screenshots for this tutorial are taken in Logic Pro, the content is not Logic-centric and is equally useful and valuable in any software that deals with sequenced music.
To learn more about what you get as part of Audio Premium, read this.
One of the more interesting plugins that comes pre-packaged with Logic Pro is Match EQ. Match EQ lets you “copy” the frequency spectrum, or fingerprint, of a source track and apply that spectrum to a target track. It essentially compares what your song sounds like to the source and compensates for the difference, hence the name “match”. The most common and practical use of Match EQ is for mastering a final mix, but it can also be an extremely useful tool for bringing out individual instruments and even for new or special effects. In this tutorial we’ll discuss how to get started using Match EQ and look at a few different ways you can use the basic features to put it to use.
Table of Contents
- Why Use Match EQ?
- Some Basic Guidelines
- Source
- Current Track
- Adjusting Settings
- For Mastering
- Using a Source Track
- Default Settings
- For Single Instruments and Sections
- For Effects
- Conclusion
Existing Premium members can log-in and download. Not a Plus member? Join now.
Quick Tip: Colorize a Comic Strip With Photoshop
Converting a rough sketch into a polished piece of digital art might not be as hard as you think. In today’s quick tip tutorial we will demonstrate how to import a sketch into Photoshop and color it! Let’s get started!
Step 1
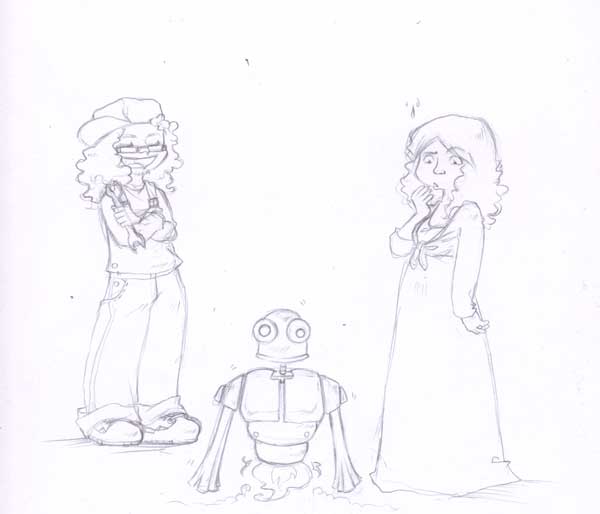
The first step is to sketch out your idea. You can sketch your idea to paper or you can draw directly in Photoshop.
Step 2
Once you have completed your sketch, you now need to ink your drawing. In this step you will need to trace over your lines with a nice black or dark blue pen and erase your pencil lines. You want to do this so you have clean lines that you can use to color your artwork later on.

Step 3
Now scan your artwork into Photoshop. Scan it in at 300 dpi, RGB, TIFF or JPG in grayscale if possible.
Step 4
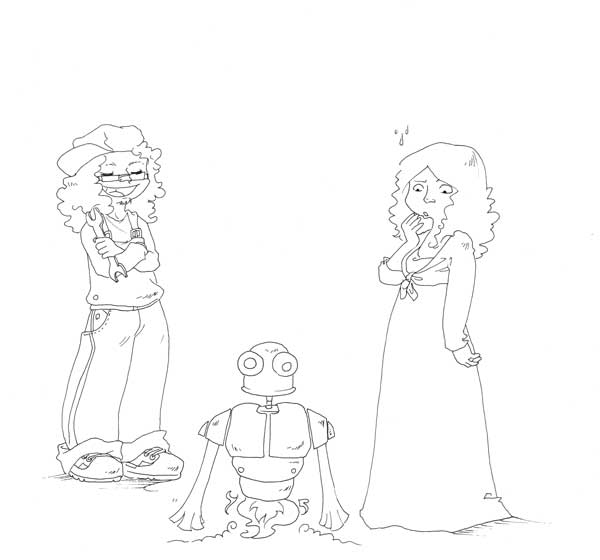
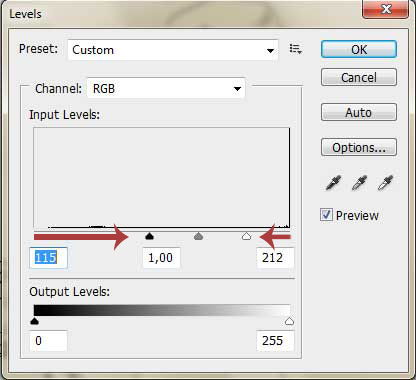
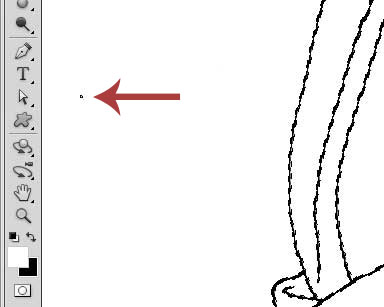
Once you have imported your sketch into Photoshop, crop it (if necessary), desaturate it (Image > Adjustments > Desaturate) and open the Levels panel (Image > Adjustments > Levels) and adjust it as shown. The key here is to increase the amount of contrast and remove any unnecessary artifacts. You may also need to zoom in and erase any dust or specs left over from the scan. This is also a great place to clean up any of the line work. Use a black brush to do this.
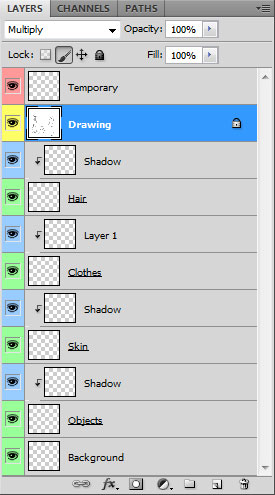
Now let’s organize our layers. What we will do in this step is place the scanned artwork at the top of our layer stack, lock it, and set its blending mode to multiply. This will allow us to color the layers below it without having to extract it from the white background. Finally, organize your layers as shown below. Your layer stack may not look identical. The key here it to organize your layers so you can find them later on.
Step 5
Now we can start to add color to our artwork. Select a hard brush and zoom in to a comfortable magnification. Start brushing in color where necessary but be careful not to color outside of the lines. Keep your keyboard handy so you can quickly flip between the Brush (B), Eraser (E), and Hand Tools (Space Bar). A tablet will seriously help you color your artwork; so if you have one, use it.
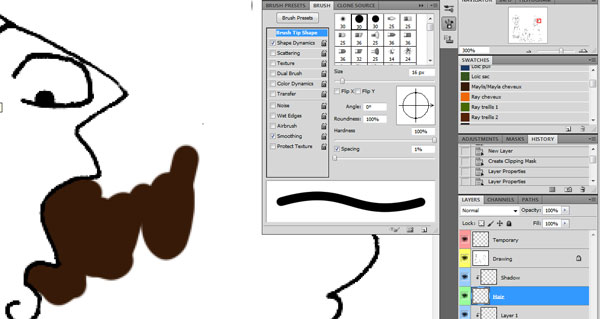
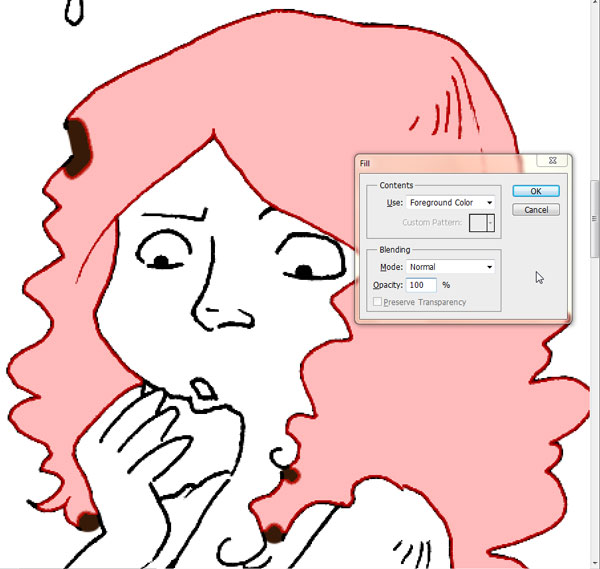
Feel free to use the magic wand tool to select and fill large areas. To do this, select the Magic Wand Tool (W) in Continuous Mode, Tolerance set to 100, with the Sample All Layers selected. Click inside the area you want to fill and then click Select > Modify > Expand and choose 1, 2 or 3 pixels, depending on the thickness of the pen you used. Now select Edit > Fill and choose the color you want. The image below shows the selection in mask mode (in red).
Note : don’t use Fill in mask mode, because it will select the whole picture instead of colorizing the selection.

Step 6
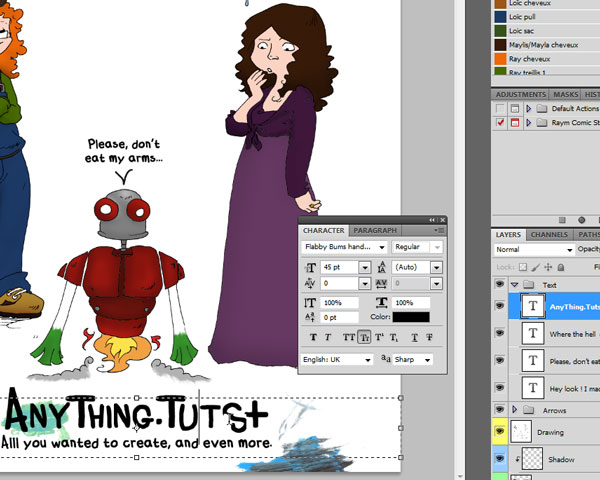
Now add some text to your artwork if necessary. Feel free to draw in some nice speech balloons. I used the Manuscript Font below.
Step 7
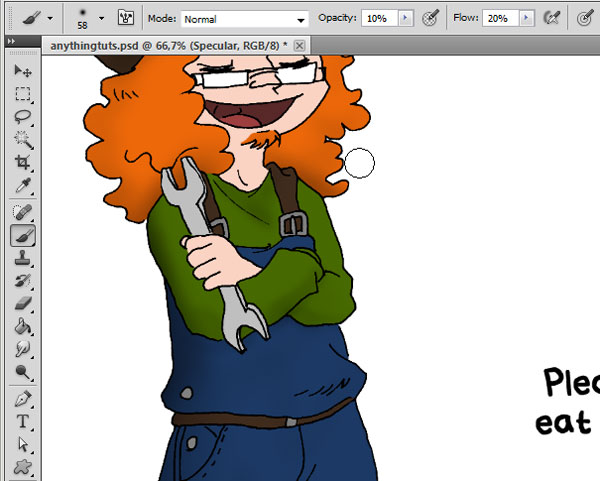
You can add some shadows and highlights to your artwork in this step. Shadows and Highlights can be tough to master so feel free to experiment here. There are several ways to produce shadows and highlights. The Pen Tool may be useful if you want to produce a hard shadow or highlight. A Soft brush on the other hand will produce a nice soft lighting. Use clipping masks with their blending modes set to multiply or screen to produce a nice, non-destructive effect.
Final Image
Take a look at the final image below.
Time Saving Techniques
You can save time by using some of the shortcuts listed below.
- (B) : Brush
- (E) : Eraser
- (I) : Eyedropper Tool
- (X) : Invert background and foreground color.
- (Q) : Mask Mode
- (H) : Hand
- (W) : Wand Tool
- (Cmd/Ctrl + D) : Deselect
- (Alt + Right Click + Mouse Up or Down) : Increase or Decrease the Brush Hardness
- (Alt + Right Click + Mouse Left or Right) : Increase or Decrease the Brush size
Enhance The Workspace
Keeping the swatches palette open while you color is always useful. Especially if you are coloring a series of comics and want to have some standard colors for the skin and clothing.
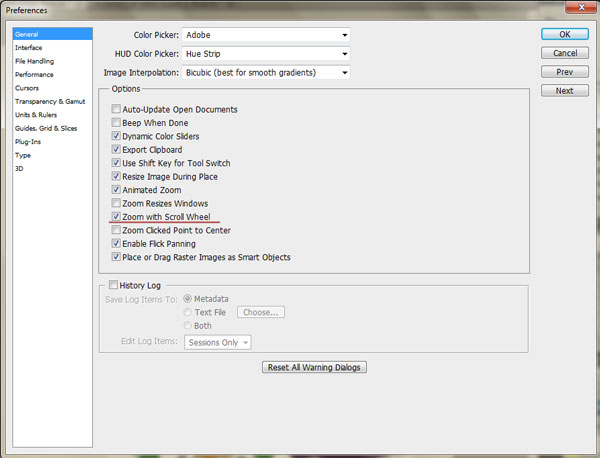
The navigation panel is also helpful, as it will allow you to adjust the magnification and pan throughout your artwork on the fly.
Use Actions
Actions are also quite helpful if you find yourself repeating the same processes over and over again. Plus Members will find a set of actions included in their download as an example. Descriptions of these actions are below.
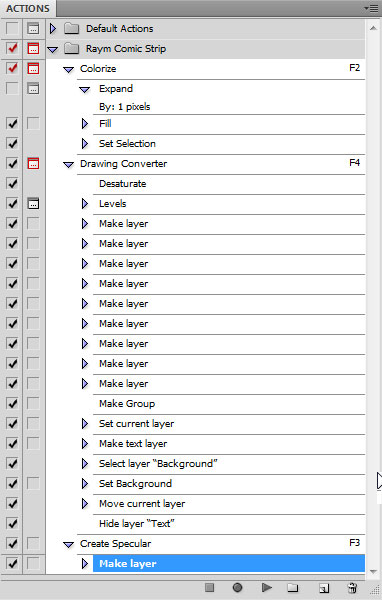
The Colorize Converter Action
This action will expand a selection by 1 pixel, fill it with the foreground color and deselect it. To perform this action, simply select an area to fill and press play.
The Drawing Converter Action
This action will clean up your artwork as demonstrated in Step 4 and also automatically produce your color layers. All you need to do is import your artwork into Photoshop and activate the action.
The Create Specular Action
Specular light is the reflection of the light by an object. In colorization, it means that this is the brightness point of the object. Because I don’t put a Specular Light Layer on every layer, I created an action that allows that. Just by pressing the F3 key, this Action creates a new Specular layer, makes it a Clipping Mask, and put it in Overlay Mode. Then, you can just take a white brush to draw your specular lights.
Conclusion
Coloring artwork can be easy and fun. I hope you learned something new in this tutorial and I look forward to writing some more. If you want some more tips about preparing line work for color check out this great tutorial Preparing Line Drawings for Coloring in Photoshop.
From the Silver Screen to Your Computer: Movie Fan Art to Inspire You
Movies, as we all know, are a huge part of almost everyone’s life. Whether you hate them or love them, movie posters, cover art, and trailers can be found just about everywhere. As designers, we take frequently take inspiration from the movies we see. Today we have a wonderful collection of eighty superb pieces of movie fan-art. We’d love to know which are your favorites. Let us know in the comments!
A Clockwork Orange
A Clockwork Orange
A Clockwork Tattoo
A Clockwork Orange Closeup
Alien
Alien Queen
Alien Front
Alien Queen
Avatar
Avatar
Avatar
Avatar
Avatar
Batman
Batman
Batman
Batman
Dawn of the Dead
Dawn of the Dead
Dawn of the Dead
Donnie Darko
Donnie Darko
Donnie Darko: Colegio
Donnie Darko
Gladiator
Gladiator
Gladiator
Gladiator
The Godfather
Godfather
The Godfather
The Godfather
The Green Mile
The Green Mile
The Green Mile
Mr Jingles
Harry Potter
Harry Potter: Nostalgia
Harry Potter
Harry Potter: Hermione
Harry Potter
Kill Bill
Kill Bill
A Bill To Kill
Kill Bill: Gogo Yubari
Kill Bill: The Bride
King Kong
King Kong
King Kong vs. Spinosuchosaurus
King Kong
Lord of the Rings
Lord of the Rings: The King
Lord of the Rings
The Lord of the Rings
Lord of the Rings: Ringwar
The Matrix
The Matrix
Matrix
The Matrix Reloaded
Pirates of the Caribbean
At Worlds End
Pirates of the Caribbean
Pirates of the Caribbean
Pirates of the Caribbean
Predator
Predator
Predator
Predator
Pulp Fiction
Pulp Fiction
Pulp Fiction
Pulp Fiction
Saw
Saw
Saw
Jigsaw Puppet
Shaun of the Dead
Shaun of the Dead
Shaun of the Dead
Shaun of the Dead
The Shawshank Redemption
Shawshank Redemption
The Shawshank Redemption
Red and Andy
Sin City
Sin City
Sin City
Sin City
Spiderman
Spiderman 2
Spiderman
Spiderman
Star Wars
Star Wars Saga
Star Wars Insider Cover
Star Wars: Happy 30th
The Terminator
Terminator
Terminator
Terminator T700
Twilight
Twilight
Twilight
Twilight
need many PR 6-10 links by YolliVolli
Php Curl Doc Submitter 2
Hi,
I need a php curl/mysql script to submit docs/pdfs to sites like:
docstoc .com
scribd .com
slideshare .com
… 7 more
NOTE: I will create the account on those sites manually
I want to have users, project creation, proxy (I have lists already) and reports after submission (success/error), the docs should go public after submission.
Thanx
J
WordPress + Wowza
Complete 25 DropBox Registrations using my referal link by barrettjacobsen
I need 25 people to sign up to dropbox.com with my referral link (this requires an e-mail address and the installation of a program). Once 25 people have signed up and I’ve gotten the extra storage space that is granted with those sign-ups you’ll be paid your bid amount… (Budget: $30-250, Jobs: Anything Goes, Data Processing, Virtual Assistant)
6 Articles Required, Potential for long term relationship by ScorpioGirl
I am looking for a ghostwriter to write 6 original articles. Each article must be 1,000 words or more. As each article covers a specific topic, but they all relate to a main theme (Insurance) – you must be able to produce an engaging and informative piece of quality written work… (Budget: $30-250, Jobs: Academic Writing, Articles, Ghostwriting, Insurance, SEO)


